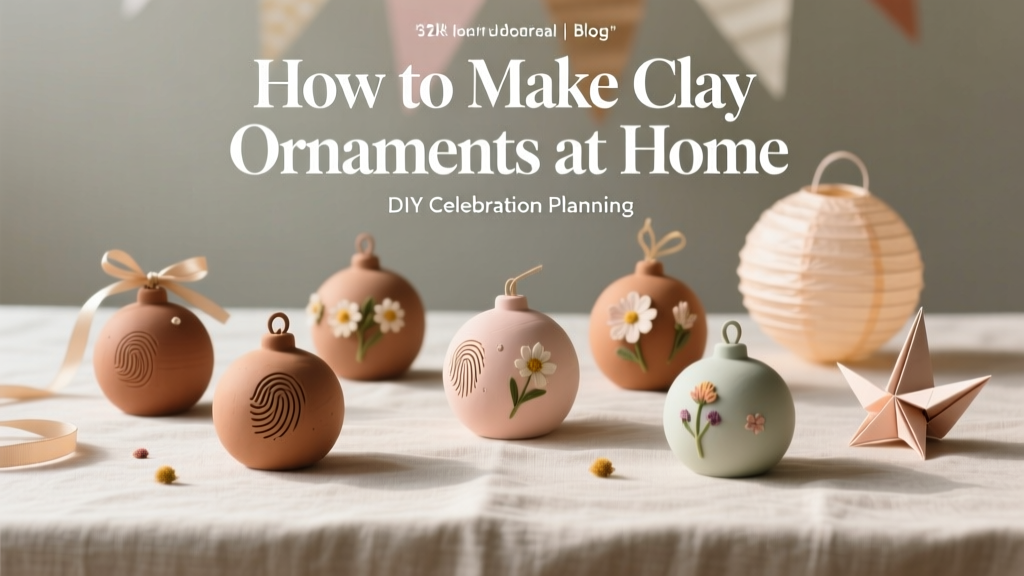
How to Make Clay Ornaments at Home
Clay ornaments are one of those DIY crafts that feel instantly rewarding: you start with a simple lump of clay and end with a personalized decoration you can hang, gift, or use as party decor. They’re perfect for holidays, birthdays, baby showers, wedding favors, and even themed parties where you want a handmade touch that looks polished.
What makes this project especially fun is how flexible it is. Keep it beginner-simple with basic shapes and stamped patterns, or go all-in with painted details, marbling, metallic accents, and custom name tags. Plus, making clay ornaments at home is budget-friendly, mess-manageable, and easy to batch-produce when you need a bunch for a party.
Grab your rolling pin, pick a clay type that fits your timeline, and get ready to create ornaments that feel meaningful—not mass-produced.
Project Overview: Skill Level, Time, and Best Uses
- Skill level: Beginner to Advanced (you choose the complexity)
- Active time: 45–90 minutes (for 8–12 ornaments)
- Drying/baking time:
- Air-dry clay: 24–72 hours
- Salt dough: bake 1–3 hours (low temperature)
- Polymer clay: bake 15–30 minutes (per package directions)
- Best for: DIY party decorations, gift tags, place cards, tree ornaments, favor labels, garlands, and keepsakes
Choose Your Clay: What Works Best for Ornaments
Option 1: Air-Dry Clay (Most beginner-friendly)
- Pros: No oven needed, easy to shape, great for stamps and impressions
- Cons: Can warp or crack if dried too fast; needs sealing for durability
- Best for: Rustic party decor, boho themes, baby showers, modern minimal ornaments
Option 2: Polymer Clay (Most durable + best detail)
- Pros: Strong after baking, great color options, holds crisp edges
- Cons: Requires oven; can be pricier for large batches
- Best for: Long-lasting ornaments, detailed designs, glitter/metallic looks, branded party themes
Option 3: Salt Dough (Budget classic)
- Pros: Super inexpensive, pantry ingredients, great for kids’ parties
- Cons: More prone to puffing/rough texture; needs sealing; can be fragile
- Best for: Classroom parties, family crafting nights, large-volume ornaments
Materials and Tools (with Estimated Costs)
Prices vary by brand and region, but this list will help you plan your DIY crafts budget for party decorations and handmade projects.
Core Supplies
- Clay (choose one):
- Air-dry clay (2 lb / 0.9 kg): $8–$18
- Polymer clay (8–16 oz total across colors): $10–$30
- Salt dough ingredients (flour + salt): $2–$6
- Rolling pin: Acrylic or wooden rolling pin: $8–$15
- Thickness guides: Craft sticks, paint stirrers, or 1/8-inch (3 mm) rolling guides: $0–$10
- Cutters: Cookie cutters (metal preferred) or craft blade: $5–$15
- Hole maker: Drinking straw, skewer, or needle tool: $1–$8
- Work surface: Silicone mat or parchment paper: $6–$15
Decorating + Finishing
- Stamping tools: Rubber stamps, letter stamps, lace, textured fabric, botanicals: $3–$20
- Acrylic paint (craft paint set): $8–$20
- Paint brushes: Small round + flat brush set: $5–$12
- Metallic accents: Gold leaf pen or metallic paint: $6–$12
- Sealer: Water-based acrylic sealer (matte or gloss) or Mod Podge: $7–$15
- Hanging ribbon/twine: Satin ribbon, jute twine, or baker’s twine: $3–$10
Nice-to-Have Tools
- Craft knife + cutting mat: $10–$20
- Fine-grit sandpaper (220–400 grit): $3–$6
- Alphabet stamps (for names): $8–$20
- Clay conditioning tools: Acrylic roller, pasta machine (polymer clay): $12–$50
Step-by-Step: How to Make Clay Ornaments at Home
Step 1: Set Up Your Crafting Station (5 minutes)
- Cover your table with a silicone mat or parchment paper.
- Set out your cutters, straw/skewer, and a tray or baking sheet lined with parchment.
- If you’re using polymer clay, wash your hands between colors to avoid smudging.
Step 2: Roll the Clay to the Right Thickness (10 minutes)
For ornaments that feel sturdy but not bulky, aim for:
- Air-dry clay: 1/4 inch (6 mm)
- Polymer clay: 1/8–3/16 inch (3–5 mm)
- Salt dough: 1/4 inch (6 mm)
Tool tip: Place two craft sticks on either side of your clay and roll over them. This keeps the thickness even so ornaments dry/bake consistently.
Step 3: Cut Out Shapes (10 minutes)
- Press cookie cutters straight down (avoid twisting, which can distort edges).
- Lift away excess clay gently.
- Transfer shapes to a parchment-lined tray using a thin spatula or bench scraper if needed.
Party-ready ideas: stars, circles, scallops, hearts, gingerbread silhouettes, balloons, shamrocks, snowflakes, florals, or theme icons (e.g., seashells for a beach party).
Step 4: Add the Hanging Hole (2 minutes)
- Use a straw for a clean, round hole (great for ribbon).
- Place the hole about 3/8 inch (1 cm) from the top edge.
- For heavier ornaments, make two small holes side-by-side for extra stability.
Step 5: Texture, Stamp, or Personalize (10–20 minutes)
This is where handmade ornaments go from “cute” to “wow.” Try one of these:
- Textile press: Lay lace or textured fabric over the clay and roll gently once.
- Botanical imprint: Press a leaf (veins down) into the clay, then peel away carefully.
- Name ornaments: Use alphabet stamps for names, dates, or short party phrases (e.g., “Cheers!”).
- Rubber stamp pattern: Lightly dust stamp with cornstarch to prevent sticking (especially for air-dry).
Step 6: Dry or Bake (Varies)
Air-Dry Clay Drying
- Let ornaments dry flat on parchment for 24 hours.
- Flip them carefully and dry another 24–48 hours.
- To reduce curling, dry under light airflow—not direct heat.
Polymer Clay Baking
- Follow your brand’s package directions exactly (temperature and time vary).
- Typical range: 265–300°F (130–150°C) for 15–30 minutes.
- Bake on parchment on a baking sheet; let cool completely before handling.
Salt Dough Baking (Quick Recipe + Bake)
Simple salt dough recipe (makes a batch for ornaments):
- 2 cups (240 g) all-purpose flour
- 1 cup (300 g) table salt
- 3/4 cup (180 ml) water (add slowly)
- Mix flour and salt, then add water gradually until a dough forms.
- Roll to 1/4 inch (6 mm), cut shapes, and poke holes.
- Bake at 200°F (95°C) for 1–3 hours depending on thickness, flipping halfway.
Step 7: Sand, Paint, and Seal (30–60 minutes active)
- Sanding (optional): Once fully dry/cool, lightly sand rough edges using 220–400 grit.
- Painting: Use acrylic paint in thin coats. Let each coat dry 10–20 minutes.
- Sealing: Apply 1–2 thin coats of water-based acrylic sealer (matte for modern, gloss for bright party decor).
Finish idea: Paint the background a solid color, then dry-brush metallic paint across raised texture for a high-end look.
Step 8: Add Ribbon or Twine and Style Them (5 minutes)
- Cut ribbon to 10–12 inches (25–30 cm) for a loop.
- Thread through the hole and tie a knot or bow.
- Use ornaments as:
- Party favor tags
- Place cards (write names with a paint pen)
- Garland pieces (string multiple ornaments)
- Mini backdrop decor on a photo wall
Pro Tips for Better Results (Especially for Party-Ready Batches)
- Make a “test ornament” first: Check thickness, stamp depth, and paint finish before producing a full set.
- Keep edges crisp: Smooth edges with a slightly damp fingertip (air-dry/salt dough) or a soft brush dipped in rubbing alcohol (polymer clay).
- Prevent sticking: Lightly dust your surface with cornstarch (air-dry) or use parchment for polymer clay.
- Batch like a pro: Roll all clay first, cut all shapes, then stamp, then punch holes. Assembly-line style saves time.
- Plan your color palette: Match party decorations—think two main colors + one metallic accent for cohesive DIY decor.
Fun Variations (Beginner-Friendly and Advanced)
Beginner-Friendly Ornament Ideas
- Monogram stamps: One letter in the center + simple border dots
- Confetti paint splatter: Dip a toothbrush in paint and flick gently
- Two-tone dip paint: Paint the bottom third of the ornament a contrasting color
- Simple imprint texture: Use a fork, lace, or mesh bag for quick patterns
Advanced Ornament Ideas
- Marbled clay (polymer): Twist two colors lightly and roll—don’t overmix
- Raised lettering: Add tiny clay letters on top, then bake/dry together
- Embedded glitter/foil: Press foil flakes into the surface and seal well
- Layered cutouts: Stack a smaller contrasting shape on top for a 3D look
- Photo transfer (air-dry): Transfer an image using gel medium, then seal (best for keepsake parties)
Troubleshooting: Fix Common Clay Ornament Problems
- Ornaments are cracking:
- Clay may be too dry—knead in a tiny bit of water (air-dry/salt dough)
- Dried too fast—avoid direct sun/heat; dry slowly and evenly
- Too thin—aim for 1/4 inch (6 mm) for air-dry and salt dough
- Ornaments are warping/curling:
- Flip them during drying so both sides dry evenly
- Dry on a flat surface; avoid moving them early
- For air-dry: place a sheet of parchment over ornaments and set a light book on top for 1–2 hours (not too heavy)
- Stamps stick to the clay:
- Dust the stamp lightly with cornstarch
- Press straight down, lift straight up
- Paint looks streaky:
- Use 2–3 thin coats instead of one thick coat
- Let layers dry fully between coats
- Ribbon tears through the hole:
- Make the hole a bit farther from the edge (1 cm is a good target)
- Use two holes and thread ribbon through both
- Seal thoroughly to strengthen air-dry/salt dough
Common Crafting Mistakes to Avoid
- Making ornaments too thin: Thin pieces crack and break easily—especially when used as party favor tags handled by guests.
- Forgetting the hole until after drying: It’s much harder to add later and may cause splits.
- Rushing the dry time: Painting or sealing damp clay traps moisture and can cause bubbling, peeling, or mold (salt dough).
- Using too much water to smooth: Over-wetting air-dry or salt dough makes surfaces gummy and weak.
- Skipping sealing: Unsealed ornaments can absorb humidity and fingerprints—seal for a clean, professional finish.
- Overbaking polymer clay: Follow the package directions closely; too hot can darken or scorch edges.
FAQ: Clay Ornaments at Home
1) What’s the best clay for DIY ornaments that last?
Polymer clay is typically the most durable for long-term keepsakes. Air-dry clay can also last well if you make ornaments thick enough and seal them properly.
2) Do I need to seal air-dry clay ornaments?
Yes if you want them to hold up as party decorations or keepsakes. Use a water-based acrylic sealer in matte or gloss. Apply 1–2 thin coats on both sides.
3) How many ornaments can I make from 2 lb (0.9 kg) of air-dry clay?
As a rough estimate, at 1/4 inch (6 mm) thick you can make about 12–20 medium ornaments (2.5–3.5 inches wide), depending on shape and how much clay you trim away.
4) Can kids make clay ornaments for parties?
Absolutely. Air-dry clay and salt dough are both kid-friendly with supervision. Prep the station, pre-roll clay slabs if needed, and stick to simple cutters and texture presses.
5) How do I make clay ornaments look more “professional”?
Focus on consistency and finishing: use thickness guides, smooth edges, stamp cleanly, paint in thin coats, and seal evenly. A limited palette (two colors + metallic) also makes handmade party decor look intentional.
6) Can I turn these into place cards or party favors?
Yes—clay ornaments are great for handmade party decorations. Stamp or paint guest names, add ribbon, and place them on plates as place cards that double as take-home favors.
Wrap-Up: Make a Batch, Then Make Them Your Own
Clay ornaments are a creative sweet spot: simple enough for a cozy afternoon craft session, but customizable enough to match nearly any party theme or holiday style. Start with a few classic shapes, experiment with texture and paint, and you’ll quickly find your signature look.
When you’re ready, make a matching set for your next celebration—handmade party decorations like these always get noticed (and guests love taking them home).
Happy crafting! Explore more DIY crafts, party decoration ideas, and handmade project tutorials on smartpartyprep.com.
More Articles
 Easy Wooden Signs for Beginners
 Budget DIY Pressed Flower Art Under $15
 DIY Candles for Home Decor
 Budget DIY Dream Catchers Under $20
 How to Allow 3rd Party Cookies on iPad in 2024: A Step-by-Step Fix for Logins, Shopping, and Tracking That *Actually Works* (No Safari Tricks Needed)
 DIY Beaded Bracelets for Home Decor
 Modern Fabric Bunting Designs
 Budget DIY Gift Boxes Under $20
 Upcycled Custom Stickers from Recycled Materials
 17 Do It Yourself Party Favors That Actually Impress Guests (No Craft Store Run Needed — Just $5, 20 Minutes & What’s Already in Your Drawer)