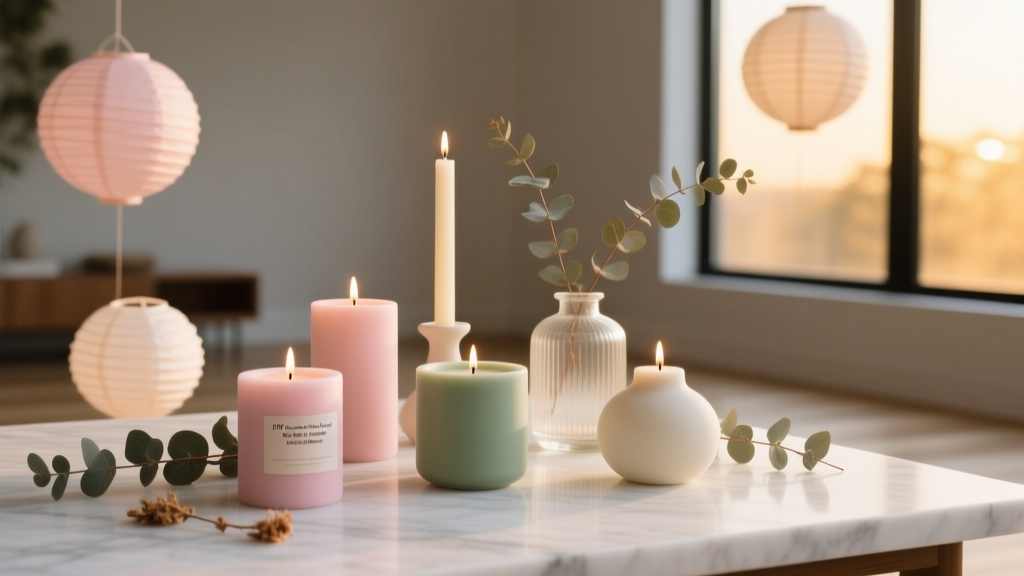
DIY Candles for Home Decor
Handmade candles are one of those DIY crafts that feel instantly rewarding: you melt, pour, decorate, and suddenly you’ve created something that looks boutique-level—without boutique prices. They’re cozy for everyday home decor, but they also shine (literally) as party decorations: think centerpieces for birthdays, bridal showers, baby showers, holiday tables, and outdoor evenings on the patio.
What makes this project especially fun is how customizable it is. You can match colors to your party theme, add scents that fit the season, and dress up jars with labels, ribbon, or dried botanicals. Plus, candles make thoughtful handmade gifts—perfect for hostess presents, party favors, and “thank you” bundles.
This guide walks you through beginner-friendly candle making with simple tools, clear measurements, and plenty of creative variations. You’ll also find troubleshooting tips and common mistakes to avoid so your DIY candles look as good as they smell.
Project Overview: Skill Level, Time, and What You’ll Make
- Skill level: Beginner (with optional advanced upgrades)
- Total time: 60–90 minutes active time + 24–48 hours curing
- Yield: About 4 small jar candles (6 oz / 180 ml each) or 2 medium candles (10–12 oz / 300–350 ml each), depending on containers
- Best for: DIY party decorations, table centerpieces, party favors, handmade gifts, cozy home decor
Materials & Tools (with Estimated Costs)
Wax Options (Choose One)
- Soy wax flakes (easy, beginner-friendly, great scent throw): 2 lb (0.9 kg) bag, $12–$20
- Coconut-soy blend (creamy look, strong scent throw): 2 lb bag, $18–$28
- Beeswax pellets (natural honey scent, firmer, longer burn): 1–2 lb, $18–$35
Wicks (Match to Container Size)
- Pre-tabbed cotton wicks (best for jars; easiest): pack of 25–100, $6–$12
- Wood wicks (advanced; cozy crackle): pack of 10–20, $8–$15
- Wick stickers (double-sided adhesive dots): 50–100 pack, $4–$8
Containers (Heat-Safe Only)
- Glass candle jars (6–10 oz): $2–$5 each
- Mason jars (8 oz / 240 ml): $1.50–$3 each
- Tin candle containers (party-favor friendly): $1–$3 each
Fragrance & Color (Optional)
- Candle fragrance oil (skin-safe, candle-safe; not essential oils unless labeled for candles): 1–2 oz, $6–$15
- Candle dye (liquid dye or dye blocks): $5–$12
Decor (Optional, Party-Ready)
- Ribbon, twine, or velvet cord: $3–$10
- Printable labels or sticker paper: $5–$12
- Dried orange slices or cinnamon sticks (tie-on decor): $4–$10
- Gold paint pen for names/date (party favors): $3–$6
Tools (Recommended)
- Kitchen scale (for accurate wax and fragrance): $10–$25
- Pouring pitcher (stainless steel candle pitcher): $10–$18
- Thermometer (candy or infrared): $8–$18
- Double boiler setup (saucepan + heat-safe bowl) or dedicated wax melting pot
- Wick centering tool or clothespins/chopsticks: $3–$10
- Heat gun (nice-to-have for smooth tops): $15–$30
- Paper towels, rubbing alcohol (for cleanup), scissors
Safety First (Quick Checklist)
- Work on a covered surface (parchment paper or newspaper).
- Use a dedicated pitcher/spoon for wax (not for food after).
- Never leave melting wax unattended.
- Keep water away from hot wax (it can splatter).
- Use only heat-safe containers designed for candles.
Step-by-Step: Classic Jar Candles (Beginner-Friendly)
Step 1: Choose and Prep Your Containers (5–10 minutes)
- Clean the jars with warm soapy water, dry completely.
- Wipe the inside with rubbing alcohol to remove any residue (helps adhesion and reduces wet spots).
- Set jars on a tray or baking sheet for easy moving.
Step 2: Measure Wax (5 minutes)
Accurate measuring makes your candle burn better and helps fragrance perform consistently.
- For 4 jars at 6 oz (180 ml), plan on roughly 16–20 oz (450–570 g) wax total depending on jar shape.
- A simple rule: 1 lb (454 g) wax fills about 20 oz by volume in many containers.
Best practice: Place your pouring pitcher on a kitchen scale and weigh wax flakes in grams for precision.
Step 3: Melt the Wax (10–15 minutes)
- Set up a double boiler: simmer 1–2 inches (2.5–5 cm) of water in a saucepan.
- Place wax in a candle pouring pitcher or heat-safe bowl.
- Heat gently until fully melted, stirring occasionally.
Temperature target: Melt soy wax to about 170–185°F (77–85°C).
Step 4: Attach and Center the Wicks (5 minutes)
- Stick the wick tab to the bottom center of each jar using a wick sticker (or a tiny dot of hot glue).
- Press firmly for 10–15 seconds.
- Center the wick with a wick bar, clothespin, or two chopsticks laid across the jar rim.
Wick sizing tip: For many 2.5–3 inch (6.4–7.6 cm) diameter jars, a medium cotton wick works well. When in doubt, check the wick manufacturer’s size chart for your wax type and jar diameter.
Step 5: Add Fragrance and/or Dye (5 minutes)
Once wax is melted, let it cool slightly before adding fragrance so the scent doesn’t evaporate too quickly.
- Fragrance load: For soy candles, start with 6% fragrance oil by weight (beginner-friendly and reliable).
- Example: If you have 500 g melted wax, use 30 g fragrance oil (500 x 0.06 = 30).
- Stir gently for 2 full minutes to bind fragrance to the wax.
Dye: Add a small amount (a few drops liquid dye or a sliver of dye block), stir, and adjust slowly. Candle color often dries lighter than it looks melted.
Step 6: Pour the Wax (5 minutes)
For smooth tops, pouring temperature matters.
- Pour soy wax at: about 135–150°F (57–66°C) for many blends.
- Pour slowly down the side of the jar to reduce bubbles.
- Leave about 1/2 inch (1.3 cm) of space at the top.
- Keep wicks centered as the wax begins to set.
Step 7: Cool, Set, and Cure (24–48 hours)
- Let candles cool at room temperature, away from drafts.
- After fully set, trim wick to 1/4 inch (6 mm).
- Cure time: For best scent throw, let soy candles cure 24–48 hours (some makers prefer 1 week for peak performance).
Party-Perfect Decorating Ideas (Fast, Cute, and Theme-Friendly)
Simple Favor Candle Wraps
- Wrap a 6 oz tin with a printed label: “Thank you for celebrating!”
- Add a name/date with a gold paint pen.
- Tie twine and a mini tag for a rustic party decoration vibe.
Color-Blocked Layers (Intermediate)
- Pour the first color layer (about 1/3 of the jar).
- Let it set until firm (30–60 minutes depending on room temp).
- Pour the next layer at a similar temperature to reduce separation lines.
Best for: birthday parties, graduation colors, holiday tables.
Centerpiece Candle Cluster
- Make 3–5 candles in matching jars at different heights.
- Group them on a tray with faux greenery, dried citrus, or confetti accents (kept away from flames).
Pro Tips for Better-Looking, Better-Burning DIY Candles
- Pre-warm jars slightly (not hot) with a hair dryer to help reduce wet spots and frosting in soy wax.
- Stir fragrance thoroughly for 2 minutes—gentle but consistent.
- Use a heat gun to smooth rough tops: warm the surface until it just melts, then let it reset.
- Test burn one candle before making a large batch for party favors—wick choice can change everything.
- Label your batches (wax type, wick type, fragrance %, pour temp). This makes repeat success easy.
Troubleshooting: Fix Common Candle Issues
Sinkholes or a Dip Around the Wick
- Cause: Wax cooling too fast or air pockets forming.
- Fix: Poke 2–3 small relief holes near the wick with a skewer, then heat and pour a small amount of leftover wax to top off.
- Prevention: Cool candles away from drafts; pour at the recommended temperature.
Frosting (White Crystals on Soy Wax)
- Cause: Natural characteristic of soy; temperature shifts can trigger it.
- Fix: Warm the surface gently with a heat gun for a smoother look.
- Prevention: Keep room temperature steady; pre-warm jars slightly.
Wet Spots (Wax Pulling Away from Glass)
- Cause: Wax cooling and contracting; jar temperature differences.
- Fix: Mostly cosmetic—often less visible once the candle is burning.
- Prevention: Clean jars with alcohol; pour at consistent temps; avoid cold jars.
Mushrooming Wick (Carbon Buildup)
- Cause: Wick too large or fragrance load too high.
- Fix: Trim wick to 1/4 inch (6 mm) before each burn; consider a smaller wick next batch.
Tunneling (Burning Straight Down the Middle)
- Cause: Wick too small or the first burn wasn’t long enough.
- Fix: On the first burn, let the wax melt to the edges (usually 2–3 hours for many jars).
- Advanced fix: Use the foil method: wrap foil around the top rim like a chimney to retain heat (supervise closely).
Variations: Beginner Adaptations and Advanced Upgrades
Beginner-Friendly Adaptations
- Unscented candles: Skip fragrance entirely for the simplest success.
- Pre-tabbed wicks: Avoid wick cutting and tab crimping.
- One-color candles: Focus on smooth tops and centered wicks first.
Advanced Variations
- Wood wicks: Trendy look and crackle (requires careful sizing and testing).
- Luxury vessels: Cement or ceramic candle containers (use only candle-safe versions).
- Custom scent blends: Mix two fragrance oils (example: vanilla + sandalwood for a warm party ambiance).
- Embedded wax accents: Add wax shapes (stars/hearts) made from silicone molds—keep embeds away from the wick line for safer burning.
Common Candle-Making Mistakes to Avoid
- Using non-candle fragrance: Craft store “potpourri oils” aren’t always candle-safe. Use oils labeled for candle making.
- Skipping the scale: Eyeballing fragrance can lead to oily, underperforming candles.
- Overloading fragrance: More isn’t always better—too much can seep, smoke, or reduce scent throw.
- Pouring too hot: Can increase frosting, wet spots, and uneven tops.
- Not trimming wicks: Long wicks cause soot, flicker, and mushrooming.
- Rushing cure time: Lighting too soon can make scent seem weak and burn performance inconsistent.
- Decorating dangerously: Never place dried flowers, herbs, or glitter on top where they can ignite.
FAQ: DIY Candles for Home Decor and Party Decorations
1) How much wax do I need per jar?
A quick estimate: a 6 oz (180 ml) jar often uses about 120–150 g of wax depending on jar shape. The most accurate method is to fill your jar with water, weigh it, then use about 90% of that weight in wax (wax is less dense than water).
2) Can I use essential oils instead of fragrance oils?
Only use essential oils if they’re labeled and tested for candle making. Many essential oils don’t perform well in wax and may be more flammable or irritating at higher loads. For reliable results (especially for party favors), candle fragrance oils are the easiest choice.
3) Why does my candle have a bumpy or cracked top?
Usually it’s cooling too quickly or pouring at the wrong temperature. Use a heat gun to lightly melt the top smooth, and next time try pouring a bit cooler and letting candles set away from drafts.
4) What’s the best wick for soy wax jar candles?
Most beginners do well with pre-tabbed cotton wicks designed for soy wax. Wick sizing depends on container diameter and fragrance load, so check the manufacturer’s wick guide and test-burn one candle before making a full party batch.
5) How long should I let the candle burn the first time?
Plan on 2–3 hours (or until the melt pool reaches the edges). This helps prevent tunneling and sets your candle up for even burns later.
6) Are homemade candles good for party favors?
Yes—DIY candles make standout handmade party favors. Use tins or small jars (4–6 oz), keep the design simple and consistent, add personalized labels, and allow enough curing time before your event.
Wrap-Up: Make Your Space (and Your Party Table) Glow
DIY candles bring instant warmth to home decor and add a polished, handmade touch to party decorations. Start with a simple jar candle, then experiment with colors, labels, and themed scents once you’ve nailed the basics. With the right wick, careful measuring, and a little patience during curing, your candles can look gift-ready every time.
Ready to craft more party-perfect handmade projects? Explore more DIY craft ideas, party decor inspiration, and smart hosting tips on smartpartyprep.com.
More Articles
 Paper Craft Place Cards Ideas
 How to Enable Third Party Cookies in My Browser (2024 Guide): Step-by-Step Fixes for Chrome, Safari, Firefox & Edge — Because Yes, You *Can* Still Do It (Without Compromising Security)
 Personalized Favor Bags Gifts
 DIY Resin Jewelry for Weddings
 Does Hasbro Hate Third Party Transformers? The Truth Behind Licensing, Cease-and-Desists, and Why Fans Keep Building Anyway — A Deep Dive for Customizers, Collectors & Makers
 Seasonal Slime Ideas
 Easy Soap Bars for Beginners
 How to Make a Photo Booth for a Party in Under 90 Minutes (No Pro Gear Needed): 7 Foolproof Steps That Actually Work — Even If You’ve Never Built One Before
 DIY Invitations Using Cricut
 Paper Craft Cake Toppers Ideas