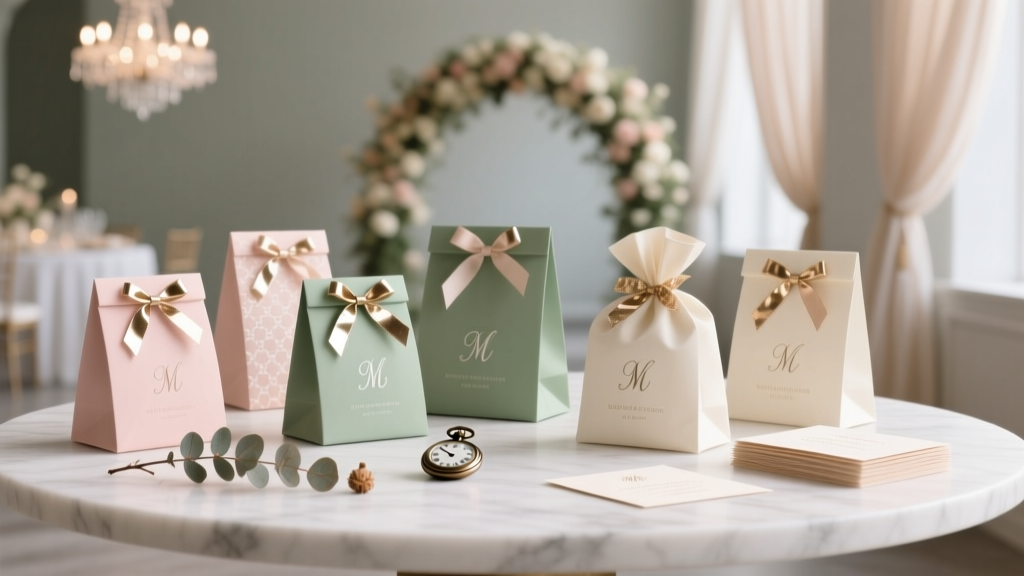
Personalized Favor Bags Gifts
Party favors are one of those little details guests remember long after the balloons deflate and the playlist ends. A personalized favor bag turns a simple “thank you for coming” into a mini gift that feels thoughtful, coordinated, and totally photo-worthy. Even better: it’s a DIY project you can scale up for a big celebration or keep small for an intimate gathering.
This craft is especially fun because it blends creativity with practicality. You get to choose colors that match your party decorations, add names or messages, and fill the bags with treats that fit your theme—birthday, baby shower, wedding, graduation, holiday party, or classroom celebration.
If you love DIY crafts that look professional without needing fancy equipment, you’re going to enjoy this. You can make beginner-friendly versions with stickers and ribbon, or level up with layered tags, heat embossing, or vinyl lettering. Let’s build favor bags that look custom-made—because they are.
Project Overview
- Skill level: Beginner (basic assembly) to Intermediate/Advanced (vinyl, stamping, embellishments)
- Time estimate:
- Single bag: 8–15 minutes
- Set of 12: 60–120 minutes (assembly-line style)
- Set of 30: 2–4 hours (prep + personalization)
- Best for: DIY party decorations, handmade gifts, party favors, classroom treats, bridal showers, kids’ birthdays
Materials & Estimated Costs
Favor Bag Options (choose one)
- Kraft paper treat bags (5 in x 7 in): $6–$12 for 50
- White paper favor bags (5 in x 7 in): $7–$14 for 50
- Clear cellophane bags (4 in x 9 in or 5 in x 11 in): $6–$12 for 50
- Muslin or organza drawstring bags (4 in x 6 in or 5 in x 7 in): $10–$20 for 25
Personalization & Decorating Supplies
- Cardstock (for tags): 65–110 lb, 8.5 in x 11 in sheets, $6–$12 per pack
- Gift tags (pre-cut, optional): $5–$10 for 100
- Ribbon (3/8 in or 5/8 in satin/grosgrain): $3–$8 per roll
- Baker’s twine (optional): $4–$8 per spool
- Stickers or label sheets (optional): $5–$12
- Alphabet stamps + ink pad (optional): $10–$25
- Vinyl (permanent or removable) for cutting machines (optional): $8–$15 per roll
- Metallic marker (gold/silver/white): $2–$6
- Washi tape (optional): $3–$10
- Mini clothespins (optional): $4–$8 for 50
Adhesives & Tools
- Double-sided tape runner (clean + fast): $6–$15
- Hot glue gun + glue sticks (for heavier embellishments): $10–$25
- Craft scissors (sharp detail scissors recommended): $8–$18
- Paper trimmer (helps speed up tag cutting): $15–$35
- Hole punch (1/8 in or 1/4 in): $6–$12
- Corner rounder punch (optional for polished tags): $6–$12
- Ruler (12 in): $2–$6
- Pencil (for light marking): $1–$3
Filler Ideas (Budget-Friendly)
- Individually wrapped candies (10–14 pieces per bag): $8–$20
- Mini cookies or popcorn bags: $10–$25
- Small toys (stickers, bubbles, erasers): $8–$18
- Self-care minis (lip balm, hand cream samples): $15–$35
Typical cost per finished favor bag: $0.75–$2.50 depending on fillers and personalization method.
Design Plan: Pick a Style That Fits Your Party
Style A: Classic Tag + Ribbon (fastest, most flexible)
- Great for: birthdays, showers, graduation
- Look: polished and coordinated
- Personalization: names, date, short message
Style B: Sticker Label + Tissue Topper (super beginner-friendly)
- Great for: classroom parties, large batches
- Look: clean, cute, quick
- Personalization: printed labels or handwriting
Style C: Vinyl Name + Mini Embellishment (advanced, boutique feel)
- Great for: weddings, milestone parties
- Look: custom and upscale
- Personalization: individual names on each bag
Step-by-Step: Personalized Favor Bag Gifts (Tag + Ribbon Method)
Step 1: Choose Bag Size and Fill Amount
Before decorating, decide what’s going inside and how full the bag should look.
- 5 in x 7 in paper bags: ideal for 8–12 small candies or 1–2 larger items
- 4 in x 9 in cellophane bags: great for snack mixes or popcorn
- 5 in x 11 in cellophane bags: best for taller treats (pretzel rods, cookie stacks)
Tip: Aim to fill paper bags about 1/2 to 2/3 full so they close neatly without bulging.
Step 2: Make Your Tags (Simple, Clean, and Consistent)
Recommended tag size: 2 in x 3.5 in (classic gift tag proportions)
- Cut cardstock into rectangles using a paper trimmer:
- For 2 in x 3.5 in tags, cut strips at 2 in wide, then trim each to 3.5 in.
- Round corners with a corner punch (optional but makes tags look store-bought).
- Punch a hole centered at the top:
- Place the hole about 3/8 in from the top edge.
- Use a 1/8 in hole punch for twine and a 1/4 in punch for thicker ribbon.
- Personalize using one of these methods:
- Metallic marker: Write the guest’s name or “Thank you!”
- Alphabet stamps: Stamp names for consistent lettering
- Printed tags: Print a template on cardstock for large batches
Step 3: Fill and Close the Bags
- Add filler items to each bag.
- Tap the bottom gently so contents settle flat.
- Fold the top down:
- Paper bags: fold down 1 in, then another 1 in for a sturdy double fold
- Cellophane: gather the top and twist once to tighten
Step 4: Attach Tags and Tie the Ribbon
Recommended ribbon length: 18–22 in per bag (enough for a nice bow)
- Thread ribbon or twine through the tag hole.
- Wrap around the folded top of the bag (paper) or gathered neck (cellophane).
- Tie a firm knot first, then a bow.
- Trim ribbon tails at an angle or into a V-cut (about 1/2 in deep) to prevent fraying.
Step 5: Add a Small “Wow” Detail (Optional, but Worth It)
- Seal the fold with a strip of washi tape
- Add a mini sticker or wax seal-style sticker on the tag
- Hot-glue a tiny pom-pom or confetti charm (use sparingly for a clean look)
Beginner-Friendly Shortcuts (Fast Batch Production)
- Use pre-made tags and personalize with a bold marker.
- Swap bows for simple knots with baker’s twine (faster and cute).
- Try label stickers directly on the bag:
- Label size suggestion: 2 in x 3 in rectangle labels
- Works especially well on kraft paper bags
- Assembly line method: cut all tags first, punch all holes, write all names, then fill all bags, then tie all ribbons.
Advanced Variations (For a Custom Boutique Look)
Vinyl Names on Bags
- Best bags: smooth paper bags or clear acrylic/clear favor boxes
- Letter size: 0.75 in–1.25 in tall for names
- Tip: Use a simple font for readability (especially for small names)
Apply vinyl after the bag is filled so the surface stays flat and you don’t accidentally stretch the bag.
Layered Tags (Two-Tone, Extra Polished)
- Cut a base tag at 2.25 in x 3.75 in
- Cut the top tag at 2 in x 3.5 in
- Adhere with a tape runner for a crisp, no-warp finish
Heat Embossed Tags
- Use embossing ink + embossing powder (gold, white, or clear)
- Heat set with a heat tool (a hairdryer is usually too weak)
- Great for wedding favors and holiday party decorations
Pro Tips for a Professional Finish
- Choose 2–3 core colors (bag + tag + ribbon) and repeat them for a cohesive party theme.
- Match your font style to the event: playful for kids, clean serif for formal parties, bold script for showers.
- Pre-cut ribbon lengths using a piece of cardboard:
- Wrap ribbon around a 10 in wide cardboard piece twice for consistent 20 in lengths.
- Keep heavy items at the bottom so bags stand nicely on a favor table.
- Use foam tape dots on tags if you want dimension (especially on kraft bags).
Troubleshooting: Fix Common Issues Quickly
- Tag holes are tearing: Reinforce with a small binder hole sticker on the back, or punch the hole slightly lower (1/2 in from top).
- Ribbon won’t stay tied: Tie a tight knot first, then the bow; choose grosgrain ribbon for more grip.
- Paper bags look wrinkled: Avoid overfilling; use a firmer bag weight and fold the top twice.
- Cellophane looks messy at the top: Use a twist tie first, then cover with ribbon for a cleaner neck.
- Ink smudges on tags: Use quick-dry ink or let tags dry 5–10 minutes before stacking.
Common Crafting Mistakes to Avoid
- Waiting to choose fillers: The contents affect bag size, closure method, and overall look.
- Using flimsy cardstock: Anything under 65 lb tends to curl once tied with ribbon.
- Over-decorating: One strong focal point (tag or sticker) plus one accent (ribbon or washi) looks more intentional than five add-ons.
- Skipping a test bag: Make one complete favor bag first to confirm measurements, spacing, and how it sits on the table.
- Not planning for time: Personalizing 30 names takes longer than you think—batch your steps to stay sane.
FAQ: Personalized Favor Bags Gifts
How far in advance can I make personalized favor bags?
For non-food items, you can assemble them 1–3 weeks ahead and store in a bin with a lid. For edible favors, aim for 1–3 days ahead depending on freshness (cookies and popcorn are best closer to the event).
What’s the best bag type for messy treats like popcorn or snack mix?
Cellophane bags are the easiest to wipe clean and show off the contents. Use a 5 in x 11 in size for a fuller look and a tidy tie area.
How do I keep handwriting consistent if I’m personalizing lots of names?
Use a fine-tip paint marker or felt-tip pen and write names in all caps. Another easy option: stamp names with an alphabet stamp set for a uniform look.
What’s a good no-glue option for classroom parties?
Go with pre-made tags, hole punch, and baker’s twine. Add a sticker to seal the bag instead of tape or glue.
How can I make favors look “expensive” on a budget?
Stick to a simple color palette, use thicker cardstock tags, add one metallic detail (gold marker or foil sticker), and keep the top closure neat with a double fold and centered tag.
Wrap-Up: Your Party, Your Personal Touch
Personalized favor bags are one of the easiest DIY party decorations to turn into a memorable handmade project. With a few basic tools, simple measurements, and an assembly-line approach, you can create favors that match your theme and make guests feel genuinely appreciated.
Pick your bag style, choose a tag design you love, and make one “test” favor first—then enjoy the satisfying rhythm of crafting the rest. When your favor table comes together with coordinated colors and custom names, you’ll be so glad you took the DIY route.
Want more party-ready DIY crafts, handmade decorations, and creative favor ideas? Explore more projects on smartpartyprep.com and keep the celebration creativity going.
More Articles
 Advanced Greeting Cards for Crafters
 Modern Paper Lanterns Designs
 How to Train a Dragon Party Favors: 7 Foolproof DIY Steps (No Fire Breathing Required!) — Easy, Kid-Safe, & Instagram-Worthy in Under 90 Minutes
 How to Unblock Third Party Cookies on MacBook: A Step-by-Step Guide That Actually Works in 2024 (No Tech Degree Required)
 Personalized Photo Frames Gifts
 DIY Resin Jewelry Using Cricut
 DIY Backdrops for Home Decor
 Advanced Custom Stickers for Crafters
 DIY Painted Rocks Using Cricut
 How to Allow Third Party Cookies on MacBook Air (2020–2024): A Step-by-Step Safari & Chrome Fix That Actually Works in 2024 — No Tech Degree Required