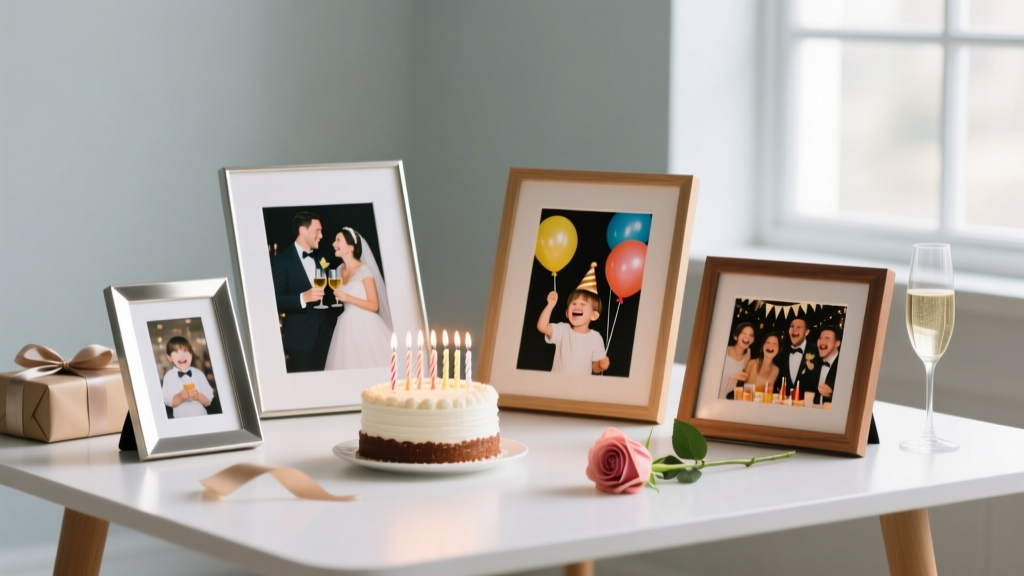
Personalized Photo Frames Gifts
Personalized photo frame gifts hit that sweet spot between heartfelt and practical—especially for parties. You can make one as a birthday keepsake, a baby shower “wishes” display, a graduation memory frame, or a wedding table centerpiece that guests actually want to take home. The best part? You don’t need fancy equipment to create something that looks boutique-quality.
This project is also party-perfect because it doubles as décor. Imagine a photo frame “wall” for a milestone birthday, mini frames as place cards for a dinner party, or a large statement frame as a photo booth prop guests can pose with. With a few basic supplies and your favorite theme colors, you’ll have a handmade decoration and a thoughtful gift all in one.
Below you’ll find beginner-friendly steps, cost estimates, measurements, and creative variations—plus a few advanced upgrades if you want to level up your DIY craft game.
Project Overview: Skill Level, Time, and What You’ll Make
- Skill level: Beginner to Intermediate (advanced options included)
- Total time: 60–120 minutes per frame (plus drying time)
- Drying/curing: Paint: 30–60 minutes per coat; glue: 20–60 minutes; Mod Podge/sealer: 1–2 hours (handle gently) or overnight cure for best durability
- Best for: DIY party decorations, handmade gifts, memory tables, photo booth props
- Finished size examples:
- Classic gift frame: 8" x 10" frame (fits a 5" x 7" or 8" x 10" photo depending on mat)
- Mini party favor frame: 4" x 6" frame
- Statement party backdrop piece: 11" x 14" frame
Materials and Tools List (with Estimated Costs)
Base Frame Options
- Unfinished wood frame (recommended for painting/staining): $6–$15 each
- Thrifted frame (great for vintage looks): $2–$8 each
- Dollar-store frame (best for mini favors): $1.25–$5 each
Decor & Adhesives
- Acrylic craft paint (2 oz bottles) or chalk paint: $2–$12
- Paintbrush set (flat 1" brush + detail brush): $6–$12
- Foam brush (for smooth sealer coats): $1–$3
- Mod Podge (Matte or Gloss) for decoupage: $6–$10
- Strong glue options:
- Hot glue sticks + hot glue gun: $10–$20 (gun), $3–$8 (sticks)
- E6000 or strong craft adhesive (for heavy embellishments): $6–$10
- Wood glue (for wood-on-wood pieces): $4–$8
- Embellishments (choose your theme):
- Ribbon (3/8" to 1" wide): $3–$8
- Artificial flowers or greenery stems: $5–$15
- Wood letters/laser-cut names: $2–$12
- Self-adhesive pearls/rhinestones: $3–$10
- Washi tape (for quick borders): $3–$8
Paper & Personalization Supplies
- Cardstock (12" x 12" scrapbook sheets) for mats: $0.75–$2 each
- Printed photos (4" x 6" or 5" x 7"): varies ($0.25–$2 each)
- Vinyl decal (optional, for names/dates): $2–$10
- Fine-tip paint pen or permanent marker (for signatures/notes): $2–$6
Tools (Recommended)
- Scissors and/or craft knife (X-Acto style) + cutting mat: $8–$20
- Ruler (12") and pencil: $2–$6
- Sandpaper (120 grit + 220 grit) or sanding block: $3–$8
- Painter’s tape (for crisp lines): $4–$8
- Clips (binder clips) to hold ribbon/trim while glue sets: $2–$6
Estimated total cost per frame: $8–$25 (depending on frame source and embellishments). Party favor minis can be as low as $2–$6 each when made in batches.
Design Planning: Pick a Theme That Matches the Party
Before you paint anything, decide how the frame will be used. This keeps your DIY project cohesive and helps it look intentional as party décor.
Quick Theme Ideas (Party-Friendly)
- Birthday: bold color blocking + name + age
- Baby shower: soft neutrals + mini florals + “Hello Baby”
- Graduation: school colors + year + tassel charm
- Wedding/engagement: white + gold accents + date + initials
- Holiday party: plaid ribbon + greenery + metallic paint
Measurement Guide (So Everything Fits)
- For a 5" x 7" photo: cut mat cardstock to 8" x 10" (or to match your frame opening), then cut a centered window at 4.75" x 6.75" (slightly smaller than the photo so edges tuck behind).
- For a 4" x 6" photo: cut mat cardstock to 5" x 7" or 8" x 10" depending on the frame. Window cut: 3.75" x 5.75".
- Ribbon border: 3/8" ribbon is great for delicate looks; 7/8" to 1" ribbon makes a bold party statement.
Step-by-Step Instructions: Personalized Photo Frame Gift
Step 1: Prep the Frame (10–15 minutes)
- Remove the backing, glass/acrylic insert, and any paper inserts. Set hardware aside in a small cup.
- Wipe the frame clean with a dry cloth. If it’s thrifted, use a slightly damp cloth and let it dry fully.
- Lightly sand:
- Use 120 grit to smooth chips or glossy finishes.
- Finish with 220 grit for a clean surface.
- Dust off sanding residue.
Step 2: Paint or Stain (20–40 minutes + drying)
- If you want crisp stripes or color blocks, apply painter’s tape where you want clean edges.
- Apply the first coat of acrylic or chalk paint using a flat brush. Paint in long strokes in the same direction.
- Let dry 30–60 minutes, then apply a second coat if needed.
- Optional: For a distressed look, lightly sand edges after the paint dries.
Step 3: Add Personalization (20–30 minutes)
Choose one personalization method (or layer them carefully).
- Option A: Wood letters (easy and cute)
- Paint or leave natural.
- Layout suggestion: center the name on the bottom frame rail (the lower horizontal piece).
- Use wood glue for wood frames or hot glue for quick hold.
- Option B: Vinyl name/date (clean, modern)
- Place the vinyl with transfer tape.
- Burnish with an old gift card for smooth adhesion.
- Peel the transfer tape slowly at a sharp angle.
- Option C: Hand-lettering (perfect for rustic themes)
- Use a paint pen for control.
- Lightly sketch with pencil first, then trace with pen.
- Erase pencil marks after the ink fully dries.
Step 4: Add Party-Themed Embellishments (15–30 minutes)
- Do a “dry layout” first (no glue) to check spacing.
- Attach ribbon:
- Cut ribbon to frame length + 1/2" extra.
- Wrap ends to the back and glue down neatly.
- Add florals, charms, or gems:
- Use E6000 for heavier pieces (allow longer cure time).
- Use hot glue for lightweight items and fast assembly.
Step 5: Seal for Durability (10 minutes + drying)
- Apply a thin coat of Mod Podge or clear acrylic sealer over painted areas (and lightly over embellishment edges where appropriate).
- Let dry 1–2 hours before handling. Overnight is best if it will be transported to a party.
Step 6: Assemble the Frame (5–10 minutes)
- Clean the glass/acrylic insert with a lint-free cloth before putting it back in.
- Insert the photo and mat (if using).
- Close the backing securely.
- If gifting, add a tag on the back: name, date, occasion, and a short note.
Pro Tips for a Polished, Gift-Ready Finish
- Use thin paint coats: Thick paint leaves brush ridges and takes longer to cure.
- Keep glue strings under control: For hot glue, wait 3–5 seconds after applying before pressing pieces together.
- Match your metals: If you use gold rhinestones, choose gold paint accents instead of silver for a cohesive party decoration look.
- Elevate with a mat: A crisp cardstock mat makes even a simple frame look professionally styled.
- Batch make for parties: Paint multiple frames at once, then personalize them assembly-line style (names last).
Creative Variations (Beginner to Advanced)
Beginner-Friendly Adaptations
- Washi tape border: No drying time—just wrap and trim.
- Single focal embellishment: One flower cluster in the corner looks intentional and avoids clutter.
- Monogram only: Add one large initial instead of full names.
Intermediate Party Decor Upgrades
- Confetti shaker frame: Replace the photo with a clear insert and add confetti inside (best with deep shadowbox frames).
- Mini bunting across the top: Use twine and tiny cardstock flags for birthdays or baby showers.
- Guest signature mat: Leave a wide white mat border for guests to sign at the party (great for weddings and graduations).
Advanced Variations (Showstopper Results)
- Resin topcoat (glossy, durable): Only if you’re comfortable with resin safety and leveling. Creates a glass-like finish.
- Wood burning personalization: Add names/dates on unfinished wood for a handcrafted heirloom feel.
- Layered 3D name plate: Stack two layers of wood letters (paint one shadow color) for depth.
Troubleshooting: Fix Common Problems Fast
- Paint looks streaky: Let it dry fully, then add a second thin coat. Use a flat brush and consistent strokes.
- Vinyl won’t stick: Make sure the surface is clean and fully cured. Lightly buff glossy paint with 220 grit and wipe dust off.
- Glue won’t hold heavy items: Switch to E6000 and allow cure time. Clamp or hold with binder clips where possible.
- Ribbon edges fray: Trim with sharp scissors and lightly seal edges with clear glue or a quick pass of heat (use caution).
- Smudged hand lettering: Let paint fully dry, lightly sand the spot, repaint, then re-letter.
Common Crafting Mistakes to Avoid
- Skipping surface prep: Paint and glue adhere best to clean, lightly sanded surfaces.
- Overcrowding the design: Leave breathing room around the photo—one focal cluster is often enough.
- Using too much glue: Oozing glue can cloud clear inserts and look messy on edges. Apply small dots and build up if needed.
- Not checking photo orientation: Confirm vertical vs. horizontal before placing name decals and embellishments.
- Handling before cure time: “Dry to touch” isn’t the same as cured. Give it extra time before wrapping or transporting to a party.
- Forgetting the back: A quick felt pad on the bottom edge prevents scratches and makes it feel like a finished handmade gift.
FAQ: Personalized Photo Frame Gifts
1) What’s the best type of frame for beginners?
An unfinished wood frame is the easiest to paint and glue to. It takes acrylic paint well, sands nicely, and hides small mistakes better than glossy plastic frames.
2) Can I make these as party favors without spending a lot?
Yes. Use 4" x 6" frames, skip heavy embellishments, and decorate with paint + washi tape + a small name tag. Making 10–20 at once also reduces cost per frame.
3) How do I turn a photo frame into a party decoration?
Try one of these: create a memory table display, label a frame with “The Guest of Honor,” use a large frame as a photo booth prop, or make coordinated frames for a party backdrop wall.
4) What glue should I use for rhinestones, flowers, and wood letters?
Hot glue is great for fast, lightweight decorating. For heavier pieces or long-lasting hold, use E6000 (allow longer cure time). For wood-on-wood, wood glue is strong and clean.
5) How can guests interact with the frame at the party?
Use a wide mat and set out fine-tip markers so guests can write messages around the photo opening. It becomes a guestbook alternative and a keepsake the recipient will actually display.
6) How do I keep the design looking cohesive?
Stick to a simple recipe: 2–3 colors, one main font style (vinyl or hand-lettering), and one focal embellishment area (corner cluster or centered bottom name).
Wrap-Up: Make One, Then Make a Set
A personalized photo frame gift is one of those DIY crafts that feels extra special because it’s both decorative and meaningful. You can tailor it to any celebration theme, match party colors, and create a handmade piece that looks amazing on a memory table or wrapped up as a gift.
Pick a frame size, choose your party vibe, and give yourself permission to keep it simple on your first try. Once you finish one, it’s hard not to plan a whole coordinated set for the next birthday, baby shower, or holiday gathering.
Want more DIY party decorations and handmade project ideas? Explore more creative tutorials and smart celebration tips on smartpartyprep.com.
More Articles
 Kids' Craft: Origami Decorations
 Seasonal Paper Flowers Ideas
 Paper Craft Crowns Ideas
 How to Enable Third Party Cookies in My Browser (2024 Guide): Step-by-Step Fixes for Chrome, Safari, Firefox & Edge — Because Yes, You *Can* Still Do It (Without Compromising Security)
 DIY Gift Boxes for Birthdays
 DIY Vision Boards in 10 Minutes
 How to Allow Third Party Cookies on iPad in 2024: A Step-by-Step Guide That Actually Works (No More 'Blocked' Messages or Broken Logins)
 Personalized Invitations Gifts
 Personalized Favor Bags Gifts
 Seasonal Wooden Signs Ideas