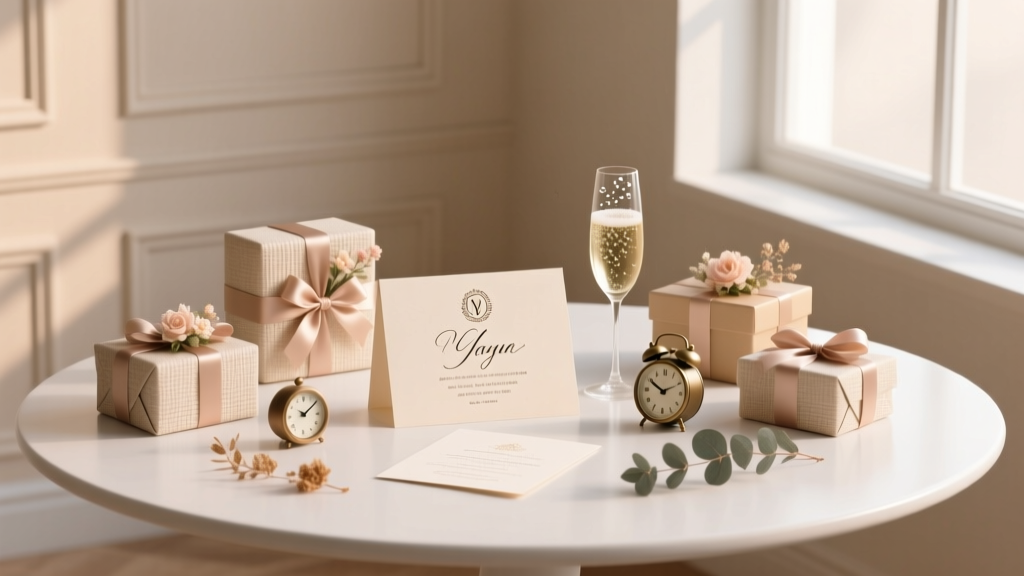
Personalized Invitations Gifts
Party invitations are already exciting—until you add a little surprise. Personalized invitation gifts turn a simple “You’re invited!” into a keepsake your guests will remember, display, and talk about. Whether you’re planning a birthday, baby shower, wedding shower, graduation, or holiday party, these handmade projects combine DIY crafts, party decorations, and thoughtful gifting into one adorable package.
The best part: you can scale this idea to fit any budget and skill level. Make a quick favor-style invite for a classroom party, or craft deluxe invitation boxes for a milestone celebration. Each version feels personal because it’s personalized—names, colors, themes, and little details that match your event.
This guide walks you through practical, step-by-step instructions for three invitation gift styles (pocket invites, mini favor invites, and invitation boxes), with measurements, tool recommendations, time estimates, and troubleshooting tips so your project looks polished and stress-free.
What Are Personalized Invitation Gifts?
Personalized invitation gifts are invitations paired with a small handmade or curated item, packaged in a way that feels like a gift. They’re perfect for:
- Weddings & showers: mini candles, bath salts, or a tea sachet
- Kids’ parties: sticker sheets, crayons, temporary tattoos
- Graduations: mini confetti poppers, keychains, photo strips
- Holiday parties: ornament, cocoa packet, or spice mix
- Adult birthdays: scratch-off ticket, mini chocolates, drink stirrer
Skill Level, Time Estimates, and Project Options
Skill Level Indicators
- Beginner: Minimal measuring, simple folds, pre-made embellishments
- Intermediate: Clean scoring, layered designs, basic assembly line workflow
- Advanced: Die-cutting, foiling, wax seals, custom inserts, complex box assembly
Time Estimates (Per 10 Invitations)
- Mini Favor Invite (Beginner): 45–75 minutes
- Pocket Invitation (Intermediate): 90–120 minutes
- Invitation Gift Box (Advanced/Intermediate): 2–3 hours
Batch tip: Most time is saved by working assembly-line style: cut all paper first, then score, then glue, then embellish.
Materials List (Product Types + Estimated Costs)
Costs vary by brand and quantity; estimates below are typical U.S. craft store/online pricing.
Paper & Printing
- Cardstock, 80–110 lb (8.5" x 11"): $8–$15 per 50 sheets
- Decorative paper (scrapbook sheets 12" x 12"): $0.75–$2 each
- Printable invitation inserts (white 32 lb paper): $6–$10 per 100 sheets
- Envelopes (A7 5.25" x 7.25" or A2 4.375" x 5.75"): $6–$15 per 25
Adhesives & Embellishments
- Double-sided tape runner (strong): $6–$12
- Liquid craft glue (quick-grab): $4–$8
- Foam tape squares (optional dimension): $4–$7
- Satin ribbon (3/8" or 5/8" width): $4–$10
- Twine (baker’s twine or jute): $3–$8
- Stickers/vinyl name labels: $4–$12
- Wax seal kit (optional): $12–$25
Tools (Recommended)
- Paper trimmer (12" guillotine or rotary): $15–$35
- Scoring board (or bone folder + ruler): $10–$20
- Corner rounder punch (optional): $6–$12
- Hole punch (single 1/8"–1/4"): $4–$10
- Metal ruler + craft knife (for precision): $8–$20
- Cutting mat: $10–$20
Gift Fillers (Pick One Style)
- Mini candy (wrapped chocolates): $5–$12 per bag
- Tea bags (individually wrapped): $4–$10
- Mini bubble tubes: $6–$12 per 12
- Small candles (1–2 oz tins): $20–$45 per 12 (or DIY pour)
- Confetti packet (DIY tissue confetti): $2–$6 materials
Project 1: Personalized Pocket Invitation Gift (Holds Invite + Small Treat)
Skill level: Intermediate
Finished size: 5" x 7" pocket (fits A7 invitation insert)
Best for: Showers, birthdays, graduation parties, dinner parties
Measurements (Pocket Base)
- Cardstock base: 10.5" x 7.5"
- Score lines: at 5" and 10" (along the 10.5" side); at 2.5" (along the 7.5" side)
- Insert card: 5" x 7" (or 4.75" x 6.75" for easy sliding)
Step-by-Step Instructions
- Cut the base cardstock to 10.5" x 7.5" using a paper trimmer. For crisp edges, cut in one steady motion.
- Score the folds:
- Place the cardstock on your scoring board with the 10.5" side across the top.
- Score at 5" and 10" to create a tri-fold with a small tab.
- Rotate and score at 2.5" along the 7.5" side to form the pocket depth.
- Create the pocket:
- Fold along score lines and crease with a bone folder.
- Trim the bottom corners of the pocket flap (the 2.5" section) at a slight angle to reduce bulk.
- Add strong double-sided tape along the outer edges of the pocket flap (left and right sides). Press firmly to seal.
- Add a gift element:
- Slide in a flat treat like a tea bag, confetti packet, or a small sticker sheet behind the invitation insert.
- If adding candy, choose something thin (like a mini chocolate) and secure it in a small cellophane sleeve.
- Personalize the front:
- Add a name label (vinyl sticker or printed tag).
- Layer a 4.75" x 6.75" decorative paper panel on the front with a 1/8" border showing.
- Tie ribbon around the pocket or use a belly band (see variation ideas below).
- Insert the invitation and any detail cards (RSVP, directions). For the smoothest fit, keep the total stack under 1/8" thick.
Project 2: Mini Favor-Style Invitation Gift (Fast + Budget-Friendly)
Skill level: Beginner
Finished size: 3.5" x 5" (fits into A2 envelope or hand-delivered)
Best for: Kids’ parties, casual gatherings, classroom celebrations
Measurements
- Invitation card: 3.5" x 5"
- Treat topper (optional): 2" x 4" folded to 2" x 2"
Step-by-Step Instructions
- Print or write the invite on 110 lb cardstock (or print on 32 lb paper and mount to cardstock). Keep wording short and clear.
- Round the corners using a corner rounder punch for a professional look (optional but impactful).
- Attach a small gift:
- Staple a mini candy bag to the invite with a decorative topper.
- Or tie a small bubble tube using twine through a hole-punched corner.
- Or attach a sticker sheet in a small clear sleeve with double-sided tape.
- Add personalization:
- Use alphabet stickers for the guest’s name.
- Or hand-letter names with a fine-tip marker (0.5 mm) and add a small doodle matching the party theme.
Project 3: Invitation Gift Box (A Wow-Factor Keepsake)
Skill level: Intermediate to Advanced
Finished size: 6" x 4" x 1" box (easy to hold, fits small items)
Best for: Bridal showers, milestone birthdays, quinceañeras, sweet 16, VIP events
Materials (Box-Specific)
- Rigid gift boxes (6" x 4" x 1"): $12–$25 per 10 (or use paper mache boxes)
- Crinkle paper filler: $6–$12 per bag
- Small gift item (candle, bath salt vial, ornament, keychain)
Step-by-Step Instructions
- Line the box:
- Add a handful of crinkle paper filler (about 1/2" deep).
- Place the small gift item slightly off-center so the invitation can sit neatly beside it.
- Create an invitation insert:
- Cut a card to 5.5" x 3.5" for a clean fit.
- Mount a printed invitation panel (5.25" x 3.25") on top for a layered look.
- Add a personalized name tag:
- Cut a 2" circle or a 1.5" x 3" tag.
- Add the guest’s name and tie it to the gift item or adhere it to the invitation.
- Close and decorate:
- Wrap ribbon around the box (use 5/8" ribbon for a bold look).
- Add a wax seal on the ribbon overlap or a layered label on top.
- Delivery tip: These are best hand-delivered. If mailing, place the gift box in a shipping box with padding.
Pro Tips for Clean Results (And Less Stress)
- Score before folding to prevent cracked cardstock—especially on dark colors.
- Use strong tape for structure (tape runner or double-sided tape), and liquid glue only for small embellishments.
- Keep a 1/8" border around layered panels so everything looks intentional and centered.
- Print a test sheet on plain paper first to confirm sizing and alignment.
- Assembly line method: Cut all pieces, then score all pieces, then glue all pieces.
- Tool recommendation: A scoring board + bone folder gives a noticeably more professional finish than folding by hand.
Creative Variations (Beginner-Friendly to Advanced)
Beginner Variations
- Belly band wrap: Cut a 2" x 11" strip, wrap around the invite, and secure with tape. Add a name sticker on top.
- Sticker seal: Replace ribbon with a themed sticker to hold pockets closed.
- Photo personalization: Add a 2" x 2" photo of the guest of honor on the front panel.
Intermediate Variations
- Shaker window pocket: Add a clear acetate window filled with sequins (keep it flat for mailing).
- Layered die-cut theme: Balloons, stars, florals, or butterflies layered with foam tape.
- Color-coded inserts: Use different belly band colors for different guest groups (family, friends, coworkers).
Advanced Variations
- Foil accents: Foil the guest’s name or event title for a luxe look.
- Wax seal + vellum wrap: Wrap vellum around the pocket and seal it for a high-end stationery vibe.
- Custom mini kits: Include a tiny “party starter” kit (confetti, a mini favor, and a themed charm).
Troubleshooting: Fix Common Problems Fast
- My pocket won’t stay closed.
Use stronger double-sided tape (look for “permanent” or “extra strength”). Add a belly band if the invite stack is thick. - The cardstock cracks on folds.
Score deeper with a scoring board, fold slowly, and use a bone folder. Consider 80 lb cardstock instead of 110 lb for tight folds. - My layers look crooked.
Use a T-square ruler or a gridded craft mat. Lightly pencil center marks on the back of panels before sticking. - Embellishments fall off.
Use liquid glue for textured items (twine, buttons) and press for 15–20 seconds. Let fully cure before stacking. - Invitations don’t fit the envelope.
Measure the final thickness. For bulky invites, switch to A7 envelopes or hand-deliver.
Common Crafting Mistakes to Avoid
- Skipping a prototype: Always make one complete sample before producing multiples.
- Overfilling the pocket: Too many inserts or a thick gift causes bulging and tearing at seams.
- Using wet glue near edges: It can warp paper. Use tape for edges, glue for small details.
- Not letting adhesive set: Stack too soon and items shift. Give finished pieces 10–15 minutes before piling.
- Ignoring mailing realities: Raised embellishments, chunky bows, and candy bumps can increase postage or get crushed.
- Inconsistent cutting: Small differences show up fast. Use a paper trimmer with a measuring guide, not scissors, for base pieces.
FAQ: Personalized Invitation Gifts
How far in advance should I make personalized invitation gifts?
Aim for 2–4 weeks before you plan to hand them out. If you’re mailing, add extra time for addressing, postage, and delivery—especially for bulky invitation gift boxes.
What’s the easiest gift to include without making it too bulky?
Flat items work best: tea bags, confetti packets, sticker sheets, or a small photo strip. If you want candy, choose something thin and keep it centered.
Can these be mailed like regular invitations?
Mini favor invites and flat pocket invites often can. Avoid chunky bows and thick gifts. For anything dimensional, hand-deliver or use a padded mailer/box and confirm postage at the post office.
What size invitation should I design for a pocket invitation gift?
A 5" x 7" insert fits most pocket styles nicely. If you want extra wiggle room, design at 4.75" x 6.75" so it slides in and out easily.
How do I personalize quickly for a large guest list?
Use printable name labels or a cutting machine with vinyl names. Another fast option is printing guests’ names directly on the front panel, then cutting and assembling.
What’s a good theme match for DIY party decorations and invitations?
Pull 2–3 consistent elements—like a color palette, a shape (stars, florals, bows), and one repeating pattern—then echo those across your handmade invitations, table decor, and party favors for a cohesive look.
Ready to Make Yours?
Personalized invitation gifts are one of those DIY party projects that feel extra special without requiring complicated techniques. Start simple with a mini favor invite, or go all-out with a pocket invitation or gift box when you want that “wow” moment. Once you make a set, you’ll have a repeatable formula you can adapt for any celebration—birthdays, showers, graduations, and beyond.
Keep it fun, keep it personal, and let the theme guide your colors and embellishments. When your guests receive a handmade invitation that’s also a gift, the party excitement starts instantly.
Want more DIY crafts, handmade party decorations, and creative celebration ideas? Explore more projects and inspiration at smartpartyprep.com.
More Articles
 How to Enable Third Party Cookies on Safari in 2024: A Step-by-Step Guide That Actually Works (No More 'Blocked' Errors or Broken Logins)
 What Is the Cocktail Party Effect Psychology? The Surprising Truth About How Your Brain Filters Noise — And Why You Miss Critical Signals (Even When You're 'Listening')
 How to Allow 3rd Party Cookies on iPad in 2024: A Step-by-Step Fix for Logins, Shopping, and Tracking That *Actually Works* (No Safari Tricks Needed)
 Seasonal Gift Boxes Ideas
 DIY Cupcake Wrappers Using Cricut
 Are Pure Encapsulations third party tested? Yes—but here’s exactly which labs verify them, what tests they run (heavy metals, microbes, potency), and how to spot fake 'certified' claims in 2024.
 Is Nature's Truth 3rd Party Tested? We Investigated Every Batch Report, Lab Certificate, and Transparency Gap So You Don’t Have to Waste Time—or Risk Your Craft Projects on Unverified 'Natural' Claims
 Is Organic India Third Party Tested? We Investigated Lab Reports, Certifications & Hidden Gaps—Here’s What Independent Testing *Actually* Reveals About Their Turmeric, Ashwagandha & Triphala
 Stop Struggling with 'When the Party's Over' Guitar Chords: The Exact 4-Chord Progression (with Capo-Free & Beginner-Friendly Versions) That 92% of Learners Miss — Free Printable Chart Inside
 Advanced Backdrops for Crafters