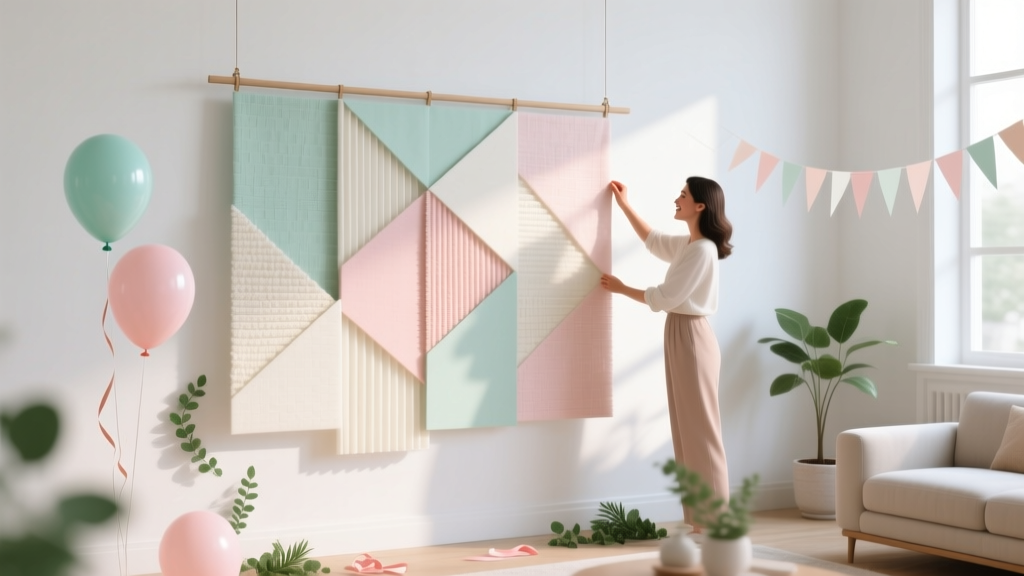
DIY Backdrops for Home Decor
A good backdrop can do more than make photos look amazing—it can completely change the feel of a room. Whether you’re hosting a birthday party at home, setting up a cozy “photo corner,” decorating for a baby shower, or just want a statement wall for everyday style, DIY backdrops are a fun, budget-friendly way to add big impact without committing to permanent changes.
The best part? You can build a backdrop using simple materials like fabric, paper, paint, faux greenery, or lights—and tailor it to your home decor. Think of it as a reusable piece of party decor that also works as a headboard alternative, a seasonal display, or a creative wall feature for content creation, Zoom calls, and family photos.
This guide walks you through several beginner-friendly and advanced DIY backdrop ideas, with clear measurements, time estimates, tool recommendations, and troubleshooting tips—so you can craft something sturdy, photogenic, and totally you.
Quick Planning: Choose Your Backdrop Style
Before buying supplies, pick the “job” your backdrop needs to do:
- Photo-ready party backdrop: high impact, bold texture, camera-friendly.
- Home decor backdrop: neutral tones, reusable season to season.
- Temporary wall decor: removable, renter-friendly, easy cleanup.
- Content creation backdrop: non-reflective, even lighting, minimal patterns.
Recommended Sizes (Most Popular)
- Small nook / chair corner: 4 ft x 6 ft
- Standard party/photo area: 6 ft x 7 ft (great for 1–3 people)
- Statement wall coverage: 8 ft x 8 ft (bigger groups, balloon garlands, props)
Skill Levels + Time Estimates
- Beginner: 45–90 minutes (fabric curtain or streamer wall)
- Intermediate: 2–4 hours (painted canvas drop cloth, faux greenery panel)
- Advanced: 4–8 hours (PVC frame with interchangeable panels, layered textures)
Materials & Tools (With Estimated Costs)
Costs vary by size and what you already have, but these ranges help you budget for DIY party decorations and handmade decor projects.
Core Backdrop Materials
- Canvas drop cloth (6 ft x 9 ft or 9 ft x 12 ft): $12–$30
- Cotton fabric yardage (45–60 in wide): $6–$15/yard (6–8 yards for a 6 ft x 7 ft look depending on drape)
- Plastic tablecloths or party backdrop rolls: $3–$15
- Crepe streamers (standard rolls): $1–$3 each (10–20 rolls for a 6 ft x 7 ft wall)
- Foam board or corrugated plastic sheets (4 ft x 8 ft): $15–$35 per sheet
- Faux greenery mats/tiles (typically 10 in x 10 in): $1–$4 each (30–50 tiles for larger walls)
Support & Hanging Options
- Backdrop stand (adjustable 6.5 ft–10 ft wide): $25–$70
- PVC pipe (1 in): $20–$45 for pipes + fittings (builds a sturdy reusable frame)
- Tension rod (40–72 in or larger): $15–$35 (best for doorways/hallways)
- Command hooks (removable): $8–$15
- Spring clamps or backdrop clips: $6–$12
Adhesives, Fasteners & Decor Extras
- Hot glue gun + glue sticks: $10–$25
- Double-sided tape or removable mounting tape: $5–$12
- Zip ties (8–12 in): $3–$8
- LED string lights (warm white or color-changing): $8–$25
- Balloon garland kit (optional): $12–$30
Tool Recommendations
- Measuring tape (25 ft is ideal)
- Scissors + craft knife (for foam board/plastic)
- Staple gun (optional, great for fabric on frames)
- Level (helps keep panels straight in photos)
- Step stool (safer than stretching on chairs)
Backdrop #1: No-Sew Fabric Drape Backdrop (Elegant + Reusable)
Skill level: Beginner
Time: 60–90 minutes
Best for: birthdays, bridal showers, home photo corner, neutral home decor
What You’ll Need
- Backdrop stand (6.5–8 ft wide) or curtain rod
- 2–3 fabric panels (each 2 yards long minimum; 6–10 yards total depending on fullness)
- Clips or safety pins
- Optional: iron/steamer, string lights
Measurements That Work Well
- Width: 6 ft backdrop = use 6–8 yards of fabric for a soft gathered look
- Height: 7 ft tall = choose fabric length 2–3 yards per panel (more if you want pooling on the floor)
Step-by-Step
- Set up your stand. Adjust to about 6 ft wide x 7 ft tall for most party spaces.
- Prep fabric. If wrinkles show easily, steam or iron first. Wrinkles can look “boho,” but they can also look messy on camera—your choice.
- Drape the first panel. Fold the top edge over the crossbar and clip it every 8–10 inches so it won’t sag.
- Add layers. Place a second and third fabric panel overlapping slightly. For a designer look, combine a solid neutral with a sheer layer (like chiffon).
- Create shape. Pin or clip fabric at mid-height to make soft swags. Step back every few minutes and check symmetry.
- Optional lighting. Weave LED string lights behind the sheer layer so the glow looks diffused, not harsh.
Pro Tips
- Use heavier fabric (linen blends, cotton) if your room gets a draft—lightweight fabric moves and twists easily.
- Hide clips by folding a small “pocket” at the top and clipping from behind.
- Photography win: choose matte fabric to avoid flash glare.
Backdrop #2: Streamer Wall Backdrop (Big Party Energy on a Budget)
Skill level: Beginner
Time: 45–75 minutes
Best for: kids’ parties, graduation, themed party decorations, colorful photo backdrop
What You’ll Need
- 10–20 crepe streamer rolls (mix 3–5 coordinating colors)
- Painters tape or removable mounting tape
- Scissors
- Optional: metallic fringe strips for shine
Step-by-Step
- Mark your area. Aim for 6 ft wide x 7 ft tall. Use painters tape to outline the rectangle on the wall if you like clean edges.
- Create a top anchor. Run a strip of painters tape across the top width. You’ll attach streamers to this “tape rail.”
- Cut streamer lengths. Cut each strand to 84 inches (7 ft). Cut 30–50 strands per color depending on fullness.
- Attach in rows. Press the top inch of each strand onto the tape rail. Overlap slightly so wall color doesn’t peek through.
- Build pattern. Try ombré (dark to light), stripes, or a random mix for a festive handmade look.
- Add a focal detail. Hang a small banner, paper fans, or a mini balloon garland across the top third of the backdrop.
Troubleshooting
- Streamers curling: reduce tension and avoid stretching crepe while taping.
- Tape won’t stick: clean the wall with a dry cloth first; switch to stronger removable mounting tape on textured walls.
- Gaps showing: add a second layer behind the first, especially for light colors.
Backdrop #3: Painted Drop Cloth Backdrop (Custom, Matte, Photo-Friendly)
Skill level: Intermediate
Time: 2–4 hours plus drying time
Best for: reusable party backdrop, home decor statement, branded event look
What You’ll Need
- Canvas drop cloth 9 ft x 12 ft (gives extra room to clip and drape)
- Acrylic craft paint or interior latex sample paint (matte finish)
- Foam roller + tray, paint brushes
- Painter’s tape (for stripes or geometric designs)
- Iron or steamer (optional but helpful)
Step-by-Step
- Wash and dry the drop cloth. This removes sizing so paint absorbs evenly. Iron if you want crisp designs.
- Lay it flat. Tape the edges to the floor (on a drop cloth or cardboard underneath) to prevent shifting.
- Base coat (optional). For a clean background, roll on a thin base color. Let dry 60–90 minutes depending on paint type.
- Add your design.
- Soft clouds: sponge on white and pale gray in loose circles.
- Modern arches: trace a large arch using a string and pencil, then paint with a brush.
- Stripes: tape every 4–6 inches and roll color between tape lines.
- Let it cure. Dry to the touch isn’t the same as fully cured. Wait overnight before folding.
- Hang it. Clip to a backdrop stand or use curtain clips on a rod.
Advanced Variation
- Add a monogram or phrase using a vinyl stencil (great for parties and photo booths).
- Texture upgrade: lightly dry-brush a second color for a linen-like depth that reads beautifully in photos.
Backdrop #4: Faux Greenery Panel Backdrop (Lush, Trendy, Great for Celebrations)
Skill level: Intermediate
Time: 2–3 hours
Best for: bridal showers, baby showers, garden-themed parties, home decor accent wall
What You’ll Need
- Faux greenery tiles (interlocking)
- Zip ties (for extra security)
- Foam board/corrugated plastic backing or a backdrop stand grid
- Optional: faux flowers, ribbon, LED fairy lights, neon-style sign
Step-by-Step
- Decide your panel size. A popular size is 4 ft x 6 ft for a chair or dessert table moment.
- Assemble tiles. Snap tiles together on the floor. If they pop apart easily, add zip ties at key connection points.
- Attach to backing.
- For foam board: use zip ties through small punched holes along the edges.
- For a stand: clip the panel using sturdy clamps at top and sides.
- Add floral clusters. Place faux flowers in groups of 3–5 stems for a natural look. Secure with floral wire or hot glue.
- Style it for parties. Add balloon accents on one side or hang a sign at eye level.
Beginner-Friendly Adaptation
- Make a 2 ft x 4 ft mini greenery panel for a cake table or gift table. Less cost, same wow factor.
Pro Tips, Creative Variations & Troubleshooting
Make Backdrops Look Fuller (Without Buying More)
- Layer neutrals: one solid + one sheer instantly adds depth.
- Use side drapes: even narrow fabric panels on both sides make the center look more styled.
- Add a top detail: a small balloon garland (4–6 ft) or paper fans draw attention upward.
Lighting Tips for Photo-Ready DIY Backdrops
- Face the light source: place the backdrop so natural light hits from the front, not behind.
- Avoid shiny plastic if you plan to use flash—glare can overpower your decor.
- Use warm white LEDs for cozy home decor; choose daylight bulbs for crisp party photos.
Fix Common Problems Fast
- Backdrop sagging: add more clips every 6–8 inches; tighten stand crossbar; use heavier clamps for thick fabric.
- Wrinkles showing in photos: steam the front-facing area only; add a sheer layer to disguise wrinkles.
- Backdrop tipping: weigh down stand legs with ankle weights, dumbbells, or sandbags.
Common Crafting Mistakes to Avoid
- Skipping measurements: “Eyeballing” often leads to a backdrop that’s too narrow for photos. Plan for at least 6 ft wide for most party setups.
- Using the wrong tape: regular tape can peel paint or fail mid-party. Use painter’s tape or removable mounting strips for walls.
- Overloading with heavy decor: balloon garlands and signs add weight—reinforce with extra clamps and secure stand legs.
- Choosing overly busy patterns: tiny prints can “vibrate” on camera. Solid colors or large shapes photograph better.
- Ignoring the floor area: if the bottom edge is messy, it shows in full-body photos. Add a rug, blanket, or clean floor sweep for a polished look.
FAQ: DIY Backdrops for Home Decor
What’s the easiest DIY backdrop for beginners?
A no-sew fabric drape backdrop is the quickest to make and easiest to reuse. A streamer wall is also beginner-friendly and very budget-friendly for party decorations.
How do I make a backdrop stand more stable?
Use weight on the legs (sandbags, dumbbells, or ankle weights), keep the height only as tall as needed, and add clamps on both sides so the backdrop weight is balanced.
Can I make a renter-friendly backdrop without damaging walls?
Yes. Use a freestanding backdrop stand, a tension rod in a doorway, or removable hooks rated for the weight. Avoid strong permanent adhesives on painted walls.
What materials look best in photos?
Matte fabric, canvas drop cloths, and layered textures photograph beautifully. Avoid glossy plastic if you’ll use flash or bright overhead lighting.
How far should people stand from the backdrop for photos?
Aim for 2–3 feet away from the backdrop. This reduces harsh shadows and helps your DIY party decor details show up clearly.
Can I reuse the same backdrop for multiple parties?
Absolutely. Choose neutral base layers (cream, beige, soft gray) and swap accents—balloon garlands, banners, paper flowers, or themed signs—to match each celebration.
Ready to Build Your Own Backdrop?
A DIY backdrop is one of those handmade projects that feels instantly rewarding—you get a big visual payoff, better party photos, and decor you can customize for every season and celebration. Start simple with fabric or streamers, then level up with painted drop cloths or greenery panels when you’re ready for a more permanent, reusable look.
Keep it fun, test your setup before guests arrive, and don’t be afraid to tweak as you go—sometimes the best ideas show up once you see it standing in your space.
Want more party-ready DIY crafts and handmade decoration ideas? Explore more creative projects and smart party prep tips on smartpartyprep.com.
More Articles
 Paper Craft Centerpieces Ideas
 Seasonal T-Shirts Ideas
 DIY Painted Canvas for Weddings
 Step-by-Step Wreaths Tutorial
 How to Make a Paper Party Hat in Under 12 Minutes (No Glue Gun, No Scissors Required — Just Printer Paper & a Stapler)
 DIY Greeting Cards in 5 Minutes
 Seasonal Masks Ideas
 DIY Cake Toppers Party Favors
 How Do I Disable Third Party Apps on Android? 7 Verified Methods (Including Hidden Settings & One-Click Revokes You’ve Never Tried)
 How Do I Allow Third Party Cookies on My Mac? A Stress-Free, Step-by-Step Guide for Safari, Chrome & Firefox (2024 Tested)