Seasonal T-Shirts Ideas
Seasonal T-shirts are one of those DIY crafts that feel instantly rewarding: you get wearable art, a party-ready outfit, and a fun activity you can do solo or with friends. Whether you’re hosting a backyard barbecue, planning a classroom celebration, putting together a holiday cookie swap, or organizing a family photo day, a themed shirt pulls everyone into the moment without needing complicated decorations.
What makes seasonal T-shirt crafting especially useful for parties is how flexible it is. You can create matching “host” shirts, personalize guest shirts as party favors, or make a quick set for a themed weekend. Most designs can be completed in an afternoon, and you can keep costs low by using basic blanks and a simple heat-transfer method—or go all-in with layered vinyl and specialty effects for a boutique look.
This guide is packed with practical, step-by-step instructions plus seasonal design ideas that double as handmade party decorations. Pick one technique, choose a season, and you’ll have a wearable project that looks intentional (even if you’re a total beginner).
Skill Level, Time Estimates, and Best Uses
Skill Levels
- Beginner: Iron-on transfer paper, simple stencils, basic heat transfer vinyl (HTV) with one color.
- Intermediate: Layered HTV, freezer paper stenciling, multi-step paint techniques.
- Advanced: Intricate layered designs, foil HTV, glow-in-the-dark HTV, bleaching effects, full “party pack” (matching shirts + signage + favors).
Time Estimates (per shirt)
- Design + cutting: 15–45 minutes (depending on complexity)
- Weeding vinyl: 5–25 minutes
- Pressing/painting: 5–20 minutes
- Total: 30–90 minutes
Party-Perfect Uses
- Matching family shirts for seasonal photos
- Birthday party “crew” shirts (host, helpers, honoree)
- Holiday potluck “theme teams” (dessert crew, games crew, grill crew)
- Kids’ craft station activity (simple stencil + fabric markers)
- Party favors: a shirt folded with a tag and ribbon
Materials List (with Estimated Costs)
Costs vary by brand and location, but these ranges help you plan a party crafting budget.
Core Supplies
- Blank T-shirts (100% cotton or cotton/poly blend): $3–$10 each
- Budget pick: basic crew neck cotton tees
- Upgrade: ring-spun cotton for a softer feel
- Tip: For HTV, cotton or cotton/poly blends both work well; for bleaching effects, use mostly cotton.
- Heat Transfer Vinyl (HTV) 12" x 24" sheets: $2–$6 per color
- Suggested types: matte HTV (everyday), glitter HTV (party sparkle), foil HTV (special occasions), glow HTV (Halloween parties)
- Fabric paint (2 oz bottles): $2–$5 each
- Fabric markers (set of 10–20): $8–$18
- Transfer paper (inkjet light/dark fabric): $10–$20 per pack (5–10 sheets)
- Freezer paper (for stencils): $5–$10 per roll
Tools (Recommended)
- Cutting machine (optional, but helpful for HTV): Cricut/Silhouette-style cutter (cost varies)
- Weeding tools: $5–$12 set
- Heat press (ideal) or household iron (works with care):
- Easy press/heat press: more consistent results
- Iron: choose one without steam holes if possible; turn steam OFF
- Pressing surface: heat press mat or folded towel (avoid ironing boards for HTV)
- Measuring tape or ruler: $2–$8
- Lint roller: $2–$6 (small step, big improvement for HTV)
- Parchment paper or Teflon sheet: $3–$10
- Cardstock (to place inside shirt while painting): $2–$6
Nice-to-Have Party Add-ons
- Ribbon + kraft tags (favor packaging): $5–$12
- Iron-on name labels (for kids’ parties): $6–$15
- Fabric-safe glitter or puff paint: $3–$8
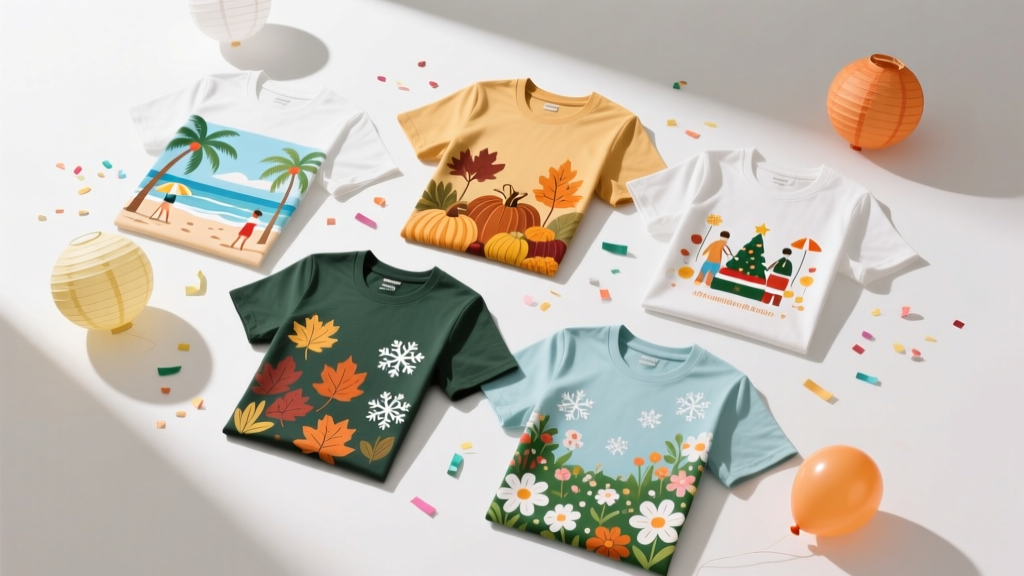
Seasonal T-Shirt Design Ideas (By Season)
These ideas are designed to work for DIY party decorations, themed gatherings, and handmade projects you can finish quickly.
Spring: Fresh, Floral, and Party-Ready
- “Bloom Crew” shirts for a garden party (simple script + small flower icon)
- Egg hunt team shirts: “Team Bunny,” “Golden Egg Squad,” “Clue Finder”
- Wildflower stencil tees: paint stems in green and add tiny dot flowers in pastel colors
- Picnic gingham letters: cut HTV letters in red/white and layer on a white tee
Summer: Bright Colors and Outdoor Fun
- BBQ host shirt: “Grill Captain” with a small spatula icon
- Pool party set: “Splash Crew,” “Lifeguard (ish),” “Snack Shack”
- Fireworks burst using fabric paint splatter (controlled with a toothbrush)
- Tropical leaf pocket design: iron-on a leaf cluster at the left chest
Fall: Cozy, Harvest, and Halloween-Friendly
- Pumpkin patch family shirts: “Pumpkin Picker,” “Cider Sipper,” “Leaf Collector”
- Thankful list shirt: heat-transfer a short list (family, friends, food, fun)
- Halloween glow HTV: ghost silhouettes or “Boo Crew” for party photos
- Autumn monogram: a large initial filled with tiny leaves (advanced layered vinyl)
Winter: Holidays, New Year, and Cozy Themes
- Holiday baking shirts: “Cookie Crew” and “Sprinkle Manager”
- Matching pajama-party tees: simple snowflakes across the chest
- New Year photo shirts: “Hello 2026” with metallic foil HTV
- Winter wonderland gradient: sponge paint light-to-dark blues with white snow dots
How to Make Seasonal T-Shirts (3 Beginner-Friendly Methods)
Choose the method that fits your tools and timeline. All three work great for DIY party crafts and handmade decorations.
Method 1: Heat Transfer Vinyl (HTV) — Clean, Durable, and Party-Perfect
Best for: crisp designs, names, matching party shirts
Skill level: Beginner to Advanced
Time: 45–90 minutes
Measurements & Placement Guide
- Adult full-front design: 10"–12" wide (centered)
- Youth full-front design: 8"–10" wide
- Left chest/pocket area: 3.5"–4.5" wide, placed about 3" down from collar seam
- Centering tip: Fold the shirt vertically to find the center line and lightly crease.
Step-by-Step HTV Instructions
- Create your design in your cutting software (text + simple icon works beautifully for parties).
- Mirror the design before cutting (most common HTV mistake).
- Cut the vinyl with the shiny carrier sheet side down.
- Weed the design using a hook tool or tweezers (remove the parts that won’t be on the shirt).
- Prep the shirt:
- Lint roll the area.
- Pre-press for 5–10 seconds to remove moisture and wrinkles.
- Position the vinyl using your measurement guide above.
- Press with heat:
- Heat press: follow vinyl brand settings (often around 305°F–320°F for 10–15 seconds).
- Iron: use high heat (cotton/linen), steam OFF, press firmly for 15–20 seconds per area, overlapping sections.
- Always use a Teflon sheet or parchment paper on top.
- Peel the carrier (warm peel or cool peel depending on vinyl instructions).
- Optional finishing press: 5 seconds with parchment paper for a smooth, long-lasting bond.
Method 2: Freezer Paper Stencil + Fabric Paint — Great for Group Crafting
Best for: kids’ parties, craft stations, rustic seasonal designs
Skill level: Beginner
Time: 30–60 minutes + dry time
Step-by-Step Stencil Instructions
- Cut a stencil from freezer paper:
- Simple shapes work best: pumpkins, stars, snowflakes, hearts, leaves.
- Keep thin details at least 1/8" (3 mm) thick so they don’t tear.
- Iron the stencil shiny side down onto the shirt (medium heat, 10–15 seconds). It should stick lightly.
- Insert cardstock inside the shirt to prevent bleed-through.
- Apply fabric paint with a sponge dauber:
- Use a “pounce” motion (up and down), not brushing.
- Do 2–3 thin layers rather than one thick coat.
- Peel stencil carefully while paint is still slightly wet for crisp edges.
- Dry and heat set per paint instructions (often 24 hours dry + iron on reverse side for a few minutes).
Method 3: Fabric Markers — Quick Custom Party Shirts
Best for: last-minute party favors, kid-friendly personalization
Skill level: Beginner
Time: 15–45 minutes + set time
Step-by-Step Marker Instructions
- Sketch your design lightly with pencil on paper first. Keep it bold and simple.
- Place cardboard inside the shirt to stop bleeding.
- Trace using fabric markers. Outline first, then fill color.
- Add personalization:
- Name across the back (3"–4" tall letters for kids, 4"–5" for adults)
- Party role on the front (Host, Helper, Birthday Star)
- Heat set according to marker directions (commonly iron on reverse side with no steam).
Pro Tips for Professional-Looking Results
- Use a lint roller before HTV to prevent tiny fibers from lifting edges later.
- Press on a firm surface. A folded towel on a table beats a squishy ironing board for vinyl adhesion.
- Keep designs party-photo friendly: high contrast colors, larger text, and bold shapes read better in pictures.
- Batch your work for parties:
- Cut all designs first
- Weed all designs second
- Press all shirts last
- Test one shirt first if you’re making a full set. Adjust size/placement before doing the rest.
- Wash-prep (optional): If shirts feel heavily starched, wash and dry first. Avoid fabric softener.
Fun Variations (Beginner to Advanced)
Beginner-Friendly Adaptations
- Single-color HTV with a seasonal phrase: “Hello Fall,” “Summer Vibes,” “Let It Snow,” “Spring Fling.”
- One stencil, two paint colors (background + highlight) for easy depth.
- Mini icon + big name for party favors: small heart/star/leaf near the collar, name across the chest.
Advanced Variations
- Layered HTV (2–4 colors): keep each layer simple and avoid stacking thick glitter layers.
- Metallic foil accents: add a small foil star or sparkle detail for holiday parties.
- Glow-in-the-dark HTV for Halloween party decorations in wearable form.
- Mixed media: HTV base design + fabric paint accents (like adding berries to a wreath or fireworks dots).
Troubleshooting: Fixes for Common Problems
- Vinyl is peeling at edges:
- Press longer with firmer pressure (especially with an iron).
- Make sure you pre-pressed the shirt to remove moisture.
- Use parchment paper and press again for 5–10 seconds.
- Design looks crooked:
- Use the fold-crease center line method.
- Measure from sleeve seams to each side of the design before pressing.
- Paint bled under stencil:
- Use less paint and pounce lightly in thin layers.
- Iron the freezer paper more firmly so edges seal.
- Marker ink bled:
- Choose fabric-specific markers.
- Let outlines dry for 1–2 minutes before coloring large areas.
- HTV looks wrinkled:
- Pre-press the shirt longer.
- Use a firm pad; avoid thick seams under the design area.
Common Crafting Mistakes to Avoid
- Forgetting to mirror HTV designs (especially text).
- Using steam when applying vinyl or heat-setting markers—steam can prevent proper adhesion.
- Pressing on an ironing board for HTV: the padding steals pressure and heat.
- Making designs too small for party photos. If it needs to read across a room, go bigger.
- Skipping the pre-press (wrinkles and moisture are sneaky troublemakers).
- Over-layering thick vinyl (like stacking multiple glitter layers). Use glitter as the top layer only, or keep layers minimal.
FAQ: Seasonal T-Shirt Crafting
What fabric works best for DIY seasonal T-shirts?
For HTV and markers, cotton or cotton/poly blends are reliable. For bleaching effects (advanced), choose mostly cotton (at least 90%) for clearer results.
Can I make these shirts without a cutting machine?
Yes. Use freezer paper stencils, fabric markers, or printable iron-on transfer paper. You can also buy pre-cut HTV letters and shapes for quick party phrases.
How long should I wait before washing a newly decorated shirt?
A safe rule is 24 hours. Then wash inside out on cold and tumble dry low (or hang dry) to keep your handmade design looking fresh.
What size should I make a front design for adult shirts?
A common sweet spot is 10"–12" wide for a centered front design. For left chest designs, aim for 3.5"–4.5" wide.
How can I turn seasonal shirts into party favors?
Fold each shirt neatly, tie with ribbon, and add a kraft tag with the guest’s name. For extra party flair, tuck in a small matching item like a sticker sheet or mini confetti packet (kept separate until gifting).
Do I need a heat press, or will an iron work?
A heat press is more consistent, especially for making sets for a party. An iron can still work well—just use high heat, no steam, firm pressure, and press in sections with overlap.
Wrap-Up: Make a Season, Make a Shirt, Make It a Party
Seasonal T-shirts are a creative way to celebrate the calendar with something you can actually use—at parties, in photos, and as handmade gifts. Start with one simple design, make a matching set for your next gathering, and you’ll quickly see how these DIY crafts can double as wearable party decorations.
Ready for your next handmade project? Explore more party-ready DIY crafts, decorations, and creative ideas on smartpartyprep.com.
More Articles
 How to Make Pet Party Invitations That Actually Get RSVPs: 7 Foolproof Steps (No Design Skills Needed + Free Templates Inside)
 Upcycled Thank You Cards from Recycled Materials
 How to Make Mini Party Hats in Under 12 Minutes (No Glue Gun, No Scissors Required) — 7 Foolproof Methods That Actually Hold Their Shape
 DIY Invitations Using Cricut
 DIY Confetti in 30 Minutes
 DIY Friendship Bracelets for Birthdays
 How to Make a Slumber Party Tent in Under 20 Minutes (No Sewing, No Special Tools — Just Blankets, Chairs & Kid-Approved Magic)
 How to Hang Party Streamers Without Tape Marks, Sagging, or Last-Minute Panic: 7 Foolproof Methods (Tested on 37 Parties)
 Personalized Confetti Gifts
 Advanced Centerpieces for Crafters