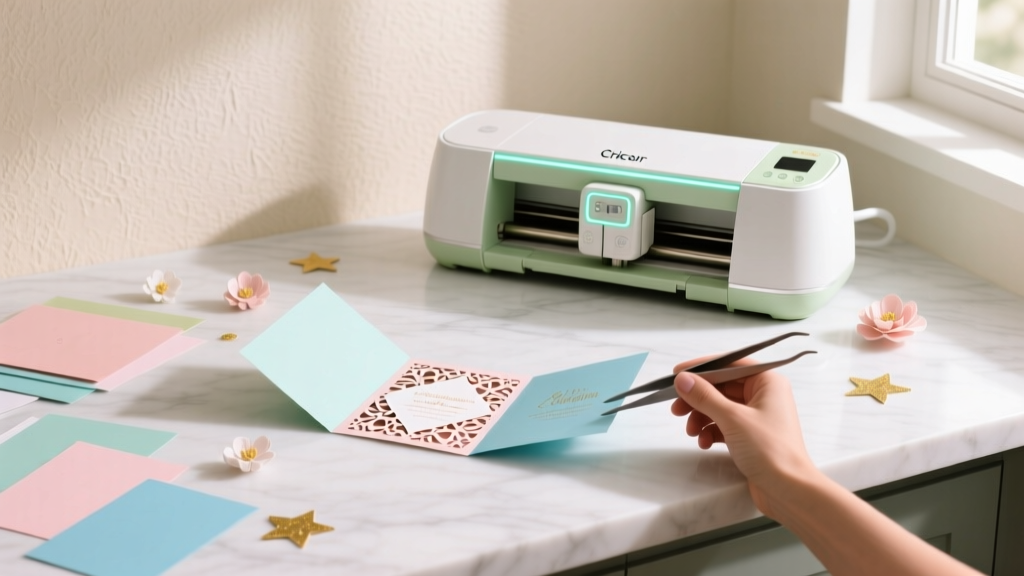
DIY Invitations Using Cricut
Handmade party invitations set the tone before guests even walk through the door. With a Cricut cutting machine, you can create invitations that look professionally printed—think crisp lettering, layered cardstock, gorgeous envelopes, and custom shapes—without paying boutique prices or relying on generic store-bought designs.
This project is especially fun because it blends creativity with practical results. You get to choose the theme (birthday, baby shower, bridal shower, graduation, holiday party), match your party decorations, and personalize details like names, dates, and RSVP info. It’s also a satisfying way to use your Cricut for more than just basic vinyl—paper craft invitations are where the “wow” factor really shows.
Whether you’re a beginner learning Cricut Design Space or an experienced crafter looking to level up with foiling and layered cuts, this guide walks you through the full process—materials, measurements, step-by-step instructions, pro tips, and troubleshooting—so you can confidently make DIY invitations your guests will keep.
Project Overview: Skill Level, Time, and What You’ll Make
- Skill level: Beginner to Intermediate (Advanced options included)
- Total time estimate:
- Design + test cut: 30–60 minutes
- Cutting: 30–90 minutes (depends on quantity and complexity)
- Assembly: 45–120 minutes
- Best for: Birthday invitations, shower invites, graduation announcements, holiday party invitations, and themed party décor coordination
- Finished size options (most common):
- A7 invite: 5" x 7" card (fits A7 envelope, 5.25" x 7.25")
- A2 invite: 4.25" x 5.5" card (fits A2 envelope, 4.375" x 5.75")
- Square invite: 5" x 5" (check postage rules—square envelopes often cost extra)
Materials and Tools (with Estimated Costs)
Cutting Machine and Essentials
- Cricut machine: Cricut Explore Air 2, Explore 3, Maker, or Maker 3 (varies by model; typically $200–$400)
- Fine-Point Blade: Standard for cardstock cuts ($10–$15)
- Cutting mats:
- LightGrip (blue) for paper and lighter cardstock ($10–$15 each)
- StandardGrip (green) for heavier cardstock ($10–$15 each)
- Brayer: Helps cardstock stick flat to the mat ($10–$15)
- Weeding tools: Hook + tweezers for tiny cutouts ($8–$15)
Paper Goods
- Cardstock (65–110 lb): Solid colors, glitter cardstock, or textured cardstock ($8–$20 per pack)
- Invitation bases: Pre-scored A7 or A2 card bases (optional, $8–$15 per pack)
- Printable cardstock (optional): For printing party details ($10–$18 per pack)
- Envelopes: A7 or A2 envelopes in theme colors ($8–$18 per pack of 25–50)
- Vellum (optional): For overlays or wraps ($8–$15 per pack)
Adhesives and Assembly
- Tape runner: Clean, fast adhesive for layering ($6–$12)
- Liquid glue (fine-tip): Best for detailed pieces ($4–$8)
- Foam dots (optional): Adds dimension ($4–$7)
- Double-sided tape (strong): For vellum wraps and belly bands ($4–$10)
Optional Upgrades (for Extra “Wow”)
- Cricut pen set: For writing or addressing ($10–$20)
- Cricut Foil Transfer Kit: Foiled names, borders, or icons ($25–$40)
- Scoring stylus or scoring wheel: Crisp folds ($10–$45 depending on model)
- Corner rounder punch: Softens edges ($6–$12)
- Wax seal kit (optional): Elevated envelope finish ($12–$30)
Cost Estimate Per Invitation
- Budget/basic: $0.50–$1.25 each (cardstock + adhesive + envelope)
- Mid-range layered: $1.25–$2.50 each (layers, vellum, foam dots)
- Premium: $2.50–$5+ each (foil, specialty paper, wax seals)
Choosing Your Invitation Style (3 Cricut-Friendly Options)
1) Layered Cardstock Invitation (Beginner-Friendly)
- Cut a base rectangle (A7 or A2), add a colored mat layer, then a focal layer (shape, name, theme icon).
- Great for birthdays, baby showers, graduation parties, and holiday gatherings.
2) Print Then Cut Invitation (Great for Lots of Text)
- Design the invite in Design Space, print it on your home printer, then Cricut cuts the shape perfectly.
- Perfect for photo invitations or detailed party details.
3) Gate-Fold or Pocket Invitation (Advanced, High Impact)
- Create a folding invitation that opens in the center or a pocket that holds insert cards.
- Ideal for weddings, formal parties, and themed events that need multiple info cards.
Step-by-Step: DIY Layered Invitations Using Cricut (A7 Size)
Finished invitation size: 5" x 7"
Recommended cardstock: 80–100 lb for base, 65–80 lb for layers
Quantity example: 20 invitations
Step 1: Pick Your Theme and Color Palette
Choose 2–4 coordinating colors that match your party decorations and handmade party décor. A simple palette keeps invitations looking polished.
- Example palettes:
- First birthday: blush + gold + cream
- Halloween party: black + orange + white
- Graduation: school color + white + metallic accent
- Baby shower: sage + ivory + kraft
Step 2: Set Up Your Canvas in Cricut Design Space
- Create a new project and set your card size to 5" x 7".
- Add a rectangle for your base layer: 5" x 7".
- Add a mat layer for a clean border: 4.75" x 6.75" (this gives a 1/8" border on all sides).
- Add a main panel for text or centerpiece: 4.5" x 6.5".
Beginner win: Keep your first design to 3 layers or fewer (base + mat + focal panel).
Step 3: Add Text and Graphics (Readable and Cut-Friendly)
- Use bold, clean fonts for cutting (thin scripts can tear).
- For cut text, keep letters at least 0.35" tall for best results.
- For written text (using Cricut pens), choose a “Writing” font or set the operation to Pen and use a single-line font if available.
Suggested layout for a party invitation:
- Top: Event title (e.g., “Emma’s 5th Birthday Party”)
- Middle: Date + time
- Lower: Address
- Bottom: RSVP line + phone/email
Step 4: Attach, Weld, and Arrange for Clean Cuts
- If you’re drawing with a pen, select your text and choose Attach to the panel it should write on.
- If you’re cutting a script word, use Weld so letters connect properly.
- Duplicate elements for your quantity (ex: 20 sets).
Step 5: Test Cut First (Saves Materials)
Before cutting everything, do a test with 1 invitation set using the exact cardstock you’ll use. Check:
- Text legibility
- Blade pressure (clean cuts, no tearing)
- Layer alignment and spacing
Step 6: Cut Your Cardstock
- Place cardstock on a LightGrip mat. Use a brayer for full contact.
- Select the correct material setting (ex: “Medium Cardstock”).
- Cut, then unload and remove cardstock by flipping the mat over and peeling the mat away from the paper (this helps prevent curling).
Step 7: Score and Fold (If Making a Folded Card)
If you’re making a folded A7 card base:
- Cut cardstock to 10" x 7"
- Score at 5" on the 10" side
- Fold carefully and crease with a scraper tool or bone folder
Step 8: Assemble Your Invitation Layers
- Glue the 4.75" x 6.75" mat layer onto the base (use a tape runner for flat, wrinkle-free adhesion).
- Add the 4.5" x 6.5" panel on top.
- Attach your focal elements (names, icons, banners). Use foam dots for dimension if desired.
Dry time: If using liquid glue, let invitations sit flat for 10–15 minutes before stacking.
Step 9: Address Envelopes and Add Finishing Touches
- Use Cricut pens to address envelopes for a coordinated, polished look.
- Add envelope liners (cut to size) or a vellum belly band around the invitation.
- Seal with a sticker, wax seal, or small piece of washi tape that matches your party theme.
Pro Tips for Professional-Looking Handmade Invitations
- Keep margins generous: Leave at least 0.25" from edges to avoid cramped designs.
- Use the right cardstock weight: 80–110 lb for bases, 65–80 lb for layers.
- Swap mats wisely: Use LightGrip for paper; StandardGrip for heavy glitter cardstock.
- Prevent cardstock tearing: Use a sharp blade and reduce pressure if intricate cuts look fuzzy.
- Batch your workflow: Cut all bases first, then all mats, then all focal pieces—assembly goes faster.
- Hide adhesive: For vellum, use tiny dots of glue behind dark text or layered elements.
- Photo-worthy detail: Add a small themed icon (balloons, stars, confetti, floral) that matches your party decorations.
Creative Variations (Beginner to Advanced)
Beginner Variations
- Single-layer flat invite: Cut a 5" x 7" card and write the details with a Cricut pen.
- Sticker-style seal: Use printable sticker paper for envelope seals featuring the party theme.
- Simple banner: Cut a banner shape and layer it behind your event title.
Intermediate Variations
- Vellum overlay: Wrap vellum around the invite and secure with double-sided tape.
- Die-cut shape invite: Use Print Then Cut to create a shaped invitation (pumpkin, heart, star, graduation cap).
- Layered name topper: Cut the name in two colors for a shadow effect (offset by 0.08"–0.12").
Advanced Variations
- Foiled details: Add a foil border or foiled names for a luxe look.
- Pocket invitation: Create a pocket that holds insert cards (RSVP, directions, dress code).
- Gate-fold invite: Two panels meet in the middle with a belly band holding it closed.
Troubleshooting: Fixes for Common Cricut Invitation Problems
- Problem: Cardstock is tearing or fuzzing.
- Fix: Replace/clean the blade, use a lighter pressure setting, and ensure the cardstock is brayered flat.
- Problem: Small letters won’t weed cleanly.
- Fix: Increase font size, choose a bolder font, or switch to writing text with a pen instead of cutting it.
- Problem: Mats won’t stick or paper shifts while cutting.
- Fix: Use a cleaner mat or a fresh one, press down with a brayer, and avoid textured cardstock for intricate cuts.
- Problem: Layers look crooked when assembled.
- Fix: Use a ruler or alignment corners (light pencil marks on the back), and apply adhesive from the center outward.
- Problem: Glitter cardstock doesn’t cut through.
- Fix: Use a StrongGrip/StandardGrip mat, select “Glitter Cardstock,” and do a second pass if needed.
Common Crafting Mistakes to Avoid
- Skipping the test cut: One quick test prevents wasted cardstock and time.
- Choosing overly thin script fonts for cutting: If it’s delicate, it will likely tear—use bold fonts or write instead.
- Using too much liquid glue: It can warp paper; use a fine-tip glue and tiny dots.
- Not accounting for mailing: Bulky embellishments can increase postage or get crushed; keep height low for mailed invites.
- Forgetting envelope sizing: Match your finished card size to the right envelope (A7 for 5" x 7").
- Overcomplicating the first attempt: Start with simple layered invitations, then add foil, vellum, and fancy folds later.
FAQ: DIY Cricut Invitations
What Cricut is best for making invitations?
Any Cricut that cuts cardstock works well (Explore series or Maker series). If you want to cut thicker materials, do heavy embossing, or work faster with certain tools, the Maker line offers more flexibility—but beginners can absolutely create beautiful DIY party invitations with an Explore machine.
Should I cut the text or write it with a Cricut pen?
For lots of party details (address, RSVP, directions), writing is usually easier and more readable. Cut text is great for short phrases like names or “You’re Invited!” A popular combo is cut a bold title and write the smaller details.
What cardstock weight should I use for invitations?
Use 80–110 lb cardstock for the base so it feels sturdy, and 65–80 lb for decorative layers. If you’re doing intricate cutouts, a smoother cardstock often cuts cleaner than heavily textured paper.
How do I make invitations faster when I need a lot?
Batch your steps: cut all base layers first, then all mats, then all focal pieces. Keep adhesives ready, and assemble in an “assembly line” (glue layer 1 on all cards, then layer 2, etc.). Also, simplify designs—fewer tiny cutouts means quicker weeding and assembly.
Can I use Print Then Cut for photo invitations?
Yes! Print Then Cut is ideal for photo party invitations because your printer handles the image quality and text, and Cricut trims the shape precisely. Use printable cardstock and do a test print to confirm colors and alignment.
How do I keep invitations from curling after cutting?
Flip the mat upside down and peel the mat away from the cardstock (instead of lifting the paper). Store finished invitations under a book for an hour or two, and avoid overusing liquid glue that can warp paper.
Ready to Make Your Own Cricut Party Invitations?
DIY invitations using Cricut are one of those party crafts that feel truly rewarding—fast enough to make in batches, customizable for any theme, and impressive without being complicated. Start with a clean layered design, do one test cut, then have fun adding details that match your party decorations and handmade party décor.
If you make a set, try saving your Design Space file as a reusable template—next time you’ll only need to update the party details and colors.
Happy crafting, and be sure to explore more DIY craft ideas, party decorations, and handmade projects at smartpartyprep.com!
More Articles
 Is Nature's Way Third Party Tested? We Investigated Every Batch Report, Lab Certificate, and FDA Compliance Gap So You Don’t Have to Waste Time—or Risk Your Craft Projects on Unverified Supplements.
 How to Do a 3rd Party Removal Spell: A Step-by-Step, Ethically Grounded Ritual (No Ouija Boards, No Curses, Just Clarity & Consent)
 Upcycled Wall Art from Recycled Materials
 How to Make a Balloon Arch for a Birthday Party: 7 Foolproof Steps (No Glue Gun, No Experience, No Stress — Just Gorgeous Results in Under 90 Minutes)
 How to Make Slumber Party Tents That Actually Stay Up (No Glue Guns, No Tears): 7 Foolproof Methods Using Stuff You Already Own — From Cardboard Castles to Fairy-Light Canopies
 Seasonal Painted Rocks Ideas
 How to Know If a Supplement Is Third Party Tested: 7 Non-Negotiable Checks That Reveal Hidden Contaminants, Fake Labels, and Dangerous Gaps — Before You Swallow One Capsule
 DIY Resin Jewelry for Weddings
 How to Install 3rd Party Apps on LG Smart TV (2024): The Only Safe, Step-by-Step Method That Actually Works — No Hacks, No Bricking, No Developer Mode Confusion
 How to Draw Party Scenes in 7 Minutes (Even If You Can’t Draw a Stick Figure): A Step-by-Step Guide That Turns Doodles Into Delightful Decorations for Birthdays, Graduations & More