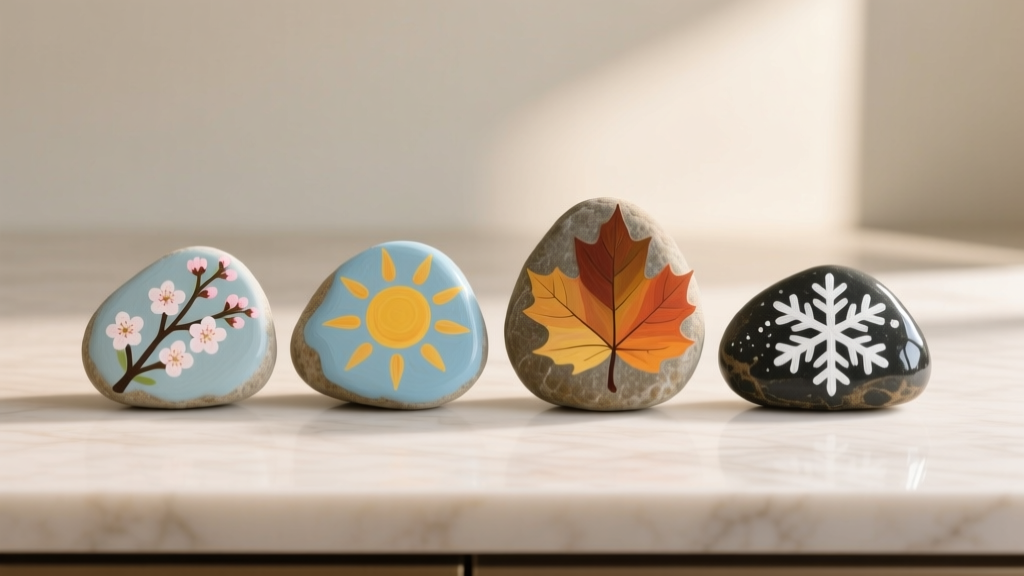
Seasonal Painted Rocks Ideas
Painted rocks are one of those rare DIY crafts that check every box: affordable, beginner-friendly, relaxing, and genuinely useful for party decorations. With a handful of smooth stones and a few craft paints, you can create handmade décor that works as place cards, table scatter, party favors, game pieces, or even small gifts tucked into treat bags. Best of all, seasonal painted rocks let you refresh your party themes throughout the year without buying new decorations every time.
This project is also wonderfully flexible. If you’re crafting with kids, you can keep it simple with bold shapes and dots. If you’re an experienced crafter, you can add fine line details, layered paint effects, or lettering. Whether you’re planning a spring brunch, summer pool party, fall harvest gathering, or winter holiday celebration, these DIY painted rocks can match your vibe perfectly.
Below you’ll find seasonal painted rock ideas, materials with estimated costs, step-by-step instructions, plus pro tips and troubleshooting to help your handmade party décor look polished and last longer.
Project Overview: Skill Level, Time, and Best Uses
- Skill level: Beginner (basic shapes) to Advanced (lettering, shading, fine details)
- Time estimate:
- Prep and wash/dry: 20–40 minutes (mostly waiting time)
- Painting per rock: 10–25 minutes (simple designs closer to 10)
- Dry time between layers: 10–20 minutes
- Sealing time: 15 minutes + 1–24 hours cure time (depends on sealer)
- Best party uses:
- Place cards (write names on the rocks)
- Table scatter décor
- Party favor “take one” basket
- Outdoor party garden markers
- Treasure hunt clues or game tokens
- Gift toppers and stocking stuffer add-ons
Materials and Tools (with Estimated Costs)
Rocks
- Smooth river rocks (2–3 inches wide): ideal for painting and lettering (bag of 20–40 rocks: $8–$20)
- Flat stones (similar to “skipping stones”): great for place cards and table décor ($10–$25 depending on quantity)
- Free option: collect from your yard/beach (check local rules; avoid protected areas)
Paint and Markers
- Acrylic craft paint (multi-pack): $8–$18
- Outdoor acrylic paint (optional for garden/outdoor parties): $6–$12
- Paint pens (oil-based or acrylic): great for crisp lines and lettering ($10–$25)
- Fine-tip permanent marker (optional for sketching): $2–$5
Brushes and Helpful Tools
- Brush set including:
- Flat brush (½ inch) for base coats
- Round brush size 2–4 for general painting
- Liner/detail brush size 0–1 for thin lines
- Dotting tools or cotton swabs (great for berries, snow dots): $3–$10
- Palette or disposable plate: $1–$5
- Pencil (for light sketching on primed rocks): $1–$2
Prep and Seal
- Dish soap + scrub brush for cleaning: $2–$6
- White acrylic paint or gesso for priming: $5–$10
- Sealer:
- Spray acrylic sealer (matte or gloss): $6–$12
- Brush-on water-based varnish (indoor): $8–$15
- Outdoor sealer (extra durable): $10–$18
Optional Party-Friendly Add-Ons
- Metallic paint (gold/silver) for glam parties: $4–$8
- Glitter topcoat (use sparingly for less mess): $4–$10
- Mini easels or place card stands for displaying name rocks: pack of 10–20 ($8–$15)
- Small organza bags to package party favors: 25 pack ($5–$10)
Step-by-Step: How to Paint Seasonal Rocks That Look Party-Ready
Step 1: Choose the Right Rocks (Size + Shape)
- For place cards: look for flat rocks about 2–3 inches across with a stable “base” so they don’t roll.
- For table scatter: smaller rocks 1–2 inches are cute and easy to make in batches.
- For garden markers: larger rocks 3–4 inches give you space for words and are more visible outdoors.
Step 2: Wash, Dry, and (Optional) Prime
- Wash rocks with dish soap and warm water. Scrub off dirt and grit.
- Rinse well and let dry completely (at least 30 minutes; longer if porous).
- Optional but recommended: apply a primer coat of white acrylic paint or gesso. Let dry 15–20 minutes. This makes colors brighter and lettering sharper.
Step 3: Paint a Base Coat (If Your Design Needs It)
- Use a flat brush to paint a solid base color (pastel, bright, or neutral depending on the season).
- Apply 2 thin coats rather than one thick coat to avoid streaks.
- Let each coat dry 10–15 minutes.
Step 4: Add the Seasonal Design
- Lightly sketch your design with pencil (especially for lettering or symmetrical shapes).
- Paint the larger shapes first (leaves, pumpkins, eggs, snowflakes).
- Then add details: outlines, dots, highlights, small patterns, and names.
- Let the paint dry between layers so colors don’t smear (usually 10–20 minutes).
Step 5: Seal for Durability (Especially for Party Handling)
- Choose matte for a modern look or gloss for bright, candy-like shine.
- Apply 2–3 light coats of spray sealer, waiting 10 minutes between coats.
- Let cure:
- Handle gently after 1 hour
- Best durability after 24 hours
Seasonal Painted Rock Ideas (Party-Friendly Themes)
Spring Painted Rocks: Fresh, Floral, and Brunch-Ready
- Floral wreath place cards: paint a thin green circle, add tiny flowers, then write names in the center.
- Ladybug rocks: red base coat + black head + dots; cute for garden parties and kids’ tables.
- Rainy-day umbrellas: pastel umbrella tops with dotted raindrops around the edges.
- Easter egg patterns: stripes, zigzags, dots, and tiny blossoms; make a matching set for table scatter.
Beginner version: simple flower dots using cotton swabs.
Advanced version: layer petals with highlights and add hand-lettered “Hello Spring.”
Summer Painted Rocks: Bright Colors and Outdoor Party Vibes
- Fruit rocks: watermelon slices, strawberries, lemons, pineapple tops (perfect for pool parties).
- Beach theme: simple waves, tiny shells, or “sand + sea” color blocking using tan and aqua.
- BBQ party sets: painted icons like burgers, corn, and picnic gingham patterns.
- Glow-style night party rocks: use neon acrylics and top with a gloss sealer for extra pop.
Party tip: Use fruit rocks as handmade table decorations and let guests take one home as a party favor.
Fall Painted Rocks: Cozy Harvest and Halloween Favorites
- Pumpkin rocks: orange base, curved lines for segments, green stem; add names for place settings.
- Autumn leaves: paint maple/oak leaf silhouettes with red-orange-yellow blends.
- Halloween icons: friendly ghosts, candy corn, bats, black cats, or mini jack-o’-lantern faces.
- Thanksgiving gratitude rocks: paint warm neutral bases and write words like “Grateful,” “Gather,” or guest names.
Advanced variation: create a buffalo plaid background (thin lines + patience!) and paint a small pumpkin on top.
Winter Painted Rocks: Holiday Charm + New Year Sparkle
- Snowflake rocks: light blue or navy base with white paint pen snowflakes.
- Holiday characters: Santa hat, reindeer faces, penguins, or snowmen (great for kids’ parties).
- Ornament rocks: paint a circle ornament with a tiny “cap” at the top and add metallic highlights.
- New Year mini “fireworks”: black base, metallic bursts in gold/silver, and a big “2026” (or your party year).
Practical party use: Make winter rocks as handmade party favors by packaging two or three in a small organza bag.
Pro Tips for Clean Lines, Bright Color, and Faster Crafting
- Thin coats win: thick paint can crack when sealed. Two thin coats look smoother and dry faster.
- Use a paint pen for lettering: especially for names. It’s easier than a brush and looks more professional.
- Batch your process: do all base coats first, then all details, then all sealing. This saves time when making party décor in sets of 10–30.
- Stabilize your rock: rest it in a bottle cap ring or a folded towel “nest” to prevent rolling while you paint.
- Quick palette refresh: mist acrylic paint with a little water to keep it workable during long crafting sessions.
Variations: Make Your Painted Rocks Even More Party-Ready
Beginner-Friendly Adaptations
- Sticker or stencil assist: use simple stencils (stars, hearts, letters) for neat shapes.
- Dot mandalas: dots look impressive even with minimal skill—perfect for table scatter.
- One-color silhouettes: a single-color pumpkin or snowflake on a contrasting background is clean and modern.
Advanced Upgrades
- Layered shading: blend two colors for depth (ex: pumpkin shadows, leaf gradients).
- Metallic accents: outline details in gold or silver for glam party themes.
- Micro-pattern backgrounds: polka dots, tiny stars, confetti speckles, or gingham.
- Hand-lettered sets: names + a small icon (leaf, snowflake, fruit) for cohesive place cards.
Troubleshooting: Fix Common Painted Rock Problems
- Paint looks streaky: add a second thin coat after the first is fully dry. Priming with white helps a lot.
- Marker bleeds or smears: ensure the paint is dry, and use an acrylic paint pen rather than water-based marker. Seal with light coats (heavy spray can make ink run).
- Sealer stays tacky: humidity can cause this. Move rocks to a dry, warm spot and allow extra cure time. Use lighter coats next time.
- Paint chips off: the rock may be dusty or oily. Wash thoroughly, consider priming, and use multiple thin seal coats.
- Brush marks show: use a slightly damp brush for base coats and avoid overworking paint as it dries.
Common Crafting Mistakes to Avoid
- Skipping cleaning: even “clean-looking” rocks can have dust that prevents paint from sticking.
- Painting on damp rocks: moisture trapped under paint can cause bubbling or peeling later.
- Using one heavy sealer coat: it can drip, cloud, or reactivate paint pen ink. Multiple light coats are safer.
- Rushing dry time between layers: this leads to muddy colors and fingerprints—especially on darker bases.
- Overcomplicating the first set: if you’re making 20 place cards, choose a simple design you can repeat consistently.
FAQ: Seasonal Painted Rocks for DIY Party Decorations
What kind of rocks are best for painted rock crafts?
Smooth, flat river rocks are the easiest to paint and seal. Aim for rocks around 2–3 inches for place cards and 1–2 inches for table scatter or party favors.
Do I need to prime rocks before painting?
You don’t have to, but priming with white acrylic paint or gesso helps colors look brighter and prevents the rock’s natural speckles from showing through—especially for pastel spring designs and winter whites.
What’s the best sealer for party favors that guests will handle?
Acrylic spray sealer (matte or gloss) works well for indoor use. For outdoor parties or garden markers, use an outdoor-rated clear sealer and allow a full 24-hour cure for better durability.
How do I add names for painted rock place cards?
Use a fine-tip acrylic paint pen for crisp lettering. For easy spacing, lightly pencil the name first, then trace with the pen. Seal with light coats to avoid smearing.
Can kids help with this project?
Yes! Choose larger rocks (about 3 inches), stick to simple shapes (dots, stripes, hearts), and use washable aprons or an old shirt. Adults can handle sealing for best results.
How many painted rocks should I make for a party?
For a polished look, plan for:
- 1 per guest if you’re making place cards
- 2–4 per guest if they double as party favors
- 15–30 small rocks for a standard table scatter set (depending on table size)
Wrap-Up: Create a Seasonal Set You’ll Reuse All Year
Seasonal painted rocks are a feel-good DIY craft that turns everyday stones into handmade decorations your guests will actually notice—and want to take home. Start with a small set (6–10 rocks) for a centerpiece or dessert table, then build your collection season by season. Before long, you’ll have a stash of budget-friendly party decorations ready for birthdays, brunches, holidays, and backyard gatherings.
Keep it simple, enjoy the process, and let your creativity show in the little details. For more DIY crafts, party prep tips, and handmade project ideas, explore more creative inspiration on smartpartyprep.com.
More Articles
 Easy Masks for Beginners
 Kids' Craft: Table Runners
 How to Make a Party Backdrop That Looks Pro (Without Spending $200): 7 Foolproof DIY Methods Using Dollar Store Supplies, Reusable Frames & Zero Sewing
 How to Allow Third-Party Cookies on Chrome iPad in 2024: The Only 4-Step Guide That Actually Works (No More ‘Settings Not Found’ Errors)
 Advanced Paper Lanterns for Crafters
 How to Install 3rd Party Apps on Vizio Smart TV (Without Jailbreaking): A Step-by-Step Guide That Actually Works in 2024 — No Developer Mode Myths, No App Store Limits, Just Real Methods That Unlock Netflix Alternatives, Plex, and More
 How to Install 3rd Party Apps on LG Smart TV (2024): The Only Safe, Step-by-Step Method That Actually Works — No Hacks, No Bricking, No Developer Mode Confusion
 DIY Resin Jewelry Party Favors
 When the Party Is Over Chords: The Only Complete, Beginner-Friendly Guide You’ll Ever Need (No Theory Required — Just Play in 7 Minutes)
 Stop Wasting $47 on Boring Party Favors: 12 Stunning, Low-Effort DIY Party Favors for Adults That Guests Actually Keep (Not Toss!) — No Glue Gun Required