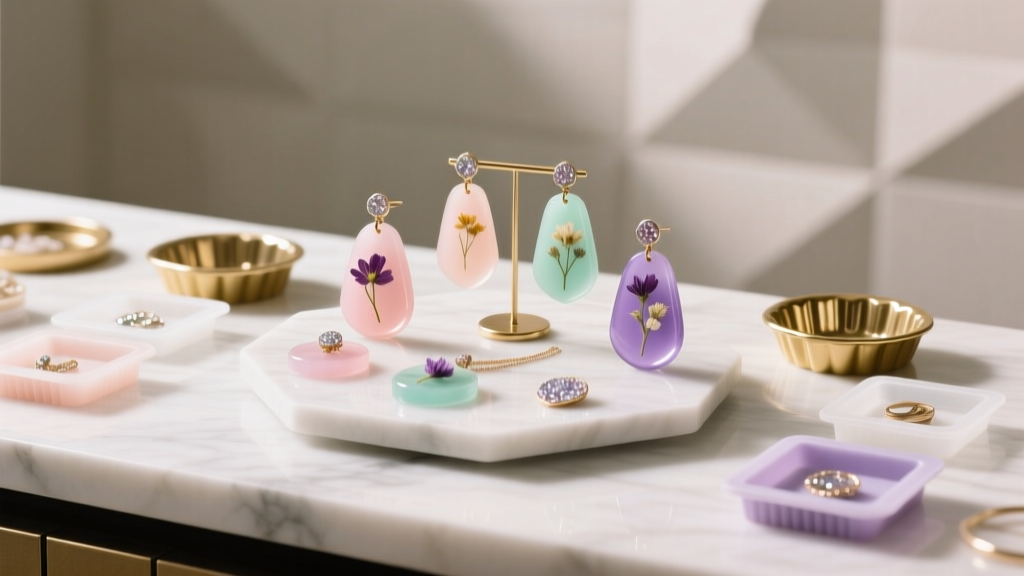
DIY Resin Jewelry Party Favors
Handmade party favors feel extra special because they’re personal, pretty, and made with intention. DIY resin jewelry party favors check all the boxes: they’re small enough to create in batches, customizable to your party theme, and impressive enough that guests will actually want to keep them. Think glossy pendants with dried flowers for a bridal shower, glittery keychains for a birthday bash, or tiny initial charms for a graduation party.
This project is also a fantastic “craft party” activity if you want guests to make their own keepsake. You can set up a simple resin station and let everyone pick colors, sparkles, and charms—then send them home with a finished piece (or a take-home kit if you’re curing overnight). Whether you’re a beginner crafter or a DIY enthusiast who loves experimenting, resin jewelry gives you tons of creative options with a polished, store-bought look.
Grab your molds, choose a color palette, and let’s turn a party detail into a memorable handmade decoration your guests can wear.
Project Overview
- Skill level: Beginner (basic molds + glitter) to Advanced (layering, embedded objects, alcohol ink effects)
- Time needed:
- Prep + mixing: 20–30 minutes
- Pouring + design: 30–60 minutes (depending on batch size)
- Cure time: 8–24 hours (varies by resin type and temperature)
- Finishing + assembly: 30–90 minutes
- Best for: Birthday party favors, bridal shower favors, baby shower keepsakes, graduation party gifts, holiday parties, craft nights
- Recommended batch size: 12–24 pieces (efficient use of mixing time)
Resin Jewelry Party Favor Ideas (Pick Your Favorite Format)
1) Pendant Necklaces
Classic and wearable. Great for initials, small pressed flowers, and confetti-style glitter.
2) Keychains
Perfect party favor that doubles as a practical gift. Use letter molds, hearts, stars, or mini tags with the event date.
3) Earrings (Studs or Dangles)
Make tiny resin shapes and attach to posts or hooks. Keep them lightweight by using shallow molds.
4) Zipper Pulls or Bag Charms
Small, cute, and quick—ideal for large parties or classroom celebrations.
Materials & Tools (With Estimated Costs)
Costs vary by brand and quantity, but these estimates help you plan a realistic party-crafting budget.
Resin Options
- 2-part epoxy resin (recommended for jewelry): 16 oz kit typically makes 20–40 small pieces. $18–$35
- UV resin (fast for small charms): Great for quick layers and small molds, requires UV lamp. $12–$25
Molds & Findings
- Silicone jewelry molds: pendants, letters, hearts, circles. $8–$18
- Keychain hardware: split rings + swivel clasps. $6–$12
- Jump rings (4–6 mm): for attaching charms. $5–$10
- Screw eye pins (optional): if molds don’t have holes. $4–$8
- Necklace cords or chains: waxed cord (1–2 mm) or chain necklaces. $8–$20
- Earring hooks/posts + backs: $6–$15
Color & Decorative Add-Ins
- Mica powder pigments: opaque shimmer. $8–$15
- Resin dye (transparent): a little goes a long way. $6–$15
- Fine glitter or chunky glitter mix: $4–$10
- Pressed/dried flowers (fully dry): $6–$18
- Foil flakes (gold/silver/rose gold): $4–$10
- Small charms or confetti (resin-safe): $5–$12
Essential Tools (Worth Having)
- Nitrile gloves: $5–$10
- Silicone mixing cups: reusable and easy to clean. $8–$15
- Stir sticks (silicone or wooden): $3–$8
- Digital scale (if resin uses weight ratios): $10–$20
- Heat tool: mini heat gun or culinary torch for bubbles. $15–$30
- Tweezers: for placing tiny items. $5–$10
- Pin vise hand drill + micro bits (0.8–1.5 mm) for holes: $8–$15
- Sandpaper set (400, 800, 1200, 2000 grit): $6–$12
- Small pliers set: needle-nose + round-nose + cutters. $10–$25
Packaging for Party Favors
- Organza bags or mini jewelry boxes: $8–$18 for 24
- Favor tags + twine/ribbon: $5–$12
- Cardstock display cards (for earrings/necklaces): $6–$15
Safety Setup (Quick but Non-Negotiable)
- Work in a well-ventilated area (open windows, fan pulling air out if possible).
- Wear nitrile gloves and protect your surface with a silicone mat or freezer paper.
- Keep resin away from kids and pets; if doing a craft party, have an adult run the resin station.
- Follow your resin brand’s instructions for mixing ratio and cure time.
Step-by-Step: How to Make Resin Jewelry Party Favors
Step 1: Choose a Theme + Plan Your Color Palette
Before mixing resin, decide on a consistent look so your favors feel cohesive with the party decorations.
- Birthday party: rainbow glitter, confetti, bold pigments
- Bridal shower: white + gold foil + florals
- Baby shower: pastel swirls, tiny stars, name initials
- Graduation: school colors, mini tassel charms, year numbers
Batch tip: For 20 favors, plan 2–3 designs max to keep your workflow smooth.
Step 2: Prep Your Molds and Add-Ins
- Wash molds with mild soap and water, then dry fully.
- Place molds on a level tray you can move without wobbling.
- Arrange your add-ins: dried flowers, foil flakes, glitter, charms.
Beginner-friendly adaptation: Use only glitter or mica powder (no embedded objects) for your first batch.
Step 3: Measure and Mix Resin
Most epoxy resins are mixed 1:1 by volume or by weight. Check your label and follow it exactly.
- Pour Part A and Part B into a mixing cup (example: 30 ml + 30 ml for a medium batch).
- Stir slowly for 3–5 minutes, scraping sides and bottom.
- Let the cup sit for 1–2 minutes so bubbles rise.
Tool recommendation: Silicone measuring cups and a flat silicone stir stick help reduce unmixed streaks.
Step 4: Color the Resin (Optional but Fun)
- For transparent color, add 1–2 drops resin dye per 30 ml, then adjust.
- For mica powder, start with 1/8 tsp per 30 ml for a shimmery opaque look.
- For glitter, start with 1/4 tsp per 30 ml. Fine glitter suspends better than chunky glitter.
Advanced variation: Split mixed resin into 2–3 small cups and tint each for layered or swirled effects.
Step 5: Pour Into Molds
- Pour slowly into each cavity, filling to about 90–95% to prevent overflow.
- Use a toothpick to guide resin into corners (especially letter molds).
- Tap the tray gently to release trapped bubbles.
Step 6: Add Decorations and Create Layers
- Embedded flowers: pour a thin layer first, place the flower, then top off with resin.
- Foil flakes: place a few pieces with tweezers, then push down slightly so they’re submerged.
- Confetti/glitter mix: sprinkle lightly; too much can clump.
Layer timing tip: If doing a two-layer design, wait until the first layer is gel-like (often 45–90 minutes) so items don’t float.
Step 7: Remove Bubbles
- Pass a heat gun over the surface for 2–3 seconds at a time, moving constantly.
- Or use a torch quickly from a safe distance (avoid scorching silicone molds).
Pro tip: Don’t overheat—too much heat can warp molds or cause ripples.
Step 8: Cure and Demold
- Cover the molds with a box or plastic container to keep out dust.
- Let cure for the full recommended time (often 12–24 hours).
- Demold by gently pulling silicone away from the piece instead of forcing the piece out.
Step 9: Finish Edges (Sand and Polish if Needed)
- If edges are rough, wet-sand lightly with 400 grit, then move to 800, 1200, and 2000.
- Wipe clean and let dry.
- Optional: apply a thin “doming” coat of resin for a glassy finish.
Step 10: Assemble Jewelry Findings
- If your mold has a hole: attach a jump ring (4–6 mm), then add chain, cord, or keychain hardware.
- If there’s no hole:
- Use a pin vise to drill a hole (1.0–1.5 mm bit works for many findings), then add a jump ring.
- Or twist in a screw eye pin with a tiny dab of resin/adhesive (let fully cure).
Necklace sizing: For most adults, 18–20 inch chains are a safe crowd-pleaser. For kids, consider 14–16 inch cords (with adult supervision and age-appropriate safety considerations).
Pro Tips for Party-Perfect Results
- Make extras: Create 10–20% more pieces for backups and last-minute guests.
- Keep designs readable: If using letter molds, stick to solid colors + light glitter so initials pop.
- Warm resin bottles slightly (sealed, in warm water for 5–10 minutes) to reduce bubbles—never microwave resin.
- Use a level surface: Even a slight tilt can make pieces cure unevenly.
- Test your add-ins: Paper confetti can bleed; use foil, plastic confetti, or glitter designed for crafts.
Creative Variations (Beginner to Advanced)
Beginner Variations
- Monochrome sparkle: one pigment + fine glitter
- Party palette mix: two colors poured side-by-side and gently swirled with a toothpick
- Confetti topper: clear resin base with confetti concentrated near the front
Advanced Variations
- Layered “floating” effect: suspend flowers or charms in the center using 2–3 cured layers
- Alcohol ink petri style (for experienced resin crafters; test first): layered drops for bloom effects
- Embedded vinyl names: cut small name decals, seal if needed, and embed between layers
- Gold-leaf edge highlight: apply leafing pen or gilding wax to edges after sanding
Troubleshooting: Quick Fixes for Common Resin Issues
- Tacky or soft pieces: Usually incorrect ratio or under-mixing. Let cure longer in a warm room; if still tacky, remake the piece (tacky resin often won’t fully harden).
- Too many bubbles: Mix slowly, warm resin bottles gently, and pop bubbles with heat in short passes.
- Glitter sinking: Use finer glitter or wait until resin thickens slightly before adding; try layering.
- Flowers turning brown: Flowers weren’t fully dried or they absorbed resin. Use fully pressed/dried florals and seal delicate pieces with a thin resin coat first.
- Cloudy finish: Moisture contamination or aggressive sanding without polishing. Wet-sand progressively and add a thin top coat.
Common Crafting Mistakes to Avoid
- Eyeballing measurements: Resin mixing ratio must be accurate—use measuring cups or a scale.
- Stirring too fast: Fast stirring creates bubbles that are hard to remove.
- Overfilling molds: Overflow leads to thin “wings” of resin that need extra sanding.
- Adding wet botanicals: Any moisture can cause cloudiness and curing problems.
- Unsealed porous items: Paper, wood, and some fabrics can release bubbles—seal first with a thin resin coat.
- Demolding too early: Pieces can warp or dent if they’re not fully cured.
Packaging Ideas That Double as Party Decorations
- Earring display cards: Match the party theme with printed names/date; set them on a tray as part of the party table decor.
- Mini jewelry boxes: Add tissue paper in your party colors and a personalized favor tag.
- Organza bags: Quick and cute—tie with ribbon and tuck in a small “thank you” note.
- Favor wall: Hang bag charms on a pegboard or string line with mini clothespins for a fun party decoration + grab-and-go station.
FAQ: DIY Resin Jewelry Party Favors
How many resin favors can I make from one kit?
A typical 16 oz epoxy resin kit often makes 20–40 small pieces depending on mold depth and size. Shallow charms and small pendant molds stretch your resin the farthest.
Can I make these ahead of time?
Yes—resin jewelry party favors are ideal for pre-party prep. Make them 3–10 days ahead so you have time for curing, sanding, assembly, and packaging.
What’s better for party favors: UV resin or epoxy resin?
UV resin is great for fast, small pieces and quick layers, but needs a UV lamp and can be trickier in deeper molds. Epoxy resin is more forgiving for beginners and batch crafting, with a longer working time for placing decorations.
How do I keep flowers from floating in resin?
Pour a thin base layer first and let it thicken to a gel-like stage, then place the flower and top off with resin. This layering method keeps embedded items centered.
Are resin favors safe for kids’ parties?
Finished, fully cured resin pieces are typically fine as keepsakes, but mixing and pouring resin should be done by adults with ventilation and gloves. For kid-led crafting, consider making the resin pieces ahead of time and letting kids assemble keychains with jump rings (adult help recommended).
Do I need special tools to attach chains and keyrings?
A small pliers set (needle-nose and cutters) makes assembly much easier. If your pieces don’t have holes, a pin vise hand drill is a simple, beginner-friendly tool for clean holes.
Ready to Make Your Own Handmade Party Favors?
DIY resin jewelry party favors are one of those party-related projects that feel both creative and practical—you get a fun crafting session and a finished favor that looks polished, personal, and theme-ready. Start simple with one color and glitter, then level up to layered flowers, foil flakes, and custom initials as you gain confidence.
When you’re ready for more party decorations, handmade projects, and clever DIY crafts that make celebrations feel unforgettable, explore more creative ideas on smartpartyprep.com.
More Articles
 Advanced Cake Toppers for Crafters
 Budget DIY Slime Under $50
 DIY Thank You Cards with Dollar Store Supplies
 Easy Soap Bars for Beginners
 Is Thorne 3rd party tested? The truth about their lab verification — what independent testing reports *actually* show (and why most supplement brands won’t publish theirs)
 Modern Fabric Bunting Designs
 How Do You Make a Party Hat in Under 12 Minutes? 5 Foolproof Methods (No Glue Gun Needed) + Printable Templates & Pro Tips to Avoid Lopsided Crowns
 How to Make a Balloon Arch for a Birthday Party: 7 Foolproof Steps (No Glue Gun, No Experience, No Stress — Just Gorgeous Results in Under 90 Minutes)
 How to Allow Third Party Cookies in Safari (2024): The Only Step-by-Step Guide You’ll Need — No More 'Blocked' Warnings, Login Failures, or Broken Tools
 Is Triquetra Third Party Tested? What You *Really* Need to Know Before Buying Spiritual Jewelry or Craft Supplies — 5 Red Flags & 3 Verified Brands That Actually Do It