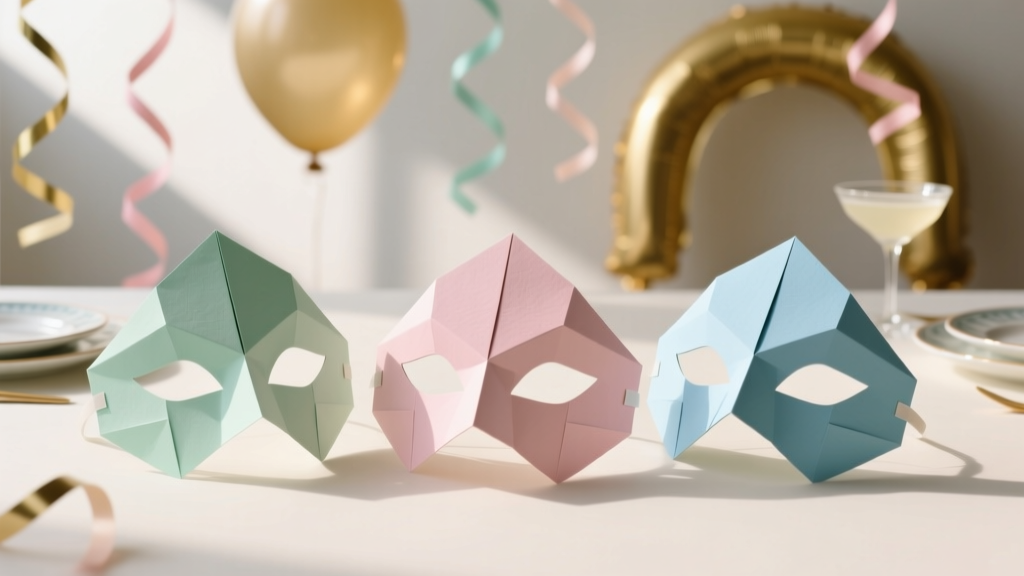
Easy Masks for Beginners
Handmade masks are one of those party DIY crafts that feel instantly festive—whether you’re planning a birthday bash, a masquerade-themed dinner, a classroom celebration, or a Halloween party. They’re quick to make, easy to personalize, and perfect for getting guests involved with a hands-on activity that doubles as party decor.
Even better: you don’t need fancy tools or expert crafting skills. With a few basic supplies, you can create comfortable, photo-ready masks that look polished. This guide keeps things beginner-friendly with clear measurements, simple techniques, and practical fixes for common hiccups.
Pick one style or set up a “mask-making station” at your next event. You’ll end up with a stack of unique, wearable party decorations—and a table full of happy makers.
Project Overview (Skill Level, Time, and Best Uses)
- Skill level: Beginner (kid-friendly with supervision); advanced variations included
- Time estimate per mask: 15–30 minutes (plus 15–60 minutes drying time depending on glue/paint)
- Best for: Masquerade parties, Mardi Gras, birthday parties, photo booth props, classroom crafts, Halloween, New Year’s Eve
- Wear time: 30–120 minutes comfortably (depending on strap choice and weight of embellishments)
Materials List (With Product Types and Estimated Costs)
Costs vary by brand and quantity, but these estimates help you plan a budget-friendly DIY craft setup.
Core Mask Base Options
- Cardstock (65–110 lb / 176–300 gsm) – great for sturdy paper masks: $5–$10 per pack
- Craft foam sheets (2 mm thickness) – comfy and flexible: $6–$12 for a multi-pack
- Paper plates (9 in / 23 cm) – easy for kid parties: $3–$6 for 50–100
- Plain DIY mask blanks (paper mache or plastic) – fastest start, great for groups: $1–$4 each (bulk packs cheaper)
Adhesives (Choose Based on Your Materials)
- Glue stick (paper-to-paper): $1–$3
- PVA/white craft glue (paper, light embellishments): $3–$7
- Low-temp hot glue gun + glue sticks (fast hold, heavier decor): $10–$20
- Double-sided tape (clean and quick for parties): $4–$8
Decor Supplies (Mix and Match)
- Acrylic craft paint (2 oz bottles): $1–$3 each
- Paint brushes (1/2 in flat + small round detail brush): $5–$12 set
- Glitter (fine glitter for smooth finish): $3–$8
- Sequins/rhinestones (self-adhesive or glue-on): $4–$12
- Feathers (assorted): $4–$10
- Ribbon (3/8 in or 1/2 in width): $3–$8
- Elastic cord (1/8 in / 3 mm): $4–$8
- Craft markers (metallics look great): $5–$15
Tools (Beginner-Friendly Recommendations)
- Scissors (sharp craft scissors; small detail scissors help): $5–$15
- Hole punch (single-hole is easiest): $6–$12
- Pencil + eraser: $1–$3
- Ruler (12 in / 30 cm): $1–$5
- Optional: craft knife + cutting mat (for crisp eye cutouts; adults only): $10–$25
Pick Your Mask Style
These three beginner-approved styles cover most party themes and materials. Choose one, or set up an assembly line and make a coordinated set for your party decorations.
Style 1: Classic Cardstock Eye Mask (Fastest + Customizable)
Great for: photo booth props, masquerade party favors, classroom crafts
Measurements (Fits Most Teens/Adults)
- Mask width: 7.5 in (19 cm)
- Mask height: 3 in (7.5 cm)
- Eye holes: 1.5 in (3.8 cm) wide x 1 in (2.5 cm) tall each
- Distance between eye holes: 0.75 in (2 cm) bridge
Step-by-Step Instructions
- Draw your mask shape. On cardstock, draw a 7.5 in x 3 in rounded rectangle. Add gentle curves on the top and bottom edges for a classic look.
- Mark eye holes. Draw two eye ovals (about 1.5 in x 1 in). Keep at least 0.5 in (1.3 cm) of cardstock around the edges so the mask stays sturdy.
- Cut out the mask. Cut the outer shape first with scissors. Then cut the eye holes:
- Beginner method: Fold the mask gently and snip a small slit inside each eye oval, then cut around your line.
- Crisp method (adult): Use a craft knife on a cutting mat.
- Add strap holes. Punch one hole on each side, about 0.5 in (1.3 cm) from the edge and centered vertically.
- Decorate. Paint, color with markers, or glue on paper shapes. Let paint dry 10–15 minutes before adding glitter or gems.
- Attach a strap.
- Elastic option: Cut 12–14 in (30–36 cm) of elastic. Thread through holes and tie knots; adjust for comfort.
- Ribbon option: Cut two 18 in (46 cm) ribbons. Tie one to each side hole for a tie-on mask (great for different head sizes).
Style 2: Comfy Craft Foam Mask (Flexible + Durable)
Great for: kids’ parties, longer wear, energetic games
Measurements
- Foam thickness: 2 mm is easiest to cut and wear
- Mask width: 7–8 in (18–20 cm)
- Mask height: 3–3.5 in (7.5–9 cm)
Step-by-Step Instructions
- Trace a template. Use the cardstock mask from Style 1 as a template. Trace onto foam with a pencil.
- Cut the foam. Cut the outer shape with scissors. Foam cuts best with long, smooth snips (avoid tiny jagged cuts).
- Cut eye holes. Fold gently and snip a small starter cut, then cut out the ovals.
- Shape for comfort (optional). Wrap the foam mask around a jar or cup (3–4 in / 7.5–10 cm diameter) for 1 minute to create a gentle curve.
- Decorate. Use acrylic paint, metallic markers, or foam stickers. If using hot glue, keep it low-temp to avoid melting.
- Add elastic. Punch or poke holes with scissors tip. Add 12–14 in (30–36 cm) elastic and knot.
Style 3: Paper Plate Animal Mask (Beginner + Party Cute)
Great for: themed birthdays (jungle, farm, woodland), classroom parties, playful DIY decorations
Step-by-Step Instructions
- Choose a plate. Use a 9 in (23 cm) paper plate for most kids; 10 in (25 cm) for adults.
- Create the face opening. Hold the plate to the face and lightly mark eye placement with a pencil (or measure roughly centered).
- Cut eye holes. Cut two ovals about 1.5 in (3.8 cm) wide x 1 in (2.5 cm) tall.
- Add animal features.
- Ears: Cut two triangles/ovals from cardstock or extra plate and glue to the top edge.
- Snout/beak: Fold cardstock into a cone or triangle and glue in the center.
- Whiskers: Use pipe cleaners or thin cardstock strips.
- Color and texture. Paint a base color, then add spots/stripes. Let dry 15–20 minutes.
- Add strap. Punch holes at the sides and tie elastic or ribbon as described above.
Pro Tips for Better-Looking, More Comfortable Masks
- Reinforce straps for cardstock masks: Add a small 1 in (2.5 cm) square of clear tape over each hole before punching. It prevents tearing during party wear.
- Keep embellishments lightweight: Too many gems can pull the mask down. Concentrate bling along the top edge and outer corners.
- Neat glitter method: Brush a thin layer of glue where you want sparkle, sprinkle glitter over a tray, then tap off excess. Seal with a light coat of clear-drying glue (or a craft sealer if you have one).
- Comfort hack: If the mask edge feels scratchy, add a thin strip of felt or washi tape along the inside top edge (forehead area).
- Photo-ready contrast: Pair a dark base (black/navy/purple) with metallic accents (gold/silver) for masks that pop in party photos.
Fun Variations (Beginner-Friendly and Advanced)
Beginner Variations
- Half-mask with a stick handle: Skip elastic and hot glue a wooden dowel or paper straw to one side. Great for photo booth props and avoids fit issues.
- Sticker-only decorating: Use foam stickers, star stickers, and self-adhesive gems—perfect for kids and fast party crafting.
- Color theme sets: Make 10 masks in two party colors (example: pink + gold) for a coordinated handmade party decoration vibe.
Advanced Variations
- Layered 3D look: Cut a second mask shape from a contrasting color, trim it smaller by 1/4 in (6 mm), and glue on top like a frame.
- Feather plume corner: Bundle 3–5 feathers and glue to one upper corner, then cover the base with a small ribbon bow or sequin cluster.
- Textured finishes: Add a thin layer of decoupage glue over tissue paper or lace for a fancy masquerade effect.
Troubleshooting (Quick Fixes That Save the Mask)
- Mask keeps slipping down: Shorten the elastic by 1–2 in (2.5–5 cm), or switch to ribbon ties for a more adjustable fit.
- Eye holes feel too small: Enlarge gradually—trim 1/8 in (3 mm) at a time so you don’t overcut.
- Cardstock bends or curls: Use heavier cardstock (110 lb/300 gsm) or glue two layers together. Let it dry flat under a book for 10 minutes.
- Glue makes paper wrinkle: Use a glue stick or double-sided tape for paper layering. If using white glue, apply a very thin coat with a brush.
- Paint looks streaky: Apply two thin coats instead of one thick coat. Let the first coat dry 10–15 minutes.
Common Crafting Mistakes to Avoid
- Cutting eye holes before testing placement: Hold the template up to your face (or a party volunteer) and lightly mark where eyes actually line up.
- Placing strap holes too close to the edge: Keep holes at least 1/2 in (1.3 cm) from the side edge to prevent tearing.
- Using high-temp hot glue on foam: It can melt or warp foam. Choose low-temp or use double-sided tape/foam-safe glue.
- Over-decorating the center area: Heavy decorations near the nose bridge can poke or make the mask tip forward. Keep bulk on the outer edges.
- Skipping drying time: If masks are stacked or worn too soon, glitter and paint transfer. Plan a drying zone (a table or clothesline with clothespins).
FAQ: Easy DIY Masks for Parties
1) What’s the easiest mask for total beginners?
A classic cardstock eye mask is the simplest: cut one shape, cut two eye holes, decorate, then add elastic or ribbon. It’s also the easiest to batch-make for party decorations and favors.
2) How do I size masks for kids vs. adults?
Use width as your main guide:
- Kids: 6.5–7 in (16.5–18 cm) wide
- Teens/Adults: 7.5–8 in (19–20 cm) wide
Ribbon ties are the most forgiving if you’re crafting for mixed ages.
3) What’s better: elastic or ribbon?
Elastic is quick and hands-free (great for kids running around). Ribbon is adjustable and often more comfortable for longer wear—plus it looks extra “masquerade” in photos.
4) How can I make masks look more “party fancy” without advanced skills?
Use a dark base color (black/navy/purple), add metallic accents (gold/silver marker), then finish with a simple gem line along the top edge. One feather cluster on a corner adds instant drama.
5) Are these masks okay for a mask-making party activity?
Yes—set out pre-cut bases and pre-punched strap holes to keep it smooth. Offer sticker packs, sequins, feathers, and markers. For younger groups, avoid tiny rhinestones (choking hazard) and use bigger foam stickers.
6) How far ahead can I make DIY masks for a party?
Cardstock and foam masks can be made 1–2 weeks ahead. Store them flat in a box with parchment paper between layers if you used glitter or paint, so your handmade projects stay crisp and clean.
Wrap-Up: Your Next Party Just Got More Creative
DIY masks are a fun way to add personality to your celebration—part craft, part costume, part party decoration. Start with a simple cardstock design, then level up with foam, feathers, and layered details once you feel confident. Make a few test masks, adjust sizing, and you’ll be ready to create a whole set that looks cohesive and handmade in the best way.
Want more beginner-friendly DIY crafts, party decorations, and creative handmade projects? Keep exploring fresh ideas on smartpartyprep.com and turn your next event into something unforgettable.
More Articles
 Budget DIY Slime Under $50
 DIY Custom Stickers Party Favors
 How to Unblock 3rd Party Cookies in 2024: A Step-by-Step Guide That Actually Works (No Tech Degree Required)
 No-Sew Scrapbook Pages Tutorial
 How to Make Embroidered Patches at Home
 How to Install 3rd Party Apps on Vizio Smart TV (Without Jailbreaking): A Step-by-Step Guide That Actually Works in 2024 — No Developer Mode Myths, No App Store Limits, Just Real Methods That Unlock Netflix Alternatives, Plex, and More
 DIY Thank You Cards with Dollar Store Supplies
 How to Make Paper Party Hats in Under 12 Minutes (No Glue Gun, No Scissors Required!) — 5 Foolproof Methods That Actually Hold Their Shape All Night
 How to Enable 3rd Party Cookies on iPad (2024): The Real Reason Safari Blocks Them & Exactly What You Lose If You Don’t Fix It in Under 90 Seconds
 Modern Table Runners Designs