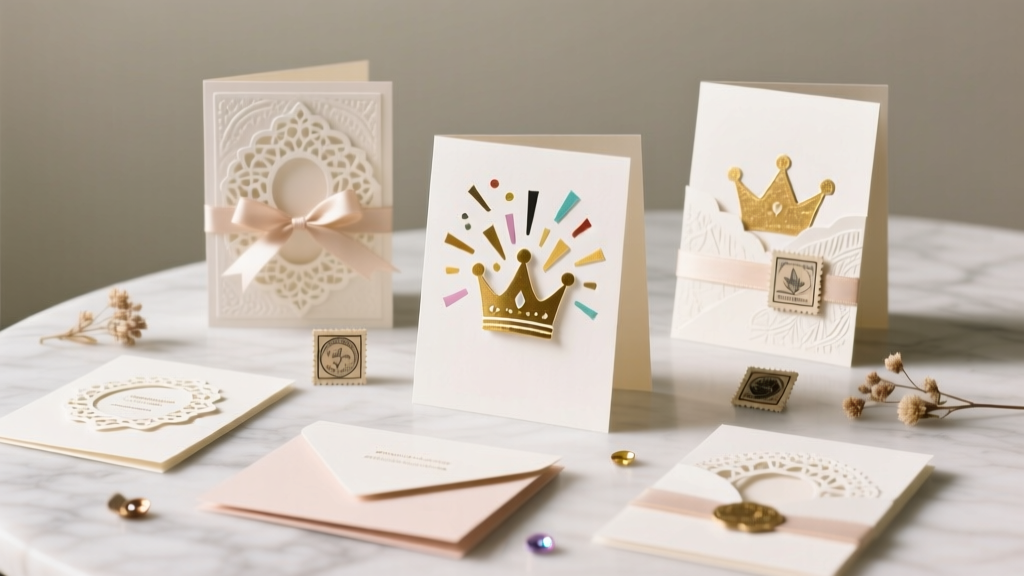
Advanced Greeting Cards for Crafters
Handmade greeting cards are one of those DIY crafts that feel instantly rewarding: you get to play with color, texture, and clever mechanics—then hand someone a tiny piece of art that doubles as a party keepsake. For birthdays, baby showers, graduation parties, and holiday gatherings, a custom card can match your theme, coordinate with your party decorations, and even become part of the table styling.
This project is especially fun for experienced makers because it’s the perfect place to try elevated techniques like shaker windows, layered die-cuts, interactive pop-ups, and heat-embossed details. You can go bold for a milestone birthday or elegant for a wedding shower—using the same core steps.
Below you’ll find multiple advanced greeting card builds with step-by-step instructions, plus pro tips, troubleshooting, and beginner-friendly adaptations so you can scale the complexity up or down. Expect crisp measurements, recommended tools, and practical tricks that keep your finished cards clean and professional-looking.
Project Overview (Skill Level, Time, Finished Size)
- Skill level: Intermediate to Advanced (beginner-friendly swaps included)
- Time estimate:
- 1 advanced card: 45–90 minutes
- Batch of 6: 3–5 hours (once materials are prepped)
- Finished card size (standard A2): 4.25 in x 5.5 in (fits A2 envelopes)
- Great for: Birthday parties, bridal showers, baby showers, graduation parties, holiday parties, thank-you notes after events
Materials and Tools (with Estimated Costs)
Costs vary by brand and whether you already own tools. These estimates are typical for craft stores and online retailers.
Paper and Adhesives
- 110 lb cardstock (A2 card bases or 8.5x11 sheets) – $6–$12 per pack
- Coordinating patterned paper (6x6 pad or 12x12 sheets) – $6–$20
- Acetate sheets (for shaker windows) – $5–$10
- Foam adhesive strips or foam tape (1/8 in thickness recommended) – $4–$8
- Strong double-sided tape (1/4 in or 1/2 in) – $5–$10
- Liquid glue (fine-tip, fast-grab) – $3–$7
Cutting, Scoring, and Measuring
- Paper trimmer (guillotine or rotary) – $15–$45
- Scoring board + bone folder – $10–$20
- Metal ruler (12 in) – $6–$12
- Precision craft knife + spare blades – $5–$12
Stamps, Ink, and Effects (Optional but Powerful)
- Clear stamps or cling stamps (sentiments, party icons) – $5–$18
- Pigment ink (for embossing) – $6–$10
- Dye ink pads (for blending) – $6–$10 each
- Embossing powder (white, gold, clear) – $5–$8
- Heat tool – $20–$35
Dies, Punches, and Specialty Add-ons
- Nested rectangle or circle dies (for windows and frames) – $10–$25
- Alphabet or word dies (e.g., “HAPPY,” “CHEERS”) – $12–$30
- Sequins/micro beads/confetti mix (shaker filling) – $4–$12
- Washi tape – $3–$10
- Ribbon (1/8 in to 3/8 in) – $3–$8
Tool Recommendations (Worth the Upgrade)
- Detail scissors for fussy-cutting – $8–$18
- Tweezers (reverse grip is great) – $5–$12
- Anti-static powder tool (for embossing) – $6–$10
- Corner rounder punch (optional) – $6–$15
Card Base Basics: Clean Cuts and Professional Scoring
Most advanced designs look “store-bought” because the foundation is crisp. Use these exact measurements for an A2 top-fold card.
Cut + Score (A2 Top-Fold)
- Cut cardstock: 8.5 in x 5.5 in.
- Score: at 4.25 in on the 8.5 in side.
- Fold: bring edges together carefully, then burnish with a bone folder.
Pro tip: For darker cardstock, score twice lightly instead of pressing hard once. This helps prevent cracking along the fold.
Advanced Build #1: Party-Themed Shaker Card (Confetti Window)
A shaker card is the ultimate party vibe: it literally contains confetti. This is a crowd-pleaser for birthdays, New Year’s, graduation parties, and kids’ celebrations.
Measurements
- Card base: 4.25 in x 5.5 in (A2)
- Front panel: 4.0 in x 5.25 in (keeps a clean border)
- Window opening: 2.5 in circle or 2.25 in x 3.25 in rectangle (centered)
- Acetate: about 3.25 in square (or 0.5 in larger than your window on all sides)
Step-by-Step Instructions
- Create the front panel: Cut your panel to 4.0 in x 5.25 in. If you want ink blending, do it now.
- Cut the shaker window: Die-cut or carefully cut a centered opening. Keep the cutout piece if you want to reuse it as an embellishment.
- Attach acetate: Flip the panel over. Tape acetate over the opening using strong double-sided tape. Make sure the tape fully seals the edges.
- Build the foam well: Add foam tape around the window on the back side.
- Butt foam edges tightly—no gaps.
- Use two layers of foam for chunky confetti.
- Add shaker filling: Sprinkle sequins/confetti onto the card base (not into the foam ring). Start small: about 1/2 teaspoon is plenty.
- Seal the shaker: Remove foam tape liners. Carefully align the window panel over the card base and press firmly to seal.
- Add sentiment: Heat emboss a party greeting (“Happy Birthday,” “Let’s Celebrate,” “Cheers”) on a strip: 0.75 in x 3.5 in. Pop it up with foam tape for dimension.
- Finish the details: Add a ribbon bow, a few gems, or a die-cut number for milestone birthdays.
Beginner-Friendly Adaptation
- Skip the window and make a faux shaker: glue sequins in a cluster behind a die-cut frame (no acetate).
- Use pre-made foam adhesive frames if you struggle with sealing.
Advanced Build #2: Layered Die-Cut “Statement” Card (Perfect for Party Decor Themes)
This style looks high-end because of the stacked layers and shadow effects. It’s easy to customize for party decorations—match the color palette of your banners, balloons, and tableware.
Measurements
- Mat layer (optional): 4.125 in x 5.375 in
- Main panel: 4.0 in x 5.25 in
- Sentiment strip: 0.75 in x 4.0 in
Step-by-Step Instructions
- Choose a focal word: “HAPPY,” “CHEERS,” “PARTY,” or a number (like “30”).
- Cut layers: Die-cut the word 4–6 times from heavyweight cardstock. Cut one more from metallic cardstock for the top layer.
- Stack for dimension: Glue layers precisely, aligning edges. Use tweezers for tight corners.
- Build the background:
- Add a subtle embossed pattern (dots, stars, confetti).
- Or create a color-block look with two rectangles of patterned paper.
- Add a shadow: Cut the same word once from vellum or a darker shade and offset behind the stack by 1–2 mm.
- Attach sentiment strip: Stamp a smaller phrase like “wishing you the best day ever” and tuck it under the word.
- Mount to card base: Use strong tape for flat layers and foam tape for the focal word.
Advanced Variation
- Add stitching around the panel edge (real or faux stitched dies).
- Use glitter cardstock as the top word layer and seal with a clear spray sealer to reduce shedding.
Advanced Build #3: Pop-Up “Surprise Inside” Card (Great for Party Invites and Thank-Yous)
This design adds a simple pop-up mechanism inside while keeping the front classy. It’s fantastic for party invitations, reveal moments (like ���It’s a Girl!”), or thank-you cards after a celebration.
Measurements
- Inside pop-up strip: 1 in x 4 in
- Score lines on strip: at 1 in and 3 in (creates a centered tab)
- Pop-up tab depth: 1 in (the middle section)
Step-by-Step Instructions
- Prepare the strip: Score at 1 in and 3 in. Fold into a “valley-mountain-valley” so the center section pops forward.
- Place on card interior: Open the card base flat. Put tape on the outer 1 in sections (the “wings”), not the center tab.
- Align and close: Position strip centered along the fold, about 1.25 in up from the bottom edge. Close the card to lock placement, then press firmly.
- Create the pop-up focal: Die-cut balloons, stars, a cake, or letters. Glue your focal to the center tab only.
- Decorate the front: Keep it simple so the surprise is inside—try an embossed sentiment and a small icon.
Beginner-Friendly Adaptation
- Skip the pop-up and instead add a fold-out message panel inside using washi tape as a hinge.
Pro Tips for Crisp, Durable Results
- Use the right adhesive for the job:
- Acetate + foam tape: strong double-sided tape
- Die-cut stacks: liquid glue (thin layer)
- Vellum: tiny dots of glue hidden behind other elements
- Prevent embossing specks: Use an anti-static powder tool before stamping with pigment ink.
- Keep shaker cards moving: Use less filler than you think; overfilling makes it clump.
- Make batches efficiently: Cut all panels first, then do all embossing, then assemble.
- Mail-friendly dimension: If you plan to mail cards, keep embellishments near the center and consider a padded envelope for chunky shakers.
Troubleshooting (Fixes for Common Problems)
- Shaker leaks sequins:
- Cause: foam tape seams have gaps.
- Fix: add a thin strip of tape over each seam, or double-layer foam and press firmly all around.
- Acetate looks cloudy:
- Cause: glue smears or static dust.
- Fix: use tape instead of liquid glue; wipe acetate with a microfiber cloth before sealing.
- Cardstock cracks on the fold:
- Cause: folding against the grain or too much pressure.
- Fix: rotate cardstock 90 degrees and test; score lightly twice, then burnish.
- Die-cut layers don’t align:
- Cause: glue grabs too fast or pieces shift.
- Fix: apply tiny dots of glue, align one end first, then “roll” the piece into place.
Creative Variations (Party-Perfect Themes)
- Kids’ party card: bright shaker confetti + balloon die-cuts + bold “YOU’RE INVITED” sentiment.
- Elegant bridal shower: vellum overlay + gold heat embossing + layered florals.
- Graduation party: school colors, die-cut year (“2026”), tiny star shaker bits.
- Holiday party: snow globe-style shaker, metallic frames, heat-embossed greetings.
- Table decor set: make matching place cards by resizing to 3.5 in x 4.875 in and using the same papers and sentiments.
Common Crafting Mistakes to Avoid
- Skipping a “dry fit” before gluing: Always place pieces without adhesive first—especially pop-ups and shaker panels.
- Using the wrong cardstock weight: Thin paper buckles with heavy embellishments. For advanced greeting cards, 100–110 lb cardstock is a dependable base.
- Over-inking stamped sentiments: It can blur small letters. Use a stamping platform if you have one for crisp impressions.
- Too much liquid glue: Warping happens fast. Use a fine-tip bottle and spread thinly.
- Not accounting for bulk: Shakers + stacked die-cuts can make cards thick. Plan envelopes accordingly.
FAQ: Advanced Handmade Greeting Cards
1) What’s the best card size for party invitations or thank-you cards?
A2 (4.25 in x 5.5 in) is the most versatile for handmade cards and easy to find envelopes for. For party invitations with more details, consider A7 (5 in x 7 in) if you want extra space for event info.
2) How do I keep shaker elements from sticking to the acetate?
Static can make confetti cling. Lightly rub the inside of the acetate with a dryer sheet before sealing, or use an anti-static powder tool around the window opening.
3) Can I make these cards without a die-cutting machine?
Yes. Use a craft knife + metal ruler for windows, and cut simple shapes with scissors or punches. For layered words, print a bold word from your computer, trace it onto cardstock, then cut and stack.
4) What adhesives work best for glitter cardstock and heavy embellishments?
Use strong double-sided tape for large flat areas and a fast-grab liquid glue for detailed die-cuts. For chunky pieces, foam tape or glue dots hold well—test first to make sure they don’t pop off textured glitter surfaces.
5) How can I make advanced cards more beginner-friendly?
Choose one “feature” per card (shaker or embossing or layered die-cuts). Keeping the rest of the design flat and simple helps you practice without getting overwhelmed.
Wrap-Up: Make a Card That Becomes Part of the Party
Advanced greeting cards are a fun way to level up your DIY crafts while creating something that feels personal, polished, and celebration-ready. Whether you go for a confetti shaker, a layered statement word, or an interactive pop-up, you’ll end up with a handmade project that fits right in with your party decorations and makes your recipient feel truly celebrated.
Try one design this week, then remix it with a new color palette for your next birthday party, shower, or holiday gathering. When you’re ready for more creative party crafts, decor ideas, and handmade projects, explore more tutorials on smartpartyprep.com.
More Articles
 Advanced Centerpieces for Crafters
 How to Draw Party Scenes in 7 Minutes (Even If You Can’t Draw a Stick Figure): A Step-by-Step Guide That Turns Doodles Into Delightful Decorations for Birthdays, Graduations & More
 DIY Thank You Cards with Dollar Store Supplies
 What Is 'A Party of Patches'? The Surprisingly Viral DIY Crafter’s Guide to Hosting a Low-Stress, High-Joy Fabric-Fueled Gathering That Builds Community (Not Just Quilts)
 What Is a Third Party Adapter? The Hidden Risks (and Real Savings) You’re Ignoring When Charging Your Laptop, Camera, or EV — Here’s How to Spot the Safe Ones in Under 60 Seconds
 How to Allow Third Party Cookies on Chrome in 2024: A Step-by-Step Guide That Actually Works (No More 'Blocked' Errors or Broken Logins)
 Kids' Craft: Wreaths
 How Do You Make Party Hats That Actually Stay On? (No Glue Gun, No Tears — Just 3 Foolproof Methods Using Stuff You Already Have)
 Kids' Craft: Vision Boards
 How to Draw the Boston Tea Party in Just 7 Simple Steps — No Art Degree Needed! (Beginner-Friendly Tutorial with Historical Accuracy & Printable Reference Sheets)