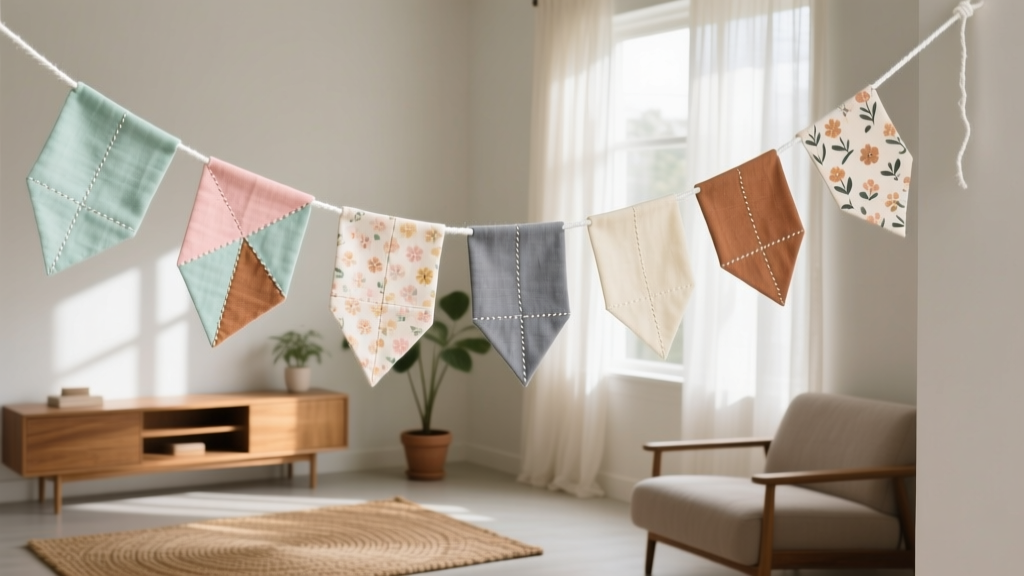
DIY Fabric Bunting for Home Decor
Few handmade decorations feel as instantly cheerful as bunting. It’s the kind of DIY craft that can turn an everyday wall, mantel, or bookshelf into a party-ready focal point—without needing a big budget or a ton of experience. Fabric bunting is especially satisfying because it’s reusable, durable, and endlessly customizable. Make it once, then bring it out for birthdays, baby showers, seasonal celebrations, or just to give your home a cozy, curated vibe.
This project is also wonderfully flexible: you can sew it, use fusible web, or even make a no-sew version with fabric glue. Whether you love crisp modern triangles, sweet scallops, or boho fringe, fabric bunting adapts to your style. You’ll end up with a handmade decoration that looks boutique-level, but is totally doable at your kitchen table.
Ready to craft a piece that works as both home decor and party decoration? Let’s make bunting you’ll be excited to hang again and again.
Project Overview: Skill Level, Time, and Finished Size
- Skill level: Beginner (no-sew or basic sewing) to Intermediate (lined flags, bias tape binding, decorative trims)
- Estimated time:
- No-sew: 45–90 minutes
- Sewing machine: 60–120 minutes
- Lined + embellished: 2–3 hours
- Typical finished length: 6–10 ft (adjustable)
- Recommended flag size for home decor: 6 in wide x 7 in tall (triangle), with 1/4 in seam allowance if sewing
- Spacing: Flags can touch edge-to-edge for a full look, or leave 1/2–1 in gaps for an airy feel
Materials and Tools (With Estimated Costs)
Fabric and Notions
- Cotton quilting fabric (fat quarters or 1/4 yard cuts): 3–6 pieces for a mixed look (approx. $2–$5 each)
- Accent fabric options:
- Canvas or denim for rustic bunting
- Linen blend for a soft, elevated texture
- Felt for a no-fray, beginner-friendly option
- Binding/tie material (choose one):
- Pre-made double-fold bias tape (1/2 in): $3–$6 per 3–5 yd package
- Cotton twill tape (1/2–1 in): $4–$10 per roll
- Ribbon (3/8–7/8 in): $3–$12 depending on quality
- Thread: All-purpose polyester thread (approx. $3–$5)
- Optional fusible web (for no-sew or crisp edges): $5–$12
- Optional trims: Pom-pom trim, rickrack, lace, tassels ($4–$10)
Tools
- Fabric scissors: Sharp shears for clean edges ($10–$25)
- Rotary cutter + self-healing mat + quilting ruler (optional but amazing): $30–$70 total
- Sewing machine: Any basic machine works (optional for no-sew)
- Iron + ironing board: Helps everything look polished
- Pins or sewing clips: Clips are great for bias tape ($3–$10)
- Measuring tape or ruler: For consistent flag sizing
- Marking tool: Chalk pencil or washable fabric marker ($3–$8)
Estimated Total Cost
- Budget bunting (scrap fabric + twine): $5–$15
- Mid-range (new fabric + bias tape): $20–$45
- Premium (linen/canvas + trims + lined flags): $40–$80
Design Planning: Choose Your Style and Measurements
Pick a Flag Shape
- Classic triangle: Fastest to cut and sew; works for almost any party decor.
- Swallowtail (notched “V”): Slightly more advanced; adds a playful banner vibe.
- Rectangle or pennant: Great for minimalist or modern home decor.
- Scalloped bottom: Sweet for baby showers, tea parties, and kids’ rooms.
Recommended Measurements (Easy + Balanced)
- Triangle template: 6 in wide x 7 in tall
- Cut size if sewing two layers: Add 1/4 in seam allowance around edges (so cut about 6.5 in x 7.5 in before trimming, or trace with allowance)
- Number of flags for a 6 ft bunting: 10–14 flags depending on spacing
- Extra tie length: Add 12–18 in at each end for hanging
Step-by-Step: How to Make Fabric Bunting (Sewing Machine Method)
Step 1: Make a Sturdy Template
- Draw a triangle on cardstock: 6 in wide at the top and 7 in tall.
- Cut it out neatly. A clean template keeps every flag consistent.
- If sewing two layers, either:
- Make a second template with 1/4 in seam allowance, or
- Trace the main template and add seam allowance as you cut.
Step 2: Cut Your Fabric Flags
- Iron your fabric first (wrinkles cause wonky cutting).
- Trace your template on the wrong side of the fabric.
- For double-sided bunting (recommended): cut two triangles per flag (front and back).
- For a quicker version: cut one triangle per flag and plan to hem or use pinking shears.
Step 3: Sew the Flags
- Place two triangles right sides together.
- Sew down the two long sides and the bottom edge using a 1/4 in seam allowance. Leave the top open.
- Trim the point carefully (don’t cut the stitching).
- Turn right side out and use a chopstick or turning tool to gently shape the point.
- Press flat with an iron for crisp edges.
Step 4: Prep Your Binding (Bias Tape or Twill Tape)
- Cut binding to your desired length: bunting length + 24–36 in extra for ties.
- If using double-fold bias tape, open it slightly and press if it feels springy.
- Mark placement points for flags with pins or small pencil marks so spacing stays consistent.
Step 5: Attach Flags to the Binding
- Slide each flag’s top edge into the fold of the bias tape (or line up under twill tape).
- Clip or pin in place.
- Sew along the entire length of the binding, catching the flags as you go. Aim for a neat topstitch about 1/8 in from the edge.
- At each end, fold the tape inward for a clean finish and stitch. You can also angle the ends into a point for prettier ties.
Step 6: Hang and Adjust
- Test-hang with painter’s tape first if you’re placing it on a wall.
- For mantels and shelves, try draping with a gentle curve for a relaxed, styled look.
No-Sew Fabric Bunting (Beginner-Friendly Adaptation)
If you don’t have a sewing machine, you can still make gorgeous fabric bunting that works as party decor and everyday home decor.
- Choose felt (best no-fray option) or cotton fabric with pinking shears to reduce fraying.
- Cut triangles: 6 in wide x 7 in tall.
- Fold the top edge over a piece of twine, ribbon, or twill tape by about 1 in.
- Secure with fabric glue or strong craft glue. Clamp with clothespins and let dry fully (usually 1–2 hours).
- Optional: add fusible web to create crisp double-layer flags without stitching—iron according to package directions.
Pro Tips for Polished, Party-Ready Results
- Press every step: Ironing after turning flags makes bunting look store-bought.
- Chain sew: If making many flags, sew them assembly-line style to save time.
- Use clips for bias tape: Clips keep layers aligned better than pins, especially on thick fabric.
- Stabilize slippery fabric: Lightly starch cotton or use a walking foot if your layers shift.
- Even spacing trick: Decide on a consistent gap (like 1/2 in), then use a small piece of cardboard as a spacer.
- Make it reversible: Use two coordinating fabrics per flag so your handmade decoration works year-round.
Creative Variations (From Simple to Advanced)
Easy Variations
- Monochrome bunting: All neutrals (cream, tan, black) for modern home decor.
- Seasonal sets: Make interchangeable strands for holidays—fall plaids, winter whites, spring florals.
- Mini bunting: 3 in x 4 in flags for dessert tables, bar carts, or party backdrops.
Intermediate Upgrades
- Appliqué letters: Spell out “HAPPY BIRTHDAY” or a name with iron-on vinyl or sewn appliqué.
- Decorative topstitching: Use contrast thread, a longer stitch length (3.0–3.5), or a zigzag edge.
- Trim accents: Add pom-pom trim along the bottom of each flag for instant party energy.
Advanced Variations
- Lined + interfaced flags: Add lightweight fusible interfacing for extra structure (great for photography backdrops).
- Quilted patchwork flags: Piece scraps together, then cut triangles—perfect for memory bunting.
- Scalloped edges: Sew curves carefully, clip seam allowances, then turn for a smooth finish.
Troubleshooting: Fix Common Issues Fast
- My triangles look uneven: Re-check your template and cut stacks of fabric with a rotary cutter and ruler for consistency.
- Flags are puckering: Press seam allowances, reduce stitch tension slightly, and avoid pulling fabric as you sew.
- Bias tape is twisting: Clip more often and sew slowly around flag tops; press the tape first.
- Fabric is fraying: Use pinking shears, apply fray check, choose felt, or make double-sided flags with seams enclosed.
- Bunting sags too much: Use twill tape (less stretchy than ribbon), or shorten the span and add a center hook point.
Common Crafting Mistakes to Avoid
- Skipping the iron: Wrinkles lead to inaccurate cutting and a homemade (not handmade) look.
- Using flimsy binding: Very thin ribbon can curl and droop—twill tape or bias tape holds shape better.
- Not leaving tie length: Always add 12–18 in at each end so you can knot or bow it easily.
- Overcrowding the flags: If the banner feels bulky, add small gaps or reduce the number of flags.
- Choosing fabric that’s too thick for tight points: Heavy canvas can be tricky to turn—trim seam allowances and use a turning tool gently.
- Rushing glue dry time (no-sew): Let it cure completely before hanging, especially for party decorations that might be bumped.
FAQ: DIY Fabric Bunting for Home Decor and Parties
How many flags do I need for a 10-foot bunting?
For 6 in wide flags, plan on 18–24 flags depending on whether they touch or you leave 1/2–1 in spacing. Add extra length for ties on both ends.
What fabric is best for beginner bunting?
Quilting cotton is the easiest to cut and sew, and it presses beautifully. If you want a no-fray, no-sew option, felt is the most beginner-friendly.
Can I wash fabric bunting?
Yes—if you prewash your fabric first and use quality thread. To be safe, hand wash or use a gentle cycle and air dry. Iron lightly afterward to keep it crisp.
What’s the easiest way to hang bunting without damaging walls?
Try painter’s tape for a quick test placement, then use removable hooks or museum putty for a cleaner finish. For party backdrops, binder clips on a curtain rod also work well.
How do I make bunting look more “high-end”?
Press everything, use double-sided flags, choose a cohesive color palette, and topstitch the binding neatly. Adding a subtle trim (like pom-poms or rickrack) can elevate the whole strand fast.
Can I make this project with scraps?
Absolutely. Scrap-busting bunting is one of the most satisfying DIY crafts. Keep the flags the same size and repeat colors to make the mix feel intentional.
Wrap-Up: Your New Favorite Handmade Decoration
Fabric bunting is one of those party-related projects that pays you back every time you hang it. It’s practical (reusable and easy to store), creative (endless colors and shapes), and beginner-friendly (you can sew or go no-sew). Make a classic strand for everyday home decor, then build a small collection for birthdays, holidays, and last-minute celebrations.
Pick a color palette you love, start with a simple triangle template, and give yourself permission to keep it playful. Handmade projects like this are all about creating a warm, welcoming space—one flag at a time.
Want more DIY crafts and party decorations? Explore more creative, budget-friendly ideas on smartpartyprep.com.
More Articles
 Easy Balloon Arches for Beginners
 Budget DIY Origami Decorations Under $15
 DIY Crowns in An Afternoon
 Advanced Custom Stickers for Crafters
 Personalized Tie-Dye Shirts Gifts
 DIY Paper Lanterns with Dollar Store Supplies
 How to Unblock 3rd Party Cookies in 2024: A Step-by-Step Guide That Actually Works (No Tech Degree Required)
 How to Make Clay Ornaments at Home
 DIY Dream Catchers with Dollar Store Supplies
 How Do You Make a Party Hat Out of Paper in Under 10 Minutes? (No Glue Gun, No Scissors Required — Just 3 Sheets & 1 Stapler)