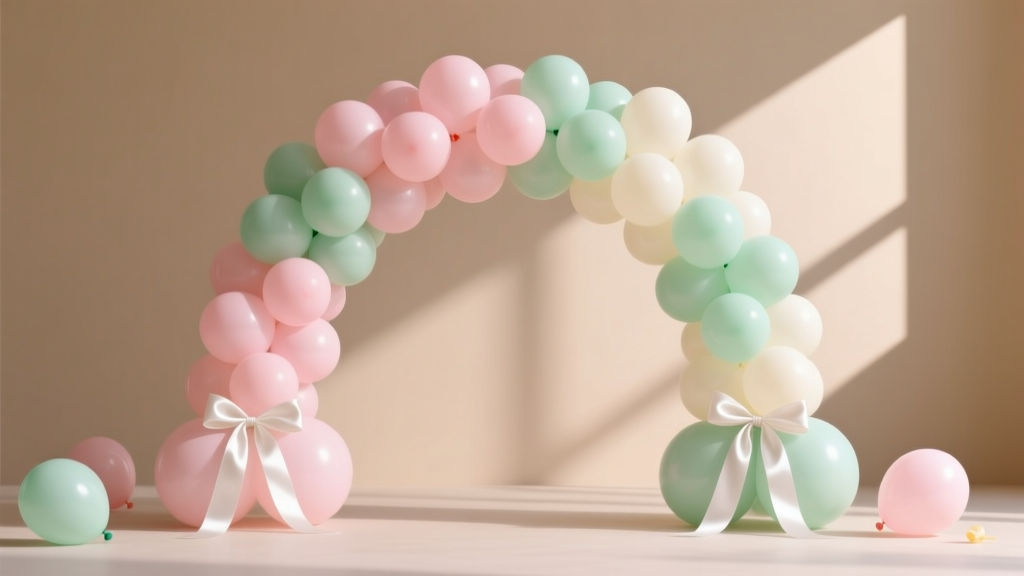
Easy Balloon Arches for Beginners
There’s something instantly joyful about walking into a party and seeing a balloon arch framing the room like a burst of celebration. Balloon arches look high-end, photograph beautifully, and (best of all) they’re completely doable as a DIY crafts project—even if you’ve never made party decorations before.
This is one of those handmade party decorations that gives a huge “wow” factor for the time and cost. You can build a classic balloon garland arch for birthdays, baby showers, graduations, weddings, holiday gatherings, or even a cozy movie night backdrop. Once you learn the basic method, you’ll be able to customize colors, sizes, and shapes for any theme.
Below you’ll find a beginner-friendly, step-by-step method with measurements, time estimates, pro tips, and easy variations—plus troubleshooting and common mistakes to avoid so your arch looks polished (not wobbly).
Skill Level, Time, and What You’re Making
- Skill level: Beginner (no crafting experience needed)
- Hands-on time: 45–90 minutes (depending on size and how fast you inflate)
- Total time including setup: 1.5–2.5 hours
- Best for: DIY party decorations, photo backdrops, dessert tables, entryways
- Finished size (typical): 6–8 ft long balloon garland (fits most party backdrops)
Materials List (Beginner-Friendly) + Estimated Costs
These are standard craft supplies for balloon garland arches. Prices vary by brand and location, but the estimates below are realistic for most party prep budgets.
Balloons (Core Supply)
- Latex balloons (best quality: thick, matte “decorator” balloons)
- 60–80 balloons for a 6 ft garland
- 90–120 balloons for an 8 ft garland
- Recommended sizes mix: 5" (mini), 10–12" (standard), 18" (statement)
- Estimated cost: $12–$30 (depending on size mix and brand)
- Optional specialty balloons (confetti, chrome, pearl, or printed)
- Estimated cost: $5–$15
Assembly Supplies
- Balloon decorating strip (plastic garland tape, 16–25 ft roll)
- Estimated cost: $4–$8
- Balloon pump (hand pump is fine; electric saves major time)
- Hand pump: $6–$12
- Electric pump: $18–$35
- Glue dots (balloon glue or removable glue dots)
- Estimated cost: $4–$7
- Fishing line or balloon string (for extra support)
- Estimated cost: $3–$6
Hanging/Anchoring Supplies (Pick Based on Your Setup)
- Command hooks (large, removable) OR painter’s tape for temporary support
- Estimated cost: $6–$12
- Backdrop stand (optional but very beginner-friendly)
- Estimated cost: $25–$60
- Balloon arch stand kit (optional alternative to hooks)
- Estimated cost: $15–$35
- Weights (hand weights, water jugs, or sandbags if using a stand)
- Estimated cost: $0–$15
Tools You’ll Be Glad You Have
- Balloon sizing tool (or a DIY sizer: a piece of cardboard with a 10" and 12" circle cut out)
- Scissors (for cutting strip and tape)
- Measuring tape (to plan placement and length)
- Step stool (for mounting higher on a wall or stand)
Plan Your Balloon Arch: Colors, Size, and Placement
Choose a Color Recipe (Easy Beginner Formula)
A simple balloon garland looks fuller when you use 3–5 colors in different amounts:
- Base color (50%) – your main shade
- Secondary color (25%) – complements the base
- Accent color (15%) – adds contrast
- Neutral (10%) – white, cream, or transparent for “breathing room”
- Optional pop (a few balloons) – metallic, chrome, or confetti
Pick a Size That Fits Your Space
- Tabletop mini garland: 3–4 ft (great for dessert tables)
- Standard party arch/garland: 6–8 ft (most common for photos)
- Fuller backdrop frame: 10–12 ft (for large walls or stands)
Beginner tip: If you’re unsure, choose 7 ft. It’s long enough to look impressive and short enough to build without feeling overwhelming.
Step-by-Step: How to Make an Easy Balloon Arch (Garland Style)
Step 1: Set Up Your Work Zone (5–10 minutes)
- Clear a floor area about 6 ft x 6 ft so balloons don’t snag on sharp corners.
- Lay out balloons by color so you can mix evenly as you go.
- Decide where the arch will go:
- On a wall: plan hook points first.
- On a backdrop stand: confirm the stand is weighted.
Step 2: Inflate Balloons in Mixed Sizes (25–45 minutes)
Most beginner arches look “off” because everything is the same size. A mix of sizes creates that professional, organic look.
- Inflate your standard balloons to about 10–11 inches for a soft, round shape (not stretched).
- Inflate some balloons slightly smaller (8–9 inches) to fill gaps later.
- Inflate mini balloons (5 inches) and set aside for finishing.
- Tie knots tightly and keep the necks short to reduce sagging.
Time-saver: An electric balloon pump can cut inflation time in half, especially for 80+ balloons.
Step 3: Create Balloon Clusters (Quads) (10–20 minutes)
- Tie two balloons together to form a pair.
- Tie two more balloons together.
- Twist the pairs around each other to form a cluster of four (a “quad”).
- Repeat until you have enough quads:
- 6 ft garland: about 14–18 quads
- 8 ft garland: about 20–26 quads
Beginner-friendly alternative: You can skip quads and attach single balloons directly to the decorating strip. Quads just make the build faster and fuller.
Step 4: Attach Balloons to the Decorating Strip (15–25 minutes)
- Cut a balloon decorating strip to your desired length:
- For a 6 ft finished garland, cut 7–8 ft strip (extra helps with hanging and shaping).
- For an 8 ft finished garland, cut 9–10 ft strip.
- Slide balloon knots into the holes of the strip, alternating colors as you go.
- Keep rotating the balloons so they point in different directions for a full look.
- Step back every few minutes to check color balance and spacing.
Step 5: Hang and Shape the Arch (10–20 minutes)
The magic happens when you mount it and “fluff” it into an arch shape.
- Wall method:
- Place 2–3 strong removable hooks (or painter’s tape loops for very short garlands).
- Hook the strip ends first, then add a middle support point if needed.
- Backdrop stand method:
- Use zip ties, string, or fishing line to secure the strip to the top bar.
- Weight both feet of the stand with water jugs or sandbags.
- Gently twist and nudge balloons to fill thin spots and create a smooth curve.
Step 6: Fill Gaps with Mini Balloons (5–15 minutes)
- Inflate mini balloons (5") and a few smaller 8–9" balloons.
- Add glue dots to the balloon knot area.
- Press into gaps where you see the strip or the arch looks uneven.
Goal: No “bald spots,” no visible strip from the front, and a pleasing mix of sizes.
Pro Tips for a Full, Professional Look
- Underinflate slightly for rounder balloons and fewer pops.
- Use matte balloons for a modern, high-end DIY party decoration style (chrome works best as an accent).
- Build the garland longer than you think—you can always compress it for a fuller look.
- Support points prevent sagging: add a middle hook or tie point for garlands over 7 ft.
- Keep minis for the end: they’re your “patch kit” for hiding gaps and refining shape.
- Photograph test: snap a quick photo from where guests will stand; it reveals thin spots you don’t notice in person.
Beginner Variations (Easy Wins) + Advanced Upgrades
Beginner-Friendly Adaptations
- Half arch (asymmetrical garland): attach to one side of a backdrop stand for a trendy look with fewer balloons.
- Mini tabletop garland: 3–4 ft, taped to the front of a table or hung above a dessert spread.
- Two-tone ombré: blend light-to-dark shades of the same color family.
Advanced Variations (When You’re Ready)
- Add florals: tuck faux flowers or greenery into the strip using floral wire (avoid real flowers that wilt).
- Organic “wild” sizing: incorporate more 18" balloons and vary sizes dramatically for a luxe effect.
- Frame an entire backdrop: build two garlands (left and right) and connect at the top for a full balloon arch frame.
Troubleshooting: Fix Common Balloon Arch Problems
My arch is sagging in the middle
- Add a third support point (middle hook or tie to stand).
- Run a strand of fishing line through sections of the garland and pull gently upward.
- Reduce weight by removing a couple of 18" balloons or spreading them out.
I can see the decorating strip
- Rotate balloons so they face forward and cover the strip.
- Add 5" mini balloons with glue dots where the strip peeks through.
- Compress the garland slightly for a denser look.
Balloons are popping while I work
- Underinflate slightly and keep balloons away from sharp surfaces.
- If it’s hot, build in a cooler room and avoid direct sunlight.
- Use better-quality latex balloons; thin balloons pop more easily.
Colors look random instead of balanced
- Step back and identify clumps of the same color; swap a few balloons around.
- Use your base color as the “glue” that connects sections visually.
- Add a neutral (white/cream) to soften strong contrasts.
Common Crafting Mistakes to Avoid
- Making every balloon the same size: your arch will look flat and grid-like. Mix sizes for a professional balloon garland style.
- Overinflating: balloons become pear-shaped and pop more easily.
- Not buying enough balloons: you’ll end up with thin spots. Always grab an extra 10–20 balloons.
- Skipping a plan for hanging: know your mounting method before you start inflating.
- Relying on weak tape for heavy garlands: use hooks, a stand, or multiple support points.
- Building too early in hot conditions: heat and sun shorten balloon life. Assemble the day of (or the night before indoors).
FAQ: Easy Balloon Arches for Beginners
How many balloons do I need for a balloon arch?
For a classic DIY balloon garland arch, plan 60–80 balloons for 6 ft and 90–120 balloons for 8 ft. Using multiple sizes makes it look fuller without needing as many standard balloons.
Can I make a balloon arch the night before?
Yes. Build it the night before and keep it indoors away from heat, sun, and pets. Latex balloons typically look best within 24 hours, though quality balloons can last longer.
Do I need helium?
No—most balloon arches and balloon garlands are made with air-filled latex balloons. Helium is expensive, doesn’t last as long, and isn’t needed for this style of party decoration.
What’s the easiest way to hang a balloon garland on a wall?
Use removable Command hooks plus balloon strip. Hang both ends first, then add a support hook in the middle if the garland is longer than 6–7 ft.
How do I keep balloons from popping outside?
Outdoor balloon arches are tricky. Keep the arch in the shade, avoid peak heat, and inflate slightly under size. If possible, assemble outside close to party time and use thicker, high-quality balloons.
Can I reuse a balloon arch?
You can sometimes reuse the decorating strip, hooks, and stand, but the balloons themselves usually won’t survive deflating and reinflating neatly. For reusable party decor, consider mixing balloons with reusable faux greenery or signage.
Wrap-Up: Your First Balloon Arch Can Look Amazing
A balloon arch is one of the most satisfying DIY crafts you can make for a celebration: quick learning curve, big visual payoff, and endless ways to personalize. Start with a simple 6–8 ft garland, focus on mixing balloon sizes, and use mini balloons at the end to polish everything up. By your second arch, you’ll feel like you’ve unlocked a whole new level of handmade party decorations.
Want more beginner-friendly party decorations and creative handmade projects? Explore more DIY craft ideas on smartpartyprep.com and keep building your celebration skills—one fun project at a time.
More Articles
 What Is the Cocktail Party Effect Psychology? The Surprising Truth About How Your Brain Filters Noise — And Why You Miss Critical Signals (Even When You're 'Listening')
 No-Sew Scrapbook Pages Tutorial
 How to Make T-Shirts at Home
 DIY Crowns in An Afternoon
 Paper Craft Soap Bars Ideas
 Rustic Cake Toppers Ideas
 Budget DIY Place Cards Under $50
 Upcycled Backdrops from Recycled Materials
 Budget DIY Painted Rocks Under $15
 How to Remove a Pokemon from Your Party in Cobblemon: The 3-Step Method That Actually Works (No Crashes, No Lost Data, and Zero Mod Conflicts)