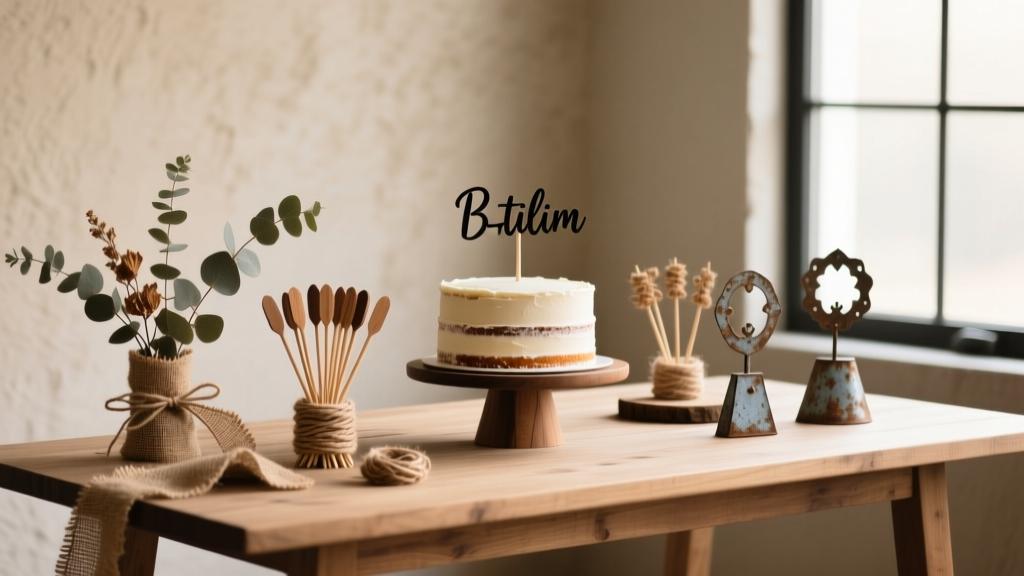
Rustic Cake Toppers Ideas
Rustic cake toppers are one of those party decorations that feel “extra special” without requiring fancy equipment or a big budget. They instantly add charm to birthdays, baby showers, weddings, anniversaries, and backyard celebrations—and they’re small enough to make in an evening. If you love DIY crafts, this is a satisfying handmade project because you can personalize every detail: names, dates, tiny florals, natural textures, and even the wood grain.
Another reason these toppers are so fun: they’re practical. A well-made cake topper becomes a keepsake, a photo prop, and a centerpiece all in one. Plus, many rustic styles pair beautifully with semi-naked cakes, buttercream swirls, fruit toppings, and simple sheet cakes—so you can dress up a store-bought cake just as easily as a homemade one.
Below you’ll find beginner-friendly rustic cake topper ideas and a few advanced variations, along with materials, estimated costs, step-by-step instructions, troubleshooting, and pro tips. Choose one design or mix-and-match to create your own signature look.
Quick Project Overview
- Skill level: Beginner to Intermediate (with optional Advanced upgrades)
- Time needed: 30 minutes to 2.5 hours (plus drying time for glue/paint)
- Best for: Weddings, birthdays, baby showers, engagement parties, anniversary cakes, rustic-themed parties
- DIY craft keywords: handmade cake topper, rustic party decorations, DIY party decor, cake topper ideas, handmade wedding topper
Materials List (with Estimated Costs)
Most rustic cake topper projects use a small set of repeat supplies. Pick what matches your chosen style.
Core Supplies (Choose What You Need)
- Wooden skewers (12-inch) or bamboo dowels (1/8 inch x 12 inch): $2–$6 per pack
- Food-safe barrier: clear drinking straws or food-safe floral picks to sleeve the sticks (pack): $2–$5
- Hot glue gun + glue sticks: $8–$20 (or use craft glue for slower setting)
- Craft scissors: $5–$15
- Craft knife (X-Acto style) + cutting mat: $10–$25
- Ruler + pencil: $2–$5
Rustic Texture & Design Materials
- Natural jute twine (1–2 mm): $3–$8
- Burlap ribbon (2–4 inch wide) or burlap fabric: $4–$12
- Kraft cardstock (65–110 lb): $5–$12
- Wood veneer sheets or thin basswood sheets: $6–$18
- Mini wooden shapes (hearts, stars, circles): $3–$10
- Dried florals (baby’s breath, lavender, bunny tails) or faux greenery picks: $6–$18
- Mini clothespins (optional): $2–$5
Finishing Supplies
- Acrylic paint (white, black, sage, terracotta): $1–$3 per bottle
- Paintbrush set (small detail + flat brush): $5–$12
- Fine-tip permanent marker or paint pen: $2–$6
- Clear matte sealer spray (optional): $6–$12
- Sandpaper (220 grit): $3–$6
Tool Recommendations (Nice-to-Have)
- Mini hole punch (1/8 inch): great for bunting and tags ($6–$12)
- Small pliers/wire cutters: for floral wire ($6–$15)
- Letter stencils: for clean typography ($4–$12)
Rustic Cake Topper Ideas (Pick Your Style)
1) Rustic Bunting Cake Topper (Classic & Beginner-Friendly)
This is the go-to DIY cake topper for rustic party decorations: a tiny banner strung between two sticks. It’s lightweight, budget-friendly, and easy to personalize.
- Time: 35–60 minutes
- Skill level: Beginner
- Best look: kraft paper + twine + simple lettering
2) Wood Slice Monogram Topper (Keepsake-Style)
Wood slices instantly read “rustic.” Add initials, a date, or a short phrase like “Mr & Mrs.”
- Time: 60–90 minutes
- Skill level: Beginner to Intermediate
- Best look: light sanding + white paint pen lettering
3) Dried Floral Cluster Topper (Soft, Natural, Romantic)
A small floral spray attached to a pick looks gorgeous on semi-naked and buttercream cakes. Choose dried elements for a true rustic vibe.
- Time: 45–75 minutes
- Skill level: Intermediate
- Best look: baby’s breath + lavender + muted ribbon
4) “Naked Wood” Script Word Topper (Advanced Upgrade)
If you have wood veneer or basswood, you can create a clean script word topper with a rustic material. It’s a showstopper for weddings and milestone birthdays.
- Time: 1.5–2.5 hours
- Skill level: Advanced (or Intermediate with patience)
- Best look: natural wood + minimal greenery
Step-by-Step: Rustic Bunting Cake Topper
This is the perfect first handmade cake topper. It packs a big visual impact with simple supplies.
Measurements & Cutting Guide
- Banner width: 6–7 inches total span
- Flag size: 1.25 inch wide x 1.5 inch tall (cut 7–9 flags)
- Stick height: 8–10 inches (trim skewers if needed)
- String length: 10–12 inches (gives slack for a gentle curve)
Instructions
- Cut your flags. Use kraft cardstock or burlap ribbon backed with cardstock. Cut 7–9 rectangles (1.25 x 1.5 inches), then snip a small “V” notch at the bottom of each to create pennants.
- Punch holes or fold tabs.
- Option A (hole punch): Punch 1/8-inch holes near the top corners of each flag.
- Option B (fold-over): Fold the top 1/4 inch over the twine and glue it down.
- Letter your message. Write “HAPPY BDAY,” initials, “LOVE,” or a name using a fine-tip marker or paint pen. Keep letters about 3/4 inch tall for readability.
- String the banner. Thread flags onto twine in your desired order. Leave 2–3 inches of twine at each end for tying.
- Prepare the sticks. Use two skewers or dowels. Wrap the top 2 inches with twine for texture (optional) and secure with a tiny dab of hot glue.
- Attach the banner. Tie each end of the twine to the sticks. Adjust the curve so the center dips about 1–1.5 inches lower than the ends for a soft, rustic drape.
- Add a rustic detail. Glue a mini faux leaf sprig, a tiny bow of linen ribbon, or a small wooden heart near the top of one stick.
- Make it food-safe. Slide a clear straw over the bottom 3–4 inches of each stick (the part that touches cake). Trim straws if needed.
Step-by-Step: Wood Slice Monogram Topper
This topper doubles as a keepsake—especially for weddings, engagement parties, and anniversaries.
Measurements
- Wood slice size: 2–3 inches diameter, about 1/4 inch thick
- Stick length: 6–8 inches inserted depth; overall 10–12 inches is easy to handle
Instructions
- Sand the surface. Lightly sand the front and edges with 220-grit sandpaper for a smoother writing surface.
- Plan your lettering. Pencil initials or a short phrase in the center. Keep at least 1/4 inch margin from the bark edge.
- Add lettering. Use a paint pen (white looks crisp) or a fine brush with acrylic paint. Let dry 10–15 minutes.
- Attach the stick. Hot glue a skewer or dowel to the back. For extra strength, glue a second skewer alongside the first (parallel), about 1/2 inch apart.
- Optional seal. Lightly spray with a matte sealer (especially if you’ll store it). Let cure per label directions.
- Food-safe barrier. Add a straw sleeve or floral pick to cover the portion that goes into the cake.
Step-by-Step: Dried Floral Cluster Topper
Great for rustic party decor that feels elevated and natural.
What You’ll Need (in addition to core supplies)
- Dried florals (choose 3 types): one airy (baby’s breath), one spiky (lavender), one soft (bunny tails)
- Floral tape or thin floral wire
- Ribbon (linen or cotton, 3/8 inch to 5/8 inch wide)
Instructions
- Build a small bundle. Cut stems to 4–6 inches. Arrange into a mini bouquet about 3–4 inches wide.
- Secure the stems. Wrap tightly with floral tape or wire 1 inch above the cut ends.
- Attach to a stick. Place the bundle against a skewer/dowel and wrap again with floral tape. Add a small dot of hot glue if needed for stability.
- Add a ribbon wrap. Cover the tape area with twine or ribbon for a finished rustic look. Tie a small bow.
- Food-safe barrier. Sleeve the lower portion with a straw. If the bouquet is heavy, use two skewers for better balance.
Pro Tips for Beautiful, Sturdy Rustic Cake Toppers
- Balance matters: Keep the topper’s “top weight” centered. If it leans, add a second skewer or shorten the banner span.
- Use a template for clean cuts: Cut one perfect flag, then trace it for the rest.
- Choose the right cardstock: 65 lb is flexible; 110 lb is sturdier. For bunting, 65–80 lb is a sweet spot.
- Make it photo-friendly: Bold, simple lettering reads best. Thick paint pen strokes show up better than thin pencil lines.
- Keep adhesives neat: Apply hot glue with a toothpick for tiny dots rather than big blobs.
- Test on a dummy base: Stick the topper into a foam block or a potato to check height and stability before the party.
Variations (Beginner Adaptations + Advanced Upgrades)
Beginner-Friendly Swaps
- No hot glue gun? Use tacky craft glue and clothespins to hold pieces while drying (allow 30–60 minutes).
- No hole punch? Fold the top edge of each flag over the twine and glue.
- Short on time? Make a single “tag” topper: cut a 2 x 3 inch kraft tag, write the message, glue to one skewer, add twine bow.
Advanced Rustic Cake Topper Ideas
- Layered look: Stack two banner layers (kraft + lace trim) for texture.
- Wood-burned monogram: Use a wood-burning tool on a wood slice (advanced; practice on scrap first).
- Veneer script: Print a word in a thick script font, trace onto wood veneer, cut with a craft knife, and reinforce the back with a thin cardstock layer.
- Mini macramé accent: Tie a tiny square knot strip (about 1 inch wide) and attach to a stick for boho-rustic style.
Troubleshooting: Fix Common Issues Fast
- Banner sags too much: Shorten the twine by 1 inch or move the flags closer together. You can also use slightly thicker twine.
- Flags spin or flip: Use the fold-over method (glued tab) instead of holes, or add a dot of glue behind each flag to “lock” it in place.
- Topper won’t stand straight: Add a second skewer for support or insert the sticks deeper into the cake (aim for 2–3 inches deep).
- Hot glue strings everywhere: Let glue cool 3–5 seconds before pressing pieces together, and remove strings after cooling using tweezers.
- Wood slice lettering bleeds: Seal the surface first with a thin coat of matte Mod Podge, let dry, then letter on top.
Common Crafting Mistakes to Avoid
- Skipping the food-safe barrier: Wood and skewers can shed fibers. Use straw sleeves or food-safe picks for any part touching the cake.
- Making it too heavy: Oversized wood pieces or big floral bundles can topple. Keep the main element under 4 inches wide unless you reinforce with two sticks.
- Using thin paper for bunting: Regular printer paper curls easily. Choose cardstock or reinforce with a second layer.
- Over-lettering: Too many words become hard to read on a cake. Stick to 1–2 short words, initials, or a date.
- Forgetting drying time: Paint and glue need time to set. Build the topper at least a few hours before the event (or the day before).
FAQ: Rustic Cake Toppers
1) How tall should a cake topper be?
For most 8–10 inch cakes, aim for 8–10 inches tall overall, with 2–3 inches inserted into the cake. For taller tiered cakes, you can go up to 12 inches.
2) Are rustic cake toppers food-safe?
The topper itself doesn’t need to be edible, but any part that touches the cake should be separated with a food-safe barrier. Sliding clear straws over skewers is an easy, budget-friendly solution.
3) Can I make these without a cutting machine?
Yes. All the DIY cake topper ideas here can be made with scissors and a craft knife. For script words, pick a thicker font and cut slowly with a fresh blade.
4) What’s the best glue for cake toppers?
Hot glue is the fastest for assembly and holds well for lightweight materials. For paper-on-paper details, tacky glue gives a flatter finish (just allow drying time).
5) How do I store a handmade cake topper?
Store flat in a small box (shoebox size works), with tissue paper around delicate pieces. Keep it dry and out of heat so glue doesn’t soften and cardstock doesn’t warp.
6) Can I match the topper to my party theme?
Absolutely. Use themed colors (sage, dusty blue, terracotta), swap shapes (stars, hearts), and add small details like mini pumpkins for fall parties or tiny faux pine for winter celebrations.
Wrap-Up: Your Cake, But Make It Rustic
A rustic cake topper is one of the easiest handmade party decorations to customize, and it adds instant personality to your dessert table. Start with the bunting topper if you’re new to DIY crafts, then try a wood slice monogram or a floral cluster once you’re comfortable with the basics. Make it simple, make it sturdy, and make it yours.
Want more DIY party decor and handmade project ideas? Explore more creative tutorials and smart celebration tips on smartpartyprep.com.
More Articles
 Kids' Craft: Beaded Bracelets
 How Do I Allow Third Party Cookies on My Mac? A Stress-Free, Step-by-Step Guide for Safari, Chrome & Firefox (2024 Tested)
 Advanced Cake Toppers for Crafters
 Personalized Photo Frames Gifts
 How to Make a Balloon Arch for a Birthday Party: 7 Foolproof Steps (No Glue Gun, No Experience, No Stress — Just Gorgeous Results in Under 90 Minutes)
 Easy Origami Decorations for Beginners
 Seasonal Origami Decorations Ideas
 Step-by-Step Fabric Bunting Tutorial
 How to Hang Streamers for a Party Without Tape Mess, Sagging, or Last-Minute Panic: 7 Foolproof Methods That Actually Stick (Tested on 32 Parties)
 Rustic Tie-Dye Shirts Ideas