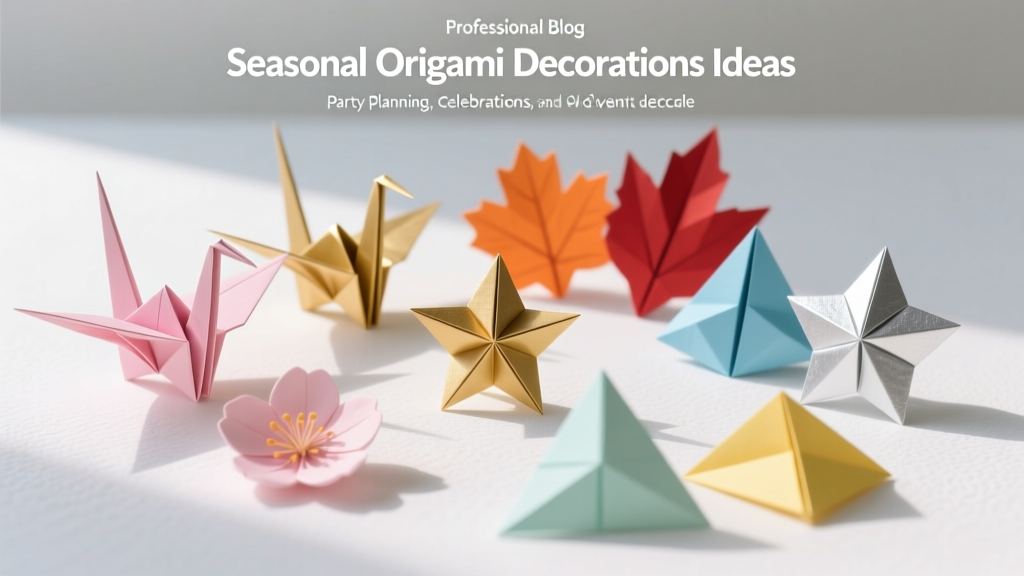
Seasonal Origami Decorations Ideas
Origami has a special kind of magic: a flat sheet of paper becomes a party-ready decoration with just a few folds. It’s budget-friendly, easy to personalize, and perfect for seasonal celebrations—whether you’re hosting a cozy fall gathering, a winter holiday party, a spring brunch, or a summer backyard bash. Even better, origami decorations store flat, travel well, and can be made in batches while you binge a favorite show.
This guide is designed for DIY enthusiasts who want practical, step-by-step handmade party decorations. You’ll find seasonal origami ideas you can mix and match into centerpieces, garlands, place settings, favor toppers, cake table décor, and photo booth backdrops. Most projects use simple folds and require minimal tools, so beginners can jump right in—while advanced crafters can add detail with scoring, layering, and modular builds.
Grab a few paper packs in seasonal colors, clear a table, and get ready to fold your way through the year.
At-a-Glance: Skill Levels, Time Estimates, and Best Party Uses
- Beginner (no prior origami experience): 3–8 minutes per piece
- Intermediate (comfortable with basic folds): 8–20 minutes per piece
- Advanced (modular origami, precision folding): 20–45 minutes per piece
Best uses for DIY origami party decorations:
- Table centerpieces and place cards
- Balloon/string light backdrops (origami accents)
- Garlands and bunting alternatives
- Favor packaging toppers and gift tags
- Photo booth props (mounted on sticks)
Materials and Tools (with Estimated Costs)
You can make most seasonal origami decorations with a starter kit of basics. Prices vary by brand and region; the estimates below fit typical craft-store or online pricing.
Paper (choose based on the project)
- Origami paper packs (6" x 6" / 15 x 15 cm, assorted colors, 100 sheets): $6–$12
- Double-sided origami paper (great for stars and flowers, 50–100 sheets): $7–$15
- Kraft paper (12" x 12" scrapbook sheets for rustic fall décor, 25 sheets): $8–$15
- Metallic or foil origami paper (holiday sparkle, 20–50 sheets): $6–$14
- Cardstock (65–80 lb for tags and sturdy leaves; not ideal for complex folds): $6–$12
Adhesives and hanging supplies
- Glue dots (clean, fast for garlands): $4–$8
- Craft glue (PVA or tacky glue for stronger holds): $3–$6
- Double-sided tape (quick seams): $4–$7
- Clear fishing line or nylon thread (invisible hanging): $3–$7
- Baker’s twine (rustic garlands): $3–$6
Tools (recommended)
- Paper trimmer (for cutting perfect squares from scrapbook paper): $12–$30
- Small scissors (detail trimming): $4–$10
- Bone folder or scoring tool (crisp folds; beginner-friendly): $6–$12
- Ruler and pencil (measuring and marking): $2–$8
- Mini binder clips or paper clips (holding glued seams while drying): $3–$6
- Optional: hot glue gun (for attaching to wreaths/frames; use carefully): $8–$20
Seasonal Origami Decoration Ideas (Project Menu)
Pick one project for a quick win, or combine a few for a full party setup. Each idea includes suggested paper size, skill level, and where it looks best.
Spring: Cherry Blossom Flowers + Butterfly Place Accents
- Cherry blossom-style flowers (Beginner–Intermediate): 6" x 6" paper; great for garlands and napkin rings
- Butterflies (Beginner): 6" x 6" paper; perfect for place cards, favor tags, and drink stirrers
Summer: Citrus Slice Pinwheels + Tropical Paper Fans
- Citrus pinwheels (Beginner): 6" x 6" double-sided paper; bright photo booth backdrop
- Accordion fans (Beginner): 8" x 8" to 12" x 12"; statement wall décor over dessert table
Fall: Maple Leaves + Pumpkin Garland
- Maple leaves (Intermediate): 6" x 6" to 8" x 8"; table scatter and place settings
- Origami pumpkins (Beginner–Intermediate): 6" x 6"; adorable garlands and mini centerpiece clusters
Winter: Scandinavian Stars + Snowflake Medallions
- Paper stars (3D look) (Intermediate): 6" x 6"; ornaments, chandeliers, and window décor
- Snowflake medallions (Beginner): 8" x 8" to 12" x 12"; backdrop filler and ceiling hangers
Step-by-Step Instructions: 5 Seasonal Origami Decorations
Project 1: Easy Origami Butterfly (Spring Place Cards)
Skill level: Beginner
Time: 3–6 minutes each
Paper: 6" x 6" (15 x 15 cm), lightweight origami paper works best
- Start with color side down. Fold in half diagonally to make a triangle. Crease firmly with a bone folder.
- Fold the triangle in half (point to point) to make a smaller triangle, then unfold the last fold to leave a center crease.
- Create wings: Take the left corner and fold it up toward the top point, stopping about 1/2" (1.3 cm) below the tip. Repeat on the right side, mirroring the fold.
- Flip the model over. Fold the bottom point up so it peeks above the top edge by about 1/4" (6 mm).
- Lock it: Fold that peeking tip back down behind the butterfly to help hold the shape. Press creases sharply.
- Style for parties: Add a tiny glue dot underneath if you want the butterfly to stay perched on a place card or napkin.
Party use ideas:
- Write guest names on a small cardstock rectangle and attach the butterfly with a glue dot.
- Make mini butterflies with 3" x 3" paper for cupcake toppers (attach to toothpicks).
Project 2: Accordion Paper Fan (Summer Backdrop Decor)
Skill level: Beginner
Time: 8–15 minutes each fan
Paper: 12" x 12" scrapbook paper (or two 8" x 8" sheets taped together for a larger fan)
- Cut and prep: If using rectangular paper, trim to a square (8" x 8", 10" x 10", or 12" x 12"). Larger squares make bolder party decorations.
- Accordion fold: Fold 1/2" (1.3 cm) pleats back and forth across the entire sheet.
- Fold in half: Bring the two ends together to form a V-shape; crease the midpoint.
- Secure the center: Wrap a 6" (15 cm) piece of floral wire, twist tie, or thread around the center. Tie tightly.
- Create the fan shape: Glue or tape the two inner edges together to form a semicircle. Hold with clips until set (about 2–5 minutes for tacky glue).
- Make a full circle (optional): Create a second semicircle and glue the flat edges together to form a full rosette.
- Hang safely: Use a small loop of tape or a paper clip on the back to hang from fishing line or removable wall hooks.
Variation: Punch tiny holes along the outer edge and thread fairy lights behind the fans for a glowing DIY party backdrop.
Project 3: Simple Origami Pumpkin (Fall Garland or Centerpiece)
Skill level: Beginner–Intermediate
Time: 10–18 minutes each
Paper: 6" x 6" (15 x 15 cm) orange paper; small rectangle of green paper for a leaf
- Start color side down. Fold the paper in half vertically and horizontally, then unfold (you want clear crease lines).
- Form a preliminary base: Fold diagonally both ways, unfold, then collapse into a triangle base (bring opposite corners together and flatten).
- Lift and fold side corners: On the top layer, fold left and right corners up to the top point, making a diamond shape.
- Flip and repeat on the other side so both sides match.
- Round the pumpkin: Fold the top point down about 3/4" (2 cm). Fold the bottom point up about 1" (2.5 cm). Fold small amounts of the side points inward to soften corners.
- Shape it: Gently puff the center by opening layers slightly; use a glue dot inside if you want it to hold a 3D form.
- Add stem: Roll a 1" x 2" (2.5 x 5 cm) strip of brown paper into a tight tube and glue. Attach at the top with tacky glue or hot glue.
Garland tip: Make 10–14 pumpkins for a 6-foot (1.8 m) garland. Attach each pumpkin to baker’s twine with a tiny clothespin or a dot of hot glue (if permanent).
Project 4: Maple Leaf-Style Origami (Fall Place Settings)
Skill level: Intermediate
Time: 12–25 minutes each
Paper: 7" x 7" (18 x 18 cm) for a larger, more dramatic leaf; use kraft, red, or gold
- Start with a square, color side down. Fold diagonally into a triangle. Crease sharply.
- Accordion fold the triangle: Make pleats about 3/8"–1/2" (1–1.3 cm) from the long edge toward the point, folding back and forth until you reach the tip.
- Fold the pleated triangle in half to find the center.
- Secure the base: Wrap thread around the bottom 1" (2.5 cm) and tie firmly (or use a small piece of floral wire).
- Fan it open: Carefully spread the pleats into a leaf shape. Adjust spacing to create a maple-leaf silhouette.
- Add a stem: Glue a 2" (5 cm) brown paper strip to the back center base.
Beginner-friendly adaptation: Use fewer pleats (wider accordion folds) for a simpler leaf that still looks festive on a plate.
Project 5: 3D Paper Stars (Winter Ornaments and Hanging Décor)
Skill level: Intermediate–Advanced
Time: 20–35 minutes each
Paper: 5" x 5" or 6" x 6" (metallic or double-sided looks amazing)
- Make 5 identical units: Start with a square. Fold in half, unfold, then fold edges to the center line to create crisp guiding creases.
- Create the points: Use those creases to fold a narrow kite shape; the exact folds vary by star pattern, but the goal is a long, triangular point with a locking flap.
- Repeat 5 times for a classic five-point star (or 6–8 units for more complex shapes).
- Assemble: Slide each unit’s flap into the pocket of the next. Work in a circle until the last connection locks in.
- Reinforce (optional): Add tiny glue dots inside the pockets for durability if kids will be handling them.
- Add a hanger: Thread fishing line through one point using a needle, or tape a loop to the inside.
Advanced variation: Use gradient paper (ombre) and alternate light/dark units for a high-end, Scandinavian-inspired holiday party decoration look.
Pro Tips for Clean Folds and Party-Ready Results
- Use a bone folder for crisp creases—especially on stars and rosettes.
- Keep a “square-check” habit: If your paper isn’t perfectly square, folds drift. Trim precisely with a paper trimmer.
- Batch fold assembly-line style: Fold 10 butterflies to the same step before moving on. It’s faster and more consistent.
- Match paper weight to complexity: Thin origami paper (around 60–80 gsm) for intricate folds; slightly thicker scrapbook paper for rosettes and fans.
- Choose removable hanging methods for parties: removable hooks, painter’s tape loops, or lightweight fishing line.
- Make it kid-friendly: Pre-cut squares and start with butterflies and fans. Avoid tiny modular stars for little hands.
Seasonal Color Palettes and Styling Ideas
Spring party décor
- Colors: blush pink, soft yellow, mint, white
- Style: butterflies on glassware, flower garlands across a dessert table
Summer party décor
- Colors: coral, turquoise, lemon yellow, lime
- Style: giant paper fans behind the drink station, citrus pinwheels on straws
Fall party décor
- Colors: burnt orange, deep red, mustard, kraft brown
- Style: leaf place settings, pumpkin garland across a mantel or buffet
Winter party décor
- Colors: white, silver, gold, icy blue
- Style: hanging stars at varied heights, snowflake medallions on windows
Troubleshooting: Quick Fixes for Common Origami Issues
- My folds look sloppy: Slow down and crease firmly. Use a bone folder and align corners before pressing.
- Paper keeps tearing: Switch to slightly heavier paper or reduce refolding the same crease multiple times.
- My model won’t lie flat: Check if your paper is perfectly square and if your center creases are accurate.
- Garland pieces spin oddly: Use two attachment points (two glue dots or two stitches) to keep decorations facing forward.
- Stars pop open: Add a tiny glue dot inside each locking pocket, especially with foil paper.
Common Crafting Mistakes to Avoid
- Using cardstock for intricate origami: It’s too stiff for detailed folds and tends to crack at creases.
- Skipping precision cutting: Even a 1/8" (3 mm) difference throws off symmetry, especially for stars and modular pieces.
- Over-gluing: Visible glue can warp paper. Use glue dots or a toothpick to apply tiny amounts of tacky glue.
- Hanging heavy décor with weak tape: For backdrops, use removable hooks or stronger mounting tabs rated for the weight.
- Waiting until the day of the party: Fold items in advance. Store flat in a shoebox with tissue paper layers.
FAQ: Seasonal Origami Decorations
What’s the best paper size for beginners?
Start with 6" x 6" origami paper. It’s large enough to handle easily and small enough to make multiples for DIY party decorations.
How do I make origami decorations last longer for multi-day events?
Use slightly heavier paper (scrapbook weight), reinforce stress points with tiny glue dots, and keep décor away from humidity. For hanging pieces, use fishing line instead of tape alone.
Can I use these origami decorations outdoors?
Yes, with a few adjustments: use thicker paper, avoid windy placements, and keep them under a canopy. For extra durability, lightly mist with a clear matte sealant (test first to prevent warping).
How many pieces should I make for a garland?
For a standard 6-foot (1.8 m) garland, plan on 10–16 pieces, depending on size and spacing. For 6" shapes, 12 is a nice full look.
What’s the easiest seasonal set to start with for a party?
Try butterflies + paper fans. Both are beginner-friendly, quick to batch, and instantly make a party space feel styled.
How can I personalize origami décor for birthdays or themed events?
Choose paper that matches your theme, add metallic accents, write names or dates with a fine-tip marker, or attach small tags for party favors. Mixing patterns (stripes + florals) also gives a designer look.
Wrap-Up: Fold a Season of Celebration
Seasonal origami decorations bring big party energy without big spending, and every fold is a chance to customize your event—colors, patterns, and scale are completely in your hands. Start with a batch of butterflies or fans, then level up to pumpkins, leaves, and 3D stars as your confidence grows. Your future self will thank you when you can pull out a box of handmade décor that’s ready for the next celebration.
Want more DIY crafts, party decorations, and handmade project ideas? Keep exploring fresh inspiration on smartpartyprep.com.
More Articles
 Budget DIY Slime Under $50
 How to Install 3rd Party Apps on Firestick in 2024: The Only Step-by-Step Guide You’ll Ever Need (No Tech Degree Required)
 How to Make Party Hats Out of Construction Paper in Under 12 Minutes (No Glue Gun, No Scissors Required for Kids!) — 7 Foolproof Designs That Actually Stay On Heads
 Kids' Craft: Origami Decorations
 How to Make Party Hat in 7 Minutes Flat — No Glue Gun, No Scissors, No Stress (Just Paper, Tape & Joy)
 Is Primal Queen Third Party Tested? The Truth About Lab Verification, What ‘Certified’ Really Means, and How to Spot Genuinely Transparent Brands (Not Just Marketing Claims)
 How to Allow Third Party Cookies on MacBook Air (2020–2024): A Step-by-Step Safari & Chrome Fix That Actually Works in 2024 — No Tech Degree Required
 How to Make a Backdrop for Party in Under 90 Minutes (No Sewing, No Pro Tools — Just $12 & Your Dining Table)
 20 Creative Scrapbook Pages Ideas
 Advanced Backdrops for Crafters