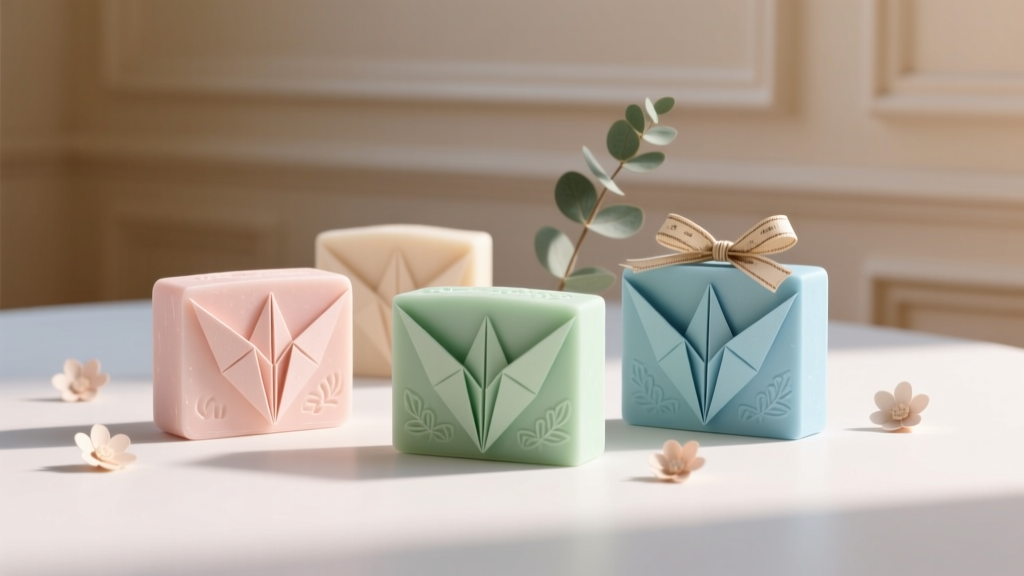
Paper Craft Soap Bars Ideas
If you love the look of artisan soap bars but want a budget-friendly, mess-free project for parties, showers, and gift tables, paper craft soap bars are a total win. They’re cute, customizable, lightweight, and surprisingly realistic—perfect for table décor, party favors, pretend play displays, or photo booth props. Best of all, you can make a whole “soap shop” worth of bars without waiting for anything to cure or dry overnight (unless you want special finishes).
This project is also a fantastic way to match a party theme. Think pastel “spa day” bridal shower favors, bright “citrus splash” summer birthday décor, or chic black-and-white “apothecary” bars for Halloween parties. You control the colors, scents (optional!), labels, and packaging—so every bar looks intentional and event-ready.
Whether you’re a beginner looking for an easy paper craft or an experienced DIYer ready for advanced embellishments, you’ll find multiple ideas below. Pick one style or mix them for a fun “handmade soap bar collection” display.
Project Overview
- Skill level: Beginner (basic bars), Intermediate (layered/embossed), Advanced (molded edges, faux marbling, realistic packaging)
- Time estimate: 10–20 minutes per bar (basic); 25–40 minutes per bar (layered/packaged)
- Best uses: DIY party decorations, bridal/baby shower table décor, handmade party favors, gift toppers, photo props, craft fair display items
- Size suggestion: 2.5 in x 3.5 in x 1 in (6.4 cm x 8.9 cm x 2.5 cm) for a realistic “hand soap” look
Materials & Tools (with Estimated Costs)
Paper & Base Supplies
- Cardstock (80–110 lb / 216–300 gsm) for sturdy boxes and wraps: $6–$12 per pack
- Scrapbooking paper (patterned or textured) for decorative wraps: $5–$15
- Corrugated cardboard (shipping box scrap works) for thick “soap” cores: free–$5
- EVA craft foam sheets (2–5 mm) for softer rounded edges (optional): $5–$10
Adhesives & Finishes
- PVA craft glue (white glue) for paper-to-paper: $3–$7
- Glue stick for quick wraps (less warping): $2–$5
- Double-sided tape (8–12 mm width) for clean seams: $4–$10
- Hot glue gun + mini sticks for fast assembly (optional): $8–$20
- Matte Mod Podge or clear acrylic sealer for durability: $6–$12
Coloring & Detail Tools
- Distress ink or stamp pads (for “soap” shading): $5–$8 each
- Chalk pastels or soft charcoal for soft color blending: $5–$12
- Metallic marker or gel pen for luxury branding accents: $2–$6
- Embossing tool or ball stylus to round edges and press logos: $3–$10
Cutting & Measuring
- Craft knife (precision/X-Acto) + extra blades: $5–$12
- Self-healing cutting mat (9x12 in or larger): $10–$20
- Metal ruler (12 in): $5–$10
- Scoring tool (bone folder or scoring stylus): $6–$12
- Scissors for quick trims: $3–$10
Optional “Party Favor” Packaging
- Cellophane treat bags (4x6 in): $4–$8
- Wax paper or parchment for soap-style wraps: $3–$6
- Baker’s twine or satin ribbon: $4–$10
- Sticker paper or printable labels: $6–$15
Paper Craft Soap Bar Ideas (Pick Your Style)
Idea 1: Classic “Wrapped Soap Bar” (Best for Party Favors)
This version is quick, clean, and looks polished on favor tables. The “soap” is a sturdy core wrapped like a boutique bar.
Idea 2: Layered Spa Soap (Great for Bridal & Baby Showers)
Create two or three “layers” using colored paper or foam for a modern artisan look—think oatmeal + honey, lavender + cream, or rose + blush.
Idea 3: Faux Marble Soap (Statement Table Décor)
Use marbled paper (or make your own marbling effect) to mimic high-end soap bars. Perfect for a luxe spa party theme.
Idea 4: “Embossed Logo” Soap (Advanced, Very Realistic)
Add a pressed logo/monogram on top. These are stunning for branded party décor, wedding welcome tables, or craft fair displays.
Step-by-Step: Basic Paper Craft Soap Bar (Classic Wrapped Style)
Measurements (Standard Bar Template)
- Finished bar size: 2.5 in (W) x 3.5 in (L) x 1 in (H)
- Core layers: 4–6 pieces of corrugated cardboard cut to 2.5 x 3.5 in (stacked to reach ~1 in thickness)
- Wrap strip: 8.75 in x 4.25 in cardstock (adjust as needed for thickness)
Step 1: Build the “Soap” Core
- Cut 4–6 identical rectangles from corrugated cardboard: 2.5 in x 3.5 in.
- Stack and glue layers with PVA glue or hot glue. Press under a heavy book for 5–10 minutes for a flatter, sturdier block.
- Optional (for smoother edges): wrap the block in a single layer of thin cardstock using glue stick, trimming corners neatly.
Step 2: Round the Edges (Makes It Look Like Real Soap)
- Use scissors to gently bevel the corners of the block (tiny snips).
- Sand lightly with a nail file or fine sandpaper (optional) to soften edges further.
- If you’re using EVA foam instead of cardboard, round edges by trimming and lightly compressing with your fingers.
Step 3: Add Color & “Soap” Shading
- Choose a base color paper (cream, pastel, or white).
- Use chalk pastels or distress ink to add subtle shading around edges—real soap often looks slightly darker at corners.
- Blend with a cotton swab or soft tissue for a smooth, velvety look.
Step 4: Wrap the Bar
- Score the wrap strip to match the bar’s edges. For the 2.5 x 3.5 x 1 in bar, start scoring at:
- 3.5 in
- 4.5 in
- 8.0 in
- Wrap the strip tightly around the core and secure the seam with double-sided tape for a clean finish.
- Fold and glue the ends like a present (triangle folds), or leave the ends open if you plan to slide it into a sleeve.
Step 5: Add a Label (Instant “Handmade Soap” Vibes)
- Cut a label band: 1.25 in tall x 8.5 in long (trim to fit).
- Write or print a name like:
- “Lavender & Oat”
- “Citrus Mint”
- “Vanilla Cream”
- “Spa Day Soap Co.”
- Wrap the band around the bar and secure on the back with tape or glue stick.
Optional Step 6: Seal for Durability
- Brush on a thin coat of matte Mod Podge (avoid soaking the paper).
- Let dry 20–30 minutes and add a second coat if needed.
Variations for Party Themes (Beginner to Advanced)
Beginner-Friendly Variations
- Single-color spa set: Make 12 bars in matching pastel tones for a cohesive DIY party decoration display.
- Confetti “soap”: Glue tiny paper specks (hole punch dots) onto the base layer before wrapping. Seal with matte sealer.
- Mini guest soaps: Scale down to 1.5 x 2 x 0.75 in for place settings or cupcake toppers (non-edible).
Intermediate Variations
- Layered soap look: Stack different colored cardstock/foam layers (example: 1/3 cream, 1/3 blush, 1/3 coral) and wrap the sides with a thin matching strip.
- Wax paper wrap: Wrap the finished bar in wax paper, twist ends like candy, and tie with baker’s twine—great for handmade party favors.
- Botanical belly band: Add a small pressed faux leaf (paper cutout) under a vellum band for garden party décor.
Advanced Variations
- Embossed monogram/logo: Print a small logo, place it on top, and use a ball stylus to press the design into slightly softened paper (or a thin foam top layer).
- Faux marble finish: Use marbled scrapbook paper or create marbling with swirled pastel chalk and a light seal coat.
- Apothecary “soap box” packaging: Build a small cardstock box with a cut-out window (acetate sheet), then add a label for a boutique display.
Pro Tips for Realistic Results
- Use rounded edges: Sharp corners are the #1 giveaway that it’s paper. Take the extra 2 minutes to bevel and smooth.
- Keep seams on the back: Align your wrap seam and label seam so the front looks like a store-bought product.
- Choose soap-like colors: Cream, ivory, dusty pink, sage, pale lavender, and soft aqua look especially convincing.
- Make a “set”: Party décor looks more intentional when you create 6–12 bars in coordinated colors with matching label designs.
- Print labels on matte paper: Glossy labels can look more like candy packaging than handmade soap.
Troubleshooting (Quick Fixes)
- Problem: Wrapping paper buckles or wrinkles.
Fix: Use a glue stick or double-sided tape instead of wet glue. Score folds before wrapping. - Problem: Bar looks too “boxy.”
Fix: Trim and round the edges more. Add ink shading to corners to soften the shape. - Problem: Labels won’t stick cleanly.
Fix: Use double-sided tape on the label ends. Avoid placing tape over chalk pastel areas. - Problem: Colors look flat.
Fix: Add subtle shading with ink on edges and a tiny highlight using a white gel pen. - Problem: Core feels flimsy.
Fix: Add more cardboard layers or switch to 5 mm EVA foam for a sturdier, thicker bar.
Common Crafting Mistakes to Avoid
- Skipping scoring: Unscored folds crack paper and create messy corners.
- Using too much liquid glue: It warps cardstock and causes ripples under labels.
- Cutting without a metal ruler: Wobbly edges make the bar look less “product-like.”
- Overdoing the shading: Heavy dark ink can look dirty instead of realistic. Build color gradually.
- Making every bar different: For party decorations, a coordinated set looks more styled than random colors and fonts.
FAQ: Paper Craft Soap Bars
1) Can these paper soap bars be used as actual soap?
No—these are decorative paper crafts only. They’re great for party décor, displays, and handmade party favors, but they’re not functional soap.
2) What paper is best for sturdy bars?
Use 80–110 lb (216–300 gsm) cardstock for wraps and corrugated cardboard or EVA foam sheets for the core. This combination keeps the bar strong and easy to shape.
3) How do I make them look more realistic for a spa-themed party?
Round the edges, add soft shading with distress ink, and use a simple label design (minimal fonts, neutral colors). Wrapping in wax paper with twine instantly gives that handmade soap bar vibe.
4) Are these safe for kids’ crafts?
Yes with supervision. For kids, skip the craft knife and use pre-cut rectangles, scissors, and glue sticks. Adults can handle scoring and precision cuts.
5) How far in advance can I make them for party decorations?
You can make them weeks in advance if stored flat in a dry box. If you seal them with matte Mod Podge or acrylic sealer, they’ll hold up even better.
6) Can I add scent to the paper bars?
You can lightly scent the packaging (not the paper core) by adding a tiny drop of essential oil to a small cotton pad and placing it inside a favor bag (not directly on paper to avoid stains).
Conclusion
Paper craft soap bars are one of those DIY party projects that look high-effort but feel relaxing to make. Once you’ve made a couple, you’ll be designing full collections—matching colors, swapping labels for different party themes, and styling them into gorgeous party decorations and handmade favor displays.
Try a small batch first (3–6 bars), then scale up for your next bridal shower, birthday, or spa-themed get-together. When you’re ready, add layered colors or an embossed monogram for that boutique finish.
Want more DIY crafts, party decoration ideas, and handmade projects? Keep exploring fresh, creative tutorials on smartpartyprep.com!
More Articles
 Kids' Craft: Mason Jar Crafts
 How to Make Confetti at Home
 Advanced Greeting Cards for Crafters
 DIY Dream Catchers for Home Decor
 How to Make a Balloon Arch for a Birthday Party: 7 Foolproof Steps (No Glue Gun, No Experience, No Stress — Just Gorgeous Results in Under 90 Minutes)
 How to Enable 3rd Party Cookies on Safari in 2024: The Real Truth (Spoiler: You Can’t — But Here’s What Actually Works Instead)
 How to Enable 3rd Party Cookies in Safari (2024): The Truth No One Tells You — It’s Not Just a Toggle, and Here’s Why Your Login Failures, Analytics Gaps, and Ad Personalization Break Without This Critical Fix
 Modern Mugs Designs
 Budget DIY Memory Books Under $15
 How to Make a Party Popper in 7 Minutes (No Glue, No Mess, No Store-Bought Kits) — A Foolproof DIY Guide That Actually Works Every Time