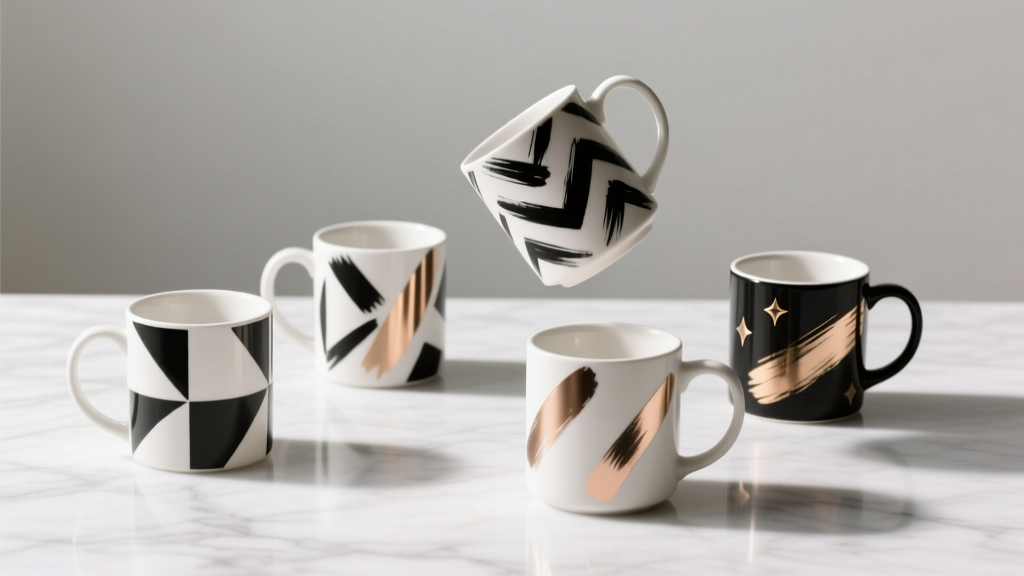
Modern Mugs Designs
Modern mug designs are one of those DIY crafts that feel instantly rewarding: you get a functional piece you can use every day, and it doubles as a party decoration when styled on a drink station or dessert table. A set of coordinated mugs makes a cozy, “put-together” look for brunches, baby showers, holiday cocoa bars, book clubs, and birthday mornings—without spending boutique prices.
Even better, this is a party-ready handmade project you can personalize for guests. Think name mugs for place settings, minimalist patterns that match your party theme, or a small batch of “favor mugs” filled with hot cocoa mix and marshmallows. Whether you’re a beginner trying your first paint pen or an experienced crafter experimenting with vinyl stencils and firing methods, modern mugs are flexible, forgiving, and genuinely fun.
This guide walks you through several modern styles (minimalist line art, geometric color blocking, monochrome typography, and terrazzo-inspired speckles) with practical, step-by-step instructions, supply recommendations, time estimates, and troubleshooting so your mugs look sleek—not crafty.
Project Overview: Skill Level, Time & Best Uses
Skill Level Options
- Beginner: Paint pen line art, simple dots, names/initials
- Intermediate: Vinyl stencil designs, color blocking with tape
- Advanced: Layered decals, multi-step baking/firing, terrazzo patterning
Time Estimates (Per Mug)
- Design & prep: 10–20 minutes
- Decorating: 20–45 minutes (depending on complexity)
- Dry time: 1–24 hours (product dependent)
- Heat-set/bake: 30–60 minutes (optional/if recommended)
Party Uses
- Hot cocoa bar mugs (winter parties, movie nights)
- Brunch mug sets for bridal showers and Mother’s Day
- Personalized guest mugs for sleepovers, birthdays, and friendsgiving
- Handmade party favors (fill with candies, tea, cocoa, or mini succulents)
Materials & Tools (With Estimated Costs)
Core Supplies
- Plain ceramic mugs (11–15 oz, glossy white is easiest): $2–$6 each (bulk packs often $1.50–$3 each)
- Oil-based paint markers (fine tip + medium tip; black/white + 1–3 accent colors): $10–$20 per set
- Rubbing alcohol (70% or 91%) + lint-free cloth: $2–$6
- Pencil (optional for sketching on glossy mugs) and soft eraser: $1–$3
Optional (Highly Useful) Add-Ons
- Painter’s tape (1/2 in / 12 mm and 1 in / 25 mm widths): $4–$8
- Permanent adhesive vinyl + craft knife or cutting machine: $5–$15
- Transfer tape (for vinyl stencils/decals): $5–$10
- Acrylic paint (multi-surface) + small flat brush: $6–$15
- Clear dishwasher-safe sealer (spray or brush-on, read labels carefully): $8–$16
- Oven thermometer (helps with accurate baking): $6–$12
Tool Recommendations
- Fine-tip paint pen: for thin line art and typography details
- Medium/bullet-tip paint pen: for bold shapes and quick fill areas
- Self-healing cutting mat (if cutting vinyl by hand): $8–$15
- Ruler or flexible measuring tape: $2–$8
Design Planning: Make It Look Modern (Not Busy)
Modern designs usually share a few traits: clean lines, limited color palettes, and intentional spacing. Before you start, pick a style and set a simple “rule” for your mug series:
- Palette rule: black + white + one accent color (sage, terracotta, blush, navy)
- Motif rule: stick to one shape family (arches, dots, stripes, triangles)
- Placement rule: design stays in a band 2 in (5 cm) tall, or only on one side
Quick Measuring Guide
- Typical design zone: 2–3.5 in (5–9 cm) tall on the front face
- Keep 1 in (2.5 cm) clear from the rim for comfortable sipping
- Avoid the handle pinch area: keep details at least 1/2 in (12 mm) from where fingers rest
Step-by-Step: Modern Minimalist Line Art Mug
Best for: beginners, quick party sets, monochrome themes
Look: single continuous line face, abstract plant, or squiggle
Estimated time: 30–45 minutes + dry time
Step 1: Clean the Mug
- Wash with dish soap and warm water. Dry completely.
- Wipe the design area with rubbing alcohol using a lint-free cloth.
- Let it air-dry for 2 minutes.
Step 2: Lightly Sketch (Optional)
- Use a pencil to place a few guide dots for where your line will start and end.
- Keep it simple: one face outline, one leaf stem, or one abstract loop.
Step 3: Draw with an Oil-Based Paint Pen
- Prime the paint pen (press tip down on scrap paper until ink flows).
- Hold the mug steady with your non-dominant hand and draw slowly.
- For a modern look, keep the line weight consistent and avoid over-detailing.
Step 4: Add a Tiny Accent (Optional)
- Add 3 dots, a small star, or one arch in a muted accent color.
- Keep accents under 10% of the total design area.
Step 5: Dry + Cure
- Let the mug dry untouched for at least 1 hour.
- Follow your paint pen’s instructions: some are air-cure only (24–72 hours), others recommend oven-baking for durability.
- If baking is recommended: place the mug in a cool oven, set to 350°F (175°C), bake for 30 minutes, then turn off the oven and let the mug cool inside for 30–60 minutes. (Always check your marker label; temperatures vary.)
Step-by-Step: Geometric Color-Block Mug (Tape Method)
Best for: bold party color themes, matching décor, statement sets
Estimated time: 45–70 minutes + dry/cure time
Materials Add-On
- Painter’s tape (1/2 in / 12 mm recommended)
- Multi-surface acrylic paint or paint pens in 2–3 colors
- Small flat brush (1/4 in / 6 mm to 1/2 in / 12 mm)
Step 1: Tape Your Shapes
- Choose a modern layout: diagonal half, stacked arches, or a band around the base.
- Apply tape firmly; press down edges with a fingernail or an old gift card to prevent bleed.
- Keep shapes large (at least 1 in / 2.5 cm wide) for a clean modern look.
Step 2: Paint in Thin Coats
- Apply paint in 2–3 thin coats instead of one thick coat.
- Wait 5–10 minutes between coats (or as directed).
Step 3: Remove Tape at the Right Time
- Remove tape while paint is slightly tacky (not fully cured) for the crispest edge.
- Pull tape back over itself at a low angle.
Step 4: Cure for Durability
Let paint cure fully (often 24–72 hours). If your paint is oven-bake friendly, use the same cool-oven method listed above, following the paint label’s temperature guidance.
Step-by-Step: Modern Typography Name Mugs (Party-Perfect)
Best for: place settings, party favors, bridesmaid gifts
Estimated time: 30–60 minutes per mug
Two Easy Methods
Method A: Freehand Paint Pen (Fastest)
- Choose a simple font style: all-caps sans serif looks the most modern.
- Measure and mark a center point on the mug front.
- Write the name in 1/2–3/4 in (12–19 mm) letter height for readability.
- Add a thin underline or tiny dot cluster for style.
Method B: Vinyl Stencil (Cleanest Edges)
- Cut the name from adhesive vinyl (or by hand with a craft knife).
- Apply stencil to the mug and burnish edges firmly.
- Use a paint sponge or paint pen to fill. Use very light pressure to avoid seepage.
- Peel stencil carefully once paint is tacky.
Pro Tips for Sleek, Modern Results
- Less color = more modern: pick 1–3 colors total.
- Use odd numbers: 3 dots, 5 terrazzo chips, 1 bold stripe.
- Work in zones: design on the front only, or a band around the bottom 1.5 in (4 cm).
- Rotate the mug, not your wrist: cleaner lines and smoother curves.
- Test first: scribble on the mug bottom to see ink flow and drying behavior.
Modern Variations (Beginner-Friendly to Advanced)
Beginner Variations
- Monochrome dot gradient: dots from 2 mm to 6 mm, clustered near the base.
- Single arch motif: one arch centered on the mug, 2 in (5 cm) tall.
- Two-stripe band: wrap two thin stripes (1/8 in / 3 mm) using paint pen and slow rotation.
Intermediate Variations
- Terrazzo speckle: add small irregular “chips” (3–8 mm) in 3 colors, leaving plenty of white space.
- Half-dip illusion: tape a clean diagonal and paint the lower half in one matte color.
- Scandi-inspired pattern: alternating triangles or short dashes in a 2 in (5 cm) band.
Advanced Variations
- Layered stencil design: base shape + outline + small accent marks.
- Gold accent details: use a metallic oil-based marker sparingly (tiny stars, thin edge line).
- Full party set system: one motif, three colorways—great for themed party decorations and coordinated tablescapes.
Troubleshooting: Fixes for Common Problems
Problem: Paint Pen Beads Up or Won’t Stick
- Cause: oils/residue on mug surface
- Fix: wipe again with rubbing alcohol; avoid touching the cleaned area with fingers
Problem: Blurry or Bleeding Edges (Tape/Vinyl)
- Cause: tape not burnished, paint applied too thick
- Fix: burnish edges; use thin coats; remove tape while tacky
Problem: Smudging While Working
- Cause: resting hand on fresh ink
- Fix: rotate mug so your hand stays on blank areas; take short breaks for drying
Problem: Design Scratches Off After Curing
- Cause: insufficient cure time or incompatible product
- Fix: allow full cure (often 72 hours); consider a dishwasher-safe sealer; hand-wash for longevity
Common Crafting Mistakes to Avoid
- Skipping surface prep: a quick alcohol wipe makes a huge difference in durability.
- Overcrowding the design: modern style relies on negative space; stop before it feels “full.”
- Using thick paint layers: thick layers crack, peel, and look uneven—thin coats win.
- Not following cure instructions: different markers/paints have different bake times and temperatures.
- Putting designs on the rim: it wears fast and isn’t ideal for food-contact areas.
- Rushing tape removal: wait for tacky paint; peel slowly for crisp lines.
FAQ: Modern DIY Mug Designs
1) Are DIY mugs dishwasher-safe?
Some paints and oil-based paint markers can be durable after proper curing, but “dishwasher-safe” depends on the exact product. For the longest life, plan to hand-wash and avoid soaking. If you need party mugs that hold up well, choose products labeled dishwasher-safe and follow their cure directions exactly.
2) Do I need to bake the mugs in the oven?
Only if your paint/marker manufacturer recommends it. Many crafters use the cool-oven method at around 300–375°F (150–190°C), but always follow the label. If you’re making these for a party soon, air-curing can work—just give it the full recommended time.
3) What type of mug is best for modern designs?
Glossy white ceramic is the easiest and most versatile. It makes black lines crisp, colors look true, and it fits nearly any party theme. Matte mugs look trendy too, but they can show marker strokes more.
4) How do I center a name or design on the mug?
Measure the front area between the handle edges. Place a small pencil dot at the midpoint, then align your stencil or the middle letter of the name to that dot. Keeping the text band about 2 in (5 cm) tall helps it look balanced.
5) Can I use regular acrylic craft paint?
Yes, but look for multi-surface acrylic (made for glass/ceramic) for better adhesion. Regular craft paint can work for decorative mugs, but it may scratch more easily unless sealed and fully cured.
6) How many mugs should I make for a party set?
For a cohesive drink station, 6–12 mugs is a sweet spot. If you’re doing place settings, plan one per guest plus 1–2 extras for backups.
Wrap-Up: Your Modern Mug Set Is Ready for Party Season
A modern mug design project checks all the boxes: it’s practical, affordable, and full of creative possibilities. Start with one minimalist line art mug to build confidence, then scale up into a coordinated set that matches your party decorations, tablescape colors, or seasonal themes. The best part is seeing them stacked at your cocoa bar or laid out as personalized favors—handmade and genuinely useful.
When you’re ready for your next DIY crafts win, explore more party-ready handmade projects and creative decoration ideas on smartpartyprep.com.
More Articles
 DIY Tie-Dye Shirts for Home Decor
 DIY Greeting Cards in 5 Minutes
 How to Make Party Hats for Stuffed Animals in Under 15 Minutes (No Sewing Required!) — 7 Adorable, Budget-Friendly Designs That Actually Stay On
 DIY Wreaths Using Cricut
 How to Allow Third Party Cookies in Safari (2024): The Only Step-by-Step Guide You’ll Need — No More 'Blocked' Warnings, Login Failures, or Broken Tools
 How to Enable 3rd Party Cookies in Safari (2024): The Truth No One Tells You — It’s Not Just a Toggle, and Here’s Why Your Login Failures, Analytics Gaps, and Ad Personalization Break Without This Critical Fix
 How to Enable Third Party Cookies on iPhone in 2024: The Real Truth (Spoiler: You Can’t — But Here’s What Actually Works Instead)
 Upcycled Clay Ornaments from Recycled Materials
 DIY Vision Boards in 10 Minutes
 How to Automate Third Party Plugins in FL Studio: The 7-Step Blueprint That Cuts Your Mix Automation Time by 68% (No Coding Required)