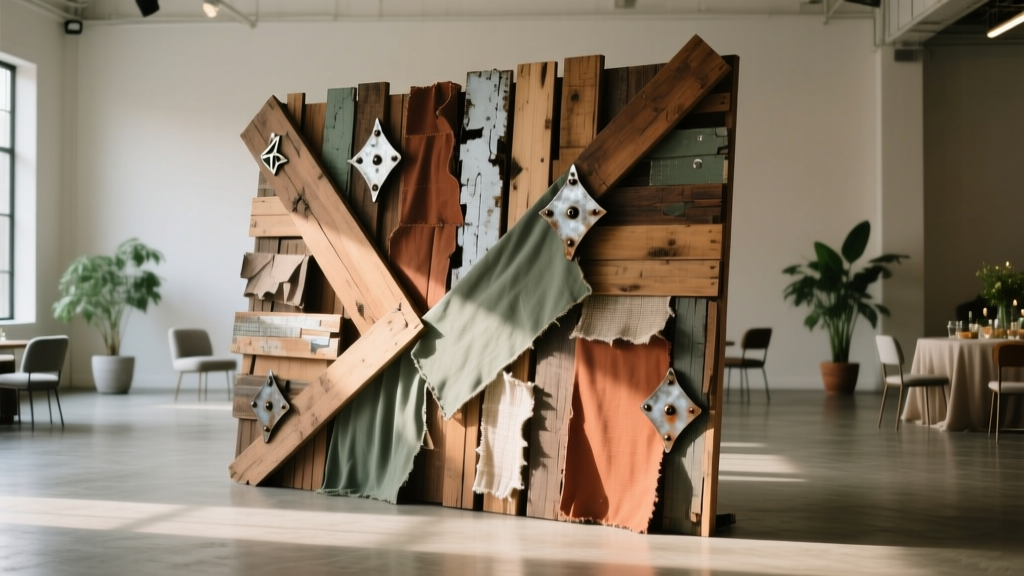
Upcycled Backdrops from Recycled Materials
Party backdrops are one of those decorations that instantly make a space feel “ready.” They frame photos, hide cluttered corners, and turn a simple table into a focal point. The best part? You don’t need to buy expensive panels or single-use decor to get a high-impact look.
Creating upcycled backdrops from recycled materials is fun because it’s a creative challenge with a big payoff. You’ll turn everyday items—cardboard, paper bags, old fabric, magazines, plastic bottles—into a handmade party decoration that looks intentional and stylish. It’s also a budget-friendly win: you can make a photo-worthy backdrop for a fraction of the cost of store-bought options.
This guide walks you through several beginner-friendly designs plus advanced variations, with measurements, tool recommendations, and practical troubleshooting. Pick one style or mix them for a custom, one-of-a-kind DIY party backdrop.
Quick Overview: Skill Levels, Time, and Best Uses
- Skill level: Beginner to intermediate (advanced options included)
- Time estimates: 60 minutes to 4 hours (depending on design and size)
- Great for: Birthday parties, baby showers, bridal showers, graduations, holiday gatherings, classroom parties, and DIY photo booth backdrops
- Common finished size: 6 ft x 6 ft (photo booth sweet spot) or 4 ft x 6 ft (behind a dessert table)
Materials & Tools (with Estimated Costs)
Base/Support Options (choose one)
- PVC pipe backdrop stand (adjustable 6–8 ft wide): $25–$60
- Photography backdrop stand (collapsible): $35–$90
- Tension rod + curtain rings (for doorways 28–48 in): $15–$35
- DIY cardboard panel wall (appliance boxes): $0–$15
- String line between two hooks (lightweight backdrops only): $5–$10
Upcycled Decor Materials (mix and match)
- Cardboard (shipping boxes, cereal boxes): free
- Brown paper bags (grocery bags) or kraft paper: free–$8
- Old fabric (bedsheets, curtains, button-down shirts): free–$12
- Magazines, junk mail, book pages: free
- Plastic bottles (clear soda/water bottles): free
- Egg cartons (paper pulp cartons work best): free
- Yarn, twine, ribbon scraps: free–$6
Adhesives & Fasteners
- Hot glue gun (high-temp recommended) + glue sticks: $10–$20
- Painter’s tape (removes cleanly): $4–$8
- Staple gun + staples (for fabric/cardboard): $10–$25
- Double-sided tape (heavy-duty for paper): $5–$12
- Zip ties (for attaching to stands): $3–$6
- Binder clips or clothespins: $2–$8
Tools (recommended)
- Scissors (sharp craft scissors)
- Utility knife/box cutter (for cardboard; use with a cutting mat)
- Ruler or measuring tape (at least 10 ft)
- Hole punch (single-hole punch for garlands)
- Cutting mat (protects tables/floors): $10–$25
- Optional: acrylic paint or spray paint (low-odor), $4–$8 per color
Plan Your Backdrop: Size, Placement, and Photo-Friendly Tips
Choose your size
- Dessert table backdrop: 4 ft wide x 6 ft tall
- Photo booth backdrop: 6 ft wide x 6–7 ft tall
- Statement wall: 8 ft wide x 7 ft tall (best with a sturdy stand)
Photo tip: keep it readable on camera
- Use 2–3 main colors plus one neutral (kraft, white, black, or metallic).
- Mix matte + a little shine (magazine gloss, clear plastic, or metallic paint) for depth.
- Leave a clear center zone about 3 ft wide for faces if it’s a photo booth.
Backdrop Idea #1: Paper Bag “Flower Wall” (Beginner-Friendly)
This is a go-to DIY party decoration because it looks expensive, but it’s mostly recycled paper and simple folding. You can keep it natural kraft for boho parties or paint it to match any theme.
Time & skill
- Skill level: Beginner
- Time: 1.5–3 hours for a 6 ft x 6 ft section (faster with helpers)
Materials
- 25–40 brown paper grocery bags (or similar weight paper)
- Hot glue gun or heavy-duty double-sided tape
- Scissors
- Optional: paint, sponge brush, glitter (sealed), or metallic marker
Step-by-step instructions
- Cut the bag into squares: Flatten each bag. Cut off the bottom seam and handles. Cut into 8 in x 8 in squares (or 6 in x 6 in for smaller blooms).
- Stack and fold: Stack 6–8 squares. Fold the stack accordion-style in 1 in folds.
- Tie the center: Wrap a small strip of paper, yarn, or twine around the center and tie tightly.
- Shape the ends: Round the ends for a soft flower, or cut into points for a starburst look.
- Fluff: Gently separate layers, pulling upward one sheet at a time. Repeat on the other side to form a full flower.
- Make multiples: Create a mix of sizes (6 in, 8 in, 10 in) for visual interest.
- Attach to your base: Hot glue flowers onto a cardboard panel, or clip/tie them to a mesh netting attached to a stand. Aim for tight spacing so gaps don’t show in photos.
Best themes
- Boho birthday party
- Rustic baby shower
- Neutral bridal shower
- Earthy holiday gatherings
Backdrop Idea #2: Cardboard Tile “Geometric Wall” (Sturdy & Modern)
If you want a backdrop that stands up well to indoor traffic (and can be reused), cardboard tiles are a smart choice. Think modern, graphic, and super customizable.
Time & skill
- Skill level: Beginner to intermediate
- Time: 2–4 hours for cutting + assembling a 6 ft x 6 ft wall
Materials
- Large cardboard boxes (double-wall cardboard is best)
- Utility knife + cutting mat
- Ruler/straight edge
- Painter’s tape and/or hot glue
- Optional: paint, leftover wallpaper, magazine sheets for collage
Step-by-step instructions
- Cut tiles: Cut 12 in x 12 in squares (or 10 in x 10 in if your cardboard is smaller). For a 6 ft x 6 ft wall, you’ll need 36 tiles (since 6 ft = 72 in; 72/12 = 6 tiles per row; 6x6 = 36).
- Optional texture: Score diagonal lines lightly with the knife (don’t cut through) and fold slightly to create 3D facets.
- Decorate:
- Paint alternating tiles two colors, or
- Collage with magazine pages, or
- Cover with brown paper for a clean, uniform look.
- Assemble panels: Tape tiles together into 3 panels measuring 24 in x 72 in (2 tiles wide x 6 tiles tall). This makes the backdrop easier to transport.
- Join panels: Use painter’s tape on the back to hinge panels together.
- Mount: Clip to a backdrop stand crossbar with binder clips, or attach to a wall using removable hooks (lightweight only).
Extra pop
- Add a paper rosette cluster in one corner.
- Attach a DIY banner across the top third for a “styled” photo booth look.
Backdrop Idea #3: Fabric Scrap “Ribbon Waterfall” (Fast & Dramatic)
Got an old sheet, thrifted curtains, or clothing that can’t be donated? Turn it into a flowing handmade party backdrop that moves beautifully in photos.
Time & skill
- Skill level: Beginner
- Time: 60–120 minutes
Materials
- Old fabric (lightweight woven fabrics are easiest)
- Scissors or rotary cutter + mat
- Twine, clothesline, or a curtain rod
- Clothespins or lark’s head knots (no-sew)
Step-by-step instructions
- Cut strips: Cut fabric into 2 in wide strips. For a 6 ft tall backdrop, cut strips 80 in long (gives you extra length to knot and still reach the floor).
- Prep the top line: Tie twine between two stands or use a backdrop stand crossbar.
- Attach strips: Fold a strip in half, place the loop over the line, then pull tails through the loop (a simple lark’s head knot). Repeat, pushing strips close together.
- Build density: For a 6 ft wide line, plan on 120–180 strips depending on how full you want it.
- Trim the bottom: Once hung, trim ends so the bottom is even (or intentionally staggered for a boho vibe).
Beginner-friendly adaptation
- Use plastic tablecloth strips mixed with fabric for more volume with less cutting time.
Advanced variation
- Dip-dye the ends (ombré effect), then air dry fully before hanging.
Backdrop Idea #4: Recycled Plastic Bottle “Glow Wall” (Advanced, High Impact)
This one is a showstopper for evening parties. Clear bottles catch light beautifully—especially with string lights behind.
Time & skill
- Skill level: Intermediate to advanced
- Time: 3–6 hours (cutting and shaping takes time)
Materials
- 25–40 clear plastic bottles (same size looks best)
- Utility knife + scissors
- Sandpaper (220 grit) or nail file to soften sharp edges
- Zip ties or fishing line
- Optional: battery fairy lights or LED curtain lights ($10–$30)
Step-by-step instructions
- Clean and dry: Remove labels and wash bottles. Dry completely.
- Cut shapes: Cut off the bottle bottoms to make “flower cups,” or cut bottles into rings/spirals. Aim for pieces about 2–4 in tall.
- Soften edges: Lightly sand cut edges so they’re safe to handle.
- Create strands: Punch two small holes opposite each other on each piece. Thread fishing line through to create vertical strands 6–7 ft long.
- Hang on a crossbar: Tie strands to a dowel or backdrop stand crossbar, spacing about 2–3 in apart.
- Add lights: Hang LED curtain lights behind the strands for a glowing texture (avoid hot bulbs).
Pro Tips for a Polished, Photo-Ready Backdrop
- Build in panels: Make your backdrop in 2–3 sections so it’s easier to transport and store.
- Anchor the stand: Use sandbags, hand weights, or filled tote bags at the base—especially if kids will be running around.
- Test the camera view: Step back 6–8 feet and take a quick phone photo. Adjust gaps and height before you commit.
- Hide attachment points: Cover clips with a flower, bow, or extra ribbon strip.
- Use removable adhesives on walls: Painter’s tape and removable hooks help protect paint (still test a small spot first).
Variations to Match Any Party Theme
Color and texture swaps
- Vintage party: Collage with book pages + lace scraps.
- Rainbow birthday: Paint cardboard tiles in a gradient.
- Under the sea: Plastic bottle pieces + blue tissue paper layers.
- Garden party: Paper bag flowers + leaf shapes cut from cereal boxes.
- New Year’s Eve: Add metallic magazine pages and black cardstock accents.
Advanced upgrades
- 3D depth: Mount some elements on foam tape (or stacked cardboard squares) to create shadow and dimension.
- Integrated signage: Add a recycled cardboard “NAME/AGE” sign painted in bold lettering at eye level.
- Balloon + upcycle combo: Use recycled-material backdrop as the base and add a small balloon garland cluster on one side.
Troubleshooting: Fix Common Backdrop Problems
- Backdrop looks wrinkled (paper or fabric):
- For fabric, steam or iron before cutting strips.
- For paper, gently roll it the opposite direction to relax curls.
- Gaps show in photos:
- Add a second layer behind (a sheet, kraft paper roll, or tablecloth).
- Increase density in the center area where photos will be taken.
- Backdrop won’t stay attached to the stand:
- Use binder clips at the top corners and center.
- Add zip ties for heavy sections (cardboard panels).
- Cardboard curls or warps:
- Use double-wall cardboard when possible.
- Paint both sides lightly (one-sided heavy paint can warp).
- Hot glue won’t hold on slick surfaces:
- Rough up plastic lightly with sandpaper, or switch to zip ties.
Common Crafting Mistakes to Avoid
- Skipping measurements: Even “organic” backdrops look better when the overall size is planned (especially for photos).
- Making it too narrow: A 3 ft wide backdrop feels cramped in group photos. Aim for at least 5–6 ft wide for photo booths.
- Using weak tape for heavy pieces: Cardboard panels need clips, zip ties, or staples—not basic gift wrap tape.
- Forgetting the floor line: If it’s a photo area, decide whether the backdrop should touch the floor or stop 12–18 in above to avoid scuffing.
- Building directly on the event wall without a test: Always test adhesives in an inconspicuous spot first.
- Overloading with too many colors: Too many patterns can look messy on camera. Keep a simple palette and repeat it.
FAQ: Upcycled DIY Party Backdrops
How do I make a backdrop sturdy enough for outdoor parties?
Use a backdrop stand with weighted bases (sandbags or hand weights). Choose heavier elements like cardboard tiles rather than lightweight paper. Avoid windy setups unless the backdrop is anchored at the bottom corners too.
What’s the easiest recycled-material backdrop for a total beginner?
The fabric scrap ribbon waterfall is the simplest: cut strips, knot onto a line, trim the bottom. It’s forgiving, fast, and hard to mess up.
How can I make my backdrop look “full” without using tons of materials?
Add a solid base layer first (old sheet, kraft paper roll, or a reused plastic tablecloth), then decorate the front with clustered accents. Concentrate the densest decor in the center third where photos will be framed.
Can I reuse an upcycled backdrop?
Yes. Build in panels, store flat when possible, and use clips/zip ties instead of permanent glue on the stand. Cardboard tile panels and fabric strip backdrops are the easiest to reuse.
What lighting works best for photo booth backdrops?
Soft, even light looks best. Try a ring light facing the guests or two lamps angled toward the backdrop. If you’re using string lights behind translucent elements (like plastic bottle pieces), use LEDs to avoid heat.
How do I transport a large backdrop without it falling apart?
Make it modular: three 24 in x 72 in panels (or similar) fit in most cars. Carry extra binder clips, painter’s tape, and a small hot glue gun for quick fixes on site.
Ready to Make Your Own Upcycled Backdrop?
A great backdrop doesn’t have to be pricey or wasteful. With a little measuring, a few basic tools, and recycled materials you already have, you can create a standout DIY party decoration that’s custom to your theme and genuinely fun to make. Start with one simple technique, then level up with texture, layers, and lighting as you gain confidence.
When you’re ready for your next handmade party project, explore more DIY craft ideas and party prep inspiration on smartpartyprep.com.
More Articles
 12 Stunning Do It Yourself Party Centerpieces You Can Make in Under 30 Minutes (No Craft Experience Needed — Seriously)
 Rustic Favor Bags Ideas
 Modern Thank You Cards Designs
 DIY Garlands for Home Decor
 30 Creative Party Banner Ideas
 Kids' Craft: Confetti
 DIY Vision Boards Using Cricut
 How to Enable Third Party Cookies on iPad Chrome (2024 Guide): Why It’s Not Possible — And What You *Can* Actually Do Instead to Restore Login & Tracking Functionality
 DIY Party Hats Using Cricut
 Kids' Craft: Table Runners