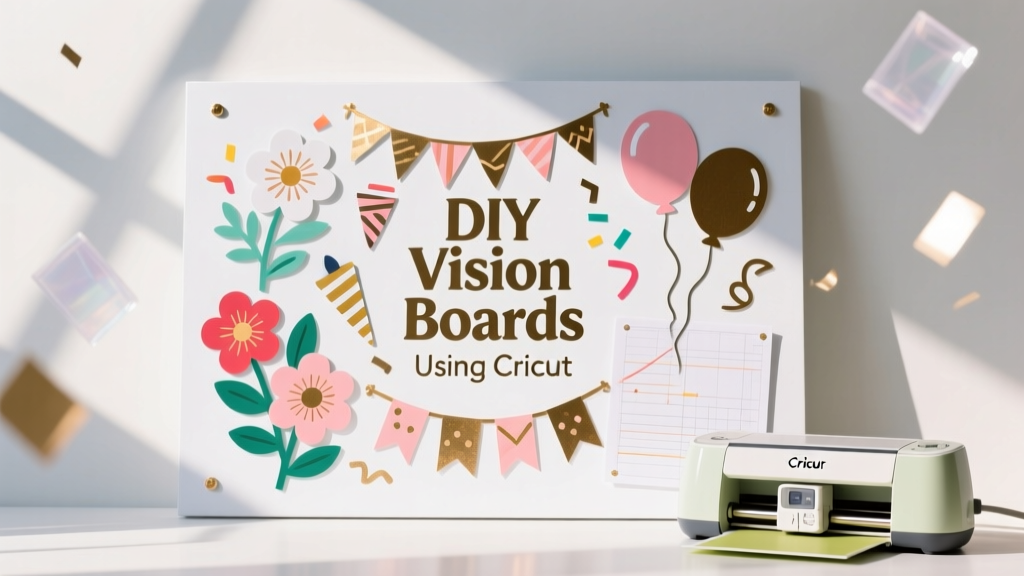
DIY Vision Boards Using Cricut
A vision board is already a powerful tool for goal-setting, but making one with a Cricut turns it into a polished piece of handmade décor you’ll actually want to display. Think of it as part craft project, part creative reset—perfect for a New Year’s party activity, a graduation celebration, a bridal shower “dream wall,” or a cozy craft night with friends.
What makes this project extra fun is the mix of textures and techniques: cutting crisp vinyl titles, layering cardstock shapes, adding photos, and finishing with party-worthy details like confetti colors, glitter accents, and themed icons. You’ll end up with something that looks boutique-level, but it’s totally doable with beginner Cricut skills.
Even better: Cricut vision boards are easy to customize for events. Create matching boards for a girls’ night in, a “new home” housewarming, or a birthday goal-setting station. Guests leave with a personalized keepsake—and you get a handmade party decoration that doubles as an activity.
Project Overview
- Skill level: Beginner to Intermediate (Advanced options included)
- Active craft time: 60–120 minutes
- Drying time: 0–30 minutes (if using paint or glue)
- Finished size options:
- Classic display board: 16" x 20"
- Party-friendly mini board: 8" x 10"
- Framed wall art: 12" x 12"
- Best for: DIY party decorations, handmade projects, goal-setting nights, photo-based keepsakes
Materials & Estimated Costs
Costs vary based on what you already own. The list below is designed for a crisp, professional-looking Cricut project that works beautifully as party décor.
Base Options (choose one)
- Foam board (16" x 20"): $3–$8
- Poster board (22" x 28", cut down): $1–$4
- Canvas panel (12" x 12" or 11" x 14"): $6–$15
- Wood sign blank (12" x 18" or 16" x 20"): $10–$25
Cricut Supplies
- Cricut machine (Explore Air 2 / Explore 3 / Maker / Joy): already owned
- StandardGrip cutting mat (12" x 12" or 12" x 24"): $10–$20
- Fine-Point Blade: typically included; replacement $10–$15
- Weeding tools (hook, tweezers): $8–$18
- Scraper tool: $6–$10
- Brayer (optional but helpful for cardstock): $10–$15
Vinyl, Paper & Adhesives
- Permanent vinyl (for titles on smooth surfaces): $3–$8 per roll/sheet
- Removable vinyl (for temporary party décor): $3–$8
- Heat transfer vinyl (HTV) (if applying to fabric banner vision boards): $4–$10
- Transfer tape (medium tack): $5–$12
- Cardstock (65–80 lb, assorted colors): $5–$12
- Photo prints (wallet size or 4" x 6"): $0.20–$1 each
- Double-sided tape runner: $5–$12
- Liquid craft glue (quick-grab): $3–$6
- Foam dots (for dimension): $3–$6
Optional Party-Perfect Embellishments
- Glitter cardstock: $6–$12
- Washi tape: $3–$10
- Confetti or sequins: $3–$8
- Mini clothespins + twine (photo line): $4–$10
- Paint + foam brush (for wood bases): $5–$15
Design Planning: Pick a Vision Board Style
Choosing a layout first makes everything easier in Cricut Design Space and helps you avoid overcrowding.
Style A: Title + Sections (Best for Beginners)
- Large title at top (ex: “My 2026 Goals”)
- 3–6 labeled categories (ex: Home, Travel, Wellness, Career, Celebration)
- Photos and icons under each section
Style B: Photo Collage + Quote (Great Party Activity)
- Big central quote cut in vinyl
- Photos arranged around it
- Minimal labels, maximum visual impact
Style C: Vision Board “Menu” (Advanced + Super Cute for Parties)
- Designed like a café menu with headings and bullet lists
- Perfect for graduation parties, engagement parties, or “new chapter” celebrations
- Use layered cardstock and thin borders for a clean look
Step-by-Step: DIY Vision Board Using Cricut
Step 1: Choose Your Finished Size & Sketch a Layout
Before you open Design Space, decide on size and spacing.
- Recommended size: 16" x 20" foam board for a wall display or party backdrop table
- Margin guide: Leave a 1" border around all edges for a cleaner look
- Section sizing idea: If doing 4 sections, plan for four 7" x 9" zones with a little space between
Quick tip: Use painter’s tape to lightly mark the border and section zones on the board. It keeps placement neat and helps with symmetry.
Step 2: Build Your Title & Labels in Cricut Design Space
- Create a new project and set your title text (ex: “VISION BOARD” or “Dream Big”).
- Title size guide: 10"–13" wide for a 16" x 20" board; 6"–8" wide for a 12" x 12".
- Pick a font that weeds well:
- Beginner-friendly: bold sans-serif, simple script with thicker lines
- More advanced: thin script (works best with larger sizing)
- Create section labels (ex: “TRAVEL,” “HOME,” “WELLNESS”).
- Add simple icons (stars, hearts, champagne glasses for party themes, balloons, airplanes, plants).
Step 3: Cut Vinyl Titles and Cardstock Shapes
- Vinyl titles: Use permanent or removable vinyl depending on your base.
- Cardstock mats: Cut rectangles to frame photos for a cohesive, handmade decoration look.
Cut settings: Choose the material setting that matches your vinyl/cardstock. When in doubt, do a small test cut.
Step 4: Weed Vinyl Cleanly (Without Losing Tiny Details)
- Use a light source or craft light pad if you have one.
- Start weeding from the corner and pull slowly at a low angle.
- For small letters (like inside “A” or “R”), use tweezers.
Time estimate: 10–25 minutes depending on font complexity.
Step 5: Apply Transfer Tape to Vinyl
- Cut a piece of transfer tape slightly larger than your design.
- Burnish with a scraper tool (firm pressure).
- Flip and peel the vinyl backing away slowly.
Tool recommendation: A scraper tool gives cleaner results than using your fingers alone, especially for longer titles.
Step 6: Place Your Main Title First
Anchoring the title sets the entire layout.
- Measure and lightly mark the center top of the board (about 1.5" down from the top edge).
- Hover the transfer tape over your marks, then tack down one side first.
- Burnish, then peel transfer tape back slowly at a sharp angle.
Beginner-friendly method: Use the “hinge technique” with painter’s tape across the top edge of the vinyl so it doesn’t shift.
Step 7: Add Sections, Photos, and Layers
This is where your DIY vision board becomes party-worthy.
- Arrange section labels and icons first (don’t glue yet).
- Place photo mats underneath photos:
- Mat measurement idea: For a 4" x 6" photo, cut a 4.5" x 6.5" cardstock rectangle.
- For wallet photos: Cut 2.5" x 3.5" mats.
- Adhere in layers:
- Use tape runner for flat layers
- Use foam dots behind photos or key words for dimension
- Add embellishments (glitter accents, washi borders, confetti clusters).
Time estimate: 30–60 minutes depending on detail level.
Step 8: Final Finishing Touches for Display
- For foam board/poster board: Add a simple ribbon loop on the back for hanging.
- For party table display: Use a small easel (6"–12") or a plate stand.
- For framed boards: Build on a 12" x 12" cardstock base and slide into a frame.
Pro Tips for Clean Results (Even If You’re New to Cricut)
- Use fewer fonts. One title font + one label font keeps the design cohesive.
- Choose high-contrast colors. Dark vinyl on light base (or vice versa) reads better across a room—perfect for party décor.
- Keep thin script letters larger. Aim for at least 1" tall for delicate scripts to weed smoothly.
- Group your goals visually. Use consistent shapes (circles or rectangles) to frame photos for a polished handmade look.
- Batch cut for parties. If hosting a vision board party, cut all titles/labels ahead of time and set up an “embellishment bar.”
Fun Variations (Beginner-Friendly to Advanced)
Beginner: Sticker-Style Labels
- Use removable vinyl for section headers and simple icons.
- Skip tiny details and focus on bold shapes and clean text.
Intermediate: Layered Cardstock Titles
- Cut the title 2–3 times in cardstock.
- Stack layers with glue for a chipboard-like 3D effect.
- Looks amazing on party backdrops and dessert tables.
Advanced: Shaker Pocket Goal Windows
- Create a few 3" x 4" shaker pockets using acetate sheets.
- Fill with sequins or confetti that matches the party theme.
- Seal edges with strong double-sided tape.
Party Theme Ideas
- Bridal shower: “Our Next Chapter” + icons (rings, florals)
- Graduation party: “Class of 2026 Goals” + school colors
- Birthday: “This Year I’m Celebrating…” + balloons and stars
- New home: “Home Dreams” + paint swatches and room goals
Troubleshooting: Quick Fixes for Common Cricut Vision Board Issues
My vinyl won’t stick to the board
- Wipe the surface with a dry cloth first (dust blocks adhesion).
- For textured surfaces (canvas, raw wood), use:
- Permanent vinyl + extra burnishing, or
- Switch to painted wood (smooth finish), or
- Use cardstock titles instead of vinyl.
Transfer tape won’t release
- Try lighter pressure when burnishing the transfer tape.
- Peel back slowly at a sharp angle, keeping tape close to the surface.
- If using glitter vinyl, use strong grip transfer tape.
My cardstock tears on the mat
- Use a less sticky mat (LightGrip) or “de-stick” a StandardGrip mat by tapping it with a clean cotton shirt.
- Flip the mat upside down and peel the mat away from cardstock (not the other way around).
My layout looks cluttered
- Remove 10–20% of elements and add whitespace.
- Limit yourself to 3 main colors + 1 accent color (like gold or silver).
Common Crafting Mistakes to Avoid
- Skipping a dry fit. Always place everything before gluing—especially photos and big quotes.
- Using tiny fonts for vinyl. Small script may look pretty on screen but can be frustrating to weed.
- Over-gluing. Liquid glue can warp paper; use a tape runner for most flat layers.
- Not measuring the title. A title that’s too large crowds the board; too small gets lost in the design.
- Mixing too many styles. Keep icons consistent (all line art or all solid shapes) for a cleaner handmade decoration vibe.
FAQ: DIY Vision Boards Using Cricut
Do I need Cricut Access to make a vision board?
No. You can use free fonts and upload your own images. Cricut Access can be convenient for quick icons and ready-to-go layouts, but it’s optional.
What’s the best base for a vision board that will be displayed at a party?
For a crisp party decoration look, foam board (16" x 20") is lightweight and clean. If you want something sturdier that can be reused, choose a painted wood blank or a canvas panel.
Can I make mini vision boards as party favors?
Yes—mini boards are a hit for craft parties. Use 8" x 10" canvases or thick cardstock in clear sleeves. Pre-cut titles and set out sticker sheets, washi tape, and small photo prints so guests can assemble quickly.
How do I print photos for my vision board without spending a lot?
Print 4" x 6" photos in value packs or use wallet-size collages. Another budget-friendly option is printing on regular paper and mounting onto cardstock mats.
Should I use removable or permanent vinyl?
Use removable vinyl if you want to adjust wording later or if it’s a temporary party display. Use permanent vinyl for long-term wall décor on smooth surfaces.
How can I make my vision board look more “finished”?
Add consistency: match photo mat sizes, repeat 1–2 shapes throughout (circles, arches, stars), and include a subtle border (washi tape or a thin cardstock frame). Dimension from foam dots also makes it look professionally crafted.
Ready to Make Yours?
A Cricut vision board is one of those DIY crafts that feels meaningful while still being playful and decorative—exactly what you want for a creative weekend project or a party activity that guests will remember. Start simple with a bold title and a few sections, then level up with layered cardstock, shaker pockets, or themed icons that match your celebration.
When you’re done, display it proudly on a shelf, dessert table, entryway console, or gallery wall. It’s a handmade project with real purpose—and it looks fantastic in photos, too.
Want more party-ready DIY crafts and handmade decoration ideas? Explore more creative projects on smartpartyprep.com and keep the inspiration going.
More Articles
 Modern Table Runners Designs
 How to Make Mini Party Hats in Under 12 Minutes (No Glue Gun, No Scissors Required) — 7 Foolproof Methods That Actually Hold Their Shape
 Rustic Mason Jar Crafts Ideas
 Seasonal Favor Bags Ideas
 Advanced Origami Decorations for Crafters
 How Do You Make Party Hats That Actually Stay On? (No Glue Gun, No Tears — Just 3 Foolproof Methods Using Stuff You Already Have)
 Advanced Paper Lanterns for Crafters
 Paper Craft Centerpieces Ideas
 Is Levels Protein Third Party Tested? We Investigated Every Batch Report, Lab Certificate, and FDA Compliance Record So You Don’t Have to Waste Money on Unverified Supplements
 DIY Place Cards for Birthdays