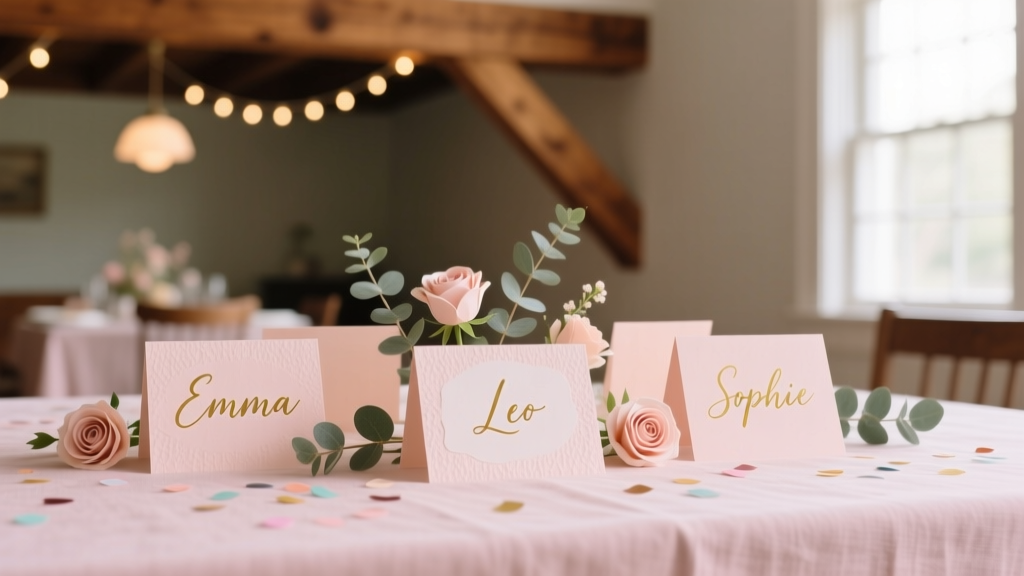
DIY Place Cards for Birthdays
DIY place cards are one of those small party details that make a birthday celebration feel instantly more thoughtful. Whether you’re hosting a kid’s party with energetic friends, a milestone dinner for adults, or a cozy family gathering, handmade place cards help guests feel welcomed and make your table look styled—without needing expensive décor.
The best part? This is a beginner-friendly DIY craft that can be as simple or as elevated as you want. You can create quick folded cards in 20 minutes, or turn them into mini party decorations with themes, textures, and personalized touches that match your birthday color palette.
Below you’ll find practical, step-by-step instructions, cost estimates, and creative variations—plus troubleshooting and common mistakes to avoid—so you can confidently make birthday place cards that look polished and party-ready.
Project Overview: Skill Level, Time, and What You’ll Make
- Skill level: Beginner (with optional advanced upgrades)
- Time estimate:
- Simple folded cards: 2–4 minutes each
- Decorated/theme cards: 5–10 minutes each
- For 12 guests: about 30–90 minutes depending on style
- Finished size (recommended): 3.5 in x 2 in folded tent card (fits most place settings)
- Best for: Birthday parties, dinner parties, dessert tables, themed celebrations, kids’ tables
Materials List (With Specific Product Types + Estimated Costs)
Core Supplies (Choose These First)
- Cardstock, 8.5 in x 11 in, 65–110 lb (white, kraft, or colored)
- Cost: $6–$12 for 50–100 sheets
- Notes: 65 lb is easier to fold; 110 lb feels luxe but needs better scoring
- Paper trimmer (guillotine or sliding blade)
- Cost: $12–$25
- Tool recommendation: a trimmer with a clear measurement grid for accurate cuts
- Scoring tool (bone folder, scoring board, or the back of a butter knife)
- Cost: $4–$15 (or free with household items)
- Adhesive (pick one)
- Glue runner or double-sided tape: $5–$10
- Craft glue (fine-tip): $3–$6
- Foam tape (for 3D elements): $4–$7
- Writing tools
- Fine-tip black marker (0.3–0.5 mm) or gel pen: $3–$8
- Optional: metallic paint pen for glam themes: $4–$10
Optional Decorations (Mix and Match)
- Washi tape (patterns to match your party theme): $3–$10
- Stickers (stars, balloons, numbers, letters): $2–$8
- Ribbon (1/8 in to 3/8 in wide): $3–$7
- Mini clothespins (for photo place cards): $3–$6
- Die-cut machine or punches (circle, scallop, star): $6–$25+ depending on tool
- Small faux greenery sprigs or dried flowers: $5–$12
Handy Tools for Cleaner Results
- Small scissors (precision tips): $6–$12
- Ruler (metal is best for straight edges): $3–$8
- Pencil + eraser (for light guidelines): $2–$5
- Corner rounder punch (optional, makes cards look “store-bought”): $6–$12
How Many Place Cards Can You Make Per Sheet?
A standard 8.5 in x 11 in sheet can make six tent-style place cards at 3.5 in x 2 in folded.
- Cut size (flat): 3.5 in x 4 in
- Fold line: at 2 in (so it stands like a tent)
Cut plan: Cut the sheet into strips 3.5 in wide. Each strip (3.5 in x 11 in) yields two cards at 4 in long (with a small scrap).
Step-by-Step: Classic Folded Tent Place Cards
Step 1: Measure and Cut the Cardstock
- Trim cardstock into rectangles: 3.5 in x 4 in.
- Make one test card first to confirm you like the size next to your plates and napkins.
Beginner-friendly tip: If measuring feels intimidating, use a paper trimmer’s grid and cut a full batch at once.
Step 2: Score for a Crisp, Professional Fold
- On the 4 in side, mark the center at 2 in.
- Use a scoring tool and ruler to score a straight line.
- Fold along the score line to create a tent.
- Run a bone folder (or the back of a spoon) along the fold to sharpen it.
Why scoring matters: It prevents cracked edges, especially on thicker or textured cardstock.
Step 3: Add Guest Names (Simple and Clean)
- Lightly pencil a baseline about 1 in from the bottom edge.
- Write the name in the center. Keep letters large enough to read from across the table.
- Erase pencil marks once the ink is dry.
- Letter size guideline: Aim for 1/2 in tall letters for easy visibility.
- Spacing tip: If names vary in length, write long names slightly smaller to keep them centered.
Step 4: Add a Simple Decorative Detail (Optional, Big Impact)
Choose one fast embellishment for a cohesive look:
- One strip of washi tape across the bottom edge (about 3.5 in long)
- A small sticker in the top corner
- A tiny punched shape (circle/star) attached with a glue runner
Step 5: Prep for Party Setup
- Stand each card and gently press the tent shape so it sits evenly.
- Arrange place cards in seating order on a tray or baking sheet for easy transport.
- Keep them away from humidity until the party (especially if using craft glue).
Three Creative DIY Birthday Place Card Styles (With Variations)
1) Balloon-Themed Place Cards (Great for Kids and Bright Parties)
Extra materials: balloon stickers or balloon cutouts, string/line drawn with a pen
- Create the classic tent card (3.5 in x 2 in folded).
- Add a balloon sticker or paper balloon shape near the top.
- Draw a thin “string” line down toward the name.
- Beginner option: Use one sticker per card.
- Advanced variation: Layer two balloon cutouts using foam tape for a 3D look.
2) Photo Place Cards (Built-In Party Favor + Conversation Starter)
Extra materials: small printed photos (2 in x 2 in or 2 in x 3 in), mini clothespins or glue dots
- Make tent cards slightly larger for stability: cut 4 in x 4 in, fold at 2 in (final: 4 in wide).
- Print photos and trim to size.
- Attach the photo to the front using a mini clothespin (cute) or glue dots (sleek).
- Write the name below the photo.
- Theme idea: Use childhood photos for milestone birthdays (18, 21, 30, 40, 50).
3) Elegant Dinner Party Place Cards (Minimal + Luxe)
Extra materials: metallic pen, vellum strip, ribbon (1/8 in), small greenery sprig
- Create tent cards using 110 lb cardstock in white or soft neutral.
- Write names in metallic ink (gold or silver).
- Wrap a 1 in wide vellum strip around the base and secure with double-sided tape.
- Tuck a tiny greenery sprig under the vellum for a fresh “event” look.
- Advanced variation: Add heat embossing if you have embossing ink and powder.
Pro Tips for Beautiful, Consistent Handmade Place Cards
- Batch your process: Cut all cards first, then score all, then write all names. It’s faster and more consistent.
- Use a spacing guide: Create one “template” card with pencil guidelines for name placement, then lightly mark the rest.
- Test pens on scrap cardstock: Some markers feather on textured paper, and metallic pens can smear if not fully dry.
- Choose high-contrast combos: Dark ink on light cardstock (or white ink on dark cardstock) reads best at a party table.
- Stability hack: If cards wobble, slightly widen the base by gently opening the tent and pressing the fold again.
- Kid-proofing: For children’s tables, avoid glitter that sheds and tiny embellishments that can pop off.
Troubleshooting: Quick Fixes for Common Issues
My cardstock is cracking on the fold
- Score before folding (don’t skip this on thick cardstock).
- Fold slowly and reinforce with a bone folder.
- Try a slightly lighter cardstock (65–80 lb) for easier folding.
The ink smears or takes forever to dry
- Switch to a fast-drying fine-tip marker.
- Let names dry for 1–2 minutes before stacking.
- Avoid glossy or coated cardstock for handwritten place cards.
My cards won’t stand up straight
- Make sure your fold is exactly at 2 in.
- Use heavier cardstock or slightly larger cards (4 in wide finished).
- Place a discreet glue dot inside the tent to hold the angle (optional).
My cuts look uneven
- Use a paper trimmer instead of scissors for straight edges.
- Check that the paper is flush to the trimmer’s guide before cutting.
- Replace dull trimmer blades if edges look “ragged.”
Common Crafting Mistakes to Avoid
- Starting without a size test: Make one sample card and place it on a plate setting before cutting 20 more.
- Using paper that’s too thin: Regular printer paper tends to flop. Use at least 65 lb cardstock.
- Over-decorating: Puffy stickers, heavy embellishments, or bulky bows can make cards tip over.
- Writing names at the very end: Handwriting takes longer than you think. Do names early so you’re not rushed on party day.
- Skipping dry time: Stacking fresh ink is a recipe for smudges. Lay cards flat until fully dry.
- Ignoring readability: Super light ink or overly fancy lettering can be hard to read in dim party lighting.
FAQ: DIY Birthday Place Cards
How far in advance can I make place cards?
You can make most DIY place cards 3–7 days ahead. Store them flat in a box or large zip bag away from humidity and direct sunlight, especially if you used glue or metallic ink.
What’s the best cardstock weight for place cards?
65–80 lb cardstock is the easiest for beginners and folds beautifully when scored. For a more premium look, use 100–110 lb cardstock and score carefully to prevent cracking.
Can I make place cards without a paper trimmer?
Yes. Use a ruler and sharp scissors, or a craft knife with a cutting mat. A paper trimmer is faster and straighter, but not required for handmade party decorations.
How do I make place cards match a birthday theme?
Pick one or two theme elements and repeat them consistently—like color (pink + gold), icons (stars, balloons), or texture (kraft paper + twine). A little repetition makes DIY décor look coordinated.
What if I don’t know the final guest list yet?
Pre-cut and pre-fold all blank cards, then add names once the guest list is confirmed. You can also create a few extras for last-minute additions.
Are place cards necessary for casual birthday parties?
They’re optional, but they’re incredibly helpful for managing friend groups, keeping siblings separated (when needed), and making the table feel special—especially for sit-down meals or planned activities.
Conclusion: Your Table Is About to Look So Good
DIY place cards for birthdays are a fast, satisfying handmade project that brings structure to seating and adds a personal touch to your party decorations. Start with the classic tent card, keep your design simple and readable, and add one fun theme detail to tie everything together.
Make a small batch first, find a style you love, then repeat it assembly-line style—you’ll be surprised how quickly your table comes together. When guests see their names waiting for them, it sets the tone for a warm, thoughtful celebration.
Want more party-ready DIY crafts and handmade decoration ideas? Browse more creative projects and smart hosting inspiration on smartpartyprep.com.
More Articles
 How to Record Xbox Party Chat in 2024: The Only Step-by-Step Guide That Actually Works (No Capture Card Required)
 Paper Craft Photo Frames Ideas
 How to Make a Party Hat from Paper in Under 8 Minutes (No Glue Gun, No Scissors Required — Just 3 Sheets & a Stapler)
 DIY Resin Jewelry Using Cricut
 How to Allow Third Party Cookies on Chrome in 2024: A Step-by-Step Guide That Actually Works (No More 'Blocked' Errors or Broken Logins)
 How Do I Block Third Party Cookies in 2024? The Real-World Guide That Actually Works (No Tech Degree Required)
 How to Make Party Hat in 7 Minutes Flat — No Glue Gun, No Scissors, No Stress (Just Paper, Tape & Joy)
 DIY Mugs Party Favors
 Upcycled Memory Books from Recycled Materials
 DIY Wooden Signs in 1 Hour