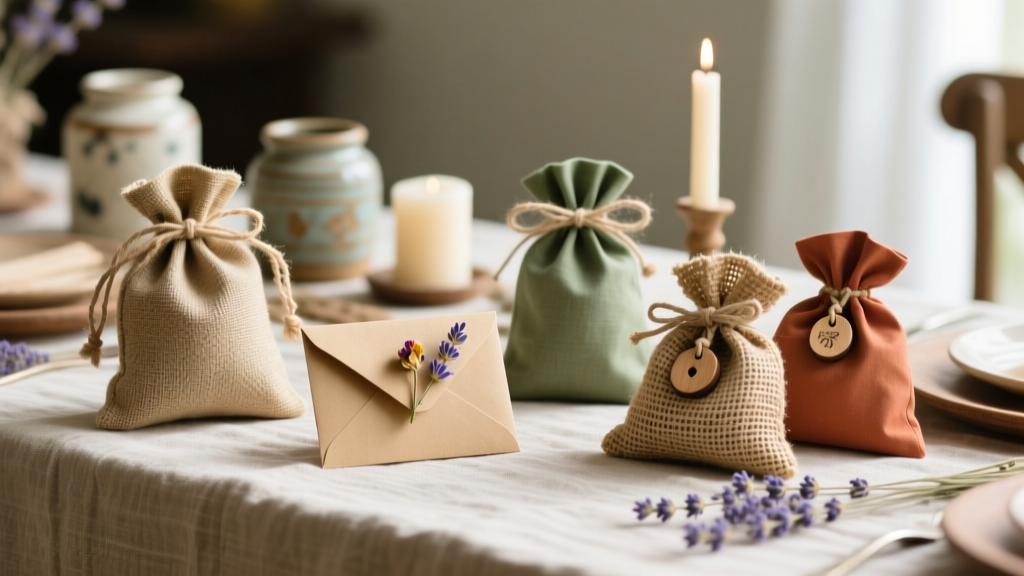
Rustic Favor Bags Ideas
Rustic favor bags are the kind of party detail guests actually notice—because they feel thoughtful, handmade, and a little bit magical. Whether you’re planning a barn wedding, woodland baby shower, fall birthday, or a cozy holiday gathering, rustic treat bags instantly add warmth and charm to your party table.
Even better: these DIY favor bags are budget-friendly and flexible. You can dress up simple kraft paper bags with twine and greenery, stamp muslin bags for a farmhouse vibe, or turn mini burlap sacks into keepsakes. Most designs can be finished in an afternoon, and you’ll end up with party decorations that double as functional packaging.
This guide shares several rustic favor bag ideas with clear steps, measurements, and pro tips. Pick one style or mix a few for a layered “collected” look that feels curated and personal.
Quick Project Overview
- Skill level: Beginner to Intermediate (advanced variations included)
- Time estimate: 10–25 minutes per 10 bags (after setup); 45–90 minutes total for 20–30 bags
- Best for: weddings, baby showers, bridal showers, birthday parties, graduation parties, holiday gatherings
- Rustic style keywords: kraft paper, twine, burlap, muslin, dried flowers, wax seal, stamped tags
Materials List (With Product Types + Estimated Costs)
Choose materials based on the favor bag style you want. Prices vary by brand and location, but these estimates help you plan.
Bag Bases
- Kraft paper favor bags (5 x 7.5 in or 6 x 9 in, pack of 25–100): $6–$18
- White paper favor bags (same sizes, pack of 25–100): $7–$20
- Muslin drawstring bags (4 x 6 in or 5 x 7 in, pack of 10–50): $8–$22
- Mini burlap bags (4 x 6 in, pack of 10–50): $9–$28
- Glassine treat bags (5 x 7 in, pack of 50–100): $7–$15
Decor + Closures
- Jute twine (100–200 ft spool): $4–$10
- Cotton baker’s twine (optional, for softer look): $4–$9
- Brown paper raffia (optional): $5–$10
- Brown/ivory cardstock (65–80 lb for tags): $6–$12
- Dried florals (baby’s breath, lavender, wheat stems): $6–$18
- Mini clothespins (pack of 25–50): $3–$8
- Wax seal kit (optional): $12–$30
- Rubber stamps + ink pad (optional): $8–$25
Adhesives + Tools (Recommended)
- Hot glue gun (low-temp is beginner-friendly) + glue sticks: $10–$20
- Double-sided tape (strong craft tape): $4–$10
- Paper trimmer (faster than scissors for tags): $15–$35
- Scissors (sharp detail scissors for twine ends): $5–$15
- Hole punch (single-hole, 1/4 in): $5–$12
- Ruler (12 in) + pencil: $2–$6
- Optional: corner rounder punch for polished tags: $6–$15
Rustic Favor Bag Ideas (Pick Your Favorite Style)
Idea #1: Classic Kraft Bag + Twine + Handmade Tag
Look: simple farmhouse, works for any theme. Best for: cookies, candies, small soaps, tea bags.
Measurements
- Bag size: 5 x 7.5 in (good for 2–4 cookies or small candy mix)
- Tag size: 2 x 3.5 in (easy to cut from cardstock)
- Twine length per bag: 18–22 in
Step-by-Step
- Fill the bag. Leave at least 1.5–2 in of empty space at the top so it can fold neatly.
- Fold the top. Fold down 1 in, then fold again 1 in to create a clean double fold.
- Secure the fold. Add a strip of double-sided tape under the second fold (or use one small dot of hot glue at each corner).
- Make tags. Cut cardstock into 2 x 3.5 in rectangles. Punch a hole about 3/8 in from the top edge, centered.
- Personalize. Write names, a short “Thank you,” or stamp a simple icon (leaf, heart, initial).
- Tie it up. Wrap twine around the folded top once or twice, thread the tag, and tie a bow or a double knot.
Idea #2: Dried Floral Sprig + Twine Wrap (Elevated Rustic)
Look: wedding-ready rustic chic. Best for: bridal showers, boho parties, garden themes.
What You’ll Add
- Dried lavender sprigs (about 2–3 in long each) or baby’s breath
- Hot glue (tiny dot) or simply tuck under the twine
Step-by-Step
- Finish a bag using the steps from Idea #1 (fold + secure).
- Place a dried sprig centered on the front of the bag, just under the fold.
- Wrap twine around the top so it pins the sprig in place.
- If needed, add a pinhead-size dot of hot glue behind the sprig stem to prevent slipping.
- Add a small tag or leave tag-free for a minimal look.
Idea #3: Muslin Drawstring Bags with Stamped Designs
Look: soft, reusable, handmade. Best for: bath salts, small candles, jewelry, party favors guests will keep.
Tool Recommendation
- Use fabric ink or acrylic paint + fabric medium (helps prevent cracking after drying).
Step-by-Step
- Prep the bag. Insert a piece of cardboard inside the muslin bag so ink doesn’t bleed through to the back.
- Ink the stamp. Lightly coat the stamp—too much ink causes blurry edges.
- Stamp the design. Press firmly for 2–3 seconds without rocking.
- Dry completely. Let it air dry at least 30 minutes (or follow ink directions).
- Heat-set (if required). Many fabric inks recommend ironing for 30–60 seconds with a pressing cloth.
- Fill + tie. Add the favor, pull drawstrings, and tie a simple bow.
Idea #4: Mini Burlap Bags with Lace Trim (Rustic Glam)
Look: barn wedding meets vintage charm. Best for: weddings, anniversaries, fall events.
Measurements
- Lace strip: 0.75–1.25 in wide, cut to 6–7 in (wraps front of most 4 x 6 in mini bags)
Step-by-Step
- Cut lace. Trim lace to length; test wrap around the bag’s front.
- Attach lace. Use a thin line of hot glue across the front of the burlap bag (about 1.5 in down from the top). Press lace gently into glue.
- Add a tag. Tie jute around the neck/top and add a kraft tag.
- Optional centerpiece detail. Glue a tiny wooden heart or mini button at the center of the lace band.
Idea #5: Glassine Treat Bags + Rustic Topper (Fastest Assembly Line Option)
Look: clean and bakery-cute with rustic accents. Best for: cookie favors, caramel popcorn, candies.
Measurements
- Topper size: 2 x 6 in cardstock strip (fits most 5 in wide glassine bags)
Step-by-Step
- Fill the glassine bag. Tap gently to settle treats.
- Fold topper. Score or fold the 2 x 6 in strip in half to make a 2 x 3 in folded topper.
- Staple or tape. Slide topper over the bag’s open edge and secure with 1–2 staples or strong double-sided tape.
- Rustic finish. Wrap a short piece of twine around the topper or add a mini clothespin with a tag.
Assembly-Line Method (Make 30 Bags Without Stress)
- Set up stations: cutting tags, punching holes, filling bags, folding/sealing, tying.
- Pre-cut everything: tags, twine lengths (20 in each is a good standard), lace strips, topper strips.
- Do one step for all bags before moving to the next. This keeps your DIY party decorations consistent and faster.
Pro Tips, Variations, and Troubleshooting
Pro Tips for a Polished Rustic Look
- Keep your palette tight: kraft + white + greenery, or kraft + black ink + twine.
- Use a tag template: cut one “master” tag and trace it for consistent sizing.
- Snip twine ends cleanly: cut at a sharp angle for a tidy finish.
- Choose the right adhesive: double-sided tape for paper; hot glue for burlap, lace, and wood accents.
Beginner-Friendly Adaptations
- Skip stamping and write on tags with a fine-tip permanent marker.
- Use pre-made favor tags and focus on tying and styling.
- Choose kraft bags + clothespins instead of folding and taping.
Advanced Variations (Worth the Extra Time)
- Wax seal closure: seal twine onto a folded flap for an old-world vibe (great for weddings).
- Custom printed stickers: add round kraft labels with names/date for professional-looking handmade projects.
- Layered tag set: stack a small 1.5 in kraft circle tag on top of a 2 x 3.5 in ivory tag using a brad.
- Hand-torn paper tags: tear edges instead of cutting for extra rustic texture.
Troubleshooting
- Twine keeps sliding off: Wrap it twice and tie a double knot; add a small dot of hot glue under the first wrap.
- Stamped images look blurry: Use less ink and press straight down without rocking.
- Burlap frays too much: Trim loose fibers and add a thin line of fabric glue along raw edges.
- Bag tops won’t stay folded: Increase fold depth to 1.25 in and use stronger tape (or two small staples hidden under twine).
Common Crafting Mistakes to Avoid
- Overfilling bags: Leave space for folding or tying—aim for 70–80% full.
- Using high-temp hot glue on thin paper: it can warp or burn; use low-temp glue or tape.
- Cutting tags one-by-one with scissors: it’s slower and uneven; a paper trimmer saves time and looks cleaner.
- Mixing too many textures: burlap + lace + heavy ribbon + large florals can look busy. Choose 2–3 textures max.
- Ignoring food safety: if favors are edible, use inner liners (glassine bag inside kraft bag) or wrapped treats.
- Waiting until the night before: stamping, glue, and ink sometimes need drying time. Make bags 2–5 days ahead if possible.
FAQ: Rustic Favor Bags
1) What size favor bag should I use for cookies or candy?
For 2–4 medium cookies or a handful of candy, a 5 x 7.5 in kraft bag works well. For bigger favors (mini candle, larger snack portion), go with 6 x 9 in. If you want guests to reuse the packaging, a 5 x 7 in muslin drawstring bag is a great upgrade.
2) How do I keep dried flowers from falling off the bag?
Wrap twine around the bag top twice so it pins the stems down. If the stems still slip, add a tiny dot of hot glue behind the stem bundle before tying.
3) Can I make rustic favor bags without a hot glue gun?
Yes. Use strong double-sided tape for paper and cardstock, and tie embellishments on with twine. For burlap + lace, fabric glue works, but allow extra drying time (often 1–4 hours).
4) What are easy rustic favor bag ideas for kids’ parties?
Kraft bags with a simple stamped star/heart and a name tag are quick and durable. You can also let kids decorate tags with crayons or stickers, then finish each bag with twine for that rustic touch.
5) How far in advance can I assemble favor bags?
Non-food favors can be assembled 1–2 weeks ahead. For edible treats, assemble bags 1–3 days ahead for best freshness, or package treats in sealed inner bags and place them into the rustic bag earlier.
Wrap-Up: Make Your Party Favors Feel Extra Special
Rustic favor bags are a simple DIY craft that delivers a big payoff—your party favors look styled, coordinated, and handmade, even if you’re working on a budget. Start with kraft bags and twine for an easy win, then level up with dried florals, stamped muslin, or lace-wrapped burlap when you want something more elevated.
Try one idea this week, make a small batch as a test run, and adjust your tags and embellishments until they feel just right for your theme. Your guests will love the cozy, personal touch.
Want more party-ready handmade projects and DIY party decorations? Explore more creative ideas on smartpartyprep.com.
More Articles
 DIY Mugs for Home Decor
 Advanced Custom Stickers for Crafters
 Budget DIY Gift Boxes Under $20
 How to Train Your Dragon Party Decorations: 7 No-Stress DIY Projects That Take Under 2 Hours (No Glue Gun Required!)
 Budget DIY Photo Booth Props Under $25
 How to Remove a Pokemon from Your Party in Cobblemon: The 3-Step Method That Actually Works (No Crashes, No Lost Data, and Zero Mod Conflicts)
 Seasonal Masks Ideas
 Advanced Backdrops for Crafters
 How to Enable 3rd Party Cookies in Safari (2024): The Truth No One Tells You — It’s Not Just a Toggle, and Here’s Why Your Login Failures, Analytics Gaps, and Ad Personalization Break Without This Critical Fix
 DIY Confetti in 30 Minutes