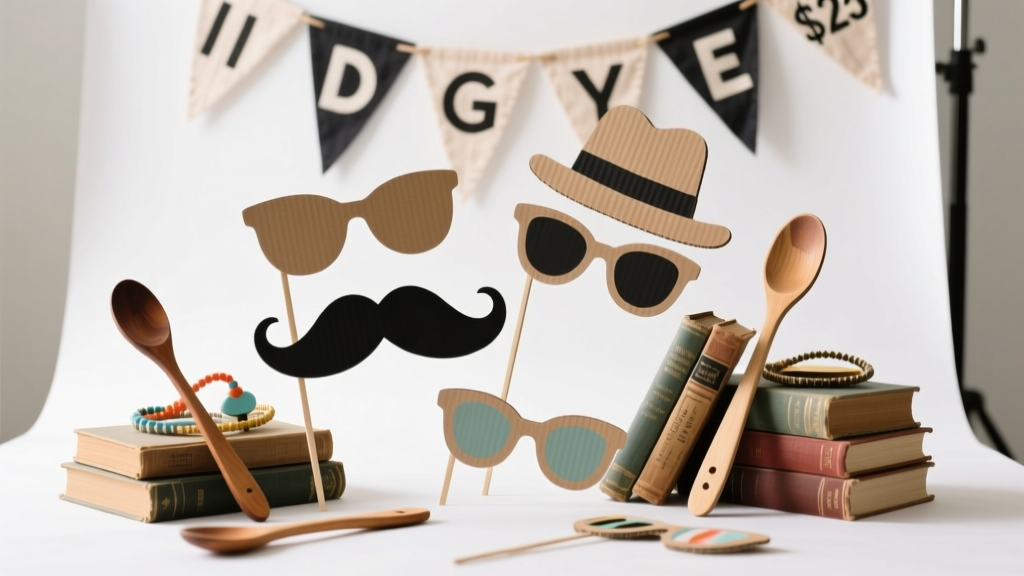
Budget DIY Photo Booth Props Under $25
A great photo booth can turn a regular party corner into the most-loved spot in the room. The best part? You don’t need a pricey kit to get big laughs and great pictures. With a few basic craft supplies, you can make sturdy, reusable DIY photo booth props that look polished, photograph well, and match your party theme.
This project is especially fun because it’s fast, customizable, and perfect for crafting solo or with friends. You’ll end up with a mix of classic props (mustaches, glasses, speech bubbles) and a few themed extras that make your party photos feel personal and handmade.
Below you’ll find a step-by-step plan to create a full set of budget party decorations and props for under $25—plus pro tips, troubleshooting, and beginner-friendly options.
Project Overview
- Skill level: Beginner (advanced variations included)
- Total time: 60–120 minutes (depending on number of props)
- Estimated cost: $15–$25
- Makes: 15–25 photo booth props (average set)
- Best for: Birthdays, weddings, baby showers, graduation parties, holiday parties, and themed events
Materials List (Under $25) + Estimated Costs
Costs vary by location, but this list keeps you comfortably within budget using common craft-store or dollar-store items.
Core Supplies
- Cardstock (8.5" x 11"), assorted colors (12–20 sheets) — $4–$7
- Foam board or poster board (optional for extra stiffness, 1 sheet 20" x 30") — $3–$5
- Wooden dowels or bamboo skewers (12" length, pack of 25–50) — $2–$4
- Hot glue sticks (mini or standard, pack) — $2–$4
- Double-sided tape (optional but helpful) — $2–$4
Decorative Add-Ons (Pick 1–3 Based on Budget)
- Glitter paper or glitter foam sheets (2–4 sheets) — $2–$6
- Adhesive gems or sequins — $1–$4
- Metallic markers (gold/silver) — $2–$5
- Washi tape — $2–$5
Recommended Tools
- Scissors (8" craft scissors work fine)
- Craft knife (utility/X-Acto style) + a cutting mat (for crisp details)
- Ruler (12")
- Pencil and black marker (fine tip + regular tip)
- Hot glue gun (low-temp is safer for longer crafting sessions)
- Optional: 1/8" hole punch (great for speech bubbles and hanging props)
Prop Set Plan: What to Make (Photogenic Favorites)
If you want a well-rounded set, aim for a mix of face props, signs, and themed pieces. Here’s a balanced lineup that photographs well:
Classic Must-Haves (8–12 props)
- 2–3 pairs of oversized glasses
- 2 mustaches (one big, one curled)
- 1–2 lips (smile or kissy)
- 1 bow tie or neck tie
- 1 crown or tiara
- 1 top hat
Speech Bubbles & Signs (6–10 props)
- 2 speech bubbles: “Say Cheese!” and “Best Day Ever”
- 1–2 thought bubbles: “Party Time!” “OMG!”
- 2 mini signs: “Team Bride,” “Birthday Queen,” “Congrats Grad,” etc.
Easy Theme Boosters (Choose 3–6 props)
- Stars (great for New Year’s, glam themes)
- Hearts (weddings, Valentine’s, anniversaries)
- Balloon shapes (birthday parties)
- Pumpkins/snowflakes (seasonal parties)
Step-by-Step: Make DIY Photo Booth Props That Hold Up
Step 1: Choose a Size Guide (So Props Look Great on Camera)
Use these measurements for a flattering, photo-friendly scale:
- Glasses: 6.5"–7.5" wide, 2.5"–3" tall
- Mustache: 5"–6.5" wide
- Lips: 4.5"–5.5" wide
- Speech bubbles: 7"–9" wide, 5"–7" tall
- Hats/crowns: 7"–9" wide (depending on style)
- Handles (dowels/skewers): 10"–12" long
Step 2: Create Templates (Fast + Repeatable)
- On plain paper, sketch your shapes using the size guide above.
- Cut out the paper templates.
- Trace templates onto cardstock (or glitter paper for accent props).
Beginner shortcut: Keep shapes simple—bold outlines and chunky silhouettes read best in photos.
Step 3: Cut Clean Shapes
- Cut cardstock with scissors for basic curves.
- Use a craft knife for interior cutouts (like the lenses in glasses) and crisp corners.
- If making glasses: cut lens holes that are at least 2" wide so they don’t look tiny in pictures.
Time saver: Stack 2 sheets of cardstock and cut the same shape twice (works best with simpler silhouettes).
Step 4: Reinforce for Durability (Optional but Worth It)
If you want props that survive multiple parties, reinforce them:
- Trace the finished cardstock prop onto foam board or extra cardstock.
- Cut the backing slightly smaller (about 1/8" inside the edge) so it won’t show.
- Glue the backing to the prop with a thin layer of glue or double-sided tape.
Budget option: Skip foam board and simply double-layer cardstock (two identical shapes glued together).
Step 5: Decorate (Keep It Bold)
Photo booth props need contrast and clear shapes. Try these decorating ideas:
- Outline edges with a black marker for definition.
- Add glitter accents to only 10–20% of the prop (too much glitter can look messy in photos).
- Use metallic marker to add small details: eyelashes, stitching lines, crown jewels.
- Add washi tape borders to speech bubbles.
Step 6: Attach Handles That Don’t Wiggle
- Flip the prop over.
- Place the dowel/skewer so it overlaps the prop by 2.5"–3".
- Hot glue along the contact area in a thick line.
- Press the stick into the glue and hold for 15–20 seconds.
- For extra strength, glue a small cardstock “brace” strip (about 1" x 3") over the stick end like a bandage.
Safety note: If kids will use these, wrap the bottom end of skewers with tape or use dowels/paper straws.
Step 7: Add Wording to Speech Bubbles
For crisp lettering:
- Write with a bold marker (letters at least 3/4" tall).
- Keep phrases short: 1–3 words reads best in photos.
- Use high contrast (black on white, white on black, gold on dark colors).
Pro Tips for Better-Looking (and Better-Lasting) Props
- Use matte cardstock for most props to reduce glare in flash photography.
- Round sharp corners slightly so props don’t bend and crease as easily.
- Make a few “big” props (9" wide speech bubbles) for group photos.
- Color-block your set: pick 3 main colors + 1 metallic accent so everything looks coordinated.
- Pre-test in your camera: hold a prop at arm’s length and snap a quick photo to check scale.
Variations for Any Party Theme
Beginner-Friendly Adaptations
- No craft knife? Skip interior cutouts and draw lens circles on glasses instead.
- No hot glue gun? Use strong double-sided tape and add the cardstock brace strip over the handle.
- Short on time? Make 10 props total: 3 glasses, 2 mustaches, 2 speech bubbles, 1 lips, 1 crown, 1 bow tie.
Advanced Variations (Extra “Wow” Without Much Extra Cost)
- Layered 3D look: Cut a second shape in a contrasting color and mount with foam tape for dimension.
- Shaker props: Create a speech bubble frame, add a clear plastic window (recycled packaging), and fill with confetti.
- Interactive props: Add a small flap (like a “closed/open” mouth) using a paper fastener brad.
- Theme icons: Baby shower (bottles, pacifiers), graduation (caps, diplomas), holiday (ornaments, reindeer antlers).
Troubleshooting: Quick Fixes for Common Issues
- Prop keeps spinning on the stick: Add more glue + a cardstock brace strip over the handle end.
- Cardstock is curling: Use less wet glue, switch to tape, or double-layer cardstock to flatten it.
- Glitter shedding everywhere: Choose glitter foam instead of loose glitter, or seal edges lightly with clear-drying glue.
- Speech bubble text looks messy: Write in pencil first, then trace with marker. Or cut letters from contrasting cardstock.
- Props look small in photos: Increase width by 1"–2" (especially for glasses and speech bubbles).
Common Crafting Mistakes to Avoid
- Making props too detailed: Tiny features disappear in photos—bold shapes win.
- Using thin paper instead of cardstock: Regular printer paper bends instantly; use at least 65 lb cardstock if possible.
- Placing the handle too low: Attach closer to the center so the prop balances and doesn’t flop forward.
- Overloading with decorations: Too many gems/tape pieces can peel and create visual clutter.
- Skipping a quick camera test: One test photo saves you from remaking half your set.
FAQ: DIY Photo Booth Props
1) Can I really make a full set of photo booth props under $25?
Yes. Stick to cardstock + skewers/dowels as your base and choose only 1–2 extras (like metallic marker and a couple sheets of glitter paper). A 15–25 prop set is very doable within a $15–$25 budget.
2) What’s the best material for sturdy props?
For the best durability, use cardstock + a second cardstock layer or add a foam board backing. Foam board is stiffer, but double-layer cardstock is often enough for one-night parties.
3) How do I make props kid-safe?
Use wooden dowels or paper straws instead of sharp skewers, and wrap the handle ends with tape. Also keep props larger and avoid tiny detachable gems for very young kids.
4) How far in advance can I make these?
You can make them 1–2 weeks ahead. Store them flat in a large envelope, a pizza box, or a shallow plastic bin to prevent bending.
5) Do I need a cutting machine (like a Cricut) for clean props?
No. Scissors + a craft knife for interior cuts is enough. A cutting machine is great for advanced layered designs, but beginner-friendly shapes look fantastic when cut neatly and outlined boldly.
6) What’s the easiest way to match my party decorations?
Choose a palette of 3 colors + 1 metallic (example: blush, white, black + gold). Repeat those colors across your handmade party decorations and props for an instantly coordinated look.
Wrap-Up: Your Photo Booth Just Got a Whole Lot More Fun
With a few simple supplies and an hour or two of crafting, you can build a photo booth prop set that’s creative, sturdy, and totally personalized—without blowing your party budget. Keep your shapes bold, your handles reinforced, and your colors coordinated, and you’ll have props that guests reach for all night.
Want more budget-friendly DIY crafts, party decorations, and handmade projects for celebrating in style? Explore more creative ideas on smartpartyprep.com.
More Articles
 Kids' Craft: Tie-Dye Shirts
 Budget DIY Masks Under $5
 30 Creative Invitations Ideas
 DIY Dream Catchers Party Favors
 How to Allow Third Party Cookies on a Mac in 2024: A Step-by-Step Safari & Chrome Guide (No Tech Degree Required)
 How to Allow 3rd Party Cookies on iPad in 2024: A Step-by-Step Fix for Logins, Shopping, and Tracking That *Actually Works* (No Safari Tricks Needed)
 DIY Cake Toppers Using Cricut
 Step-by-Step Backdrops Tutorial
 Personalized Photo Frames Gifts
 How to Make Paper Lanterns at Home