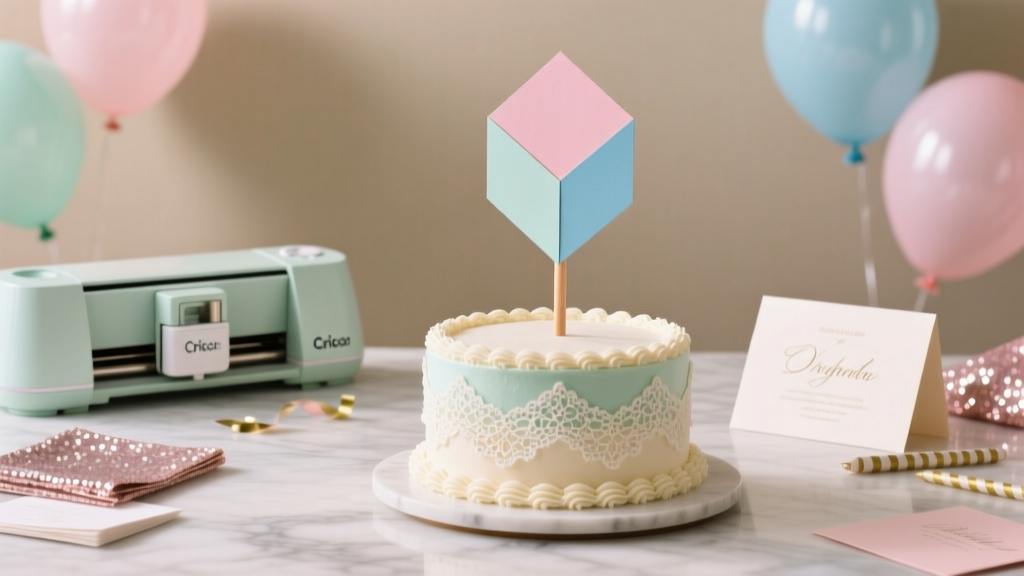
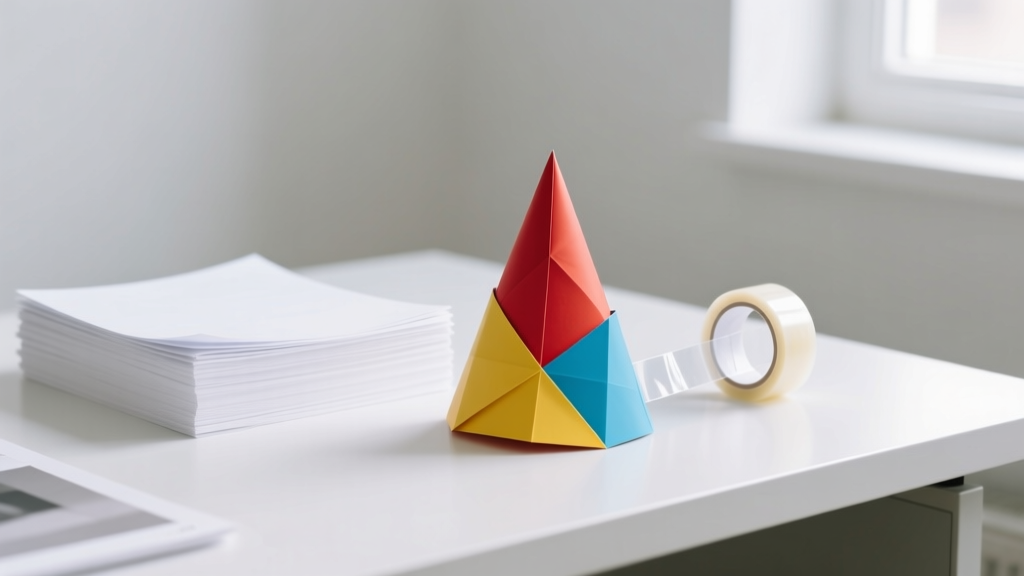
DIY Cake Toppers Using Cricut
If you love party planning, you already know this secret: the smallest details make the biggest impact. A cute, custom cake topper can turn a simple store-bought cake into a centerpiece that looks professionally styled—without the bakery price tag.
Making DIY cake toppers with a Cricut is one of those “why didn’t I try this sooner?” projects. It’s fast, customizable for any theme (birthdays, baby showers, weddings, graduations), and it’s a fantastic way to use up cardstock, vinyl scraps, and leftover glitter paper.
Best of all, you can make a whole set of matching party decorations—cupcake toppers, banners, favor tags—using the same design. If you’re into handmade party décor, this is a skill you’ll use again and again.
Skill Level, Time Estimates, and What You’ll Make
- Skill level: Beginner to Intermediate (advanced options included)
- Time estimate: 20–45 minutes for one topper (longer if layering or drying glue)
- Cut time: Typically 1–5 minutes per topper design
- Finished size: Most toppers look best at 5–7 inches wide and 3–6 inches tall (plus the stick)
Materials and Tools (With Estimated Costs)
Cricut Machine + Design Tools
- Cricut machine (Cricut Explore Air 2, Cricut Maker, or Cricut Joy Xtra): varies ($180–$400+)
- Design software: Cricut Design Space (free)
- StandardGrip cutting mat (12x12): $10–$16
- Fine-Point blade (standard with most machines): $10–$15 (replacement)
- Weeding tool (optional for vinyl details): $7–$12
- Scraper or brayer (helps cardstock adhere to mat): $8–$15
Paper, Adhesives, and Topper Sticks
- Heavy cardstock (80–110 lb / 216–300 gsm): $6–$12 per pack
- Glitter cardstock (non-shed preferred): $7–$15 per pack
- Foam adhesive squares (for 3D layering): $3–$6
- Glue options:
- Double-sided tape runner (clean + fast): $6–$12
- Liquid craft glue (strong, needs drying time): $3–$8
- Hot glue gun + mini sticks (fast + strong): $10–$25
- Topper sticks:
- Food-safe bamboo skewers (10–12 inches): $2–$5
- Paper straws (cute for kid parties): $4–$10
- Acrylic sticks (sleek, modern look): $6–$15
Optional Extras for Pro Results
- Self-adhesive lamination sheets (adds shine + stability): $6–$12
- Vinyl (for names, small accents): $3–$10 per roll
- Metallic marker/paint pen (edge detailing): $3–$8
- Cellophane treat bags (to keep toppers clean before use): $3–$8
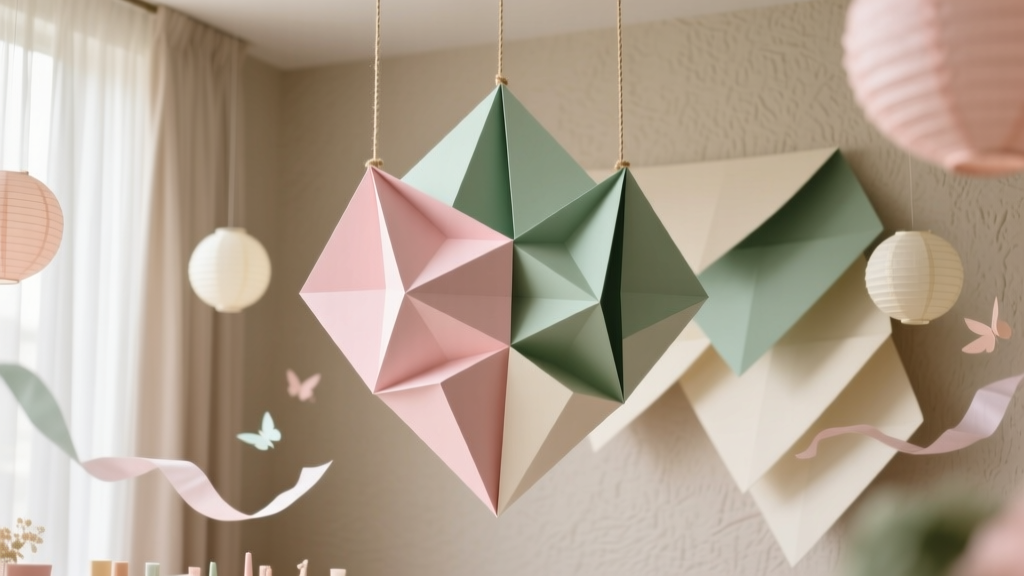
Design Ideas That Always Look Great on Cakes
If you’re choosing your first Cricut cake topper design, keep it bold and readable. Cakes are viewed from a few feet away, often in low indoor lighting, so thin details can disappear.
Beginner-Friendly Topper Styles
- Single-word toppers: “Happy Birthday,” “Congrats,” “One,” “Baby”
- Silhouette shapes: stars, hearts, butterflies, dinosaurs, clouds
- Number toppers: “1,” “16,” “30,” “50” with a shadow layer behind
Intermediate + Advanced Topper Styles
- Layered script + shadow: elegant and easy to read
- Multi-layer cardstock scenes: rainbows, castles, florals
- Shaker toppers: acetate window + confetti inside
- 3D paper florals attached to a name topper
Step-by-Step: How to Make a Cricut Cake Topper
Step 1: Pick Your Cake Size and Plan Topper Measurements
Use these measurements as a practical starting point:
- 6-inch cake: topper width 4.5–5.5 inches
- 8-inch cake: topper width 5.5–6.5 inches
- 10-inch cake: topper width 6.5–7.5 inches
Stick height: Aim for 3–4 inches inserted into the cake and 2–4 inches visible below the design, depending on your cake style.
Step 2: Create or Upload a Design in Cricut Design Space
- Open Cricut Design Space and start a new project.
- Choose:
- Text (great for names and phrases), or
- Images (use Cricut library or upload an SVG)
- Size your design to your target width (example: 6.25 inches for an 8-inch cake).
- For readability, add a shadow layer:
- Duplicate the design,
- Use Offset (0.08–0.12 inches is a sweet spot for most toppers),
- Place the offset behind the main layer.
Step 3: Choose Materials and Set Cut Settings
- Best cardstock weight: 80–110 lb for sturdy toppers
- Glitter cardstock tip: place glitter side down if your material sheds; consider “glitter cardstock” setting for cleaner cuts
- Cut setting: Start with the material preset in Design Space; do a small test cut if your design has thin details.
Step 4: Cut Your Layers
- Place cardstock on a StandardGrip mat.
- Use a brayer or your hand to press it flat so edges don’t lift.
- Load the mat and cut.
- When done, flip the mat upside down and peel the mat away from the cardstock to avoid curling.
Step 5: Assemble the Topper (Flat or Layered)
Option A: Flat topper (fastest)
- Cut one design layer + one backing shadow layer.
- Apply a tape runner or thin liquid glue to the back of the top layer.
- Center it on the shadow layer and press firmly.
Option B: 3D layered topper (extra wow)
- Cut your shadow layer, main layer, and any accent layers (stars, hearts, age number, etc.).
- Attach accents using foam adhesive squares for dimension.
- Press gently and check alignment before fully sticking.
Step 6: Attach the Stick Securely
This is the step that makes your topper feel “professional.”
- Flip the topper over.
- Place your skewer or straw so it sits centered and extends up behind the design by at least 1.5–2 inches.
- Secure with hot glue or strong double-sided tape.
- Add a second cardstock backing piece (same shape as your shadow layer) over the stick to sandwich it in place.
- Press flat under a book for 3–5 minutes if using liquid glue.
Step 7: Make It Food-Safe and Party-Ready
- Even though the topper doesn’t need to be edible, it does touch food. Wrap the part that goes into the cake:
- Use a small piece of plastic wrap, or
- Slip the stick into a straw before inserting
- Store finished toppers in a clean box or a large zip bag until party time.
Pro Tips for Clean Cuts and Sturdy Toppers
- Use bold fonts for cake toppers: thin script can tear or look messy after cutting. If you love script, add a thick offset shadow behind it.
- Weld script letters: if your cursive font cuts as separate letters, use Weld to connect them before cutting.
- Double up for strength: glue two shadow layers together (back-to-back) for a thick, sturdy base.
- Hide the stick: sandwich the stick between two backing layers for a clean front and back.
- Prevent cardstock curl: remove cardstock by bending the mat away from paper (not paper away from mat).
- Quick edge upgrade: run a metallic marker along the edge of the topper for a crisp, finished look.
Fun Variations (Beginner to Advanced)
Beginner Variations
- Confetti look: add tiny stars or dots cut from leftover cardstock and glue around the name
- Two-tone topper: solid base + glitter word layer
- Mini cupcake toppers: resize your design to 2–2.5 inches wide and attach to toothpicks (wrap toothpick base for food-safety)
Advanced Variations
- Shaker cake topper: cut two frames, add acetate, fill with confetti, and seal (amazing for birthdays)
- Vinyl personalization: add a name in vinyl over a cardstock shape for crisp details
- Layered ombré: stack 3–5 offset layers in gradually changing shades
- Acrylic + vinyl topper: cut an acrylic blank (or buy one) and apply permanent vinyl lettering
Troubleshooting: Fixes for Common Cricut Cake Topper Issues
- My cardstock is tearing or shredding.
- Try a new blade or clean your blade housing.
- Switch to a slightly thicker font or increase offset.
- Use the correct material setting and reduce pressure if you see tearing.
- Small pieces lift while cutting.
- Use a brayer to firmly adhere cardstock to the mat.
- Choose less intricate designs or simplify thin swirls.
- Make sure your mat is clean and sticky enough.
- The topper looks flimsy or bends.
- Use 100–110 lb cardstock and add a backing layer.
- Sandwich the stick and use hot glue for a rigid hold.
- Keep topper width proportional to stick strength (wide toppers need sturdier skewers or two sticks).
- Glue is warping the paper.
- Use a tape runner for flat adhesion.
- If using liquid glue, apply a very thin layer and press under a book.
Common Crafting Mistakes to Avoid
- Making the design too detailed: ultra-thin flourishes often disappear on a cake. Choose bold shapes and readable text.
- Skipping the backing layer: a single layer of cardstock can flop, especially in humid kitchens.
- Placing the stick too high or too low: you need at least 1.5–2 inches of stick behind the design for stability.
- Using glitter that sheds: loose glitter can end up on frosting. Choose non-shed glitter cardstock or seal edges with clear-drying glue.
- Not planning for transport: toppers can snag in boxes. Transport flat in a shallow container with tissue paper padding.
- Forgetting food-contact protection: wrap or cover the portion inserted into the cake for a cleaner, safer setup.
FAQ: DIY Cake Toppers Using Cricut
What’s the best cardstock for Cricut cake toppers?
Heavy cardstock in the 80–110 lb (216–300 gsm) range gives the best balance of clean cuts and strength. For extra sturdy toppers, glue two backing layers together.
How do I make a cake topper that doesn’t fall over?
Use a shadow backing layer, sandwich the stick between two layers, and make sure the stick extends at least 1.5–2 inches behind the design. For wide toppers (7+ inches), consider using two skewers spaced about 1.5 inches apart.
Can I use permanent vinyl for cake toppers?
Yes—vinyl is great for names and small details, especially on smooth cardstock or acrylic blanks. If applying vinyl to cardstock, burnish gently so you don’t dent the paper.
How far in advance can I make handmade cake toppers?
You can make them 1–2 weeks ahead (or even earlier) as long as you store them flat in a clean, dry place. Avoid humid areas to prevent warping.
Do I need to laminate my cake topper?
No, but lamination can add durability and a wipeable finish. If you’re worried about moisture (buttercream, fridge condensation), a self-adhesive laminate sheet on the front layer can help.
Why is my Cricut not cutting all the way through cardstock?
Check that you selected the correct material setting, make sure your blade is sharp, and confirm your cardstock is fully adhered to the mat. If needed, use More Pressure or run the cut again without unloading the mat.
Make One Topper, Then Build a Whole Party Theme
Once you’ve made your first DIY cake topper using a Cricut, you’ll start seeing themes everywhere—colors, fonts, shapes, and little details you can match across your party decorations. Try a simple “Happy Birthday” topper first, then level up with layered cardstock, 3D foam spacing, or a shaker design when you’re ready.
When you make it yourself, you get exactly what you want: the perfect name spelling, the perfect shade of pink or gold, and a cake that looks like it was styled for a photo shoot.
Looking for more DIY crafts and handmade party decoration ideas? Keep exploring new projects, printables, and party prep inspiration here on smartpartyprep.com.
More Articles
 How to Hang Party Streamers Without Tape Marks, Sagging, or Last-Minute Panic: 7 Foolproof Methods (Tested on 37 Parties)
 How to Enable 3rd Party Cookies on Safari in 2024: The Real Truth (Spoiler: You Can’t — But Here’s What Actually Works Instead)
 DIY Masks Using Cricut
 12 Do It Yourself Birthday Party Decorations That Take Under 30 Minutes Each (No Craft Store Runs, No Glue Gun Stress, Just Real Results You’ll Actually Use)
 How to Make Party Hats Out of Paper in Under 10 Minutes (No Glue Gun, No Scissors Required — Just Printer Paper & Tape)
 Paper Craft Backdrops Ideas
 Are Create Creatine Gummies Third Party Tested? Here’s Exactly How to Verify Lab Certification (Without Paying for a Full Batch You Can’t Trust)
 How to Remove a Pokemon from Your Party in Cobblemon: The 3-Step Method That Actually Works (No Crashes, No Lost Data, and Zero Mod Conflicts)
 Is Nature's Truth 3rd Party Tested? We Investigated Every Batch Report, Lab Certificate, and Transparency Gap So You Don’t Have to Waste Time—or Risk Your Craft Projects on Unverified 'Natural' Claims
 How to Enable 3rd Party Cookies in Chrome (2024): A Step-by-Step Fix for Blocked Logins, Ad Retargeting & SSO Failures — Before Google Shuts Them Down Completely