Paper Craft Backdrops Ideas
Nothing changes the feel of a party space faster than a great backdrop. It turns a blank wall into a photo moment, makes dessert tables look styled, and instantly raises the “wow” factor—without needing expensive rentals. If you love DIY crafts, paper craft backdrops are one of the most satisfying party decorations to make because they’re bold, customizable, and surprisingly budget-friendly.
Paper is also forgiving. You can experiment with color palettes, try new shapes, and adjust your design as you go. Whether you’re decorating for a birthday, baby shower, bridal shower, graduation, or a cozy holiday party, a handmade paper backdrop lets you match a theme exactly—right down to the shade of pink or the pattern of your paper fans.
Below you’ll find multiple paper craft backdrop ideas with clear, step-by-step instructions, realistic time estimates, skill level notes, and practical tips to help your DIY backdrop look polished (even if you’re a beginner).
Quick Planning: Pick the Right Backdrop Style
Choose based on your space and purpose
- Photo booth backdrop: Aim for a width of 6–8 ft and height of 6–7 ft if possible.
- Dessert/gift table backdrop: A 5–6 ft wide by 3–5 ft tall design often looks perfect.
- Small party corner: Even a 3 ft x 3 ft paper design can look intentional when centered behind a chair or cake stand.
Skill levels and time estimates
- Beginner: Paper chain curtain, fringe wall, simple tissue tassels (about 60–120 minutes).
- Intermediate: Rosette/fan wall, layered geometric panels (about 2–4 hours).
- Advanced: Giant paper flower feature wall, mixed-element installations (about 4–8 hours depending on scale).
Materials List (with Estimated Costs)
Costs vary by size and quality, but these estimates are realistic for a 6 ft wide party backdrop.
Paper options
- Cardstock (65–110 lb) for rosettes, fans, geometric panels: $10–$25 (pack of 50–100 sheets, 12" x 12" or letter size)
- Tissue paper for tassels, fringe, pom-poms: $6–$15 (pack of 20–50 sheets)
- Crepe paper for flowers, streamer walls: $10–$30 (multiple rolls)
- Butcher paper / kraft paper for budget-friendly large panels: $5–$12 (one roll)
Adhesives and hanging tools
- Hot glue gun + glue sticks (high-temp for sturdier builds): $10–$20
- Double-sided tape (strong): $5–$10
- Painter’s tape (wall-safe testing): $4–$8
- Command strips/hooks for damage-free hanging: $8–$15
- Fishing line or clear monofilament for “floating” looks: $3–$7
Backdrop structure (pick one)
- Foam boards (20" x 30") as modular panels: $10–$25 (3–6 boards)
- Tri-fold display boards for tabletop backdrops: $8–$15
- PVC pipe stand (DIY frame) or photography backdrop stand: $25–$60
- Large poster board sheets for lightweight builds: $6–$12
Tools (recommended)
- Scissors (8" sharp craft scissors)
- Craft knife + cutting mat (best for straight edges)
- Metal ruler (18–24")
- Stapler (heavy-duty helps for rosettes)
- Bone folder (optional, makes crisp folds for fans/rosettes)
- Measuring tape (for layout spacing)
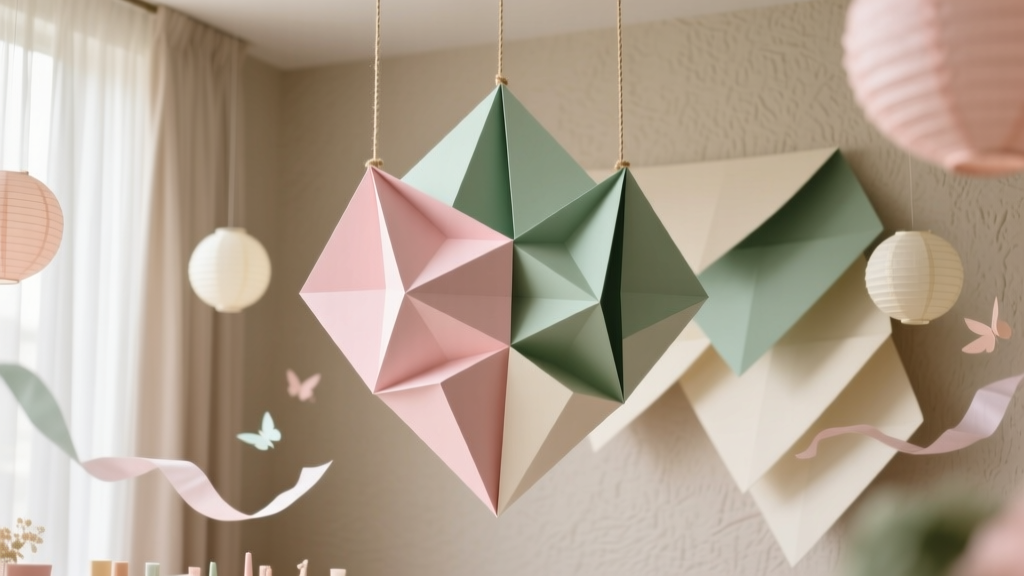
Idea #1: Paper Fan & Rosette Backdrop (Bold and Classic)
Best for: Birthdays, bridal showers, graduation parties
Skill level: Beginner–Intermediate
Time: 2–3 hours for a 6 ft wide cluster
Measurements
- Use 8–14 rosettes in mixed sizes for a full look.
- Common diameters: 8", 10", 12", 14", 16".
- For each rosette, start with paper strips that are 8.5" x 11" (letter) or 12" x 12" (scrapbook) and accordion-fold.
Step-by-step
- Accordion-fold the paper: Fold back and forth in 1" folds. Use a bone folder or your fingernail to crease sharply.
- Create two halves: Fold the accordion strip in half. Repeat with a second strip (most rosettes use two strips joined together).
- Staple the center: Staple at the fold to lock each half.
- Join halves: Hot glue or staple the ends of the two halves together to make a circle.
- Add a center cover: Cut a circle 2"–4" wide from cardstock. Glue on one side (or both sides if it will be visible).
- Attach to backing: Use foam board panels or a PVC stand with a crossbar. Apply hot glue to the back of each rosette and press firmly for 10–15 seconds.
- Build a cluster: Place the largest rosettes first, then fill gaps with smaller ones. Aim for slight overlap to look intentional.
Beginner-friendly adaptation
- Buy pre-made paper fans and mix them with a few handmade rosettes for a faster finish.
Advanced variation
- Add 3D paper butterflies (2"–4") on top of rosettes using glue dots for dimension.
Idea #2: Tissue Fringe Wall (Fast, Fluffy, and Photo-Ready)
Best for: Kids’ parties, baby showers, bright theme parties
Skill level: Beginner
Time: 60–120 minutes
Measurements
- For a 6 ft wide backdrop: plan for 36–48 fringe strips.
- Each strip: 20" wide x 12" tall tissue rectangle (can be adjusted).
Step-by-step
- Cut tissue rectangles: Stack 4–6 sheets at a time and cut to 20" x 12".
- Fold in half: Fold each rectangle so it becomes 20" x 6".
- Cut fringe: Starting from the open edge, cut fringe lines every 1/2", stopping 1" from the folded edge (leave a solid “header”).
- Unfold: Open the strip; the uncut center becomes the top header for taping.
- Attach in rows: Tape the top header to your backing (foam board, kraft paper roll, or a backdrop stand). Start at the bottom row and overlap each new row by 1–2".
- Fluff the fringe: Gently separate strands for volume.
Pro tip
- If tissue tears while fluffing, your fringe cuts are likely too thin or too long. Make fringe cuts 1/2" wide and keep them under 10" long for sturdiness.
Idea #3: Paper Chain Curtain (Budget-Friendly and Customizable)
Best for: Last-minute party decor, classroom celebrations, casual gatherings
Skill level: Beginner
Time: 45–90 minutes
Measurements
- Cut strips: 1" x 8" (or 1.5" x 10" for chunkier chains).
- For a 6 ft wide curtain, make 10–14 vertical strands of chains, each about 6 ft long.
Step-by-step
- Cut paper strips: Use a paper trimmer for speed and consistent width.
- Form the first loop: Overlap ends by 1/2" and staple or tape.
- Continue the chain: Thread a strip through the last loop, then staple/tape. Repeat.
- Create multiple strands: Build several long chains, then tie or tape them to a top support (a dowel, string, or a PVC crossbar).
- Hang and adjust: Trim strands to level the bottom or create a stylish “wave” cut.
Advanced variation
- Alternate glitter cardstock loops every 5–6 links for a sparkle effect (great for New Year’s and milestone birthdays).
Idea #4: Giant Paper Flower Feature Wall (Statement Piece)
Best for: Bridal showers, weddings, elegant birthdays, spring parties
Skill level: Intermediate–Advanced
Time: 4–8 hours depending on flower count
Recommended flower sizes
- Large: 16"–20" blooms (feature flowers)
- Medium: 10"–14" blooms (fillers)
- Small: 6"–8" blooms (gap fillers)
Step-by-step (basic layered petal flower)
- Cut petals: For one 16" flower, cut 12–16 petals from 12" x 12" cardstock. Petals can be 6"–8" tall with rounded or pointed tips.
- Shape petals: Curl edges around a marker or dowel. For deeper shape, cut a 1" slit at the base and overlap the slit edges with hot glue to “cup” the petal.
- Create a base circle: Cut a cardstock circle 6"–8" wide.
- Glue petals in layers: Start with the largest petals around the edge, overlapping slightly. Add smaller layers toward the center.
- Add a center: Roll a strip of cardstock fringed every 1/4" to make a fluffy center, or create a spiral rose center.
- Mount to backdrop: Use heavy-duty Command strips, hot glue to foam board, or attach flowers to a grid (like a plastic trellis panel) with zip ties.
Beginner-friendly adaptation
- Make 3 big flowers + leaves instead of a full wall. Cluster them in one corner for a high-impact, low-effort look.
Putting It Together: Backdrop Assembly (Works for Any Style)
Option A: Foam board panel wall (easy and portable)
- Plan your layout: For a 6 ft wide display, arrange 6 foam boards (20" x 30") in two rows of three on the floor.
- Tape seams: Use strong tape on the back to create “hinges.”
- Add your paper elements: Glue/tape from the bottom up (especially for fringe).
- Stand it up: Lean against a wall, or add support by taping a tri-fold board behind as a brace.
Option B: PVC stand (best for freestanding photo areas)
- Simple size: Build a frame about 6 ft wide x 7 ft tall.
- Attach backdrop: Clip or tie your paper pieces to a top bar using binder clips, zip ties, or string.
Pro Tips, Variations, and Troubleshooting
Pro tips for a cleaner look
- Limit your palette: Use 2–3 main colors plus one neutral. This makes DIY party decorations look more “designed.”
- Mix textures: Combine cardstock rosettes with tissue fringe, or crepe streamers with paper flowers.
- Use spacing guides: Lightly mark a grid on the backer with pencil (every 6") to keep rows straight.
Troubleshooting
- Rosettes popping open: Use a stronger center circle and glue both sides of the center (front and back) for reinforcement.
- Backdrop won’t stay on the wall: Reduce weight by using fewer layers, or switch to a stand/foam board. Use appropriate Command strips rated for the load.
- Tissue fringe looks flat: Add one extra row, then fluff by gently pulling fringe forward and outward.
- Visible gaps: Fill with mini rosettes (6"–8"), paper leaves, or small tassels rather than redoing entire sections.
Common Crafting Mistakes to Avoid
- Skipping a test piece: Make one rosette or one fringe strip first to confirm size and style before mass-producing.
- Using weak tape for heavy elements: Large cardstock flowers and rosettes need hot glue, heavy-duty tape, or proper hanging strips.
- Building too small: A backdrop that’s 3 ft wide behind a 6 ft table looks undersized. Measure your table/wall first.
- Not accounting for photo framing: Guests will stand in front of it. Keep key details at 3–6 ft high where they’ll show in photos.
- Waiting until party day: Assemble the main pieces the day before, then do final hanging and fluffing on party day.
FAQ: Paper Craft Backdrops
What’s the easiest paper backdrop for beginners?
A tissue fringe wall or paper chain curtain is the most beginner-friendly. They’re forgiving, fast, and don’t require perfect measuring.
How do I hang a paper backdrop without damaging walls?
Use Command strips/hooks rated for the weight, or hang your backdrop from a freestanding PVC/photo backdrop stand. For very light pieces, painter’s tape can work, but test it first.
How much paper do I need for a 6 ft wide backdrop?
It depends on style. A rosette cluster may use 30–60 sheets of cardstock; a tissue fringe wall often uses 40–80 sheets of tissue depending on fullness and layering.
Can I make a paper backdrop ahead of time?
Yes. Most pieces can be made 1–2 weeks ahead. Store rosettes and flowers flat in a large box. Keep tissue fringe away from moisture to prevent wrinkling.
What if my venue doesn’t allow tape on walls?
Use a backdrop stand, a PVC frame, or attach your paper decor to foam board panels that can be leaned against a wall or supported with easels.
How do I make my DIY backdrop look more professional?
Stick to a tight color palette, vary your sizes (large/medium/small), and overlap elements slightly. Add a focal point—like a cluster of giant paper flowers or a central fan burst.
Ready to Make Your Own Paper Craft Backdrop?
You don’t need a cutting machine or fancy supplies to build a backdrop that makes guests stop and take photos. Start with one idea—fans, fringe, chains, or flowers—then scale it up as your confidence grows. A handmade paper backdrop is one of those DIY crafts that feels impressive every single time you hang it up.
Keep creating, keep experimenting, and when you’re ready for your next party project, explore more DIY craft ideas and party decorations on smartpartyprep.com.
More Articles
 Modern Custom Stickers Designs
 How to Draw a Party in 7 Simple Steps (Even If You Can’t Draw Stick Figures): No Fancy Tools, No Art School Required — Just Paper, Pencil & Joy
 How to Enable Third Party Cookies in My Browser (2024 Guide): Step-by-Step Fixes for Chrome, Safari, Firefox & Edge — Because Yes, You *Can* Still Do It (Without Compromising Security)
 How to Enable 3rd Party Cookies in Safari (2024): The Truth No One Tells You — It’s Not Just a Toggle, and Here’s Why Your Login Failures, Analytics Gaps, and Ad Personalization Break Without This Critical Fix
 No-Sew Masks Tutorial
 DIY Wreaths for Birthdays: Handmade Party Decorations That Wow
 No-Sew Friendship Bracelets Tutorial
 How Do I Unblock Third Party Cookies? (2024 Step-by-Step Guide for Chrome, Safari, Firefox & Edge — No Tech Degree Required)
 Advanced Invitations for Crafters
 Is Organic India Third Party Tested? We Investigated Lab Reports, Certifications & Hidden Gaps—Here’s What Independent Testing *Actually* Reveals About Their Turmeric, Ashwagandha & Triphala