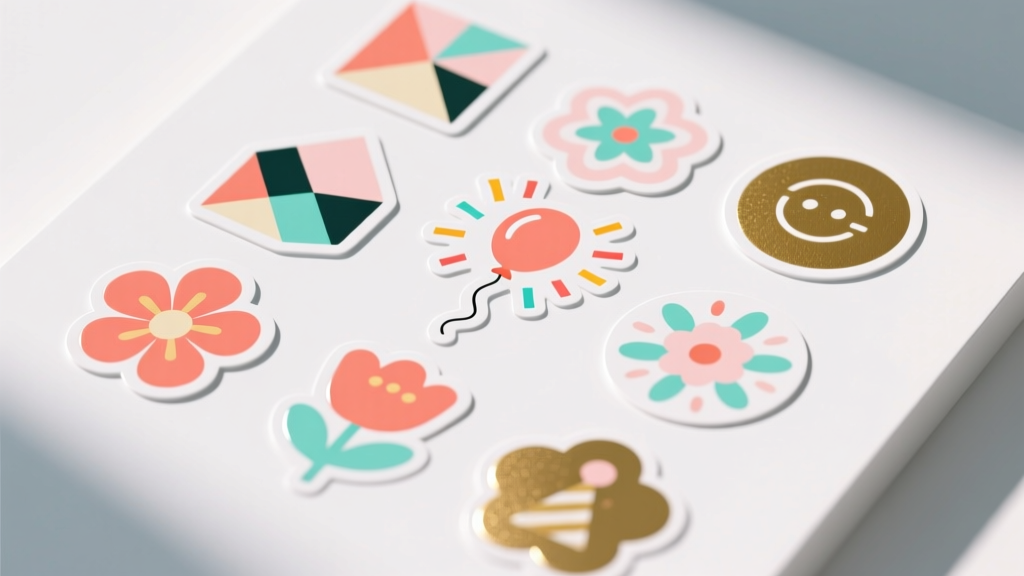
Modern Custom Stickers Designs
Custom stickers are one of those DIY crafts that feel instantly rewarding: you design something fun, print it, peel it, and suddenly your party setup looks coordinated and polished. They’re budget-friendly, beginner-friendly, and surprisingly powerful for transforming everyday items—think plain favor bags, water bottles, cupcake toppers, and thank-you cards—into handmade decorations that look professionally styled.
Even better, modern sticker design trends make it easy to create clean, current looks without needing fancy tools. Minimal line art, bold color blocking, retro typography, and “hand-drawn” accents all translate beautifully onto sticker paper. Whether you’re planning a birthday party, baby shower, graduation celebration, or holiday gathering, DIY custom stickers let you match a theme exactly and add personal touches like names, dates, and inside jokes.
This guide walks you through everything step-by-step—from choosing a sticker style and sizing designs to printing, cutting, and applying them cleanly. You’ll also get pro tips, variations for beginners and advanced crafters, troubleshooting help, and common mistakes to avoid so your handmade party decorations come out smooth and memorable.
Skill Level, Time, and Best Uses
- Skill level: Beginner to Intermediate (Advanced options included)
- Design time: 20–60 minutes (depending on complexity and how many sticker types)
- Print + cut time: 15–45 minutes
- Total project time: 45–120 minutes for a full sticker set
- Great for: party favors, handmade decorations, gift wrapping, labels, treat bags, invitations, table decor, thank-you notes
Modern Sticker Design Styles That Look Fresh for Parties
Modern doesn’t have to mean complicated. These styles are easy to create and look sleek on party decor.
1) Minimal Monochrome Labels
- Black-and-white or one-color designs (great for elegant themes)
- Perfect for: favor bags, envelope seals, candle labels, mini champagne bottles
- Design idea: a thin border + event name + date in a clean sans-serif font
2) Color-Block Shapes + Bold Type
- Two to three colors max, large shapes behind text
- Perfect for: birthday parties, graduation parties, kids’ themes with a modern twist
- Design idea: rounded rectangle color block with “THANKS!” in uppercase
3) Retro Typography Stickers
- Chunky, curved type, warm palettes (burnt orange, mustard, dusty pink)
- Perfect for: disco, groovy, throwback parties, milestone birthdays
- Design idea: arched “Happy Birthday” with a tiny sparkle icon
4) Hand-Drawn Doodles + Clean Layout
- Simple doodles (stars, hearts, confetti, florals) paired with tidy spacing
- Perfect for: baby showers, bridal showers, classroom celebrations
- Design idea: name label with doodle border in a single ink color
5) Photo + Name Stickers (Modern “Polaroid” Look)
- Small photo with a white border and minimal text
- Perfect for: birthdays, anniversaries, graduation parties, kids’ parties
- Design tip: keep photos simple and high-contrast so they print well
Materials and Tools (with Estimated Costs)
Choose supplies based on your finish goals: glossy for vibrant colors, matte for a soft modern look, and waterproof vinyl for drinks and coolers.
Sticker Supplies
- Printable sticker paper (8.5 x 11 in) – matte or glossy, 15–40 sheets
- Estimated cost: $8–$18
- Best for: labels, envelope seals, treat bags
- Printable vinyl sticker paper (8.5 x 11 in) – water-resistant option
- Estimated cost: $12–$25
- Best for: water bottles, party cups, outdoor events
- Clear sticker paper (optional)
- Estimated cost: $10–$20
- Best for: modern “no-label” look on jars and glass
- Self-adhesive laminating sheets (optional) for extra durability
- Estimated cost: $8–$15
- Best for: protecting ink from smudges, scuffs, and moisture
Cutting Tools
- Scissors (sharp detail scissors recommended) – $5–$15
- Craft knife + self-healing cutting mat – $10–$25
- Paper trimmer (for fast straight cuts) – $15–$35
- Optional cutting machine (Cricut/Silhouette) – if you already have one, it’s a huge upgrade for custom shapes
Design + Printing Tools
- Design software: Canva, Adobe Express, Procreate, or Silhouette Studio (many free options)
- Printer: inkjet recommended for vibrant color (laser can work with compatible papers)
- Ruler (12 in / 30 cm) and pencil for quick layout checks – $2–$5
Handy Application Tools
- Plastic scraper/old gift card (to smooth bubbles) – free
- Microfiber cloth (clean surfaces before sticking) – $2–$6
- Permanent marker (for hand-written names on blank stickers) – $2–$5
Planning Your Sticker Set (Sizes + Quantities)
A cohesive party look comes from repeating a few sticker sizes across different items. Here are practical, party-tested measurements.
Suggested Sticker Sizes
- Envelope seals: 1.5 in circle (3.8 cm)
- Favor bag labels: 2 in circle (5.1 cm) or 2 x 3 in rectangle (5.1 x 7.6 cm)
- Water bottle labels: 2 x 8 in wrap (5.1 x 20.3 cm) or small 2.5 in logo sticker (6.4 cm)
- Cup stickers: 2 in circle (5.1 cm) or 1 x 3 in name strip (2.5 x 7.6 cm)
- Jar labels: 2 x 2 in square (5.1 x 5.1 cm) or 2 x 3 in rectangle (5.1 x 7.6 cm)
Quantity Planning (Quick Guide)
- 12 guests: 24–48 stickers (a few types)
- 24 guests: 60–100 stickers
- 40 guests: 120–180 stickers
Tip: Print one “test sheet” first, even if you’re excited. It saves time and sticker paper.
Step-by-Step: Make Modern Custom Stickers at Home
Step 1: Choose a Party Theme and a Mini Color Palette
For modern sticker designs, limit yourself to:
- 2–3 main colors + 1 neutral (white/cream/black)
- 1–2 fonts max (one bold, one simple)
Example palettes:
- Black + white + gold (elegant birthday, engagement party)
- Sage + cream + terracotta (boho baby shower)
- Cobalt + white + silver (graduation party)
Step 2: Design Your Sticker Sheet Layout
Open your design tool and set your canvas to 8.5 x 11 in (letter size). Then create sticker shapes at the sizes you picked.
- Circles: 1.5 in, 2 in, 2.5 in
- Rectangles: 2 x 3 in, 1 x 3 in
Spacing tip: Leave 0.15–0.25 in (4–6 mm) between stickers so they’re easier to cut.
Modern design formula (easy and reliable):
- Background shape (solid or outlined)
- Main text (short and bold)
- Small accent (tiny star, line, dot pattern, or date)
Step 3: Print a Test on Plain Paper
- Print your sheet on regular copy paper.
- Hold it up to your favor bag/jar/bottle to check scale.
- Check readability from 2–3 feet away (party guests won’t be inches from your decor).
Step 4: Print on Sticker Paper (Settings Matter)
- Load sticker paper correctly (confirm which side is printable).
- In printer settings, choose:
- Paper type: “Photo Paper” or “Premium Presentation” (varies by printer)
- Quality: High/Best
- Scale: 100% (turn off “fit to page” unless your template is designed for it)
- Print one sheet and let it dry for 10–15 minutes before touching the ink.
Step 5 (Optional): Add Lamination for a Professional Finish
If you want more durability (especially for drinks), apply a self-adhesive laminating sheet:
- Place printed sticker sheet on a flat surface.
- Peel back 1–2 inches of the laminate backing.
- Align at the top edge, then slowly smooth downward using a scraper or gift card.
- Trim excess laminate from the edges.
Step 6: Cut Your Stickers (3 Methods)
Method A: Scissors (Beginner-Friendly)
- Rough-cut the sheet into smaller blocks first.
- Cut circles slowly, turning the paper—not the scissors.
- For clean edges, keep your cuts just outside the printed border.
Method B: Craft Knife + Ruler (Crisp Modern Rectangles)
- Use a cutting mat.
- Line up a metal ruler along the cut line.
- Make 2–3 light passes instead of one hard press.
Method C: Cutting Machine (Advanced, Perfect for Custom Shapes)
- Use “Print Then Cut” style features.
- Do a small test cut to dial in pressure settings for your sticker paper + laminate combo.
Step 7: Apply Stickers Smoothly (No Wrinkles, No Bubbles)
- Clean the surface with a microfiber cloth (especially plastic and glass).
- Peel the sticker slowly and avoid touching the adhesive too much.
- Place one edge first, then roll it down.
- Smooth from the center outward with a scraper or your fingers.
For jars/bottles: Apply the center first, then smooth toward the edges to prevent creasing.
Pro Tips for That Modern, High-End Look
- Use white space on purpose. Overcrowded designs look less modern. Give text room to breathe.
- Outline stickers with a thin border (0.75–1.5 pt). It makes cutting easier and looks polished.
- Keep text sizes party-visible. Aim for 12–18 pt for small labels, 18–36 pt for favor stickers.
- Match finishes to the vibe. Matte reads modern and soft; glossy reads bold and colorful.
- Batch-print by type. One sheet of all 2-inch circles, one sheet of rectangles, etc. It speeds up cutting.
Easy Variations (Beginner) and Upgrades (Advanced)
Beginner-Friendly Adaptations
- One design, multiple uses: Make a 2-inch circle and stick it on favor bags, cups, and napkins.
- Handwritten names: Print a modern border/design and leave a blank center for names with a marker.
- Use pre-cut label sheets: Great if you don’t want to cut by hand (choose common sizes like 2 x 4 in labels).
Advanced Variations
- Die-cut shapes: Create custom outlines (bows, stars, disco balls, smiley faces).
- Holographic overlay: Add holo laminate for birthdays, bachelorettes, New Year’s parties.
- Layered look: Print a muted background shape and add a second smaller sticker on top for dimension.
- Clear stickers on colored items: Print minimal text/icons on clear paper for a “printed-on” effect.
Troubleshooting: Fix Common Sticker Problems
Problem: Ink smears or feels tacky
- Fix: Let prints dry longer (15–30 minutes). Choose the correct paper setting. Add laminate only after ink is fully dry.
- Prevent: Use sticker paper designed for your printer type (inkjet vs laser).
Problem: Colors look dull
- Fix: Switch to “High/Best” quality and a glossy or premium paper setting.
- Prevent: Avoid super-dark backgrounds on matte paper if your printer struggles with heavy ink coverage.
Problem: Stickers won’t stick well to plastic cups or textured surfaces
- Fix: Clean surfaces with rubbing alcohol (spot test first). Use vinyl sticker paper for better grip.
- Prevent: Avoid heavily textured paper bags if you want a perfectly smooth seal.
Problem: Bubbles under the sticker
- Fix: Lift and reapply if possible. Smooth from center outward using a card.
- Prevent: Apply slowly, one edge at a time, on a clean dry surface.
Problem: Cutting looks jagged
- Fix: Replace dull blades, use detail scissors, or make multiple light passes with a craft knife.
- Prevent: Add a thin border to hide tiny imperfections and guide cutting.
Common Crafting Mistakes to Avoid
- Skipping the test print: Sticker paper is pricier—test on plain paper first.
- Using too many fonts: Two fonts max keeps your party decorations looking coordinated.
- Designing too small: Tiny text disappears on busy party tables. Scale up for visibility.
- Printing with “fit to page” on accident: It can shrink or stretch your measurements. Stick to 100% scale.
- Cutting before ink dries: Smudges happen fast on fresh prints.
- Not cleaning surfaces: Oils and dust reduce stickiness—especially on bottles and jars.
FAQ: Modern Custom Stickers for DIY Party Decor
What’s the best sticker paper for party favors?
For treat bags, boxes, and envelope seals, matte or glossy printable sticker paper works great. If items might get cold or damp (coolers, bottles), choose printable vinyl sticker paper and consider adding a laminate layer.
How do I make stickers waterproof?
Use printable vinyl sticker paper plus a self-adhesive laminate sheet. This combo holds up much better to condensation and light splashes. For fully waterproof outdoor use, test your specific materials first.
Can I make custom stickers without a cutting machine?
Yes. Scissors, a paper trimmer, and a craft knife are enough. Stick to modern shapes like circles, squares, and rectangles for the cleanest hand-cut results.
What printer settings should I use for sharp, vibrant stickers?
Try High/Best quality and a paper type like Photo Paper or Premium Presentation. Always do one test sheet because settings vary by printer and sticker paper brand.
How many stickers should I make for a party?
A simple plan is 2–4 stickers per guest (favor label, cup label, thank-you seal, and an extra for decor). For larger parties, batch one main design and one name label to keep it manageable.
What’s a quick modern sticker idea if I’m short on time?
Make a 2-inch circle sticker with bold text (“THANK YOU!” or the guest of honor’s name) and a tiny icon (star, heart, confetti). Print one sheet, cut, and use it everywhere—favor bags, cups, and goodie boxes.
Wrap-Up: Your Party, Your Style—One Sticker at a Time
Modern custom sticker designs are a simple DIY craft that makes party decorations feel intentional and personal. Once you create a small sticker set—one main label, one name sticker, and one “thank you” seal—you’ll have endless ways to dress up favors, tables, and gifts without spending a fortune.
Pick a color palette, keep the layout clean, test print once, and enjoy the process. You’ll be amazed how quickly a few handmade stickers can pull an entire party theme together.
More DIY party décor inspiration is waiting for you—explore more creative projects and smart celebration ideas on smartpartyprep.com.
More Articles
 Easy Coasters for Beginners
 How to Discharge Debt as a Secured Party Creditor: The Truth Behind the Viral Loophole (Spoiler: It Doesn’t Work — Here’s What Actually Does)
 Easy Soap Bars for Beginners
 Step-by-Step Wreaths Tutorial
 When the Party Is Over Chords: The Only Complete, Beginner-Friendly Guide You’ll Ever Need (No Theory Required — Just Play in 7 Minutes)
 ‘Is Just Ingredients Third Party Tested?’ — The Truth Behind Label Claims (and How to Verify What You’re Really Buying)
 Budget DIY Dream Catchers Under $20
 Easy Tie-Dye Shirts for Beginners
 DIY Masks Party Favors
 Modern Fabric Bunting Designs