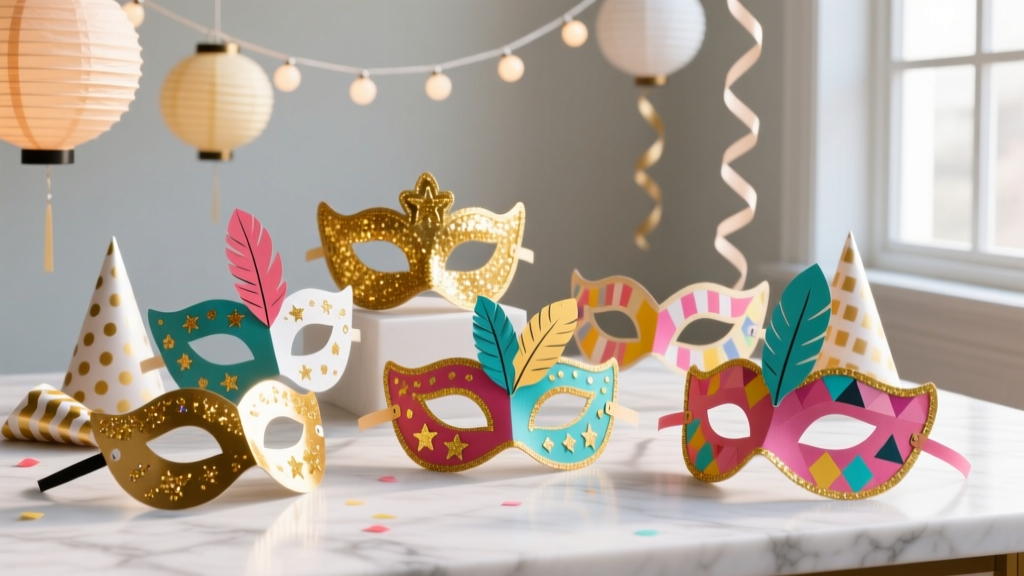
DIY Masks Party Favors
Party favors should do more than sit in a bag—they should spark excitement. DIY mask party favors are one of those rare projects that are equal parts craft activity, photo-booth prop, and take-home keepsake. Whether you’re planning a birthday bash, a masquerade party, a superhero celebration, or a Halloween gathering, handmade masks instantly turn guests into characters and make your party décor feel more interactive.
What makes this project especially fun is how customizable it is. You can match masks to your party theme, personalize them with names, and scale the design from super simple (great for kids) to extra detailed (perfect for experienced crafters). Plus, masks are lightweight, inexpensive to make in batches, and easy to package as party favors.
Grab your cardstock, a few basic tools, and your favorite embellishments—this step-by-step guide will help you create DIY masks that look store-bought, photograph beautifully, and hold up through a night of dancing, games, and giggles.
Project Overview: Skill Level, Time, and What You’ll Make
- Skill level: Beginner to Intermediate (Advanced variations included)
- Time estimate:
- Simple mask: 10–15 minutes each
- Decorated/painted mask: 20–35 minutes each (plus drying time)
- Batch prep (10 masks): 1.5–3 hours depending on detail
- Best for: DIY party decorations, handmade party favors, kids’ crafts, themed celebrations
- Finished size: Most masks fit best at 7–8 inches wide and 3–4 inches tall (not including stick or ribbon)
Materials & Tools (with Estimated Costs)
Base Materials (Choose One)
- Cardstock (80–110 lb / 216–300 gsm): Great for crisp, sturdy masks. Estimated cost: $6–$12 per 50-sheet pack
- EVA craft foam sheets (2 mm): Flexible and comfy for face-worn masks. Estimated cost: $8–$15 for 20–40 sheets
- Pre-cut paper mache or blank craft masks: Best for painting parties. Estimated cost: $1–$3 each (often cheaper in bulk)
Fasteners (Pick Your Style)
- Elastic cord (1/8 inch / 3 mm): Classic wearable option. Estimated cost: $4–$8 per roll
- Satin ribbon (3/8 inch to 5/8 inch): Ties feel fancy and fit most sizes. Estimated cost: $5–$10 per spool
- Wooden craft sticks (6–8 inch): Great as photo props and kid-friendly. Estimated cost: $3–$6 per 50
Decorations (Mix and Match)
- Acrylic paint + small brushes: $6–$15
- Glitter (fine): $3–$6
- Self-adhesive rhinestones or gem stickers: $5–$10
- Feathers (small craft feathers): $4–$8
- Metallic markers or paint pens: $6–$12
- Washi tape: $3–$10
- Felt scraps: $4–$8
Adhesives
- Hot glue gun + glue sticks: Strongest hold for embellishments. Estimated cost: $10–$25
- Tacky glue: Great for paper/foam with drying time. Estimated cost: $3–$6
- Double-sided tape (strong): Cleaner for kids’ crafting. Estimated cost: $4–$8
Tools (Recommended)
- Scissors (sharp craft scissors)
- Craft knife + cutting mat (best for clean eye holes)
- Hole punch (single punch or 1/8 inch punch works well)
- Ruler (12 inch)
- Pencil + eraser
- Optional: Corner rounder punch (for smoother edges), stapler (for quick stick attachment)
Choose Your Mask Style: Wearable or Prop?
Wearable Masks (Elastic or Ribbon)
Wearable masks feel immersive and are perfect for masquerade party decorations, superhero parties, and Halloween favors.
- Best for: Guests wearing them during the party
- Most comfortable material: EVA foam or cardstock lined with felt
Photo Booth Prop Masks (Stick Handle)
Stick masks are quick, kid-friendly, and keep makeup and face paint safe—great for birthday parties and classroom celebrations.
- Best for: Photos, games, and quick favors
- Most durable: Cardstock + stick + reinforcement tab
Step-by-Step: How to Make DIY Masks Party Favors
Step 1: Prep Your Mask Template (5–10 minutes)
- Pick a size: Start with a mask that’s about 7.5 inches wide and 3.5 inches tall for most kids and adults.
- Create or trace a shape: Draw a simple masquerade curve, superhero eye mask, cat face, or animal style.
- Mark eye holes: Eye openings should be about 1.25–1.5 inches wide each, spaced roughly 0.75–1 inch apart (adjust based on your template).
- Cut the template: Use scissors for the outer edge; use a craft knife on a cutting mat for the eye holes.
Beginner-friendly shortcut: Fold paper in half and cut both eye holes at once for symmetry.
Step 2: Trace and Cut Mask Bases (10–20 minutes per batch)
- Trace the template onto cardstock or foam.
- Cut the outer shape first.
- Cut eye holes carefully (slow, small cuts keep edges smooth).
Batch tip: Stack 2–3 sheets of cardstock and cut together (only if your scissors are strong and the shapes are simple).
Step 3: Reinforce the Mask (Optional but Worth It) (3–5 minutes)
- For cardstock masks: Add a second layer by gluing the cut mask onto another sheet of cardstock, then trim. This creates a sturdy “double-thick” base.
- For comfort: Add small felt strips on the inside where the mask touches cheeks (about 1 x 3 inches each).
Step 4: Attach the Fastener (5–10 minutes)
Option A: Elastic Wearable Mask
- Punch a hole on each side, about 1/2 inch from the edge and centered vertically.
- Cut elastic to size:
- Kids: 11–13 inches
- Teens/Adults: 13–15 inches
- Knot elastic ends through the holes. Add a dab of hot glue on the knot (optional) to prevent slipping.
Option B: Ribbon Tie Mask (Masquerade-Style)
- Punch holes in the same spot as above.
- Cut two ribbon pieces, each 16–18 inches long.
- Thread and knot or loop-tie each side.
Option C: Stick Mask Prop
- Position a 6–8 inch craft stick on the back at a diagonal or centered bottom.
- Hot glue in place.
- Reinforce: Glue a cardstock tab over the stick (about 1 x 2 inches) like a patch.
Step 5: Decorate Like a Pro (10–25 minutes + drying time)
This is where DIY party magic happens. Keep it simple for quick favors, or go all out for showstopper masks.
- Paint base layer: Acrylic paint works well on cardstock and paper mache; for foam, use paint pens or thin acrylic coats.
- Add details: Metallic marker outlines instantly look polished.
- Embellish: Add rhinestones around eye holes, feathers at corners, or glitter accents.
- Seal (optional): A light coat of clear spray sealer helps prevent glitter shedding (use outdoors).
Drying time: Acrylic paint typically dries to the touch in 10–20 minutes, but give it 30–60 minutes before packaging to avoid sticking.
Party Favor Packaging Ideas (That Also Look Like Decor)
- Cellophane favor bags: Slide mask in front-facing, tie with ribbon that matches your party theme.
- Personalized name tags: Punch a small tag (2 x 3 inches) and tie it to the elastic/ribbon.
- Mask wall display: Clip finished masks to twine with mini clothespins for DIY party decorations—then guests grab theirs to take home.
- Favor box upgrade: Add a “Mask Kit” including a mini gem sheet and a small glitter tube for at-home decorating.
Pro Tips for Cleaner Cuts, Stronger Masks, and Happier Guests
- Use a craft knife for eye holes: It’s faster and smoother than scissors for tight curves.
- Keep embellishments away from the inner eye edge: Leave a 1/8 inch buffer so rhinestones don’t poke or fall into the eye opening.
- Hot glue placement matters: For feathers, glue the quill (hard part) first, then add a second dot over it.
- Make “left” and “right” templates: If you’re adding an asymmetrical feather cluster, consistent placement looks more professional.
- Comfort check: If masks are for kids, avoid scratchy glitter directly on areas that touch skin.
Fun Variations (Beginner-Friendly to Advanced)
Beginner Variations
- Sticker masks: Skip paint and use foam stickers, gem stickers, and washi tape for a no-mess favor.
- Two-color cardstock: Cut the base in one color and add a second layer “frame” around the eyes.
- Printable template masks: Print on heavy cardstock, cut, decorate, and attach elastic.
Intermediate Variations
- Glitter-dipped edges: Brush tacky glue around the outer edge (about 1/4 inch wide) and dip into fine glitter.
- Layered shapes: Add ears, eyebrows, lightning bolts, or floral corners with foam cutouts.
- Ombre paint: Blend two acrylic colors with a damp sponge for a smooth fade.
Advanced Variations
- 3D sculpted details: Use lightweight air-dry clay accents (small horns, raised brows). Let dry fully before painting.
- LED accent masks: Add mini battery fairy lights along the top edge (best for adult parties; keep battery pack on a stick handle instead of wearable).
- Fabric overlay: Wrap mask with satin or lace, trimming eye holes neatly and gluing on the back for a couture masquerade look.
Troubleshooting: Fixes for Common Problems
- Mask bends or flops: Use heavier cardstock (110 lb), double-layer the base, or switch to EVA foam.
- Elastic feels too tight: Cut a new piece 1–2 inches longer, or use ribbon ties for adjustable fit.
- Paint warps the paper: Use thinner paint layers, paint both sides lightly, or switch to foam/paper mache masks.
- Glitter gets everywhere: Use a glitter tray (a folded piece of paper works), tap off excess, and seal with clear spray.
- Embellishments fall off: Hot glue is best for gems/feathers; press firmly for 5–10 seconds and allow cooling time.
Common Crafting Mistakes to Avoid
- Cutting eye holes too large: Start smaller—you can always trim bigger, but you can’t shrink them.
- Placing holes too close to the edge: Keep at least 1/2 inch from the edge to prevent tearing.
- Overloading the mask with heavy décor: Too many gems or thick paint can make it uncomfortable and unbalanced.
- Skipping drying time before packaging: Paint and glue need time to cure, or you’ll end up with stuck-on cellophane and smudges.
- Not testing one full prototype: Make one complete mask first (cut, attach elastic, decorate) before mass producing.
FAQ: DIY Masks Party Favors
How many masks can I make from one pack of cardstock?
A standard 8.5 x 11 inch sheet usually makes one full-size mask with some scraps left for accents. A 50-sheet pack can yield about 45–50 masks depending on your template size and layering.
What’s the best material for kids’ parties?
EVA foam is comfortable and durable, especially for wearable masks. For classroom crafts, cardstock + stickers is fast and low-mess.
How do I make masks fit different face sizes?
Use ribbon ties for the easiest adjustable fit. If using elastic, keep a few extra pre-cut lengths (11", 13", 15") so guests can choose.
Can I turn this into a party activity?
Yes! Pre-cut the mask shapes and eye holes ahead of time. Set out “decorate stations” with gem stickers, markers, feathers, and glue dots. Plan for 15–25 minutes of decorating time per guest.
How far in advance can I make DIY mask favors?
You can make them 1–2 weeks ahead. Store flat in a box with parchment paper between layers to protect paint and embellishments.
What’s the easiest way to personalize each mask?
Add names with metallic paint pens on one corner or attach a small name tag to the ribbon/elastic. For superhero themes, write nicknames like “Captain Mia” or “The Amazing Leo.”
Ready to Make Your Own Mask Favors?
DIY masks are one of the most satisfying handmade party favors because they’re practical, themed, and instantly fun. Start with a simple template and a few bold decorations, then level up with layers, glitter edges, or feather details once you find your groove. Your guests get a creative party souvenir, and you get a table full of personalized party décor that looks like it came from a boutique.
Keep your scissors sharp, your glue steady, and your imagination wide open—and when you’re ready for your next handmade celebration, explore more DIY craft ideas and party-ready projects on smartpartyprep.com.
More Articles
 DIY Embroidered Patches Party Favors
 How to Accept 3rd Party Cookies on Mac in 2024: A Step-by-Step Safari & Chrome Guide (No Tech Degree Required)
 DIY Candles with Dollar Store Supplies
 How to Enable Third Party Cookies on Safari in 2024: A Step-by-Step Guide That Actually Works (No More 'Blocked' Errors or Broken Logins)
 DIY Greeting Cards in 5 Minutes
 12 Do It Yourself Party Hats You Can Make in Under 30 Minutes (No Sewing, No Glue Gun, and Zero Craft Store Runs Needed)
 No-Sew Coasters Tutorial
 DIY Balloon Arches for Anniversaries
 DIY Wooden Signs in 1 Hour
 How to Record Xbox Party Chat in 2024: The Only Step-by-Step Guide That Actually Works (No Capture Card Required)