No-Sew Coasters Tutorial
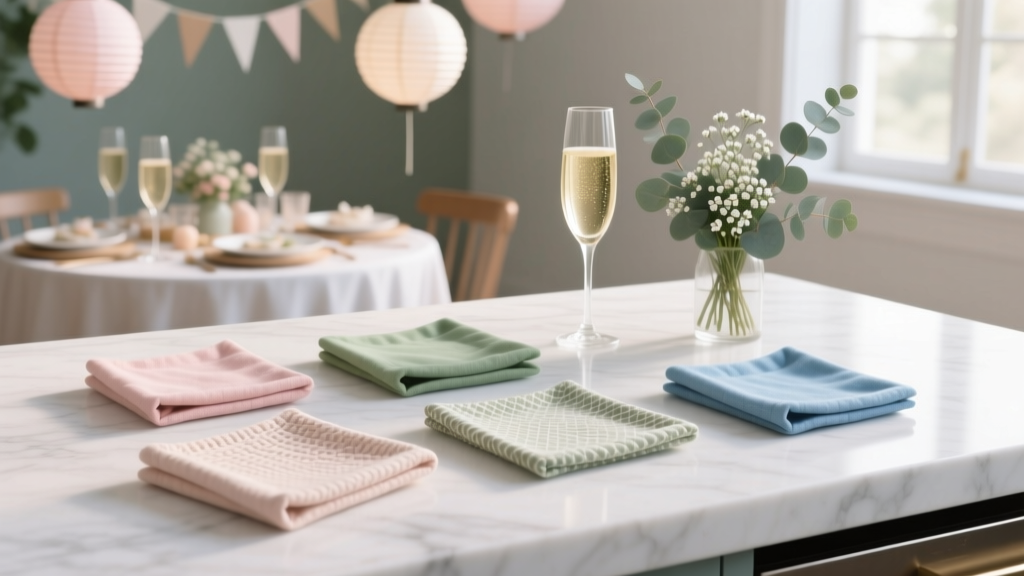
If you love party hosting and DIY crafts, no-sew coasters are one of those “why didn’t I make these sooner?” projects. They’re quick, satisfying, and instantly useful—perfect for protecting tables during birthday parties, game nights, baby showers, and holiday gatherings. Even better: you can match your coasters to your party theme, color palette, or seasonal décor without pulling out a sewing machine.
This tutorial is designed for beginners who want a polished, handmade result with minimal tools. You’ll get step-by-step guidance, exact measurements, time estimates, and creative variations—from kid-friendly felt coasters to elevated faux leather looks that feel boutique-worthy. Make a single set for your own coffee table or batch-produce a stack for party favors and handmade gifts.
Skill level: Beginner (with optional advanced upgrades)
Time: 30–60 minutes for a set of 4 (plus drying time if using glue)
Great for: DIY party decorations, handmade table décor, themed party setups, last-minute hostess gifts
What You’ll Make (And Why It Works)
These no-sew coasters are layered and bonded—no stitching required. The core idea is simple: combine an absorbent or wipeable top with a sturdy base and a grippy backing. The result is a coaster that:
- Looks coordinated with your party décor
- Helps prevent water rings and heat marks
- Stacks neatly for serving stations, drink bars, and dessert tables
- Can be customized with shapes, monograms, and theme colors
Materials & Estimated Costs
Below are three popular material “recipes.” Choose one based on the vibe you want: cozy felt, chic faux leather, or rustic cork-backed fabric. Costs are estimates for a set of 4–6 coasters, depending on what you already have.
Option A: Felt + Cork (Beginner-Friendly, Party-Proof)
- Craft felt sheets (thick, stiffened felt if possible), 9"x12" or 12"x18" pieces (2–3 sheets): $3–$8
- Cork sheet (2–3 mm thick), at least 8"x10": $5–$10
- Strong craft glue (tacky glue) or spray adhesive: $4–$10
Option B: Faux Leather/Vinyl + Felt (Sleek, Wipeable)
- Faux leather or vinyl sheet (8.5"x11" or larger): $6–$15
- Heavy felt (for backing) or thin cork: $3–$10
- Double-sided fabric tape (strong hold) and/or hot glue: $4–$12
Option C: Cotton Fabric + Fusible Web + Cork (Crisp, Patterned)
- Cotton quilting fabric (fat quarter is plenty): $4–$8
- Fusible web (iron-on adhesive sheets): $3–$8
- Cork sheet (2–3 mm): $5–$10
Tools (Recommended)
- Sharp scissors (dedicated craft scissors help): $8–$20
- Craft knife + cutting mat (great for clean edges on cork/vinyl): $10–$25
- Ruler (clear acrylic quilting ruler if you have it): $5–$15
- Circle cutter or round object to trace (jar lid, bowl, tape roll): $0–$15
- Clips or binder clips for holding layers while drying: $2–$6
- Optional: heat-safe iron (only for Option C), edge beveler (for faux leather), letter stencils
Measurements & Templates
Pick a coaster size based on the cups and glasses you use at parties:
- Standard round coaster: 4" diameter (great all-purpose size)
- Large round coaster: 4.25"–4.5" diameter (better for stemless wine glasses and iced drinks)
- Square coaster: 4" x 4" (modern look, easy cutting)
- Hexagon coaster: 4.25" point-to-point (fun for themed party tables)
Thickness tip: Aim for at least 4–6 mm total thickness (combined layers) for a coaster that feels substantial and stays flat.
Step-by-Step No-Sew Coasters (Felt + Cork Method)
This is the most beginner-friendly method and a favorite for DIY party decorations because it’s durable, forgiving, and easy to batch.
Step 1: Choose Your Shape and Make a Template
- Decide on 4" round or 4" square coasters.
- Trace your shape onto cardstock or cardboard to create a reusable template.
- Cut the template carefully—clean edges here help every coaster look more polished.
Step 2: Cut Your Layers
For each coaster, cut:
- 1 felt top (4" round or 4" square)
- 1 cork bottom (same size as felt)
Tool recommendation: Use a craft knife and cutting mat for cork. It produces crisp edges and less crumbling than scissors.
Step 3: Glue the Layers Together
- Protect your work surface with scrap paper.
- Apply a thin, even coat of tacky glue to the cork (or use spray adhesive following label directions).
- Press the felt onto the cork, aligning edges carefully.
- Smooth from the center outward to prevent bubbles.
Drying time: 20–45 minutes for initial set, 2–24 hours for full cure depending on glue type.
Step 4: Press Flat for a Professional Finish
- Stack coasters between two clean sheets of paper.
- Place a heavy book on top for at least 20 minutes.
- If edges lift, add a tiny bit of glue and clip for 10 minutes.
Step 5: Optional Edge Upgrade (Makes Them Look Store-Bought)
- Sharp edges: Trim lightly with scissors after drying to make all coasters identical.
- Color pop edge: Use a paint marker to color the cork edge (test first).
- Sealed edge: Brush on a thin coat of clear-drying glue along the cork edge to reduce crumbling.
Beginner-Friendly Adaptations
- Kid-safe version: Use felt-on-felt (two thick felt layers) with glue dots or tacky glue. Skip cork cutting.
- No-drying-time version: Use strong double-sided fabric tape instead of wet glue (press firmly).
- Mess-minimizer: Use a glue sponge or small foam brush to apply an even coat.
Advanced Variations for Party Themes
1) Faux Leather Coasters with Metallic Details
- Cut faux leather tops in 4" rounds.
- Back with felt or cork using strong double-sided tape or a thin line of hot glue around the perimeter.
- Add metallic vinyl initials or stencil paint for a glam party bar cart.
Theme ideas: New Year’s Eve (black + gold), bachelorette (white + rose gold), milestone birthdays.
2) Fabric-Coated Coasters (Cotton + Fusible Web)
- Cut fabric slightly larger than your coaster shape (about 1/2" extra all around).
- Fuse fabric to a thin felt layer using fusible web (follow package instructions).
- Trim fabric/felt to final shape.
- Glue to cork backing and press flat.
Best for: patterned party décor, matching napkins, coordinating table runners.
3) “Confetti” Felt Coasters
- Cut tiny felt dots/triangles in 3–5 colors.
- Glue them randomly to the felt top before attaching cork.
- Seal lightly with a flexible fabric sealer if desired.
Perfect for: birthday parties, graduation parties, kids’ table settings.
Pro Tips for Clean Cuts, Strong Bonds & Long-Lasting Coasters
- Cut in batches: Stack 2 felt sheets and cut together for faster, consistent results.
- Use minimal glue: Too much glue can warp felt and seep at the edges. A thin, even coat is stronger than blobs.
- Let them cure fully: If you’re making party décor for an event, make these 1–2 days ahead.
- Prevent sliding: Cork naturally grips, but if you skip cork, add small silicone dots to the bottom.
- Heat protection: For hot mugs, use thicker cork (3 mm) plus felt. Thin coasters can transfer heat.
Troubleshooting (Quick Fixes)
- Edges lifting: Add a tiny bead of tacky glue, press with clips for 10–15 minutes.
- Coaster is warped: Too much wet glue. Press under a heavy book for a few hours; next time, use a thinner coat or switch to spray adhesive.
- Cork crumbling when cutting: Use a fresh craft knife blade and cut slowly with multiple light passes.
- Glue seepage: Wipe immediately with a damp cotton swab. If dry, trim carefully with scissors.
- Felt pilling: Choose higher-quality stiff felt; avoid heavy scrubbing when cleaning.
Common Crafting Mistakes to Avoid
- Skipping a template: Freehand cutting leads to mismatched shapes, especially obvious in a stacked coaster set.
- Using school glue: It often dries brittle and can peel. Choose tacky glue, spray adhesive, or strong double-sided fabric tape.
- Rushing drying time: Coasters can look done but still shift if the adhesive hasn’t cured.
- Not pressing flat: Pressing is the difference between “crafty” and “clean, giftable finish.”
- Too-thin materials: Flimsy coasters slide, curl, and don’t protect surfaces well—especially at parties with iced drinks.
How to Use These for Parties (Decor + Function)
- Drink station stack: Set a neat pile near the beverage dispenser to encourage guests to grab one.
- Place setting detail: Put one coaster at each seat with a name tag on top for a functional escort card.
- Party favors: Tie a set of 2–4 with ribbon and a small thank-you tag.
- Theme coordination: Match coaster colors to balloons, banners, and tableware for a cohesive party setup.
FAQ: No-Sew Coasters
1) What’s the best coaster size for parties?
A 4" round fits most cups and glasses and stacks nicely. If you serve lots of iced drinks or larger tumblers, go up to 4.25"–4.5".
2) Can I make these without cork?
Yes. Use two layers of thick felt or felt + foam sheet. To prevent sliding, add silicone dots or a grippy shelf liner circle on the bottom.
3) Are no-sew coasters washable?
Most are best as spot-clean only. Felt + cork coasters can be wiped gently with a damp cloth and air-dried. Avoid soaking, which can weaken adhesives.
4) What adhesive is best for a clean, strong hold?
Spray adhesive gives the smoothest, most even bond for flat coasters. Tacky glue is budget-friendly and strong but use a thin layer. For quick assembly, heavy-duty double-sided fabric tape works well.
5) How do I keep my coasters from sticking to cold glasses?
Moisture can create suction. A slightly textured top (stiff felt) helps, and a thicker coaster reduces condensation pooling. Also consider a faux leather/vinyl top for a wipeable surface.
6) Can I personalize them for a bridal shower or birthday?
Absolutely. Add initials with stencils, heat-transfer vinyl (on faux leather or fabric), or paint markers. For a coordinated party decoration look, match the monogram color to your tableware accents.
Wrap-Up: Make a Set Today, Then Customize for Every Celebration
No-sew coasters are the kind of handmade project that pays off immediately: they protect surfaces, elevate your party tablescape, and give you endless ways to play with color and theme. Start with a simple felt-and-cork set, then level up with faux leather, patterns, and personalized details once you’ve made your first batch.
Ready for more quick, practical DIY crafts and party decorations? Browse more creative project ideas on smartpartyprep.com and keep your next celebration looking thoughtfully handmade.
More Articles
 DIY Greeting Cards Party Favors
 How to Make Party in Infinity Craft: 7 Foolproof Steps (No Modding Skills Needed) + Free Blueprint Pack for Instant Build-Ready Celebrations
 How to Make Party Hats Out of Construction Paper in Under 12 Minutes (No Glue Gun, No Scissors Required for Kids!) — 7 Foolproof Designs That Actually Stay On Heads
 Advanced Invitations for Crafters
 How to Turn Off 3rd Party Cookies in 2024: A Step-by-Step Guide That Actually Works (No Tech Jargon, Just Real Browser Instructions)
 How to Install 3rd Party Apps on Vizio Smart TV (Without Jailbreaking): A Step-by-Step Guide That Actually Works in 2024 — No Developer Mode Myths, No App Store Limits, Just Real Methods That Unlock Netflix Alternatives, Plex, and More
 Upcycled Memory Books from Recycled Materials
 DIY Vision Boards Using Cricut
 20 Creative Scrapbook Pages Ideas
 How to Make a Partiful: The 7-Step No-Stress Guide That Turns Craft Panic Into Confident Creativity (Even If You’ve Never Glued Sequins Before)