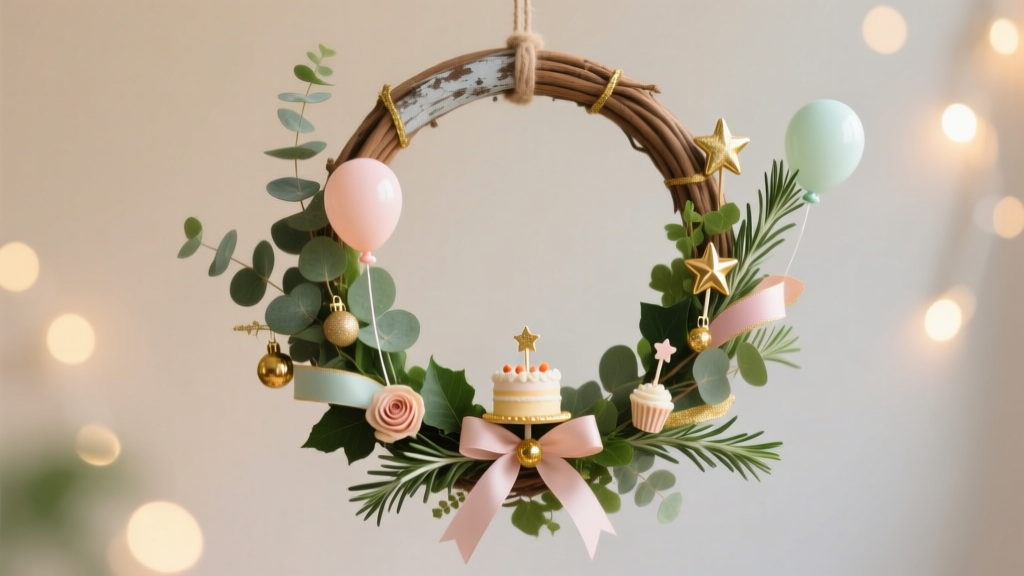
DIY Wreaths for Birthdays: Handmade Party Decorations That Wow
A birthday wreath is one of those DIY party decorations that feels instantly personal. It welcomes guests at the door, frames a dessert table, or becomes a photo backdrop accent—and it can be customized for any age, theme, or color palette. Best of all, you can make one with simple craft supplies, even if you’re a beginner who’s only used a glue gun a few times.
Unlike one-and-done banners, a DIY birthday wreath can be reused year after year. Swap out the name, age, or theme elements, and you’ve got a fresh look without starting from scratch. Whether you love ribbon crafts, paper flowers, or balloon-inspired decor, there’s a wreath style that fits your vibe.
Below you’ll find three practical, step-by-step birthday wreath ideas (from beginner-friendly to more advanced), plus pro tips, troubleshooting, and variations so your handmade decoration looks polished and party-ready.
Quick Overview: Skill Levels & Time Estimates
- Ribbon + Bow Birthday Wreath (Beginner): 45–75 minutes
- Paper Rosette + Name Wreath (Confident Beginner): 60–120 minutes
- Balloon-Inspired Mini Garland Wreath (Intermediate): 75–120 minutes
Best wreath size for most doors: 14–18 inches. Best size for a tabletop backdrop: 10–14 inches.
Materials & Tools (With Estimated Costs)
Costs vary by season and store, but these ranges help you plan a budget-friendly handmade party decoration.
Wreath Bases
- Wire wreath frame (14–16 inch): $3–$7
- Foam wreath form (12–16 inch): $5–$12
- Grapevine wreath (14–18 inch): $8–$20
Decor Materials
- Ribbon spools (wired 2.5" width + accent 1.5" width): $2–$8 each (plan 2–5 spools)
- Cardstock (12" x 12" or letter size, assorted colors): $5–$15 per pack
- Felt sheets (optional for backing letters or shapes): $0.50–$1.50 each
- Faux florals/greenery picks (optional): $2–$10 each
- Mini pom-poms or tassels (optional): $4–$12 per pack
- Vinyl letters or sticker letters (optional): $3–$10
- Mini latex balloons (5"): $4–$10 per pack
Adhesives & Fasteners
- Hot glue gun (high-temp preferred) + glue sticks: $8–$25 (sticks $3–$8)
- Floral wire (22–26 gauge): $3–$7
- Pipe cleaners/chenille stems (for wire frames): $2–$6
- Zip ties (optional, for extra security): $3–$7
- Double-sided tape (paper projects): $3–$8
Tools (Recommended)
- Wire cutters (for wire frames/floral wire): $6–$15
- Scissors (fabric + paper): $5–$20
- Ruler or measuring tape: $2–$8
- Bone folder (optional, for crisp paper folds): $5–$10
- Stencil or letter templates (optional): $3–$12
Project 1: Ribbon + Big Bow Birthday Wreath (Beginner-Friendly)
Look: Classic, fluffy, and festive. Perfect for front doors and party entrances.
Best base: 14–16" wire wreath frame (easy to tie ribbon onto).
Finished size: About 18–22" depending on bow and ribbon volume.
Materials
- 1 wire wreath frame, 14–16"
- Wired ribbon, 2.5" wide: 3 spools (each 9–12 ft) in coordinating colors/patterns
- Accent ribbon, 1.5" wide: 1–2 spools
- Pipe cleaners: 12–18 (or floral wire cut into 6–8" pieces)
- Optional: small sign or cutout that says “Happy Birthday” (6–8" wide)
- Optional: faux greenery pick (8–12")
Step-by-Step Instructions
- Cut your ribbon bundles. For a full look, cut:
- 2.5" ribbon into 10" strips (start with 24–36 strips total)
- 1.5" ribbon into 8" strips (12–24 strips total)
Tip: Cut more than you think you need. You can always add volume at the end.
- Prep your ties. Twist pipe cleaners onto the wire frame evenly spaced—about every 3–4 inches around the ring.
- Attach ribbon “poofs.” Pinch the center of a ribbon strip (like a bow-tie shape) and secure it with a pipe cleaner tie. Mix colors as you go for a balanced look.
- Build fullness in layers. Work around the wreath twice:
- First pass: place a 2.5" strip at each tie point.
- Second pass: add a second 2.5" strip and an accent 1.5" strip at alternating tie points.
- Make a big bow. Use wired ribbon to create a bow around 8–10" wide with tails about 10–14" long. Secure the center with floral wire and fluff loops.
- Attach your message. Hot glue or wire-tie your “Happy Birthday” sign slightly off-center. Add the bow above or beside it.
- Final fluff and trim. Trim any uneven tails. Shape loops and spread ribbon so the wire base disappears.
Project 2: Paper Rosette + Name Birthday Wreath (Confident Beginner)
Look: Bright, graphic, and perfect for themed parties (princess, superhero, sports, rainbow, pastel, etc.).
Best base: Foam wreath form (12–14") or sturdy cardboard ring.
Finished size: About 14–16". Great for indoor party décor and dessert tables.
Materials
- 1 foam wreath form, 12–14" (or cardboard ring with a 3" wide band)
- Cardstock: 20–30 sheets assorted (8.5" x 11" is fine)
- Hot glue gun + glue sticks (or strong tacky glue)
- Letter cutouts for name (vinyl letters, printed letters, or cardstock letters)
- Optional: metallic cardstock for a “Happy Birthday” banner strip
- Optional: foam dots for dimension
Step-by-Step Instructions
- Choose your color recipe. Pick:
- 2 main colors
- 1 accent color
- 1 metallic or neutral (white/black/gold/silver)
- Cut paper strips for rosettes. For standard rosettes:
- Cut cardstock into strips: 1.5" x 11" (each strip makes one small rosette)
- For larger rosettes, use 2" x 11" strips and tape two strips end-to-end
- Accordion-fold each strip. Make folds about 3/8" to 1/2" wide. Use a ruler for consistent spacing.
- Form the rosette circle. Glue the ends together to make a ring, then press the ring flat into a rosette shape. Add a dab of hot glue in the center to hold it.
- Add center circles. Cut 1–1.5" circles from cardstock. Glue to the center to hide folds and add contrast.
- Cover the wreath base. Start gluing rosettes around the wreath, overlapping slightly like shingles. Keep the most saturated colors evenly spaced.
- Add the name. Place letters across the bottom or center. For clean placement:
- Measure the inner opening and divide by letter count for spacing.
- Use foam dots for raised letters or glue flat for a sleek look.
- Finish with a hanging loop. Hot glue a ribbon loop (about 8–10" long) to the back. Add extra glue and press for 20 seconds.
Project 3: Balloon-Inspired Mini Garland Wreath (Intermediate)
Look: Trendy “balloon garland” style in wreath form—amazing for photo backdrops and modern party setups.
Best base: 14–18" grapevine wreath or sturdy wire ring.
Finished size: 18–22" with garland volume.
Materials
- 1 grapevine wreath (14–18") or thick wire ring
- Mini latex balloons (5") in 3–5 colors
- Balloon hand pump (recommended): $6–$12
- Low-temp hot glue gun (safer for balloons) + glue sticks
- Optional: faux eucalyptus or greenery sprigs (2–4 pieces)
- Optional: small “Birthday” script sign (6–8")
Step-by-Step Instructions
- Plan your cluster sizes. Inflate balloons to mixed sizes for realism:
- Small: 2.5–3"
- Medium: 3.5–4"
- Large: 4.5–5"
- Create balloon pairs. Tie balloons in pairs, then twist two pairs together to make a cluster of four.
- Build a mini garland segment. Make 3–5 clusters. Tie them together by twisting the necks around each other (or use a small piece of floral wire to anchor).
- Attach to the wreath. Secure the garland segment to one side of the wreath (typically top-right or bottom-left) using floral wire wraps through the grapevine.
- Fill gaps with single balloons. Use low-temp hot glue to tack small balloons into gaps. Hold in place for 5–8 seconds.
- Add greenery and a sign. Tuck greenery into the grapevine and secure with hot glue or wire. Attach your “Birthday” sign last so it stays centered and readable.
Pro Tips for a Polished, Party-Ready Birthday Wreath
- Stick to a “triangle” layout. Place your biggest elements (bow/sign/cluster) in a triangle pattern so the design looks balanced.
- Use odd numbers for accents. Three flower picks or five rosettes in an accent color looks more natural than two or four.
- Hide mechanics early. On ribbon wreaths, cover the frame evenly. On paper wreaths, cover the base edge-to-edge before adding letters.
- Make it photo-friendly. Add one high-contrast element (white letters on bright colors, gold on navy, black on pastel) so it reads well in pictures.
- Door safety tip. Use a wreath hanger or removable hook rated for the wreath’s weight. For apartment doors, an over-the-door hanger prevents adhesive damage.
Beginner Adaptations & Advanced Variations
Beginner-Friendly Tweaks
- Swap rosettes for pre-made paper fans. Attach 6–10 fans around a foam ring for a fast “wow” effect.
- Use a pre-cut “Happy Birthday” sign. Many craft stores sell wooden or chipboard words you can paint.
- Stick to two ribbons. Fewer patterns are easier to balance and still look festive.
Advanced Variations
- Interchangeable center plaque. Glue small magnets to the back of a sign and embed a metal washer on the wreath so you can swap ages/themes.
- LED light accent. Wrap micro-LED fairy lights around grapevine for evening parties (battery pack on the back).
- 3D paper florals. Mix rosettes with layered cardstock flowers for extra texture.
- Theme add-ons: mini party hats, confetti picks, tiny pennant banners, or a small photo of the birthday person.
Troubleshooting: Fixes for Common Wreath Issues
- Wreath looks flat: Add a second layer of ribbon strips/rosettes, or increase bow size to 10–12" wide.
- Colors feel chaotic: Pull one pattern/color out and replace with a solid. Repeat the accent color in 3–5 spots.
- Letters won’t stick to paper rosettes: Glue letters onto a strip of cardstock first (like a nameplate), then attach the nameplate to the wreath.
- Balloon wreath popping: Use low-temp glue, avoid over-inflating, and don’t press balloons onto sharp grapevine points—pad with a dot of glue first.
- Wreath feels heavy: Switch to a foam base and paper elements, or reduce large wood signs and use lightweight cardstock instead.
Common Crafting Mistakes to Avoid
- Skipping a quick layout test. Before gluing, place your main elements on the wreath and snap a photo. It’s easier to spot imbalance on camera.
- Using the wrong glue temperature. High-temp glue can melt balloons and warp thin paper. Use low-temp for balloons and quick-dab technique for paper.
- Cutting everything the same size. Mix sizes (ribbon lengths, rosette diameters, balloon sizes) for a more professional look.
- Overcrowding the center. Leave enough negative space so “Happy Birthday” or a name is readable from 6–10 feet away.
- Not reinforcing hanging points. Add an extra strip of felt or cardstock over the back of your hanging loop with glue for durability.
FAQ: DIY Birthday Wreaths
What’s the best wreath base for beginners?
A wire wreath frame (14–16") is easiest for ribbon wreaths because you can tie pieces on without complicated measuring. For paper projects, a foam wreath form is lightweight and forgiving.
How do I make a birthday wreath reusable every year?
Use a neutral base (white, gold, black, kraft) and attach the name/age on a removable piece:
- Velcro dots
- Mini binder clips hidden behind a bow
- Magnet + washer method
How big should a “Happy Birthday” sign be on a wreath?
For a 16" wreath, aim for a sign that’s 6–8" wide. If the wreath is very full (ribbon-heavy), go closer to 8" so it doesn’t get visually lost.
Can I make a birthday wreath without a hot glue gun?
Yes. Use floral wire, pipe cleaners, and strong double-sided tape for lightweight pieces. Tacky glue works for paper rosettes, but you’ll need extra drying time (plan an overnight cure for best hold).
How do I store a birthday wreath so it doesn’t get crushed?
Use a large plastic bin or wreath storage container. For ribbon wreaths, gently fluff before storing and place the bow facing up. For paper wreaths, avoid humidity and stack nothing on top.
Wrap-Up: Make a Wreath That Feels Like the Party Starts at the Door
DIY wreaths for birthdays are a fun way to turn simple craft supplies into a standout party decoration—one that guests notice right away and the birthday person will want to keep. Start with the ribbon wreath if you want fast results, try paper rosettes for bold color and personalization, or go balloon-inspired when you’re ready for a statement piece.
When you make one, take a photo before the party starts—you’ll love seeing your handmade birthday decor in the background of all those memories. For more DIY crafts, party decorations, and creative handmade projects, explore more ideas on smartpartyprep.com.
More Articles
 Step-by-Step Photo Booth Props Tutorial
 How Do I Enable Third Party Cookies on My Mac? The Real Answer (Spoiler: You Can’t — But Here’s What Actually Works in 2024)
 Kids' Craft: Table Runners
 Is Primal Queen Third Party Tested? The Truth About Lab Verification, What ‘Certified’ Really Means, and How to Spot Genuinely Transparent Brands (Not Just Marketing Claims)
 DIY Dream Catchers with Dollar Store Supplies
 How Do You Enable 3rd Party Cookies in 2024? (Spoiler: It’s Not Just One Click — Here’s Exactly What Changes in Chrome, Safari, Edge & Firefox)
 How to Make Party Hats Out of Paper in Under 10 Minutes (No Glue Gun, No Scissors Required — Just Printer Paper & Tape)
 How to Draw a Party in 7 Simple Steps (Even If You Can’t Draw Stick Figures): No Fancy Tools, No Art School Required — Just Paper, Pencil & Joy
 Rustic Mason Jar Crafts Ideas
 Advanced Centerpieces for Crafters