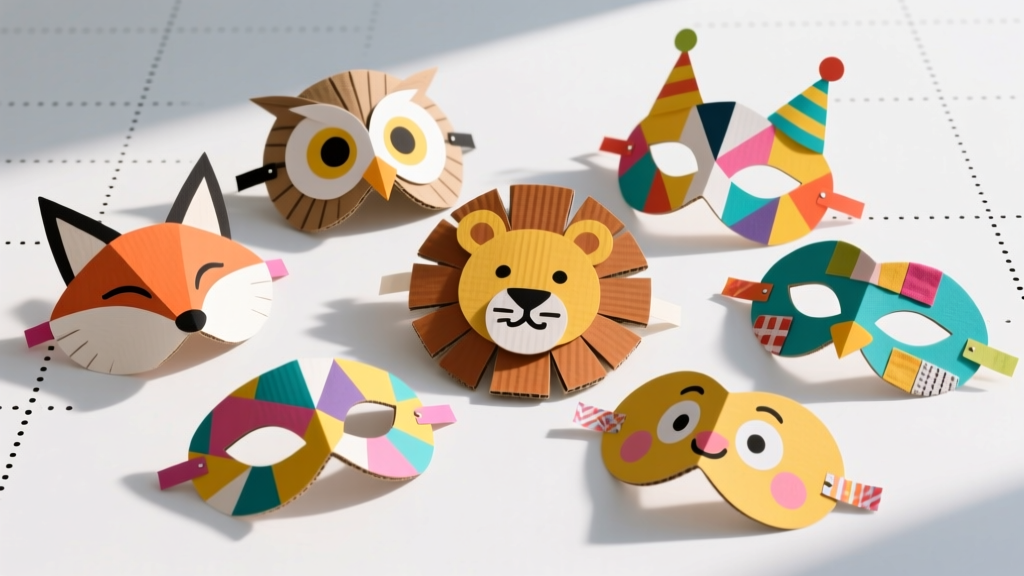
Budget DIY Masks Under $5
DIY masks are one of those party crafts that check every box: they’re quick, photogenic, kid-friendly (with supervision), and wildly customizable for any theme—Halloween, masquerade, animal parties, superhero birthdays, New Year’s Eve, classroom celebrations, even photo booth corners at weddings. The best part? You don’t need fancy equipment or expensive supplies to make masks that look store-bought.
This guide is all about budget DIY masks under $5 each, using easy-to-find materials from craft stores, dollar stores, and what you already have at home. Whether you’re crafting one statement piece or batching 20 masks for a party, you’ll find practical, step-by-step instructions, time estimates, and helpful fixes for common mistakes.
Pick a style below (or mix and match techniques), set out a “mask bar” on a table, and let your guests decorate their own. It doubles as an activity and a party decoration—instant fun, instant photos.
Quick Overview: Skill Level, Time & Budget
- Skill level: Beginner to Intermediate (advanced variations included)
- Time per mask: 10–30 minutes (plus drying time if painting/gluing)
- Estimated cost per mask: $1–$5 depending on embellishments
- Best for: Birthday parties, Halloween, masquerade, photo booth props, themed sleepovers, classroom crafts
Materials & Tools (With Estimated Costs)
Budget-Friendly Base Options (choose one)
- Cardstock (110 lb) – $0.15–$0.40 per sheet (1 sheet = 1–2 masks)
- Cereal box or thin cardboard (recycled) – $0
- Paper plate (9 inch) – $0.10–$0.25 each
- Felt sheets (9 x 12 in) – $0.50–$1.25 each (often 1 mask per sheet)
- Foam sheets (9 x 12 in) – $0.75–$1.50 each
Fasteners (choose one)
- Elastic cord (1/8 in) – about $0.10–$0.30 per mask (use 12–14 in)
- Ribbon (3/8–5/8 in) – about $0.15–$0.50 per mask (use 2 pieces, 18 in each)
- Craft sticks (6 in) for handheld masks – $0.05–$0.15 each
Adhesives (pick what you have)
- Glue stick (paper-only) – low cost, low mess
- Tacky glue – great for felt, sequins, trims
- Hot glue gun + mini glue sticks – fastest hold for trim (adult supervision recommended)
- Double-sided tape – quick and clean for party crafting stations
Decor (choose a theme)
- Acrylic paint (2 oz) – $0.75–$1.50 per color
- Markers – often already owned
- Glitter glue – $1–$2
- Feather trim / individual feathers – $1–$3 for a small pack
- Sequins or gem stickers – $1–$3
- Pipe cleaners for antennae/whiskers – $1–$2 per pack
- Washi tape – $1–$4 per roll (use sparingly to stay under $5)
Tools (recommended)
- Scissors (8 in) for general cutting
- Small detail scissors for eye holes and curves
- Hole punch (single or standard) for elastic/ribbon holes
- Pencil + eraser for sketching
- Ruler (12 in)
- Optional: craft knife + cutting mat (advanced, cleaner eye holes)
Size Guide: Measurements That Fit Most Faces
These measurements work well for most kids and adults. Adjust as needed for comfort.
- Adult mask width: 7.5–8.5 in
- Adult mask height: 3–4 in (not counting tall decorations)
- Kid mask width: 6.5–7.5 in
- Kid mask height: 2.75–3.5 in
- Eye hole size: about 1.25 in wide x 0.75 in tall (adjust for glasses)
- Elastic length: kids 10–12 in; adults 12–14 in (test and knot)
- Ribbon ties: 18 in each side (two pieces)
DIY Mask #1: Classic Masquerade Cardstock Mask (Under $3)
Best for: masquerade parties, New Year’s Eve, photo booth props
Time: 15–25 minutes + 10 minutes dry time (if painting)
Skill level: Beginner
What You’ll Need
- 1 sheet cardstock (110 lb)
- Pencil, ruler, scissors
- Hole punch
- Elastic (12–14 in) or ribbon ties (2 x 18 in)
- Decor: paint/markers, glitter glue, sequins, feathers (optional)
Step-by-Step
- Create your template. Draw a horizontal line 8 in long. Mark the center. Sketch a gentle mask curve above and below the line for a total height of about 3.5 in.
- Mark eye placement. From the center mark, measure 1.5 in to the left and right. That’s the center of each eye hole. Sketch oval eye holes about 1.25 in wide x 0.75 in tall.
- Cut out the mask. Cut the outer shape first. Fold the mask slightly (not a hard crease) and snip a starter cut inside each eye hole, then cut around the ovals carefully.
- Reinforce (optional but helpful). If the cardstock feels flexible, glue a second layer of cardstock or cereal box cardboard behind it. Keep the eye holes aligned.
- Add holes for ties. Punch one hole on each side, about 1/2 in from the edge and centered vertically.
- Decorate. Add paint, marker patterns, glitter glue swirls, gem stickers, or a feather cluster on one side. Let wet glue/paint dry fully.
- Attach elastic or ribbon. Thread elastic through holes and knot on the inside. For ribbon, tie or hot-glue ends to the inside edges.
Budget Breakdown (Example)
- Cardstock: $0.25
- Elastic: $0.20
- Glitter glue accents: $0.50
- Gem stickers (a few): $0.75
- Total: about $1.70
DIY Mask #2: No-Print Paper Plate Animal Mask (Under $2)
Best for: kids’ parties, classroom crafts, jungle/safari themes
Time: 10–20 minutes
Skill level: Beginner
What You’ll Need
- 1 paper plate (9 in)
- Markers or acrylic paint
- Scissors
- Hole punch + elastic OR craft stick for handheld style
- Optional: pipe cleaners, pom-poms, felt scraps
Step-by-Step
- Flatten and plan. Place the plate with the curved edge facing out. Lightly sketch eyes about 2.5–3 in down from the top rim.
- Cut eye holes. Use small scissors to cut neat ovals. For younger kids, pre-cut the eye holes before craft time.
- Shape the top (optional). For a fox/cat, cut two triangles at the top rim to create “ears.” For a bear, glue on two half-circle ears cut from scraps of plate.
- Color the face. Use markers for quick coverage or paint for bold color. Add nose, whiskers, stripes, spots, or a muzzle.
- Add 3D details. Glue pom-poms for noses, pipe cleaners for whiskers or antennae, or felt shapes for eyebrows.
- Attach the wearing method. Punch holes on both sides and add elastic, or hot-glue a craft stick handle to the bottom/side for a photo booth mask.
Easy Animal Ideas
- Cat: triangles ears + whiskers + pink nose
- Fox: orange face + white muzzle + black ear tips
- Ladybug: red face + black spots + pipe cleaner antennae
- Tiger: orange + black stripes + white cheeks
DIY Mask #3: Felt Superhero Mask (Under $5)
Best for: superhero birthday parties, costume stations, party favors
Time: 20–30 minutes
Skill level: Beginner (Intermediate if hand-stitching)
What You’ll Need
- 1 felt sheet (9 x 12 in)
- Sharp scissors
- Elastic (10–14 in)
- Tacky glue or hot glue
- Optional: metallic vinyl stickers, fabric paint, contrasting felt for emblem
Step-by-Step
- Cut the base. Cut a rectangle about 8 in x 3.5 in (adult) or 7 in x 3.25 in (kid). Round the corners.
- Shape the sides. Trim small inward curves near the cheeks so it hugs the face visually (take off 1/4 in at a time).
- Create eye holes. Fold the mask gently in half to mirror eye placement. Cut two matching ovals. Unfold and test in front of a mirror.
- Reinforce elastic points. Cut two tiny felt squares (1 in x 1 in). Glue them to the back where the elastic will attach to prevent tearing.
- Attach elastic. Glue elastic ends between the reinforcement squares and the mask back. Press firmly and let set.
- Add superhero flair. Cut a lightning bolt, star, or initial from contrasting felt and glue to the front. Add lines with fabric paint or marker.
Pro Tips for Party-Worthy DIY Masks
- Batch-cut for groups: Cut 10–20 mask bases and eye holes ahead of time. Set out decorations buffet-style for a DIY party activity.
- Use a “drying zone”: Designate a table corner with wax paper so glued gems and glitter glue can set without smearing.
- Make it comfy: Add a small strip of self-adhesive craft foam (about 3/8 in wide) along the forehead area on the back for softer wear.
- Keep glue tidy: For gems and sequins, apply glue with a toothpick for less mess and better placement.
- Photobooth upgrade: Add bold outlines with a black marker, plus one “statement” element (feather cluster, metallic trim, or big star) to read well in photos.
Variations: Beginner-Friendly and Advanced Upgrades
Beginner-Friendly Adaptations
- Skip elastic: Make handheld masks with a craft stick handle—easier for little kids and quicker for party stations.
- Use stickers instead of glue: Foam stickers and gem stickers are fast, clean, and great for group crafting.
- Pre-draw templates: Trace around a simple mask stencil so everyone starts with a clean shape.
Advanced Variations (Still Budget-Friendly)
- Layered look: Cut a second mask shape 1/4 in larger in a contrasting color and glue behind for a “framed” edge.
- Texture mix: Combine cardstock base with felt accents (brows, cheek shapes, nose) for a pro finish.
- Paint techniques: Sponge paint metallic acrylic lightly over black for a luxe masquerade effect.
- Ribbon trim edge: Glue 1/4 in ribbon around the outer edge for a polished border (work in 2–3 in sections).
Troubleshooting: Fixes for Common Mask Problems
- Mask feels flimsy: Glue a second layer of cardstock or thin cardboard behind it. Press under a book for 3–5 minutes to flatten while drying.
- Eye holes don’t line up: Lightly pencil the eye placement while holding the mask to the face (or use a mirror). Enlarge holes gradually—trim 1/8 in at a time.
- Elastic is too tight: Cut and re-knot with an extra 1–2 in length. If it’s too loose, tie a small knot near one end to shorten.
- Gems keep popping off: Switch to tacky glue or hot glue. Press each gem for 10 seconds and allow full dry time before wearing.
- Paint warps the paper: Use less water, paint thin coats, or color with markers. Cardstock warps less than printer paper.
Common Crafting Mistakes to Avoid
- Cutting eye holes too large too soon: Start smaller and test-fit. You can always trim bigger, but you can’t easily shrink them.
- Placing holes too close to the edge: Keep tie holes at least 1/2 in from the side edge to prevent tearing.
- Using runny glue for heavy decorations: School glue often fails with gems/trim. Use tacky glue, hot glue, or strong double-sided tape.
- Not accounting for glasses: Make eye holes wider (up to 1.5 in) and avoid bulky decorations near the nose bridge.
- Skipping drying time: Glitter glue and paint need a few minutes minimum. Set a timer at the party so masks don’t smear right before photos.
FAQ: Budget DIY Masks Under $5
1) What’s the cheapest mask base that still looks good?
Cardstock is usually the best value: crisp edges, easy cutting, and it holds decorations well. Recycled cereal box cardboard is even cheaper, but cover it with paint or colored paper for a cleaner finish.
2) Are these DIY masks safe for kids?
Yes with basic precautions: supervise scissors use, avoid small gems for very young children (choking hazard), and keep hot glue guns in adult hands. Handheld stick masks are a great option for toddlers.
3) How do I make masks fit different ages?
Use the size guide above and keep a few extras in different sizes. For the easiest fit, use ribbon ties instead of elastic—ribbon adjusts to any head size.
4) What’s the fastest option for a party craft table?
Pre-cut paper plate or cardstock bases and eye holes, then set out stickers, markers, and feathers. Guests can decorate in 10 minutes, and you avoid bottlenecks with cutting.
5) How can I keep the cost under $5 if I want a “fancy” look?
Choose one statement element (like a small feather cluster or metallic trim) and keep the rest simple (marker patterns or a painted base). A little sparkle goes a long way in party photos.
6) How far in advance can I make these masks?
You can make them 1–2 weeks ahead. Store flat in a box with wax paper between decorated masks so gems and glitter don’t snag.
Wrap-Up: Your Party Just Got More Creative
Budget DIY masks are proof that party decorations and handmade projects don’t have to be pricey to feel special. With a simple base, a comfortable fit, and a few bold details, you’ll have masks that look amazing in photos and give guests something fun to do—and take home.
Try one style first, then build a mini “mask-making station” for your next celebration. You’ll be surprised how quickly a pile of cardstock, a few feathers, and some glue turns into a full-on party moment.
Want more DIY crafts, party decorations, and creative handmade project ideas? Browse the latest inspiration on smartpartyprep.com and keep the crafting fun going.
More Articles
 No-Sew Clay Ornaments Tutorial
 Rustic Cake Toppers Ideas
 How to Make Party Hats Out of Construction Paper in Under 12 Minutes (No Glue Gun, No Scissors Required for Kids!) — 7 Foolproof Designs That Actually Stay On Heads
 DIY Tie-Dye Shirts with Dollar Store Supplies
 Step-by-Step Place Cards Tutorial
 Step-by-Step Fabric Bunting Tutorial
 How to Make Confetti at Home
 Seasonal Photo Frames Ideas
 Budget DIY Resin Jewelry Under $15
 Advanced Greeting Cards for Crafters