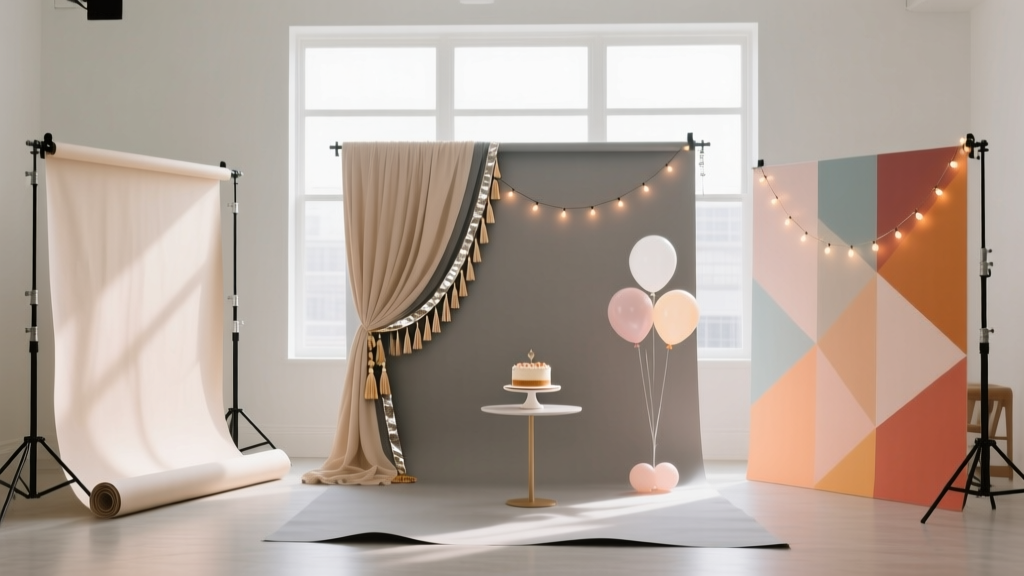
Step-by-Step Backdrops Tutorial
A great party backdrop turns a plain wall into a photo-worthy moment. Whether you’re styling a birthday, baby shower, graduation, or a cozy holiday gathering, a handmade backdrop instantly upgrades your party decorations—without needing a pro decorator budget.
This is one of those DIY crafts that feels just as fun to make as it is to show off. You can match any theme, reuse the frame for future events, and customize the colors to your space. Plus, backdrops are practical: they hide clutter, create a focal point behind a dessert table, and give guests a designated “photo spot” that makes your party feel intentional.
Below you’ll find a beginner-friendly, step-by-step backdrop tutorial with measurements, time estimates, pro tips, and a few advanced variations. Pick one base method and then add your favorite decorative layer—streamers, balloons, tissue fans, faux florals, or a combo.
Skill Level, Time, and Finished Size Options
- Skill level: Beginner to Intermediate (advanced add-ons optional)
- Total time: 1–3 hours depending on style (plus optional drying time for glue/paint)
- Recommended finished sizes:
- Small: 5 ft wide x 6 ft tall (great for tight spaces)
- Standard: 6 ft wide x 7 ft tall (best for most parties and photos)
- Extra wide: 8 ft wide x 7 ft tall (amazing for dessert tables and group shots)
Backdrop Styles You Can Make (Choose One Base + One Decor Layer)
Base Options
- Option A: Foam board panels (clean, modern, great for “arched” shapes)
- Option B: PVC pipe frame + fabric/curtain (reusable, budget-friendly)
- Option C: Tri-fold display board + add-ons (fastest, perfect for beginners)
Decor Layers
- Streamers: bold color coverage, quick and inexpensive
- Balloon garland: high-impact party decoration, very photogenic
- Tissue paper fans/pom-poms: lightweight, playful texture
- Faux florals/greenery: elegant, works for weddings and showers
- Lettering: vinyl, painted, or paper-cut for names and milestones
Materials List (With Estimated Costs)
Costs vary by size and region; the ranges below are typical for a 6 ft x 7 ft DIY party backdrop.
Base Materials
- PVC Pipe Frame (Option B):
- 3/4" PVC pipe, total ~40–50 ft (cut into sections) — $15–$30
- 3/4" PVC elbows (4) + T-joints (2–4) — $6–$15
- PVC cutter or fine-tooth saw — $10–$25 (tool, reusable)
- Sandbags or water weights (2–4) — $10–$25
- Fabric Backdrop:
- Polyester backdrop curtain (6–10 ft wide, 7–10 ft tall) — $15–$40
- Clamps (6–10 pack) or large binder clips — $6–$15
- Foam Board Panels (Option A):
- Foam boards 20" x 30" (8–12 boards) — $20–$60
- Gaffer tape or strong duct tape — $8–$15
- Command strips (optional for wall-safe mounting) — $8–$20
Decor Materials (Pick Your Look)
- Streamers: 10–18 rolls (crepe paper, 81 ft rolls) — $10–$30
- Balloon garland:
- Balloons in assorted sizes (5", 10–12", 18") ~80–140 balloons — $20–$45
- Balloon tape strip — $5–$10
- Glue dots — $4–$8
- Hand pump or electric balloon pump — $10–$35
- Tissue fans/pom-poms: 6–12 pieces — $10–$30
- Faux greenery/flowers: 2–6 stems/garlands — $15–$60
- Lettering: cardstock + craft knife or vinyl decals — $5–$25
Tools & Helpful Extras
- Measuring tape (at least 10 ft)
- Scissors + a sharp craft knife (for clean paper cuts)
- Hot glue gun + glue sticks (high-temp holds better) — $10–$25
- Painter’s tape (temporary positioning)
- Step stool (for safe reaching)
Step-by-Step Tutorial: PVC Frame + Fabric + Streamer or Balloon Accent
This method is the most versatile for DIY party backdrops because it’s sturdy, reusable, and works with nearly any decor layer.
Step 1: Choose Your Size and Cut List
Standard 6 ft wide x 7 ft tall frame (easy to transport and fits most rooms):
- Top bar: 72" (6 ft)
- Side uprights: 2 pieces at 84" (7 ft)
- Feet: 2 pieces at 24" (front/back stabilizers)
- Connectors: 2 elbows for top corners; 2 T-joints for feet (or elbows + extra pipe depending on design)
Tool recommendation: A ratcheting PVC cutter gives the cleanest cuts and is beginner-friendly.
Step 2: Dry-Fit the Frame (No Glue Yet)
- Lay your pieces on the floor in a rectangle shape.
- Attach the top bar to the uprights using elbows.
- Add feet at the bottom using T-joints (one on each upright) and a 24" piece extending forward/back.
- Stand it up and gently test wobble.
Beginner-friendly adaptation: Skip PVC cement so you can disassemble the frame for storage. If it’s a one-time event, you can glue the joints for extra rigidity.
Step 3: Add Weight and Stabilize
- Place sandbags or ankle weights on the feet (one per side minimum).
- If you’re outdoors, use two weights per side and keep the fabric taut to reduce wind flap.
Step 4: Hang the Fabric Backdrop
- Drape the fabric over the top bar so it falls evenly on both sides.
- Use clamps or binder clips along the top bar (space them every 10–12").
- Adjust the fabric so it just kisses the floor or puddles slightly for a luxe look.
Pro tip: Steam or iron the fabric ahead of time. Wrinkles show up more in photos than you expect, especially with flash.
Step 5A: Streamer Wall Overlay (Fast, Bold, Budget-Friendly)
This adds color and texture while keeping materials inexpensive—ideal for birthdays and themed parties.
- Cut streamers into 7.5–8 ft lengths (a little longer than your height so you can trim the bottom).
- Attach a strip of painter’s tape or masking tape across the top of the fabric as your “anchor line.”
- Starting at one side, tape streamer ends to the anchor line. Overlap each streamer by 1–2 inches for full coverage.
- Trim the bottom edge straight (or cut into a soft wave pattern).
Advanced variation: Create an ombré streamer backdrop by transitioning colors every 8–12 inches across the width.
Step 5B: Balloon Garland Accent (High-Impact, Photo-Ready)
Instead of covering the whole wall with balloons, build a garland “swoosh” on one side for a modern party decoration look.
- Inflate balloons in mixed sizes. For a 6x7 backdrop, plan for 60–110 balloons depending on fullness.
- Attach balloon knots into the balloon tape strip, alternating sizes.
- Shape the garland on the floor first, then bring it up to the backdrop.
- Secure to the PVC frame using string, zip ties, or strong clamps.
- Fill gaps with 5" balloons using glue dots.
Pro tip: Inflate slightly different sizes within each balloon group (some 10", some 11.5"). The variation looks more professional.
Step 6: Add a Focal Detail (Name, Age, or Theme)
- Quick option: Hang a pre-made banner across the top third.
- Clean modern option: Add vinyl lettering on a foam board sign (18" x 24") and mount it center.
- Crafty option: Cut large paper letters (8–12" tall) from cardstock and attach with double-sided tape.
Step 7: Do a Photo Test and Adjust
- Stand 6–10 feet back and take a photo with and without flash.
- Check for gaps, wrinkles, and areas that look uneven.
- Adjust lighting: a small ring light or floor lamp angled upward can reduce harsh shadows.
Pro Tips for a Clean, Professional Finish
- Work in odd clusters: Balloon clusters of 3–5 look more natural than evenly spaced pairs.
- Use a color recipe: Choose 2 main colors + 1 accent + 1 neutral (white, cream, or clear).
- Hide mechanics: Keep tape and clamps behind the fabric fold or behind balloon mass.
- Mind the floor: If your backdrop ends at the floor, add a small rug or faux grass mat to “finish” the photo area.
- Transport smart: Build balloon garlands the day of (or night before) and keep them cool, out of sunlight.
Variations You Can Try (Beginner to Advanced)
Beginner-Friendly Variations
- Tri-fold board backdrop: Cover a tri-fold display board (typically 48" x 36") with wrapping paper and add a banner. Great for tabletop dessert displays.
- Simple fabric + lights: Hang a curtain panel and weave warm white fairy lights behind it for a soft glow.
- Paper fan cluster: Arrange 6–10 tissue fans on the upper corners for instant texture.
Advanced Variations
- Panel look with foam boards: Tape foam boards together from the back to create a 5–6 ft wide panel, then paint in matte colors for a modern “event panel” style.
- Arch shape: Sketch an arch on a foam board wall, cut with a sharp craft knife, and reinforce the back with additional foam strips and tape.
- Mixed media: Combine fabric drape + balloon garland + greenery for a layered, styled photoshoot vibe.
Troubleshooting: Fix Common Backdrop Problems
- Backdrop keeps tipping: Add more weight to feet, widen feet to 30", or move the setup closer to a wall for wind protection.
- Fabric looks wrinkled: Steam it, pull it tighter with extra clamps, or add a second layer of fabric for a thicker drape.
- Streamers curl or tear: Use less tension when taping; overlap more; avoid repositioning crepe repeatedly.
- Balloons pop or deflate fast: Keep away from heat/sun, avoid overinflation, and choose thicker latex balloons. For longer events, use balloon shine sparingly and keep them cool.
- Visible gaps in balloon garland: Add 5" balloons with glue dots, or tuck in greenery to disguise open spaces.
Common Crafting Mistakes to Avoid
- Skipping a measurement plan: Always measure your wall/space first. A 6 ft wide backdrop feels much bigger once it’s standing.
- Underestimating supplies: Streamers and balloons go faster than you think—buy 10–20% extra.
- Using weak tape for heavy items: For balloons or signs, use clamps, zip ties, or strong hooks—especially outdoors.
- Building too close to party start time: Give yourself at least 30–45 minutes for final tweaks and photos.
- Forgetting photo perspective: What looks good up close may look sparse in pictures. Always do a camera test.
FAQ: DIY Backdrops for Parties
How wide should a party backdrop be for photos?
For single-person and couple photos, 6 ft wide is a reliable standard. If you want small group shots or a wide dessert table behind it, aim for 8 ft wide.
Can I make this backdrop without power tools?
Yes. A ratcheting PVC cutter is hand-powered and easy to use. For foam boards, a sharp craft knife and a metal ruler handle most cuts cleanly.
What’s the easiest backdrop for beginners?
A fabric curtain clipped to a frame is the simplest base. Add a banner or a small balloon cluster to one corner for a quick handmade party decoration that still looks polished.
How do I keep a backdrop stable outdoors?
Use heavier weights (at least 10–20 lbs total), widen the feet, keep the setup sheltered from wind, and avoid large loose fabric that can act like a sail. If it’s very windy, switch to a smaller backdrop or a foam board panel closer to a solid wall.
How far in advance can I make a balloon garland?
Latex balloon garlands look best within 12–24 hours. You can assemble earlier, but store it indoors, away from sun/heat, and expect some softening over time.
What backdrop colors photograph best?
Solid colors with a matte finish are the most camera-friendly. Neutrals (cream, white, beige) photograph beautifully, and adding one bold accent color keeps the backdrop from looking flat.
Wrap-Up: Your Party Deserves a Handmade “Wow” Moment
A DIY backdrop is one of the most satisfying party projects because it’s big impact, highly customizable, and totally reusable if you choose a frame-based setup. Start with a simple fabric base, then add streamers, balloons, paper fans, or greenery until it feels like your theme.
Try one version for your next celebration, take a quick photo test, and tweak as you go—your skills will level up fast with each event you style. When you’re ready for more DIY crafts, party decorations, and handmade project ideas, explore more tutorials on smartpartyprep.com.
More Articles
 How to Make Party in Infinity Craft: 7 Foolproof Steps (No Modding Skills Needed) + Free Blueprint Pack for Instant Build-Ready Celebrations
 Upcycled Origami Decorations from Recycled Materials
 Budget DIY Slime Under $50
 How to Unblock 3rd Party Session Cookies in 2024: The Only 5-Step Guide You’ll Need (No Extensions, No Coding, Works on Chrome, Safari & Edge)
 Paper Craft Tote Bags Ideas
 How to Allow Third Party Cookies in Safari (2024): The Only Step-by-Step Guide You’ll Need — No More 'Blocked' Warnings, Login Failures, or Broken Tools
 Rustic Table Runners Ideas (DIY Projects for Parties, Showers, and Cozy Gatherings)
 How to Enable Third Party Cookies on iPad in 2024: A Step-by-Step Guide That Actually Works (No More 'Blocked' Errors or Broken Logins)
 DIY Cake Toppers Party Favors
 How to Install 3rd Party Apps on Vizio Smart TV (Without Jailbreaking): A Step-by-Step Guide That Actually Works in 2024 — No Developer Mode Myths, No App Store Limits, Just Real Methods That Unlock Netflix Alternatives, Plex, and More