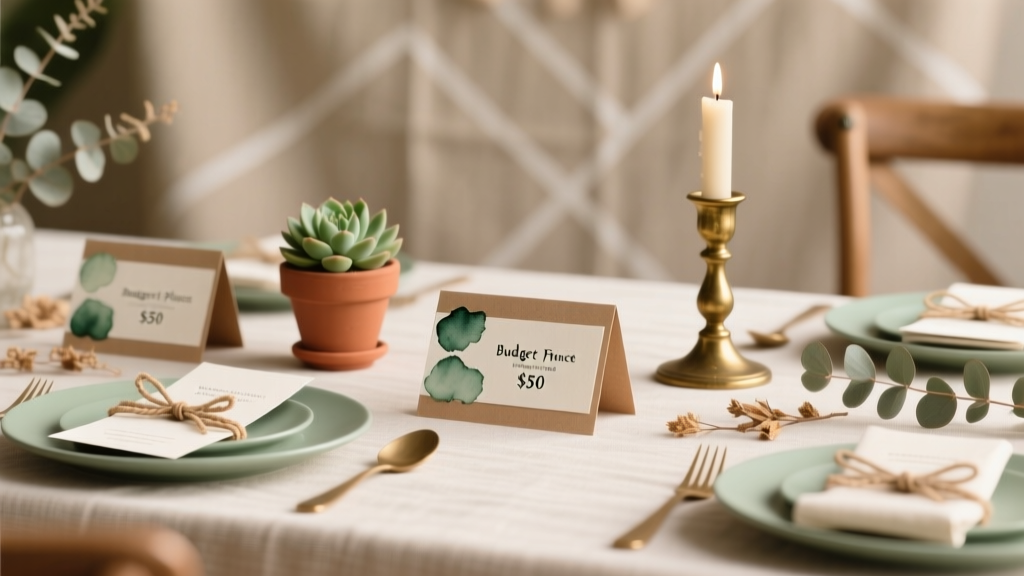
Budget DIY Place Cards Under $50
Place cards are one of those small party details that instantly make a table feel intentional. They help guests find their seats (no awkward hovering), guide the flow of your meal or games, and double as a tiny keepsake people often take home. The best part? You don’t need a fancy cutting machine or expensive materials to create handmade place cards that look polished.
This project is especially fun because it’s flexible: you can keep it super simple for a casual backyard party or dress it up for weddings, baby showers, holiday dinners, and milestone birthdays. With a few basic tools and some smart supply choices, you can make a full set of DIY place cards for well under $50—often closer to $20–$35 depending on what you already have at home.
Below are several budget-friendly DIY place card styles, each with clear steps, time estimates, and options for beginners and advanced crafters. Mix and match styles across tables, or choose one “signature” design for a cohesive look.
Project Overview (Skill Level, Time, and How Many You Can Make)
- Skill level: Beginner to Intermediate (advanced variations included)
- Time estimate:
- Simple folded tent cards: 30–60 minutes for 25 cards
- Mini clothespin place cards: 45–75 minutes for 25 cards
- Acrylic/clear “modern” cards: 60–120 minutes for 25 cards
- Typical yield under $50: 25–80 place cards (depending on style and materials)
- Great for: weddings, birthday parties, baby showers, bridal showers, holiday dinners, graduation parties, and any event needing seating
Materials List (Budget-Friendly Shopping List Under $50)
Choose the supplies based on the style you want. The list below includes estimated costs and smart swaps to keep your DIY party decorations budget-friendly.
Core Supplies (Pick 1 “card base” option)
- Cardstock (8.5" x 11"), 65–110 lb (white, cream, or color) – $6–$12 for 50–100 sheets
- Kraft cardstock or kraft paper (rustic look) – $6–$10
- Pre-cut blank tent cards (optional convenience) – $8–$15 for 50
- Budget acrylic blanks (2" x 3.5" or similar) – $10–$18 for 25–50
Writing Tools (Pick 1–2)
- Fine-tip permanent marker (black) – $2–$5
- Paint pens (white/metallic for darker cardstock or acrylic) – $6–$12
- Brush pen (for faux calligraphy) – $3–$10
Decor Options (Optional, choose what fits your theme)
- Ribbon (3/8" or 1/2" satin or grosgrain) – $3–$8
- Twine/jute – $2–$6
- Mini faux greenery stems or eucalyptus picks – $6–$12
- Pressed flowers (real or craft pack) – $7–$15
- Sticker sheets (florals, stars, hearts) – $2–$6
- Washi tape – $3–$10
Tool Recommendations
- Paper trimmer (recommended for speed and clean edges) – $12–$25 (often already owned)
- Scissors (sharp craft scissors) – $5–$15
- Ruler (12") – $2–$6
- Pencil + eraser – $1–$3
- Bone folder (or use the back of a butter knife) – $5–$10
- Hole punch (single hole) – $4–$10 (only if adding ribbon/twine)
- Hot glue gun + glue sticks (optional) – $8–$15
Budget example: Cardstock ($8) + permanent marker ($3) + twine ($4) + mini greenery ($10) + hole punch ($6) = $31 for a full handmade place card set.
Before You Start: Pick a Size and Prep an Assembly Line
Most DIY place cards look best when they’re sized to be readable but not bulky.
Recommended Place Card Sizes
- Folded tent card: 3.5" W x 2" H when folded (classic, easy to stand)
- Flat card for holders: 3" W x 2" H (works with mini clips, stands, or frames)
- Modern acrylic: 2" x 3.5" or 2.5" x 4" (sleek, minimal)
Assembly-Line Tip (Saves Tons of Time)
- Cut all cards first
- Score and fold all cards second
- Decorate in batches (add tape/ribbon/greenery)
- Write names last (after a quick ink test)
Style #1: Classic Folded Tent Place Cards (Fastest + Most Budget-Friendly)
Skill level: Beginner
Time: 30–60 minutes for 25 cards
Best for: weddings, holiday dinners, showers, buffet labeling, and simple DIY party decor
Materials
- Cardstock (65–110 lb)
- Paper trimmer or scissors
- Ruler + pencil
- Bone folder (optional but helpful)
- Fine-tip marker or brush pen
Step-by-Step Instructions
- Cut your cardstock. Cut rectangles to 3.5" x 4" for each place card. (This folds into a 3.5" x 2" tent.)
- Score the center. Lightly mark at 2" on the 4" side. Use a bone folder and ruler to score a crisp fold line.
- Fold into a tent. Fold along the scored line and press firmly so it stands up neatly.
- Plan your name layout. Lightly pencil a baseline about 3/4" from the bottom edge. This keeps names consistent.
- Write the names. Use a fine-tip marker for clean print or a brush pen for faux calligraphy. Let ink dry for 30–60 seconds before stacking.
- Optional: add a border. Add a thin line around the edge, or a small motif (dot, leaf, star) in one corner.
Beginner-Friendly Adaptation
- Use all-caps neat printing with a fine-tip marker.
- Write the first letter larger and keep the rest simple.
Advanced Variation
- Layer a smaller piece of contrasting cardstock: cut 3.25" x 1.75", glue to the front, then write the name on the layer.
- Add a wax seal sticker (budget-friendly peel-and-stick versions) for an elevated look.
Style #2: Mini Clothespin + Card Place Cards (Cute, Reusable, Great for Buffets)
Skill level: Beginner
Time: 45–75 minutes for 25 cards
Best for: casual parties, outdoor gatherings, kids’ parties, dessert tables, and buffet labels
Materials
- Mini wooden clothespins (1"–1.5") – typically $3–$8 for 50–100
- Cardstock cut to 3" x 2" (flat)
- Fine-tip marker or paint pen
- Optional: small kraft paper tags, sticker icons, or washi tape
Step-by-Step Instructions
- Cut the flat cards. Cut cardstock to 3" x 2".
- Decorate first (optional). Add a strip of washi tape across the top edge (about 1/2" wide), or add a small sticker in one corner.
- Write names in the center. Keep at least 1/4" margin on the edges so the clothespin doesn’t cover letters.
- Clip to a napkin or cup. Attach each name card to a rolled napkin, favor bag, or even the rim of a paper cup.
Advanced Variation
- Paint the clothespins (spray paint or acrylic). Let dry fully before clipping.
- Add a tiny faux greenery sprig under the clip for a “mini bouquet” look.
Style #3: Modern Acrylic Place Cards (High-End Look on a Budget)
Skill level: Intermediate (steady hand helps)
Time: 60–120 minutes for 25 cards
Best for: modern weddings, milestone birthdays, and sleek party table decorations
Materials
- Acrylic blanks (2" x 3.5" or 2.5" x 4")
- Paint pen (white or metallic gold/silver)
- Rubbing alcohol + cotton pad (for cleaning)
- Optional: small acrylic stands (budget multipacks) or place card holders
Step-by-Step Instructions
- Clean each blank. Wipe both sides with rubbing alcohol to remove oils and dust for crisp ink lines.
- Test your paint pen. Shake and prime on scrap paper. Check opacity and drying time.
- Write the guest names. Center the name, leaving about 3/8" margin at the top and bottom.
- Let dry completely. Paint pen ink can smear if stacked too soon. Allow 5–10 minutes to dry (longer if the ink is thick).
- Place in stands. Set each card in a holder so it’s easy to read from across the table.
Beginner-Friendly Adaptation
- Use a simple printed-name style (neat lowercase or all caps) instead of calligraphy.
- Practice 3–5 names on scrap plastic packaging first.
Advanced Variation
- Add a second line under the name for the table number or a short message (example: “Thanks for celebrating!”).
- Use a metallic paint pen for names and a white paint pen for a thin border.
Pro Tips for Clean, Consistent Results
- Choose thicker cardstock for tent cards. For cards that stand nicely, 80–110 lb cardstock is ideal.
- Use a scoring tool. Scoring prevents cracking and gives professional-looking folds.
- Batch your writing. Write all first names, then all last names (or all cards for one table) to keep your style consistent.
- Stick to 1–2 fonts/styles. Too many styles can look messy—simple often reads as “high-end.”
- Make 2–3 extra blank cards. Last-minute guest changes happen, and having backups saves stress.
- Do an ink test. Some markers feather on textured cardstock; test before committing.
Easy Theme Variations (Match Any Party Style)
Rustic / Farmhouse
- Kraft cardstock + black marker
- Jute twine tied in a simple bow
- Mini greenery sprig stapled or tucked under twine
Elegant / Wedding-Inspired
- Cream cardstock + gold paint pen
- Thin gold border or corner flourishes
- Wax seal sticker or small pearl sticker
Kids’ Party / Bright and Playful
- Color cardstock + bold marker
- Star/heart stickers
- Use first names only for quick readability
Holiday Dinner
- Deep green or red cardstock + white paint pen
- Add a tiny pine sprig or cinnamon-stick tie-on (keep fragrance in mind)
Troubleshooting (Quick Fixes for Common Issues)
- Problem: Cards won’t stand up.
Fix: Use heavier cardstock (80–110 lb), press the fold firmly, and make sure the fold is centered at exactly 2" on a 3.5" x 4" piece. - Problem: Ink smears.
Fix: Switch to quick-dry permanent marker, give extra drying time, and avoid stacking face-to-face. For acrylic, wait 10+ minutes before handling. - Problem: Marker bleeding/feathering on cardstock.
Fix: Try smoother cardstock, write with lighter pressure, or use a gel pen/paint pen designed for paper. - Problem: Names look inconsistent.
Fix: Lightly pencil guidelines. Keep the height of your lowercase letters around 3/8" and capitals around 1/2" for uniformity.
Common Crafting Mistakes to Avoid
- Skipping a test card. Always make one sample from your exact materials (paper + pen combo) before mass-producing.
- Cutting without measuring twice. Small size differences show up fast when cards are lined up on a table.
- Over-decorating. If the name isn’t readable from 2–3 feet away, guests will struggle to find seats.
- Using low-tack tape on textured paper. Washi tape may peel on some textures—press firmly or choose smoother cardstock.
- Waiting until the night before. Rushing leads to smudges and uneven writing. Aim to finish 1–2 days before the party.
FAQ: Budget DIY Place Cards
How many place cards can I make under $50?
With cardstock tent cards, you can often make 50–80 place cards under $50 (especially if you already have scissors and a marker). Acrylic and specialty decorations may bring the total closer to 25–50 depending on what you choose.
What’s the best cardstock weight for place cards?
For folded tent cards that stand well, aim for 80–110 lb cardstock. If you’re using flat cards with holders or clips, 65–80 lb works nicely.
Do I need calligraphy skills for a professional look?
No. Clean printing with a fine-tip marker looks modern and intentional. If you want a calligraphy vibe, try “fake calligraphy”: write in cursive, then thicken the downstrokes with the same pen.
How far in advance can I make DIY place cards?
You can make them 1–2 weeks ahead if you store them flat in a box away from humidity and sunlight. Save name writing for later if your guest list might change.
What can I use if I don’t have place card holders?
Folded tent cards stand on their own. For flat cards, use mini clothespins, tuck them into napkin folds, or place them under a small favor item so the name remains visible.
How do I keep place cards from blowing away outdoors?
Use heavier cardstock, choose clothespin-style cards clipped to napkins, or place each card under a small favor/stone. Avoid ultra-light paper if you’re hosting on a patio or in a backyard.
Wrap-Up: Your Table Can Look Styled Without Spending a Fortune
Handmade place cards are a simple DIY craft that makes party planning feel personal—and they’re one of the easiest ways to upgrade your party decorations on a tight budget. Pick a style that fits your event, keep your materials streamlined, and use an assembly-line approach to finish faster than you’d expect.
If you try one of these budget DIY place card ideas, make a few extras, have fun with the variations, and remember: a consistent look beats perfection every time. Explore more DIY party decor and handmade project ideas at smartpartyprep.com—happy crafting!
More Articles
 12 Do It Yourself Christmas Party Favors That Actually Impress Guests (No Craft Store Run Required — Just What’s in Your Junk Drawer + 20 Minutes)
 Why Don’t Third Parties Usually Succeed on Quizlet? The 5 Hidden Structural Barriers That Kill Outside Study Tools (And How to Beat Them)
 Paper Craft Party Banners Ideas
 Paper Craft Centerpieces Ideas
 Upcycled Wall Art from Recycled Materials
 DIY Fabric Bunting for Birthdays
 How to Make Diddy Party in Infinite Craft: The Only 4-Step Method That Actually Works (No Random Combos, No Wasted Time)
 Budget DIY Gift Boxes Under $20
 30 Creative Painted Rocks Ideas
 How Do I Allow Third Party Cookies on My Mac? A Stress-Free, Step-by-Step Guide for Safari, Chrome & Firefox (2024 Tested)