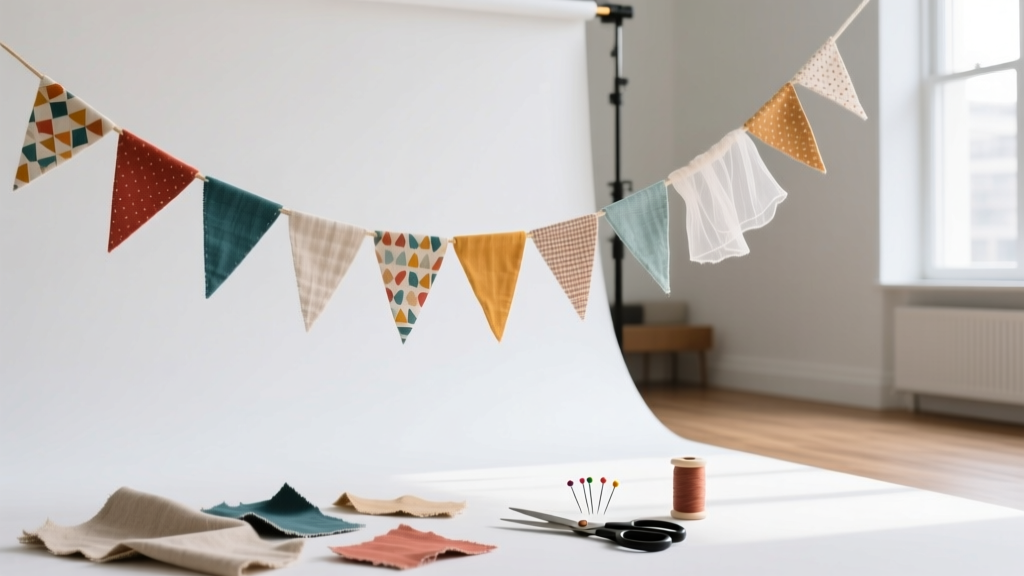
DIY Fabric Bunting for Birthdays
A handmade fabric bunting is one of those birthday party decorations that instantly makes a space feel festive—without needing balloons everywhere or a big décor budget. Whether you’re decorating a living room, backyard, classroom, or dessert table backdrop, bunting adds color, texture, and that cozy “made with love” charm that store-bought banners rarely match.
The best part? This DIY craft is wonderfully flexible. You can make fabric bunting from new cotton prints, thrifted sheets, leftover quilting scraps, or even old party outfits you can’t bear to toss. Keep it simple with no-sew options for a quick win, or level up with lined triangles, bias binding, tassels, and personalized letters.
If you enjoy DIY party decorations and handmade projects that you can reuse year after year, this is a must-try. You’ll end up with a custom birthday banner that packs flat, stores easily, and becomes a go-to piece for every celebration.
Project Overview (Skill Level + Time)
- Skill level: Beginner (no-sew or basic sewing) to Intermediate (lined, bias-bound, appliqué)
- Estimated time:
- No-sew bunting: 45–90 minutes
- Sewn single-layer bunting: 1.5–2.5 hours
- Lined bunting with binding: 2.5–4 hours
- Estimated finished length: 6–12 ft (typical for dessert tables and doorways); 12–20 ft for larger rooms/backyards
- Great for: Birthday parties, first birthdays, milestone birthdays, photo backdrops, cake table décor, highchair banners
Materials + Estimated Costs
These costs are approximate and can vary by region and sales. A fabric bunting is a budget-friendly DIY craft, especially if you use scraps or thrifted fabric.
Fabric + Base Materials
- Cotton quilting fabric (fat quarters or yardage): 3–6 fat quarters for a 10–12 ft bunting (about 12–18 flags)
Estimated cost: $1.50–$5 per fat quarter (or $6–$14 per yard) - Muslin or coordinating cotton (optional lining): 1/2–1 yard
Estimated cost: $3–$8 - Ribbon, twill tape, or bias tape for the top edge: 3/8 in to 1 in wide, 12–20 ft
Estimated cost: $4–$12 - Fusible interfacing (optional for crisp flags): lightweight, 1/2 yard
Estimated cost: $3–$6
Tools (Beginner-Friendly Options Included)
- Fabric scissors (or rotary cutter + self-healing mat + quilting ruler for faster cutting)
- Sewing machine (recommended) or hand-sewing needle for a slow-and-steady version
- Iron + ironing board (especially helpful for crisp edges)
- Measuring tape or ruler
- Chalk, washable fabric marker, or pencil
- Clips or pins (clips are great if you’re using thicker binding)
- Optional no-sew supplies: fabric glue, iron-on hem tape, or a hot glue gun (use carefully)
Budget Snapshot
- Scrap-based bunting: $5–$12
- All-new materials: $15–$35
- Heirloom-level (lined + binding + appliqué): $25–$55
Choose Your Bunting Shape + Measurements
The classic triangle flag is easiest, but you can also do swallowtail pennants, rectangles, or scallops. For birthday party decorations, triangles look festive and photograph beautifully.
Recommended Flag Size (Classic Triangle)
- Finished flag width: 6 in
- Finished flag height: 7 in
- Add seam allowance: 1/4 in on sides and bottom if sewing
Cut size for a lined triangle (two pieces per flag): 6.5 in wide x 7.5 in tall triangle (includes 1/4 in seam allowance).
How Many Flags Do You Need?
- Standard spacing: 1/2 in–1 in between flags (or touching for a fuller look)
- Rule of thumb: 10–12 flags for a 6–8 ft bunting; 15–20 flags for a 10–12 ft bunting
- Extra hanging tails: add 12–18 in of ribbon/tape on each end for tying
Step-by-Step: Sewn Fabric Bunting (Durable + Reusable)
This method makes sturdy, washable fabric bunting you can reuse for years. It’s one of the best handmade projects for birthday parties because it holds up through storage, kids, and repeated celebrations.
Step 1: Make a Template (Fast + Consistent)
- On cardstock or thick paper, draw a triangle: 6.5 in wide at the top and 7.5 in tall.
- Cut it out neatly. Label it “bunting template.”
Step 2: Cut Your Fabric
- Press fabric flat with an iron so your pieces cut accurately.
- Trace the template onto fabric with chalk or a washable marker.
- For lined bunting, cut two triangles per flag (front + back). Mix prints for a fun reversible banner.
- For single-layer bunting, cut one triangle per flag and plan to finish edges with a zigzag or binding.
Tool recommendation: If you own a rotary cutter, fold fabric right sides together and cut two layers at once for speed.
Step 3: Sew the Flags
Lined method (recommended):
- Place two triangles right sides together.
- Sew along the two slanted sides and bottom with a 1/4 in seam allowance. Leave the top edge open.
- Trim the point carefully (don’t cut the stitching), then turn right side out.
- Use a blunt tool (like a chopstick) to push out the point gently.
- Press flat, making sure seams sit right on the edge.
Beginner-friendly shortcut: If turning points feels fussy, make your triangle slightly less sharp (a tiny flat at the bottom point). It looks intentional and is easier to sew.
Step 4: Prep the Bunting Tape (Ribbon, Twill, or Bias)
- Cut your ribbon/tape to length: (desired bunting span) + 24–36 in for tying ends.
- If using bias tape, press it open slightly so it wraps the fabric easily.
Step 5: Attach Flags to the Tape
- Lay the tape flat on your workspace.
- Arrange flags in your preferred order (alternate colors, patterns, or gradients).
- Slip each flag’s top edge into/under the tape. Leave 1/2 in–1 in spacing between flags or keep them snug.
- Clip or pin in place.
- Sew along the tape edge to secure all flags in one continuous line. A straight stitch works well; sew a second line for extra durability.
Stitch recommendation: Straight stitch length 2.5–3.0. If the ribbon is slippery, slow down and use clips.
Step 6: Finish the Ends
- Fold under the ribbon ends by 1/2 in and stitch to prevent fraying.
- Optional: add a small loop on each end for hanging on hooks.
No-Sew Fabric Bunting (Quick Birthday Banner)
Need DIY party decorations fast? Try a no-sew fabric bunting that still looks polished.
- Option A: Pinked edges + fabric glue
- Cut triangles with pinking shears to reduce fraying.
- Fold the top edge over the ribbon and glue it down.
- Let dry fully before hanging (check glue instructions).
- Option B: Iron-on hem tape
- Fold the top edge over the ribbon with hem tape inside.
- Press with an iron following package settings.
Best fabrics for no-sew: felt (no fray), flannel, heavier cotton, or fabric treated with fray-check at edges.
Pro Tips for Crisp, Professional-Looking Bunting
- Press every step: Ironing turns “homemade” into “handmade in the best way.”
- Chain sew for speed: Sew multiple flags without cutting thread between each one, then snip them apart.
- Use a walking foot if your ribbon shifts or layers creep (especially with satin ribbon).
- Keep spacing consistent: Cut a small cardboard spacer (1 in) to place between flags as you clip.
- Reinforce the first and last flag: These get tugged the most when hanging.
- Choose high-contrast prints for photos: Small-scale prints can disappear at a distance; bold patterns pop in birthday pictures.
Creative Variations (Beginner to Advanced)
Beginner-Friendly Add-Ons
- Felt letters: Cut “HAPPY BIRTHDAY” from felt and glue or stitch onto flags.
- Simple theme colors: Use 2–3 fabrics that match your party plates and napkins.
- Double-sided bunting: Use two coordinating fabrics per flag for a reversible banner.
Advanced Variations (Extra Wow)
- Appliqué name flags: Add the birthday person’s name across several flags.
- Quilted bunting: Piece patchwork triangles from scraps, then line and bind.
- Pom-pom trim or ric-rac: Stitch trim along the bottom edge of each flag before assembling.
- Swallowtail pennants: Cut a V-notch at the bottom for a classic pennant look.
- Light-up bunting: String fairy lights behind it (don’t pierce wires; hang lights separately for safety).
Troubleshooting: Fix Common Issues
- My flags look wrinkly or floppy.
- Press more thoroughly and consider adding lightweight fusible interfacing.
- Use a sturdier tape (twill tape holds shape better than silky ribbon).
- The points won’t turn neatly.
- Trim seam allowance at the point (carefully) and use a blunt tool to shape.
- Stitch slightly away from the very tip (a tiny flat tip is easier and still cute).
- The ribbon/tape keeps shifting while sewing.
- Use clips instead of pins and sew slowly.
- Switch to bias tape or twill tape (more grip than satin ribbon).
- Try a walking foot if you have one.
- Edges are fraying.
- Use lined flags, pinking shears, or a zigzag stitch around edges.
- Choose less-fray fabrics (felt, flannel) for no-sew bunting.
Common Crafting Mistakes to Avoid
- Skipping the template: Eyeballing triangles often leads to uneven flags and a wavy banner.
- Forgetting extra length for tying: Always add 12–18 in on each end so you can hang it easily.
- Using ribbon that’s too narrow: Very thin ribbon can twist and won’t hold flags straight. Aim for 3/8 in to 1 in.
- Not pressing seams: Pressed seams make your bunting look crisp and intentional.
- Overcrowding the flags: Too many flags can cause bunching. Test-lay your banner before stitching everything down.
- Choosing super stretchy fabric: Knits can warp unless stabilized—save them for advanced projects with interfacing.
FAQ: DIY Fabric Bunting for Birthday Parties
How long should a birthday bunting be?
For a dessert table or fireplace, 6–8 ft works well. For a wall or backyard fence, 10–12 ft is a common sweet spot. Add extra for tying or looping around hooks.
What fabric is best for bunting?
Cotton quilting fabric is the easiest: it’s stable, easy to press, and comes in endless prints. Felt is excellent for no-sew bunting because it won’t fray.
Can I wash and reuse fabric bunting?
Yes—especially if it’s sewn. Use gentle washing (cold, mild detergent), air-dry when possible, and press lightly. If you used fabric glue, washing may loosen it over time.
How do I keep the bunting from flipping backward when hung?
Use slightly heavier flags (lined or interfaced), hang it with a bit of tension, and avoid very slippery ribbon. For outdoor parties, add a couple of tiny removable dots of tape behind a few flags to anchor them to a wall or backdrop.
What’s the easiest way to add “HAPPY BIRTHDAY” to the banner?
Cut letters from felt and attach them with fabric glue or a quick zigzag stitch. For a cleaner look, place letters on every other flag so the message is readable from a distance.
How far apart should the flags be spaced?
For a fuller, classic bunting look, place flags touching or 1/2 in apart. For a lighter, airy look, use 1–2 in spacing.
Wrap-Up: Make It Once, Celebrate Forever
DIY fabric bunting is one of the most satisfying handmade party decorations: quick enough for a weekend craft session, customizable for any theme, and durable enough to reuse for every birthday on your calendar. Start simple with a few favorite prints, then build a collection of flags you can mix and match for new celebrations.
If you make one, snap a photo before the party starts—bunting always looks extra magical in those “everything’s ready” moments. Keep creating, keep celebrating, and explore more DIY craft ideas and party prep inspiration at smartpartyprep.com.
More Articles
 DIY Masks Using Cricut
 Step-by-Step Thank You Cards Tutorial
 Paper Craft Cake Toppers Ideas
 Rustic Mugs Ideas: DIY Projects for Cozy Parties, Weddings, and Giftable Decor
 How to Draw Party Scenes in 7 Minutes (Even If You Can’t Draw a Stick Figure): A Step-by-Step Guide That Turns Doodles Into Delightful Decorations for Birthdays, Graduations & More
 Kids' Craft: Vision Boards
 How to Enable Third Party Cookies on iPad Chrome (2024 Guide): Why It’s Not Possible — And What You *Can* Actually Do Instead to Restore Login & Tracking Functionality
 Kids' Craft: Beaded Bracelets
 Budget DIY Wreaths Under $25
 How to Make Party Hats Out of Construction Paper in Under 12 Minutes (No Glue Gun, No Scissors Required for Kids!) — 7 Foolproof Designs That Actually Stay On Heads