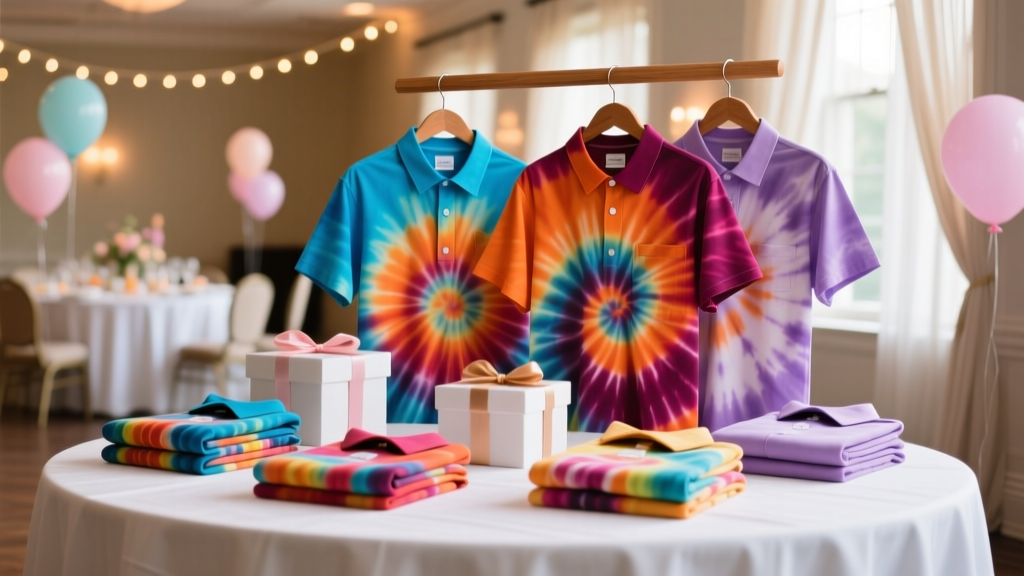
Personalized Tie-Dye Shirts Gifts
Few handmade gifts feel as instantly joyful as a fresh tie-dye shirt—especially when it’s personalized for a birthday, bachelorette, family reunion, graduation, or “just because” party. You get bold color, a one-of-a-kind pattern, and a wearable keepsake that guests actually use after the celebration ends. That’s a win for party planning and a win for meaningful DIY crafts.
This project is also party-perfect because it scales beautifully. You can make one shirt as a thoughtful gift (add a name, date, or inside joke), or set up a full tie-dye station as an activity for guests. Either way, the steps are beginner-friendly, and the upgrades (ice dye, ombré, bleach effects, layered personalization) keep it exciting for advanced crafters.
Below you’ll find a practical, step-by-step guide—with materials, estimated costs, realistic timing, troubleshooting, and creative variations—to help you make personalized tie-dye shirts gifts that look polished, wash well, and feel made-with-love.
Project Overview: Skill Level, Time, and Best Uses
Skill Level
- Beginner: Classic spiral or scrunch tie-dye + simple heat-transfer name.
- Intermediate: Multi-color placement, gradient/ombré, and layered HTV decals.
- Advanced: Ice dye, reverse tie-dye (bleach), and custom stencil work.
Time Estimates (Per Shirt)
- Prep + folding: 10–20 minutes
- Dye application: 10–15 minutes
- Batch set time: 6–24 hours (hands-off)
- Rinse + wash + dry: 30–60 minutes (mostly waiting)
- Personalization (vinyl/iron-on): 15–30 minutes
Great Party Occasions for Personalized Tie-Dye Shirts
- Birthday parties (make a shirt for the guest of honor)
- Bachelorette/bachelor weekends (matching sets with names/nicknames)
- Family reunions (year + last name across the back)
- Graduation parties (school colors + class year)
- Summer camp or sleepovers (a fun DIY party activity)
Materials & Tools (With Estimated Costs)
Costs vary by brand and quantity, but these ranges help you plan a DIY party craft budget.
Shirts and Dye Supplies
- 100% cotton T-shirts (adult sizes): $3–$8 each (value packs reduce cost)
- Fiber-reactive dye kit (bottle-style tie-dye kit or pro dyes): $10–$25
- Look for “fiber reactive” dyes for brighter, longer-lasting color on cotton.
- Soda ash (if using pro dye powders): $6–$12
- Many all-in-one kits already include soda ash; check the label.
- Plastic squeeze bottles (8–16 oz): $8–$15 for a set
- Rubber bands (medium and large): $3–$6
- Disposable gloves (nitrile recommended): $5–$12
- Plastic table cover or trash bags: $2–$6
- Zip-top bags (gallon) or plastic wrap: $3–$8
- Wire rack (optional, helps avoid pooling): $8–$15
Personalization Supplies (Choose One Method)
- Heat Transfer Vinyl (HTV): $4–$12 per roll/sheet
- Iron-on letter set (pre-cut): $6–$15
- Fabric paint pens (fine tip): $7–$15
- Permanent fabric markers: $6–$12
- Stencil set (letters/numbers): $6–$20
Tools You’ll Want Nearby
- Scissors and weeding tool (if using HTV): $2–$10
- Household iron or heat press (recommended for crisp results)
- Measuring spoons and a mixing cup (if mixing dyes from powder)
- Spray bottle (for dampening fabric): $2–$6
- Cardboard inserts (keeps dye from bleeding through): free–$3
- Masking tape or painter’s tape (for labels and lining up personalization): $4–$8
Planning Your Personalized Design
Pick a Theme and Color Palette
For party-related projects, the most cohesive results come from a limited palette:
- 2–3 colors for a clean, modern look (great for group shirts).
- 1 main color + black for bold contrast and readable personalization.
- Party theme match: pastel rainbow for baby showers, neon for pool parties, school colors for graduations.
Decide Where the Personalization Goes
- Left chest: name, small icon, date (easy and classic).
- Center front: big phrase or event title (more impact).
- Back: “Team Bride,” family name, list of nicknames, or the year.
- Sleeve: subtle personalization—great for party favors.
Smart Measurement Guide (For Centered Placement)
- Adult tee, center front: place design about 3 inches down from the collar seam.
- Left chest: place design about 7–9 inches down from the shoulder seam and 3–4 inches from center line.
- Back: place design about 2–3 inches down from the collar seam.
Step-by-Step: Tie-Dye the Shirt (Beginner-Friendly Method)
1) Prep the Shirt
- Pre-wash the shirt with a small amount of detergent (no fabric softener). This removes finishes that can resist dye.
- Leave the shirt slightly damp or mist it with a spray bottle. Damp fabric helps dye travel smoothly.
- Cover your work surface with a plastic tablecloth. Put on gloves.
2) Choose a Fold Pattern
Option A: Classic Spiral (Bold, Crowd-Pleasing)
- Lay shirt flat. Pinch the fabric at the center point (mid-chest area works well).
- Twist in one direction to form a tight spiral “bun.”
- Secure with 3–4 rubber bands crossing like pizza slices.
Option B: Scrunch (Fast, Great for Beginners and Kids)
- Scrunch the shirt into a loose mound (random texture).
- Wrap several rubber bands around it to hold the shape.
Option C: Stripes (Perfect for School Colors)
- Fold the shirt accordion-style, about 1.5–2 inches per fold.
- Band every 2–3 inches to create defined stripes.
3) Apply Dye (Color Placement Tips)
- If using a kit, mix dye according to package directions. If using pro dyes, follow your dye-to-water ratio and add soda ash as needed.
- Place the banded shirt on a wire rack or plastic tray.
- Apply dye in sections:
- For spiral: dye each “wedge” a different color.
- For scrunch: dab colors in clusters, leaving some white space.
- For stripes: dye one banded segment at a time for crisp blocks.
- Flip and repeat on the back. Use enough dye to saturate, but avoid flooding.
4) Let the Dye Set
- Place the dyed shirt in a gallon zip-top bag or wrap it in plastic wrap.
- Let it sit at 70–80°F for 8–24 hours.
- 8–12 hours: good color
- 18–24 hours: deeper, more saturated tones
5) Rinse, Wash, and Dry
- Rinse under cold water while still tied until water runs less dark.
- Remove rubber bands and rinse again, gradually shifting to warm water.
- Wash the shirt alone (or with other tie-dye items) using detergent on a warm cycle.
- Tumble dry or air dry fully before adding personalization.
Step-by-Step: Add Personalization (3 Easy Options)
Option 1: HTV (Most Professional-Looking)
- Create or choose a simple name/design (bold fonts work best on busy tie-dye).
- Cut HTV and weed away excess vinyl.
- Pre-press the shirt for 5–10 seconds to remove moisture and wrinkles.
- Position the vinyl using the placement measurements above.
- Press with a heat press (recommended) or iron:
- Heat press: typically 305°F for 10–15 seconds (follow vinyl directions)
- Iron: high heat, no steam, firm pressure for 20–30 seconds per section
- Peel carrier sheet as directed (warm peel or cool peel depends on brand).
Option 2: Fabric Paint + Stencil (Great for Groups)
- Tape a cardboard insert inside the shirt to prevent bleed-through.
- Secure stencil with painter’s tape.
- Use a sponge brush to dab fabric paint (don’t brush; it can push paint under the stencil).
- Let dry, then heat-set according to paint instructions.
Option 3: Fabric Markers (Fastest Party-Friendly Method)
- Slip cardboard inside the shirt.
- Write names, dates, or short messages in a thick, readable style.
- Heat-set if your marker instructions recommend it (often a warm iron for a few minutes).
Pro Tips for Bright Color and Clean Personalization
- Use 100% cotton for best results. Cotton blends can dye lighter and may fade faster.
- Limit mud: If you use complementary colors (blue + orange, purple + yellow), apply them with a small buffer of white space to avoid brown blending.
- Control dye spread: Tight folds = more white lines; looser folds = more blended color.
- Make personalization readable: Choose high-contrast vinyl (white, black, metallic) and simple fonts.
- Test placement first: Lay a paper template on the shirt and take a quick photo—your eye will catch crooked placement immediately.
- Batch workflow for parties: Fold all shirts first, then dye assembly-line style, then bag and label each one with masking tape.
Creative Variations (Beginner to Advanced)
Beginner-Friendly Adaptations
- Monochrome tie-dye: Use one color in light/medium/heavy saturation for a modern look.
- One-step personalization: Skip vinyl and use fabric markers for names and quick doodles.
- Mini tie-dye area: Tie-dye just the sleeves or bottom hem for a subtle party favor.
Intermediate Upgrades
- Ombre dip-dye effect: Concentrate dye at the hem and fade upward by misting with water as you go.
- Two-location personalization: Small chest icon + large back text (team names, event title).
- Glow theme: Use neon dyes and add reflective or glow-style HTV for nighttime parties.
Advanced Variations
- Ice dye: Place shirt on a rack in a bin, cover with ice, sprinkle dye powder, and let it melt through for watercolor effects (plan for extra time and mess control).
- Reverse tie-dye (bleach): Start with a dark shirt, bind it, then apply a 50/50 bleach-water solution. Rinse thoroughly once lightened, then over-dye with color if desired.
- Layered stencil over tie-dye: Add a crisp logo or date using freezer paper stencils and fabric paint.
Troubleshooting: Fixes for Common Tie-Dye Problems
- Colors look dull after drying:
- Cause: short set time, cold room, or not enough dye saturation.
- Fix: let future projects sit closer to 24 hours in a warm area; ensure fabric is thoroughly wetted with dye (not just surface-colored).
- Too much brown/muddy color:
- Cause: too many colors overlapping heavily.
- Fix: reduce palette to 2–3 colors; add white space between complementary colors; apply less dye at intersections.
- Hard dye lines and uneven patches:
- Cause: fabric too dry in spots or dye not reaching inside folds.
- Fix: start with a damp shirt and apply dye slowly, flipping and checking saturation.
- Vinyl peeling after washing:
- Cause: not enough heat/pressure or pressing on a wrinkled surface.
- Fix: re-press with correct temperature and firm pressure; always pre-press the shirt first.
Common Crafting Mistakes to Avoid
- Skipping the pre-wash: finishes on new shirts can block dye and create pale spots.
- Using fabric softener: it can resist dye and reduce vibrancy.
- Over-soaking with dye: flooding reduces white space and can cause muddiness.
- Not labeling bagged shirts for parties: if you’re making multiple gifts, label each bag with name/size to avoid mix-ups.
- Adding personalization before the shirt is fully washed and dried: trapped moisture can prevent vinyl from bonding and can smear paint markers.
- Choosing thin, delicate fonts: busy patterns swallow thin lines; go bold for readability.
FAQ: Personalized Tie-Dye Shirts Gifts
1) What’s the best fabric for tie-dye shirts?
100% cotton is the easiest and most vibrant. Cotton/poly blends work, but colors may be lighter and can fade faster.
2) How long should I let tie-dye sit before rinsing?
Aim for 8–24 hours. If you want rich color, give it closer to 18–24 hours in a warm spot.
3) Can I make these as a party activity without a huge mess?
Yes. Set up a “dye station” with a plastic table cover, gloves, a rack/tray, and pre-banded shirts. Keep colors to 2–3 per guest, and send shirts home in labeled zip-top bags for rinsing later.
4) What’s the easiest way to personalize if I don’t have a Cricut?
Use fabric markers or stencils with fabric paint. You’ll still get a custom, handmade look—perfect for DIY party favors.
5) How do I wash tie-dye shirts so the color lasts?
Wash separately the first few washes, use cold or warm water, and avoid harsh bleach. Turn the shirt inside-out to protect personalization like HTV.
6) Can I personalize with a name and date without covering the tie-dye?
Yes—choose a smaller placement like left chest or sleeve, and use a high-contrast color (white on dark tie-dye, black on bright pastels) so it stays readable.
Wrap-Up: Make a Gift They’ll Actually Wear
Personalized tie-dye shirts are one of those DIY crafts that feel celebratory the moment you make them—bright, creative, and completely unique. Whether you’re crafting a single handmade gift or creating matching party shirts for a whole crew, the steps are simple, the results are standout, and the memories last long after the party decorations come down.
Try one color palette first, then experiment with bigger patterns, ice dye, or layered personalization as your confidence grows. When you’re ready for your next party-ready handmade project, explore more DIY craft ideas and creative celebrations on smartpartyprep.com.
More Articles
 How to Discharge Debt as a Secured Party Creditor: The Truth Behind the Viral Loophole (Spoiler: It Doesn’t Work — Here’s What Actually Does)
 Rustic Mugs Ideas: DIY Projects for Cozy Parties, Weddings, and Giftable Decor
 How to Unblock 3rd Party Cookies in 2024: A Step-by-Step Guide That Actually Works (No Tech Degree Required)
 Budget DIY Coasters Under $50
 Rustic Favor Bags Ideas
 How to Install 3rd Party Apps on LG Smart TV (2024): The Only Safe, Step-by-Step Method That Actually Works — No Hacks, No Bricking, No Developer Mode Confusion
 Advanced Centerpieces for Crafters
 DIY Cake Toppers in An Afternoon
 How to Hang Party Streamers Without Tape Marks, Sagging, or Last-Minute Panic: 7 Foolproof Methods (Tested on 37 Parties)
 Step-by-Step Slime Tutorial