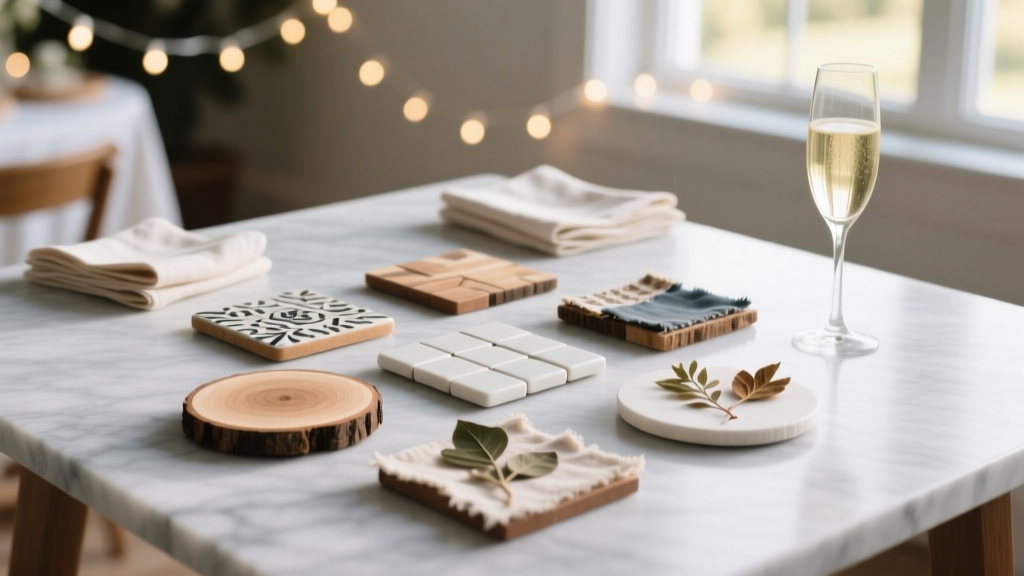
Budget DIY Coasters Under $50
Coasters are one of those party essentials you don’t think about until someone sets a cold drink on your favorite table. The fun part? You can make a whole set of handmade coasters that look boutique-worthy, match your party theme, and still keep your budget under $50.
This is a feel-good DIY craft because it’s quick, practical, and endlessly customizable—think birthday color palettes, holiday vibes, bridal shower florals, game-day stripes, or rustic farmhouse neutrals. Plus, DIY coasters double as party decorations and take-home favors guests actually use.
Below you’ll find several budget-friendly coaster styles (pick one or mix and match), with step-by-step instructions, measurements, tool recommendations, time estimates, and smart tips to help you get crisp results—whether you’re a beginner or an experienced crafter.
Project Overview: Choose Your Coaster Style
- Skill level: Beginner to Intermediate (advanced variations included)
- Total time: 60–180 minutes (depending on style + drying time)
- Active crafting time: 45–90 minutes
- Drying/curing time: 2 hours to 24 hours (sealants vary)
- Finished coaster size: Standard 4 in x 4 in (square) or 4 in diameter (round)
- Budget goal: Under $50 for 8–12 coasters (often with leftover materials)
Materials & Tools (with Estimated Costs)
These are common supplies used across multiple coaster designs. You won’t need everything—choose based on the style you make. Prices vary by store, but this list is designed to keep your total under $50.
Base Options (Pick One)
- Cork coaster blanks (4 in rounds or squares, pack of 12): $8–$15
- Ceramic tile (4.25 in x 4.25 in white tiles, 12-pack): $10–$18
- Wood rounds (3.5–4 in diameter, pack of 10–12): $12–$20
- Unfinished MDF coaster blanks (4 in, pack of 12): $10–$16
Decor Supplies (Choose What Fits Your Theme)
- Acrylic craft paint (2–4 colors): $1–$2 each
- Paint brushes (1 flat 1 in + 1 detail brush): $4–$10
- Painter’s tape (1 in): $5–$8
- Permanent marker or paint pen (black/white metallic): $3–$8
- Decoupage glue (Mod Podge) (matte or dishwasher-safe): $7–$12
- Decorative napkins or scrapbook paper: $2–$8
- Vinyl decals (optional, party phrases/monograms): $4–$10
Protection & Finishing
- Clear sealant (choose one):
- Water-based polyurethane (brush-on): $10–$18
- Acrylic spray sealer (matte or gloss): $6–$12
- Dishwasher-safe decoupage topcoat (for light use): $10–$15
- Felt or cork sheet (for backing if needed): $4–$8
- Adhesive (craft glue or hot glue sticks): $3–$6
Tools You’ll Actually Use
- Scissors or craft knife (for paper/vinyl)
- Cutting mat (recommended if using a knife)
- Ruler (at least 6 in)
- Pencil for marking
- Optional but helpful: foam brush (for smooth sealing), brayer/credit card (for decal burnishing), hair dryer (speed drying between coats)
Budget example: Cork blanks ($12) + acrylic paint ($6) + painter’s tape ($6) + spray sealer ($10) + paint pen ($5) = $39 for 12 coasters.
Style #1: Painted Geometric Party Coasters (Cork or MDF)
Best for: modern birthday parties, bachelorette weekends, graduation parties, and color-themed events.
- Skill level: Beginner
- Active time: 60–90 minutes
- Dry time: 1–2 hours
Measurements
- Coaster size: 4 in round or 4 in square
- Tape widths: 1 in tape works well; you can tear smaller strips for thin lines
Step-by-Step Instructions
- Prep the surface. Wipe coaster blanks with a dry cloth. If using MDF, lightly sand edges with fine grit sandpaper (220 grit) for a smoother finish.
- Base coat (optional but recommended). Paint one thin base coat in white or a light neutral. Let dry 15–20 minutes. Add a second coat if needed.
- Create your geometric pattern with painter’s tape.
- For triangles: tape from edge to edge, forming 3–5 sections.
- For stripes: place parallel tape lines about 1/2 in to 1 in apart.
- For color blocking: tape off one half or one corner for a bold look.
- Paint the open sections. Use a flat brush for crisp edges. Apply thin coats (thick paint tends to seep under tape). Let dry 10–15 minutes, then do a second coat if needed.
- Remove tape at the right moment. Peel tape back slowly while the paint is mostly dry but not fully cured (usually 10–20 minutes after painting). This helps prevent lifting.
- Add small party details. Use a paint pen for tiny dots, names, dates, or a simple icon (stars for New Year’s, hearts for Valentine’s, clovers for St. Patrick’s).
- Seal for protection. Spray sealer works well for cork. Apply 2–3 light coats, 10–15 minutes apart. Let cure for at least 2 hours before use (overnight is best for durability).
Style #2: Decoupage Napkin Coasters (Tiles or Wood)
Best for: tea parties, bridal showers, garden parties, baby showers, and holiday tablescapes.
- Skill level: Beginner to Intermediate
- Active time: 45–75 minutes
- Dry time: 2–24 hours (depending on sealer)
Step-by-Step Instructions
- Choose your napkin pattern. Look for small repeating designs (florals, confetti dots, stars). Busy patterns hide wrinkles better.
- Separate the napkin layers. Most decorative napkins are 2–3 ply. Use only the top printed layer.
- Cut to size.
- For 4 in round coasters: trace the coaster and cut a circle slightly larger (about 1/8 in extra).
- For tiles: cut a 4.5 in square so it can wrap edges slightly, then trim later.
- Apply a thin layer of decoupage glue. Brush a thin coat on the coaster surface.
- Place the napkin gently. Start in the center and smooth outward using a piece of plastic wrap, a dry foam brush, or your fingers very lightly. Don’t overwork it—napkins tear easily.
- Top coat. Brush another thin layer of decoupage glue over the napkin. Let dry 20–30 minutes.
- Trim the edges. Once dry, trim excess napkin with scissors or a craft knife. For tiles, a light sanding block can clean up paper edges (sand gently).
- Seal for moisture resistance. For party use, apply 2–3 coats of water-based polyurethane or a durable acrylic sealer, drying between coats (follow product directions). Let cure overnight before serving cold drinks.
Style #3: Faux Marble Coasters (Painted Tiles)
Best for: chic cocktail parties, engagement parties, New Year’s, and modern party decor.
- Skill level: Intermediate (still beginner-friendly with patience)
- Active time: 60–90 minutes
- Dry time: 4–24 hours for sealing/curing
Step-by-Step Instructions
- Base coat the tile. Paint tiles white (or use white tiles as-is). Let dry fully.
- Create marble veining.
- Use a light gray acrylic paint diluted with a few drops of water.
- Dip a thin detail brush and paint loose, broken lines across the surface.
- Immediately soften the line by dabbing lightly with a barely damp sponge.
- Add depth. Repeat with a slightly darker gray in fewer areas. Keep it minimal—marble looks best when it’s airy, not heavy.
- Optional metallic accent. Add tiny touches of gold paint pen along a few veins for glam party decor.
- Seal heavily. Tiles need a strong topcoat. Use water-based polyurethane, 3–4 thin coats. Let cure overnight.
- Add a backing. Stick felt circles or cork to the bottom corners to protect tables (especially if using tile).
Pro Tips for Clean Results (and Party-Ready Durability)
- Thin coats beat thick coats. Paint and sealer applied too thick can stay tacky and peel.
- Prevent paint bleed under tape: burnish tape edges with a fingernail or an old gift card, and paint away from the tape edge rather than into it.
- Let sealant cure, not just dry. “Dry to the touch” isn’t the same as “ready for condensation.” Overnight curing gives a more durable finish.
- Use a foam brush for sealers. It reduces brush marks and bubbles.
- Make them match your party theme. Repeat colors from your plates, balloons, banners, or table linens for cohesive handmade party decorations.
Variations: Beginner-Friendly + Advanced Upgrades
Beginner-Friendly Adaptations
- One-color + monogram: Paint coasters one solid color, then add initials with a paint pen.
- Simple stripes: Two tape lines, one accent color. Fast and clean.
- Sticker resist: Place small stickers, paint over them, peel, then seal.
Advanced Variations
- Layered stencils: Use a stencil to add a second pattern (polka dots over stripes looks great for birthdays).
- Resin-like shine (without resin): Apply extra coats of gloss polyurethane, sanding lightly between coats (very fine grit) for a glassy look.
- Photo coasters (party memories): Print small photos (3.75 in squares), decoupage onto tiles, then seal thoroughly.
- Vinyl sayings for parties: “Cheers,” “Sip Sip,” “Bride Tribe,” “Game Day,” or the event date. Seal over vinyl for longevity.
Troubleshooting: Quick Fixes for Common Issues
- My napkin tore while smoothing. Patch with a tiny piece of matching napkin and seal over it. Busy patterns hide seams well.
- Paint bled under the tape. Touch up with a small flat brush and the base color. Next time, burnish tape edges and use thinner paint coats.
- Coasters feel tacky after sealing. Apply thinner coats, switch to a different sealer (some remain sticky in humidity), and allow a longer cure time (24–48 hours).
- Bubbles in the topcoat. Don’t shake the sealer. Stir gently. Use a foam brush and slow strokes.
- Tiles scratch the table. Add felt pads or a full cork backing. This also makes them feel more “finished.”
Common Crafting Mistakes to Avoid
- Skipping the sealant. Coasters are exposed to condensation—sealing is what turns a cute DIY into a usable handmade project.
- Rushing dry times. Stacking coasters too soon can cause sticking and smudges. Give them space and time.
- Using thick paint near tape edges. That’s the #1 cause of jagged lines and peeling.
- Not protecting the bottom. Tile and wood edges can scratch. Felt pads are inexpensive and make a huge difference.
- Overloading designs. A few intentional elements look more polished than too many colors and patterns competing.
FAQ: DIY Coasters for Parties & Everyday Use
1) How many coasters should I make for a party?
A good rule is 1 coaster per guest, plus a few extras (especially if you’ll have multiple drink stations). For 10 guests, aim for 12–14 coasters.
2) What’s the most durable sealer for coasters?
For moisture resistance, water-based polyurethane (multiple thin coats) is a strong choice. Spray sealers work well for quick projects, but may need extra coats for heavy use.
3) Can I make these without fancy tools?
Yes. Scissors, a basic brush, painter’s tape, and a sealer are enough for most designs. A foam brush is optional but helpful for smooth finishing.
4) Will these work as party favors?
Absolutely. Tie a set of 2–4 coasters with twine and add a small tag like “Thanks for celebrating!” They’re useful, lightweight, and feel personal.
5) How do I keep cork coasters from warping?
Use light coats of paint/sealer on the top and consider sealing the bottom with one thin coat as well. Let them dry flat with airflow.
6) Can I use real resin and still stay under $50?
Sometimes, but resin costs vary and you’ll need extra supplies (cups, gloves, torch/heat gun). If you already have resin tools, it can work—otherwise polyurethane gives a similar glossy vibe for less.
Wrap-Up: Your Table Just Got a Handmade Upgrade
DIY coasters are the kind of budget craft that pays off immediately: your surfaces stay protected, your party setup looks coordinated, and you get a set of handmade decorations that can be customized for every season and celebration. Pick one style today, keep the colors tied to your party theme, and let the sealant do the heavy lifting for durability.
When you make your set, consider creating a “party coaster bin” so they’re ready for the next gathering—birthday nights, brunches, game-day spreads, or cozy holiday hosting.
Happy crafting! Explore more budget-friendly DIY crafts, party decorations, and handmade project ideas on smartpartyprep.com.
More Articles
 Advanced Invitations for Crafters
 How to Update Settings to Allow 3rd Party Cookies in 2024: A Step-by-Step Fix for Chrome, Safari, Edge & Firefox (No Tech Degree Required)
 Advanced Resin Jewelry for Crafters
 How to Install 3rd Party Apps on Roku TV (Without Jailbreaking): The Only Legal, Step-by-Step Method That Actually Works in 2024 — No Developer Mode Confusion, No Failed Sideloading, Just Real Results
 Modern Mugs Designs
 DIY Resin Jewelry Party Favors
 How to Make a Party Backdrop That Looks Pro (Without Spending $200): 7 Foolproof DIY Methods Using Dollar Store Supplies, Reusable Frames & Zero Sewing
 No-Sew Embroidered Patches Tutorial
 Personalized Tie-Dye Shirts Gifts
 What Is Wrapped Party? The Surprisingly Genius DIY Craft Trend That Turns Gift-Wrapping Into a Joyful, Social, Memory-Making Experience (No Scissors Required!)