Paper Craft Dream Catchers Ideas
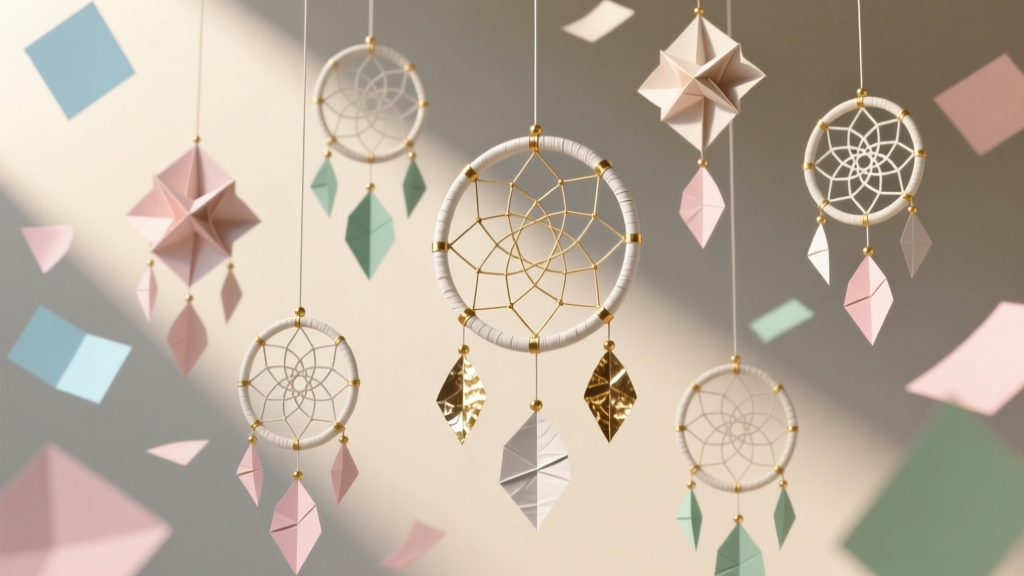
Dream catchers make magical party decorations—whimsical, lightweight, and full of texture. When you create them with paper, you get all that charm without the expense (or weight) of hoops and heavy materials. Paper craft dream catchers are perfect for birthday parties, baby showers, bridal showers, boho-themed celebrations, and even classroom craft tables. They’re also easy to personalize with party colors, names, and meaningful symbols.
What makes this project extra fun is how quickly it comes together. You can craft a single statement dream catcher for a photo backdrop, or make a whole set for a party garland, chair décor, or favor bag toppers. Paper is forgiving, beginner-friendly, and endlessly customizable—so you can keep it simple or go all-out with layered cutouts, quilling, and metallic accents.
Below you’ll find practical, step-by-step instructions plus creative variations, pro tips, and troubleshooting help so your handmade dream catcher decorations look polished and party-ready.
Project Overview: Skill Level, Time, and Best Party Uses
- Skill level: Beginner to Advanced (choose your variation)
- Time estimate (per dream catcher):
- Beginner simple version: 25–40 minutes
- Intermediate layered version: 45–75 minutes
- Advanced quilled/details version: 90+ minutes
- Great for: DIY party decorations, handmade party backdrops, photo booth décor, baby shower centerpieces, wall décor, party favors
- Finished size suggestions:
- Small favor size: 4–6 in (10–15 cm) diameter
- Standard wall/backdrop size: 8–12 in (20–30 cm) diameter
- Statement backdrop size: 14–18 in (35–45 cm) diameter
Materials List (With Product Types + Estimated Costs)
Core Supplies
- Cardstock paper (65–110 lb / 176–300 gsm) for the ring and structural pieces
- Estimated cost: $6–$12 per assorted pack
- Decorative paper (scrapbook paper, patterned paper, metallic paper, vellum)
- Estimated cost: $5–$15 per pad
- String options: embroidery floss, baker’s twine, thin satin ribbon (1/8 in–1/4 in / 3–6 mm), or metallic cord
- Estimated cost: $3–$10
- Adhesives:
- Glue stick (quick + clean): $2–$5
- Tacky glue (strong hold): $3–$7
- Double-sided tape (neat edges): $4–$10
- Optional hot glue gun + mini sticks (fast assembly): $10–$20
- Scissors (sharp craft scissors) and/or a precision craft knife (for intricate cuts)
- Estimated cost: $5–$15
- Cutting mat (recommended if using a craft knife)
- Estimated cost: $8–$15
- Ruler (at least 12 in / 30 cm) and pencil
- Estimated cost: $2–$8
Optional Embellishments (Party-Perfect Extras)
- Paper flowers (handmade or pre-made): $5–$15
- Foam dots (for 3D layering): $3–$6
- Mini paper doilies or lace-pattern paper: $3–$8
- Beads (pony beads, wood beads, letter beads): $3–$12
- Sequins or confetti (lightweight): $3–$8
- Glitter glue or metallic paint pen: $3–$10
- Hole punch (single hole) or 1/8 in punch: $5–$12
Choosing Your Paper Dream Catcher Style
1) Classic Paper Ring + Web (Beginner-Friendly)
This is the go-to version for DIY party decorations: clean, lightweight, and fast. It looks great as a wall hanging, chair-back décor, or grouped in a photo backdrop.
2) Layered Cutout Dream Catcher (Intermediate)
Instead of a string web, you create a web effect with layered paper cutouts (mandalas, lace patterns, geometric shapes). This style photographs beautifully for party backdrops.
3) Paper Quilling + Fringe Tassels (Advanced)
If you love details, quilling gives you a delicate, airy look—perfect for bridal showers, boho parties, and elegant handmade decorations.
Step-by-Step: Classic Paper Craft Dream Catcher
Finished size example: 10 in (25 cm) diameter
Time: 30–60 minutes
Skill level: Beginner
Step 1: Make a sturdy paper ring
- Cut 4 strips of cardstock: each 1 in x 12 in (2.5 cm x 30 cm).
- Glue strips end-to-end to form one long strip (about 48 in / 122 cm).
- Wrap the strip into a circle. Aim for a 10 in (25 cm) outer diameter.
- Overlap the ends by 1 in (2.5 cm) and glue firmly. Clip with binder clips or clothespins for 3–5 minutes.
- For extra strength, create a second ring the same size and glue them together (double-layer ring).
Step 2: Wrap the ring (optional but makes it look polished)
- Apply double-sided tape or a thin layer of glue stick around the ring in small sections.
- Wrap with satin ribbon (1/8–1/4 in / 3–6 mm) or decorative paper strips.
- Keep tension even to avoid bumps. Trim and secure the end on the back.
Step 3: Create the “web” with string
- Cut a length of embroidery floss or thin cord: 80–100 in (200–250 cm) for a 10 in ring.
- Tie a double knot at the top of the ring. Leave a 6 in (15 cm) tail for hanging.
- Make evenly spaced anchor points around the ring (about 8–12 points).
- Wrap the string around the ring, pull snug, and tie a simple half-knot or loop knot at each point.
- For the next round, loop the string into the middle of each previous segment (instead of the ring).
- Continue toward the center until you have a small opening (about 1–1.5 in / 2.5–4 cm).
- Tie off securely at the center. Optional: glue a small paper flower or circle over the knot.
Step 4: Add paper feathers, tassels, or streamers
- Cut 3–7 hanging strands of ribbon or twine, each 10–18 in (25–45 cm) long.
- Create paper feathers:
- Cut a feather shape about 5–7 in (13–18 cm) long from cardstock.
- Snip small angled cuts along both sides to mimic feather texture.
- Lightly curl the feather by pulling it across the edge of a scissor blade (gently).
- Attach feathers and tassels to the strands using glue or a small hole punch + knot.
- Glue or tie strands to the bottom of the ring, spacing evenly.
Step 5: Create the hanger loop
- Use the tail from the web start or add a fresh piece of ribbon.
- Make a loop about 3–5 in (8–13 cm) tall.
- Secure with a tight knot and a small dot of tacky glue.
Paper Dream Catcher Ideas (Party-Themed Variations)
Boho Birthday Color Palette
- Use terracotta, blush, cream, and gold paper accents.
- Add mini paper flowers and a few metallic cord strands.
- Hang in a set of three (8 in, 10 in, 12 in) for a photo backdrop.
Baby Shower Name Dream Catchers
- Add letter beads or paper-cut letters spelling the baby’s name.
- Use soft colors (sage, pale yellow, sky blue, lavender).
- Swap feathers for rounded paper leaves for a sweet, modern look.
Wedding or Bridal Shower “Lace” Look
- Make the web from white string and add a layered doily-style paper cutout in the center.
- Use vellum overlays for a soft, airy texture.
- Add pearl beads or tiny paper roses on the ring.
Graduation Party Dream Catchers
- Use school colors for ring wrap and tassels.
- Add a small paper grad cap cutout at the center.
- Attach a tag with the graduate’s name and year (e.g., “Class of 2026”).
Mini Dream Catcher Party Favors
- Make 4–5 in (10–13 cm) rings from cardstock.
- Use fewer web loops (6–8 anchors) to keep it fast.
- Attach to favor bags as a topper or use as a place card with a name tag.
Pro Tips for Clean, Sturdy Results
- Strengthen the ring: Double-layer cardstock rings hold their shape far better, especially for larger sizes (12 in+).
- Choose the right adhesive:
- Use double-sided tape for wrapping (less wrinkling).
- Use tacky glue for knots and load-bearing points.
- Use hot glue for quick party prep—just avoid overuse (bulky bumps).
- Keep web tension even: Pull snug but not so tight that the ring warps.
- Pre-cut assembly line style: If making multiples, cut all feathers and strands first, then assemble one step at a time.
- Photo-ready finishing: Outline paper feathers with a metallic pen or add tiny dots of glitter glue at web intersections.
Troubleshooting: Fixes for Common Issues
The ring keeps bending or going oval
- Use 110 lb (300 gsm) cardstock, or glue two rings together.
- Reduce web tension slightly.
- Add a hidden brace: glue a second inner ring about 1/2 in (1.3 cm) inside the outer ring.
The web looks uneven
- Mark anchor points lightly in pencil before tying (every 2.5–3 in / 6–8 cm for a 10 in ring).
- Keep the number of anchors consistent (8, 10, or 12) for symmetry.
- If one segment is too long, undo that knot and re-tie before continuing inward.
Paper feathers curl or droop too much
- Switch to heavier cardstock (65–80 lb / 176–216 gsm) for feathers.
- Use shorter feathers (4–5 in / 10–13 cm) for mini dream catchers.
- Add a thin strip “spine” down the center (glue a 1/8 in / 3 mm strip) for structure.
Glue is showing
- Use a glue stick for paper-to-paper areas.
- Hide join points with small paper flowers, circles, or a bow.
- Apply glue with a toothpick for tiny amounts.
Common Crafting Mistakes to Avoid
- Using thin printer paper for the ring: It bends easily. Save printer paper for decorative layers, not structure.
- Skipping dry time: Let ring seams and wrapped ends set for at least 5–10 minutes before adding tension from the web.
- Overloading with heavy embellishments: Too many beads or thick charms can pull the ring out of shape. Keep it lightweight for hanging party decorations.
- Uneven hanging strands: Measure strands and cut them together so the bottom looks intentional, not messy.
- Messy knots in the center: Tie off neatly and cover the center with a small rosette, paper flower, or layered circle.
- Not planning color balance: Pick 2–3 main colors plus 1 accent (metallic works great) for a cohesive handmade look.
Advanced Variations (When You Want the “Wow” Factor)
Layered Mandala Center
- Cut 3–5 nested circles (each 1/2 in / 1.3 cm smaller than the last) using patterned paper.
- Use foam dots between layers for depth.
- Attach the mandala to the web or replace the web entirely for a bold graphic centerpiece.
Quilled Web Accents
- Quill tight coils using 1/8 in (3 mm) paper strips.
- Glue small coils at web intersections like “beads,” but keep them minimal to avoid weight.
- Best for bridal shower décor or a boutique-style party theme.
LED Fairy Light Backdrop Dream Catchers
- Wrap micro LED wire lights around the ring (battery pack hidden behind the backdrop).
- Use vellum feathers or vellum streamers for a soft glow.
- Great for evening events and photo booth setups.
FAQ: Paper Craft Dream Catchers
1) Can I make paper dream catchers without string?
Yes. Use a layered paper cutout “web” (doily style, mandala layers, or a starburst pattern) glued inside the ring. This is a great beginner option if knotting feels tricky.
2) What size is best for party backdrops?
For a photo backdrop, a mix of 8 in, 10 in, and 12 in (20/25/30 cm) looks balanced. Hang them in clusters with varied strand lengths for that dreamy boho wall effect.
3) How do I make them more durable for an outdoor party?
Use heavier cardstock (110 lb / 300 gsm) and stronger adhesive (tacky glue or hot glue). Avoid delicate fringes if it’s windy, and consider sealing paper feathers lightly with clear spray sealer (test first).
4) Can kids make these as a party activity?
Absolutely. Prep the rings ahead of time, use tape instead of hot glue, and simplify the web with fewer anchor points (6–8). Provide pre-cut feathers and stickers for decorating.
5) How do I hang paper dream catchers neatly?
Use clear command hooks, removable adhesive hooks, or tie them to a dowel/branch for a DIY party backdrop. For lightweight versions, even painter’s tape can work on smooth walls for short events.
6) What’s the easiest way to mass-produce them for party décor?
Batch your steps: make all rings first, then wrap all rings, then create webs, then add strands. Keep one “master sample” nearby so your colors and measurements stay consistent.
Wrap-Up: Make Your Party Décor Feel Handmade and Magical
Paper craft dream catchers are one of those DIY party decorations that look impressive without requiring fancy tools or expensive supplies. Whether you’re decorating for a baby shower, a boho birthday, or creating handmade party favors, you can tailor the size, colors, and details to match your theme perfectly. Start with one simple ring-and-web design, then experiment with layered centers, paper flowers, or LED accents as your confidence grows.
Ready for more creative party-ready projects? Explore more DIY craft ideas and handmade decorations on smartpartyprep.com.
More Articles
 Budget DIY Photo Booth Props Under $25
 Personalized Favor Bags Gifts
 Advanced Origami Decorations for Crafters
 How to Unblock 3rd Party Session Cookies on Mac: A Step-by-Step Safari & Chrome Fix That Actually Works (No Extensions Needed)
 How to Make a Backdrop for Party in Under 90 Minutes (No Sewing, No Pro Tools — Just $12 & Your Dining Table)
 30 Creative Backdrops Ideas (DIY-Friendly for Parties, Photos & Celebrations)
 Budget DIY Painted Rocks Under $10
 Advanced Photo Frames for Crafters
 How to Enable Third Party Cookies on iPad Chrome (2024 Guide): Why It’s Not Possible — And What You *Can* Actually Do Instead to Restore Login & Tracking Functionality
 Budget DIY Masks Under $5