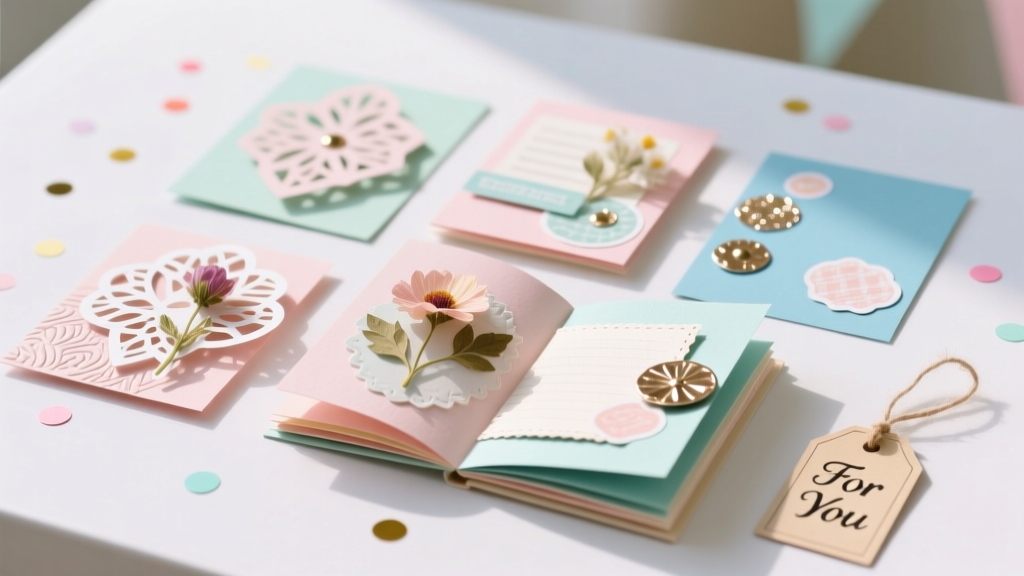
DIY Scrapbook Pages Party Favors
Party favors don’t have to be plastic trinkets that end up in a drawer by next week. DIY scrapbook pages party favors are a creative, meaningful alternative: guests leave with a personalized mini “memory page” they can keep, frame, or add to their own albums. They’re also a fantastic way to make your party decor pull double duty—your crafting table becomes part of the celebration, and the favors become a shared experience.
This project is especially fun because it works for nearly any theme (birthday, baby shower, bridal shower, graduation, retirement, holiday parties) and any age group. You can keep it simple with stickers and photos, or take it up a notch with layered paper, embossing, and interactive elements. Best of all: you can prep most of it ahead of time and assemble quickly during or right after the event.
If you love DIY crafts, handmade party decorations, and projects that feel personal without being complicated, these scrapbook page favors are going to be your new go-to.
Project Overview (Skill Level, Time, and What You’ll Make)
- Skill level: Beginner-friendly (with optional advanced upgrades)
- Time estimate:
- Prep: 30–60 minutes (cutting bases, printing photos, assembling kits)
- Per favor: 10–20 minutes (simple) or 20–40 minutes (layered/advanced)
- What you’ll make: A 6x8 in or 8.5x11 in scrapbook page (or mini page set) packaged as a party favor
- Best for: Birthdays, showers, milestone celebrations, family gatherings, classroom parties
Choosing the Scrapbook Page Favor Style
Option A: Single Feature Page (Fast + Classic)
Each guest receives one finished scrapbook page featuring a group photo or party theme design, plus a small journaling prompt they can fill in.
Option B: “Make-and-Take” Craft Station (Interactive + Memorable)
You prep page kits; guests assemble their own page during the party. Great for craft nights, tween birthdays, and bridal showers.
Option C: Mini Album Pages (Extra Special)
Create 2–4 coordinating pages per guest and bind them with rings or ribbon. This feels luxe while still being doable in batches.
Materials and Tools (With Estimated Costs)
Costs vary by brand and what you already have. The list below is designed for 12 party favors and assumes you’re making 6x8 in pages (a great size for favors—smaller than 12x12, still roomy for photos and embellishments).
Paper + Bases
- Cardstock (12x12 in or 8.5x11 in), 65–80 lb: 12–24 sheets in coordinating colors ($6–$12)
- Patterned scrapbook paper (12x12 in), acid-free: 12–24 sheets ($8–$18)
- Optional kraft cardstock for a rustic look ($5–$8)
Adhesives
- Tape runner (permanent): best for clean, fast assembly ($6–$12)
- Liquid glue (fine-tip): for small pieces ($3–$6)
- Foam adhesive squares: adds dimension ($3–$7)
Cutting + Measuring
- Paper trimmer (12 in): for straight cuts ($15–$35)
- Precision scissors: fussy cutting and trimming ($6–$15)
- Ruler (metal, 12 in) + pencil: for quick measuring ($3–$10)
- Corner rounder punch (optional): softens edges ($6–$12)
Decor + Lettering
- Alphabet stickers or chipboard letters: titles/names ($4–$12)
- Theme stickers (birthday, baby, wedding, etc.): ($3–$10)
- Washi tape (2–4 rolls): ($5–$12)
- Journaling cards or printable prompts: ($0–$6)
- Optional ribbon/twine: ($3–$8)
Photos + Printing
- Photo prints (2x3, 3x4, or 4x6): plan 1–2 photos per favor ($3–$15 depending on where you print)
- Alternative: print a themed graphic or group photo on matte cardstock for a no-photo option
Packaging (So It Feels Like a Real Party Favor)
- 6x8 cellophane bags or clear protective sleeves: ($6–$12)
- Cardboard backers (chipboard sheets cut to size): ($5–$10)
- Thank-you tags + string: ($3–$8)
Measurements and Cutting Guide
Pick one format and stick with it for batch crafting.
Recommended Favor Size: 6x8 in Page
- Base page: 6x8 in (cut from 12x12 or 8.5x11 cardstock)
- Photo mat: 4.25x6.25 in (for a 4x6 photo) or 3.25x4.25 in (for a 3x4 photo)
- Title strip: 1x6 in
- Journaling card: 3x4 in
Alternative: Standard Letter (8.5x11 in)
- Base page: 8.5x11 in
- Photo mat: 4.25x6.25 in (for 4x6) or 5x7.25 in (for 5x7)
Step-by-Step: How to Make Scrapbook Page Party Favors
Step 1: Choose a Theme and Color Palette (10 minutes)
Match your party decorations for a cohesive “wow.” Choose:
- 2 main colors (example: blush + gold)
- 1 neutral (white, kraft, or black)
- 1 accent (glitter paper, metallic washi, or a bold pattern)
Step 2: Plan the Layout (10–15 minutes)
Use a simple, repeatable design so assembly goes fast. A reliable layout:
- Photo on the left or centered
- Title strip across the top or bottom
- Journaling card on the opposite side
- 2–3 embellishments in a visual triangle (top corner, near title, near journaling)
Practical tip: Make one “master page” first. Once you love it, use it as the template for the rest.
Step 3: Batch Cut All Paper Pieces (20–40 minutes)
- Cut all 6x8 bases first.
- Cut photo mats next.
- Cut title strips and journaling mats.
Tool recommendation: A 12-inch paper trimmer speeds this up dramatically and keeps your edges crisp.
Step 4: Prep Photos or Centerpieces (15–30 minutes)
Choose one of these approaches:
- Photo approach: Print a group photo from the party (great if you have a photo printer) or use a themed photo of the guest of honor.
- Placeholder approach: Add a decorative frame or photo corner embellishments and let guests add their own photo later.
- No-photo approach: Use a party graphic (balloons, stars, baby icons) and focus on journaling prompts.
Step 5: Assemble the Pages (10–20 minutes per page)
- Adhere the background paper (optional): If you want patterned paper on top of cardstock, cut it to 5.75x7.75 in so it leaves a clean 1/8 in border around the page.
- Mount the photo to a mat: Use a tape runner for flat adhesion. Add foam squares behind the mat if you want dimension.
- Add the title: Use alphabet stickers, a pre-printed label, or a hand-lettered strip. Keep it short and bold (example: “Sofia Turns 8!”).
- Add a journaling prompt card: Glue a 3x4 card on the page. Leave room for writing.
- Finish with embellishments: Stickers, washi tape, enamel dots, or punched shapes. Aim for 3–5 elements max to avoid clutter.
Step 6: Add Personalization (Optional, 2–5 minutes per favor)
Personal touches turn a cute craft into a keepsake:
- Guest name on the title strip (“Maya’s Party Memory”)
- A mini tag that says “Thanks for celebrating!”
- A handwritten note from the host on the back
Step 7: Package Like a Party Favor (10–20 minutes total)
- Slide each page into a 6x8 clear sleeve or cellophane bag.
- Add a chipboard backer to prevent bending.
- Seal with washi tape or a sticker.
- Tie on a thank-you tag or mini charm that matches your party decorations.
Pro Tips for Beautiful, Stress-Free Results
- Use odd numbers for clusters: 3 dots, 3 stars, 3 hearts looks more natural than 2 or 4.
- Keep adhesive choices simple: Tape runner for big pieces, liquid glue for tiny bits, foam squares for one “pop” layer.
- Leave breathing room: White space (or plain cardstock space) makes the design look polished.
- Pre-make “embellishment bundles”: Put 3 stickers + 1 dot + 1 washi strip in a little pile for each page.
- Make it kid-friendly: If kids are crafting, skip liquid glue and glitter. Use stickers + tape runner + pre-cut pieces.
Creative Variations (Beginner to Advanced)
Beginner-Friendly Adaptations
- Sticker-only design: Background paper + photo + title sticker + 2 themed stickers.
- Pre-cut kits: Cut everything ahead and place in labeled envelopes for quick assembly.
- Journaling prompts: Add one simple question: “My favorite moment was…”
Advanced Variations
- Interactive flip element: Add a 3x4 flap with washi tape hinge; hide extra photos or a message under it.
- Shaker pocket: Use a small clear pocket with sequins (keep it flat for mailing/packing).
- Heat embossing: Emboss the title or a border stamp for a pro finish.
- Layered die-cuts: Stack 3–4 paper layers for a dimensional centerpiece.
Troubleshooting: Quick Fixes for Common Issues
- Page looks “too busy”: Remove one patterned layer and swap for a solid mat. Limit to one focal embellishment cluster.
- Paper is warping: Too much liquid glue. Use a tape runner for large areas and tiny dots of liquid glue for details.
- Photo won’t stick well: Photos can be slick. Use strong double-sided tape, photo-safe adhesive, or lightly sand the back edge (very gently) before taping.
- Title letters won’t align: Lightly draw a pencil guideline, place letters, then erase the line.
- Edges look uneven: Stack-cut two sheets at a time with a trimmer (not scissors) and keep your blade sharp.
Common Crafting Mistakes to Avoid
- Starting without a sample: Make one complete test page first so you don’t waste materials mid-batch.
- Using flimsy paper for the base: Choose 65–80 lb cardstock so it holds up as a party favor and doesn’t curl.
- Over-glittering: Glitter sheds and can ruin photos. If you want sparkle, use glitter cardstock or sealed embellishments.
- Forgetting to protect the favor: A clear sleeve + chipboard backer prevents bent corners in favor bags.
- Waiting until the last minute to print photos: Print early, or use placeholders so you’re not stuck without a centerpiece.
FAQ: DIY Scrapbook Pages Party Favors
How many scrapbook page favors should I make?
Make one per guest, plus 1–2 extras. Extras help if someone’s page gets smudged, bent, or you get an unexpected guest.
What size is best for party favors: 12x12, 8.5x11, or 6x8?
6x8 is the sweet spot for favors: easy to package, quick to finish, and still large enough for a photo and journaling. Use 8.5x11 if guests might frame it.
Can I do this if I don’t have photos from the party yet?
Yes. Use a decorative frame area or photo corners and add a note: “Add your favorite photo here!” You can also include a QR code link to a shared photo album.
What’s the best adhesive for scrapbook party favors?
A permanent tape runner is the fastest and cleanest for most pieces. Keep a fine-tip liquid glue for tiny embellishments and foam squares for one raised layer.
How do I turn this into a craft activity during the party?
Set up a “make-and-take” station with pre-cut kits, sample pages, and limited choices (2–3 sticker sheets, 2 washi options, 2 title designs). This keeps it fun and prevents decision overload.
How far in advance can I make scrapbook page party favors?
You can make them 1–3 weeks ahead if you store them flat in a box with chipboard backing. If adding fresh photos, prep everything else early and attach photos closer to the event.
Wrap-Up: A Party Favor Guests Actually Keep
DIY scrapbook pages party favors bring together everything crafters love: color, texture, storytelling, and a finished piece that feels personal. Whether you create a batch of matching pages or host a mini craft station as part of your party entertainment, you’ll end up with handmade party favors that double as lasting memories.
Try one sample page first, keep the layout simple, and let the theme guide your materials—then enjoy the process of turning party moments into something guests can hold onto.
Want more DIY crafts, handmade party decorations, and creative party prep ideas? Explore more projects on smartpartyprep.com and keep the celebration beautifully handmade.
More Articles
 Paper Craft Place Cards Ideas
 Modern Mugs Designs
 Advanced Paper Lanterns for Crafters
 Paper Craft Crowns Ideas
 Budget DIY Pressed Flower Art Under $15
 How to Make a Backdrop for a Party in Under 90 Minutes (No Sewing, No Pro Tools — Just Dollar Store Supplies & 5 Foolproof Steps)
 DIY Dream Catchers Party Favors
 Seasonal Wreaths Ideas
 Advanced Backdrops for Crafters
 How to Allow Third Party Cookies on a Mac in 2024: A Step-by-Step Safari & Chrome Guide (No Tech Degree Required)