DIY Pressed Flower Art Party Favors
Pressed flower art party favors are the kind of handmade detail guests remember long after the last slice of cake is gone. They’re beautiful, practical, and surprisingly doable—even if you’re a beginner crafter. Each favor feels personal because no two pressed flowers look exactly the same, which makes every piece a tiny one-of-a-kind keepsake.
This project also pulls double duty: you can use the same pressed florals to create matching party decorations (think place cards, table numbers, gift tags, or a welcome sign) so your whole celebration feels cohesive. Whether you’re planning a garden party, bridal shower, baby shower, tea party, or birthday picnic, pressed flower favors add that “handmade but polished” touch.
Best of all, you can scale the process. Make 10 for an intimate brunch or 50+ for a larger event by batching your steps. Below you’ll find beginner-friendly options, advanced variations, and practical troubleshooting so your DIY party favors turn out crisp, clean, and gift-ready.
Project Overview: Skill Level, Time & Yield
- Skill level: Beginner (with optional intermediate/advanced upgrades)
- Total active time: 1–2 hours (for 12–20 favors)
- Drying/pressing time: 1–3 weeks (traditional pressing) or 15–60 minutes (microwave pressing)
- Approx. cost per favor: $1.00–$4.00 depending on frame type and extras
- Great for: DIY party favors, handmade decorations, place cards, shower favors, birthday party keepsakes
Choosing Your Favor Style (Pick 1 Base)
Pressed flowers can be displayed lots of ways, but these are the easiest “party favor friendly” formats—durable, portable, and cute on a table setting.
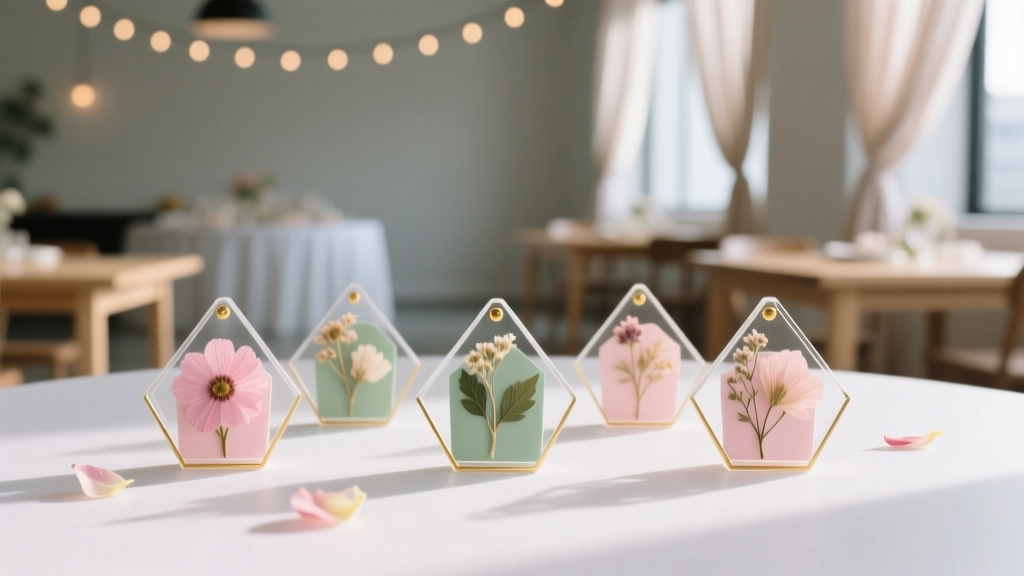
Option A: Mini Floating Frame Favor (Most Popular)
- Looks upscale and modern
- Easy assembly
- Great for table place settings
Option B: Laminated Pressed Flower Bookmark
- Budget-friendly
- Fast to make in batches
- Perfect for book clubs, tea parties, bridal showers
Option C: Pressed Flower Art Card + Clear Sleeve
- Best for very large guest lists
- Works as a favor plus thank-you note
- Easy to personalize with names and dates
Materials & Tools (with Estimated Costs)
Costs vary by brand and where you shop, but these ranges are realistic for craft stores and online retailers.
Pressed Flowers & Prep
- Fresh flowers/foliage: $0–$15 (garden clippings are perfect; grocery bouquets work too)
- Flower press (wood + bolts) OR heavy book: $15–$35 (press) or free (book method)
- Blotting paper / watercolor paper / parchment: $5–$12
- Microwave flower press (optional for speed): $15–$25
- Fine-tip tweezers: $5–$10 (highly recommended for delicate petals)
Favor Base Supplies (choose based on your option)
- Mini floating frames (2x3 in or 3x3 in): $1.50–$4 each (bulk packs are cheaper)
- Laminating sheets (5 mil) + laminator: $10–$25 for sheets; laminator $20–$40 (or use self-seal laminating pouches)
- Heavy cardstock (A7 or 5x7 sheets): $6–$12 per pack
- Clear cello sleeves (A7 or 5x7): $6–$12 per pack
Adhesives & Finishing
- Acid-free glue (tiny dots) or archival glue pen: $4–$10
- Double-sided tape (optional): $4–$8
- Clear-drying craft sealant spray (optional): $7–$12
- Ribbon or twine (1/8 in to 1/4 in wide): $4–$10
- Gift tags (2x3 in) or tag punch: $5–$12
Tool Recommendations
- Small sharp scissors (for trimming stems): $5–$12
- Craft knife + cutting mat (for clean edges on cards): $10–$20
- Ruler (metal preferred): $3–$8
- Bone folder (optional for crisp folds): $5–$10
Step 1: Press Your Flowers (3 Methods)
If you already have pressed flowers, skip ahead to assembly. If you’re pressing fresh flowers for a party date, plan early—traditional pressing gives the prettiest, flattest results.
Method 1: Traditional Book Press (Beginner-Friendly)
- Pick flowers that press well: daisies, cosmos, pansies, violas, ferns, baby’s breath, small greenery.
- Prep: trim stems to under 1/2 inch. Pat moisture gently with a paper towel.
- Layer: place flowers face-down between two sheets of blotting paper or watercolor paper.
- Press: put the paper “sandwich” inside a heavy book. Stack 5–10 lb of weight on top (extra books work well).
- Wait: 1–3 weeks. Swap blotting paper after 2–3 days if flowers are juicy (like roses).
Time estimate: 10–20 minutes setup + drying time.
Method 2: Flower Press (More Consistent Results)
- Place flowers between blotting sheets, then between press boards.
- Tighten bolts evenly until snug (not crushing).
- Store in a dry area for 1–2 weeks, checking after the first week.
Method 3: Microwave Press (Fast, but Practice First)
- Place flowers between two microwave-safe pressing pads (or ceramic tiles) with parchment/blotting paper.
- Microwave in short bursts: start with 15–20 seconds.
- Let cool completely before checking (cooling prevents curling).
- Repeat in 10-second bursts as needed.
Tip: Do a test flower first—microwave power varies a lot.
Step 2: Design Your Favor Layout (Batch-Friendly)
Before gluing anything, plan a simple layout you can repeat. This keeps your DIY party favors consistent and helps you work quickly.
- Choose a color palette: match your party decorations (pastels, bright wildflowers, neutrals).
- Pick 2–3 “hero” shapes: one focal bloom + a sprig of greenery + 1–2 tiny accents.
- Keep a safe margin: at least 1/4 inch from edges so petals don’t snag.
- Make a sample: complete one favor first, then replicate it.
Step 3: Assemble Your Pressed Flower Art Party Favors
Option A: Mini Floating Frame Favor (2x3 in or 3x3 in)
Best for: bridal showers, birthdays, garden parties, baby showers
Active time: 3–6 minutes each after flowers are pressed
- Clean the glass/acrylic: use a microfiber cloth to remove dust (dust shows up a lot behind clear panels).
- Arrange flowers: lay the frame open flat. Use tweezers to position flowers on one panel.
- Attach lightly: use tiny dots of acid-free glue (a toothpick helps control the amount). Less is more—too much glue can show.
- Close the frame: carefully align the second panel and secure the closure.
- Add a tag: tie a 2x3 in tag with ribbon/twine. Include the guest name (place card style) or a short thank-you.
Optional upgrade: Add a small gold vinyl name (1/4–3/8 inch tall letters) for a polished, personalized look.
Option B: Laminated Bookmark Favor (2 in x 6 in)
Best for: tea parties, book-themed birthdays, showers
Active time: 2–4 minutes each
- Cut cardstock backing: 2 in x 6 in strips (or 2.25 in x 7 in for a larger bookmark).
- Arrange pressed flowers: place flowers on the cardstock, keeping at least 1/8 inch from edges.
- Secure sparingly: a tiny swipe of glue pen is enough.
- Laminate: place inside a 5 mil laminating pouch. Run through laminator. Let cool flat.
- Trim: cut leaving a 1/8 inch sealed border to prevent peeling.
- Punch tassel hole: center it about 3/8 inch from the top edge. Add ribbon or tassel.
Option C: Pressed Flower Art Card + Clear Sleeve
Best for: big parties, budget-friendly favors, thank-you place settings
Active time: 2–5 minutes each
- Cut or fold cards: a great size is 4 in x 6 in (postcard style) or 5 in x 7 in for more drama.
- Create a centered “window” area: lightly pencil a rectangle guide, like 3 in x 4.5 in.
- Arrange flowers: keep it simple—1 focal + greenery + tiny accent.
- Glue carefully: minimal adhesive to avoid shiny spots.
- Write a message: add the party date, a thank-you, or the guest’s name.
- Package: slide into a clear cello sleeve. Seal with a sticker that matches your party theme.
Pro Tips for Crisp, Beautiful Results
- Press extras: aim for 30–40% more flowers than you think you’ll need. Petals tear, stems break, and you’ll want options.
- Use tweezers every time: fingers transfer oils and can smudge delicate petals.
- Keep designs flat: chunky flowers (like full roses) don’t press well unless you separate petals.
- Plan for humidity: store pressed flowers with a silica gel packet in an airtight container until assembly.
- Match your party decor: repeat a color from your table runner, invitations, or balloons to make the favors feel intentional.
- Batch your workflow: do all trimming first, then all arranging, then all gluing, then all tagging.
Fun Variations (Beginner to Advanced)
Beginner-Friendly Adaptations
- Use pre-pressed flowers: buy assorted pressed flower packs to skip the pressing timeline.
- Stick to hardy botanicals: ferns, baby’s breath, and flat daisies are forgiving.
- Choose cards over frames: cards are the easiest to batch for large parties.
Intermediate Ideas
- Wax paper mini art: sandwich flowers between wax paper sheets and fuse with a warm iron (use a towel barrier).
- Layered collage look: overlap translucent petals for depth (works beautifully with pansies).
- Add a monogram: stamp initials with waterproof ink before gluing flowers.
Advanced Variations
- Resin coaster favors: embed pressed flowers in epoxy resin molds (gorgeous but requires ventilation and curing time).
- Gold leaf accents: add tiny flakes behind the flowers for a luxe, wedding-ready feel.
- Watercolor background: paint a light wash on cardstock, let dry fully, then glue pressed flowers on top.
Troubleshooting: What to Do If…
- Your flowers turned brown: they were too moist or took too long to dry. Try thinner petals, change blotting paper after 48 hours, or use a flower press for tighter compression.
- Flowers curled after pressing: uneven pressure or removing too soon. Press longer and keep weight consistent.
- Glue is showing: use less adhesive and apply with a toothpick. Consider an archival glue pen for precision.
- Bookmarks are peeling: you trimmed too close. Leave at least a 1/8 inch sealed laminate border.
- Frames have dust specks inside: clean panels right before closing and assemble in a low-draft area.
Common Crafting Mistakes to Avoid
- Waiting too late to press flowers: traditional pressing can take up to 3 weeks. Mark a reminder on your calendar.
- Using thick flowers without prepping: split bulky blooms into flatter layers (separate petals) for better results.
- Overloading the design: too many flowers can look messy and makes pieces fragile. Negative space is your friend.
- Skipping acid-free materials: standard glue and paper can yellow over time. Acid-free supplies keep your handmade projects looking fresh.
- Trimming laminate edges too close: always keep that sealed border so favors survive being tucked into purses and pockets.
- Packaging at the last second: set aside 30–45 minutes to tag and package—this is what makes the favor feel party-ready.
FAQ: DIY Pressed Flower Art Party Favors
How far in advance should I make pressed flower party favors?
If you’re pressing your own flowers, start 2–4 weeks before the party (this includes extra time for re-pressing or replacements). If you’re using pre-pressed flowers, you can assemble favors 1–3 days ahead and store them flat in a box.
What flowers press best for beginners?
Try pansies, violas, daisies, cosmos, fern fronds, and baby’s breath. They’re naturally flat and keep color well. Avoid thick blooms unless you separate petals.
Do I need to seal pressed flowers before using them?
Not always. Inside a frame or laminate pouch, they’re already protected. For cards that won’t be laminated, a light mist of clear-drying craft sealant can help, but test first to ensure it doesn’t darken petals.
How do I keep pressed flowers from cracking?
Handle with tweezers, store them in an airtight container, and avoid over-drying in a microwave. When assembling, use minimal glue and don’t bend the paper once flowers are attached.
What’s the best way to make these for a large guest list?
Use the pressed flower card + clear sleeve method or laminated bookmarks. Batch your process: press flowers in bulk, pre-cut all cardstock, then do an assembly line for arranging, gluing, and packaging.
Can these work as place cards and favors?
Yes—and it’s a smart party planning win. Add each guest’s name on the tag (frames) or directly on the card/bookmark. They decorate the table and double as a take-home handmade favor.
Wrap-Up: A Handmade Favor Guests Will Actually Keep
Pressed flower art party favors are a sweet blend of crafty and practical: they’re lightweight, easy to personalize, and they fit beautifully into nearly any party theme. Start with a simple design, make one “test favor,” then enjoy the satisfying rhythm of batching the rest. Your guests will notice the care you put into these handmade decorations—and they’ll love taking home a little piece of the celebration.
Want more DIY party decorations, creative handmade projects, and crowd-pleasing favor ideas? Browse more craft inspiration on smartpartyprep.com and keep the celebration beautifully homemade.
More Articles
 DIY Memory Books for Home Decor
 No-Sew Coasters Tutorial
 Budget DIY Painted Rocks Under $10
 Upcycled Thank You Cards from Recycled Materials
 Paper Craft Tote Bags Ideas
 How Do I Enable Third Party Cookies on My Mac? The Real Answer (Spoiler: You Can’t — But Here’s What Actually Works in 2024)
 Modern Fabric Bunting Designs
 Personalized Photo Frames Gifts
 How to Train a Dragon Party Favors: 7 Foolproof DIY Steps (No Fire Breathing Required!) — Easy, Kid-Safe, & Instagram-Worthy in Under 90 Minutes
 How to Make Party Hats for Stuffed Animals in Under 15 Minutes (No Sewing Required!) — 7 Adorable, Budget-Friendly Designs That Actually Stay On