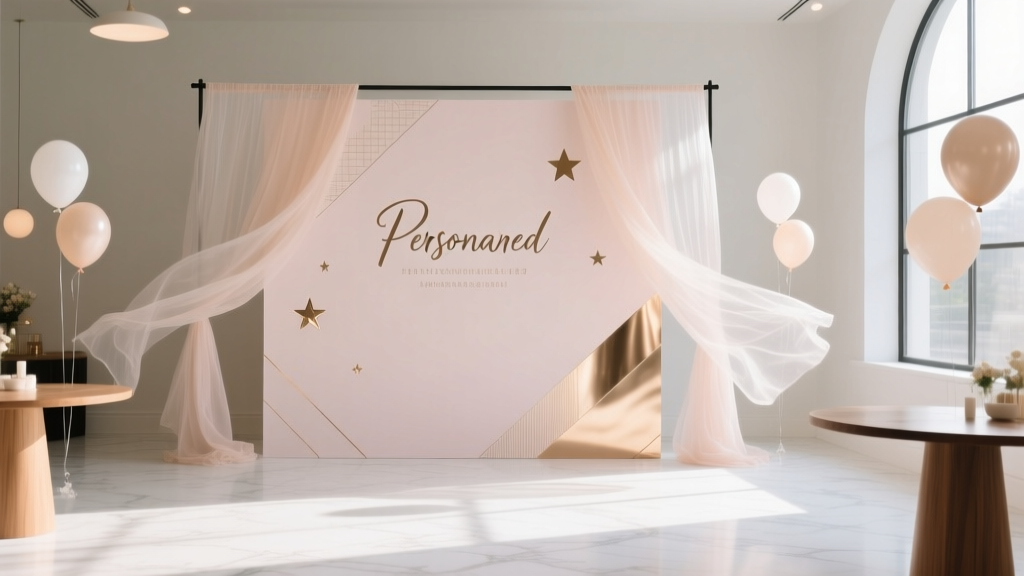
Personalized Backdrops Gifts
Some gifts get used once and forgotten. A personalized party backdrop gift is different—it becomes part of the celebration, shows up in photos for years, and feels deeply thoughtful because it’s made for their name, theme, and moment. Whether you’re crafting for a birthday, baby shower, graduation, engagement, or holiday party, a custom backdrop is one of those DIY party decorations that instantly makes the event feel “styled” without requiring a professional decorator.
Even better: these handmade backdrops pull double duty. You can gift the backdrop itself to the guest of honor (so they can reuse it later), or you can create a “backdrop kit” as a creative gift for a friend who loves hosting. Either way, you’re giving something practical, photo-worthy, and personal.
This guide walks you through beginner-friendly options and advanced variations, with clear measurements, tool recommendations, and step-by-step instructions so you can confidently build a stunning DIY photo backdrop that looks custom (because it is).
What Are “Personalized Backdrops Gifts”?
A personalized backdrop gift is a DIY party backdrop customized with names, dates, a phrase, or a theme-specific design—then presented as a gift or created specifically for someone’s event. Popular personalization ideas include:
- Name + age: “Ava’s 7th Birthday”
- Milestone: “Class of 2026” or “Cheers to 30 Years”
- Baby shower: “Oh Baby” + surname
- Wedding events: “Bride Squad” or “The Smiths”
- Holiday: “Merry & Bright” + family name
Skill Level, Time Estimates, and Best Uses
- Skill level: Beginner to Intermediate (Advanced options included)
- Total time: 1.5–4 hours (plus drying time if painting)
- Best for: DIY party decorations, photo booth backdrops, dessert table backdrops, statement wall decor
Materials List (with Estimated Costs)
Costs vary by size and personalization method. These estimates assume a backdrop around 6 ft wide x 7 ft tall (great for photos).
Backdrop Base Options
- Seamless paper roll (48"–86" wide): $25–$60
- Polyester backdrop fabric (wrinkle-resistant, 5x7 ft or 6x8 ft): $18–$45
- Cotton canvas drop cloth (6x9 ft or 9x12 ft): $15–$35
- Foam board sheets (20x30" panels; combine for a wall): $20–$60
Support & Hanging Supplies
- Adjustable backdrop stand (6.5x10 ft): $30–$80
- Heavy-duty spring clamps (2"–4"): $8–$15
- Command hooks (damage-free hanging): $8–$15
- Painter’s tape (1" or 1.5"): $4–$8
Personalization Supplies
- Vinyl lettering (adhesive, matte recommended): $8–$20
- Heat transfer vinyl (HTV) for fabric + mini heat press or iron: $10–$25 (vinyl), $25–$80 (press)
- Acrylic paint (craft or artist grade): $2–$8 per bottle
- Paint brushes (1" flat + detail set): $8–$18
- Paint pen markers (fine tip): $6–$15
Decor Add-Ons (Optional but Party-Worthy)
- Balloon garland kit (100–140 pcs + strip): $15–$35
- Faux greenery garland (6 ft): $10–$25
- Paper flowers (DIY or pre-made): $10–$40
- LED fairy lights (battery pack): $8–$18
Tools Recommended
- Measuring tape (25 ft) and metal ruler
- Scissors (fabric) and/or craft knife + cutting mat
- Level (small) for straight text placement
- Squeegee/scraper for vinyl (or a gift card)
- Lint roller (crucial for vinyl on fabric)
Choose Your Backdrop Size (Measurements That Photograph Well)
If your goal is a DIY photo backdrop for 1–4 people, these sizes work beautifully:
- Small: 5 ft wide x 6.5 ft tall (tight spaces, dessert table)
- Standard: 6 ft wide x 7 ft tall (most home parties)
- Large: 8 ft wide x 8 ft tall (big groups, pro look)
Lettering size tip: For readability in photos, make the main name/phrase at least 6"–10" tall for a 6–8 ft wide backdrop.
Project Plan: Three Personalized Backdrop Gift Styles
Style 1: Fabric Backdrop with Vinyl Name (Most Giftable)
This option folds up nicely, stores well, and feels like a “real” gift.
Step-by-Step Instructions
- Prep the fabric (10–20 minutes).
- If using polyester: remove creases with a handheld steamer or tumble dry with a damp towel for 10 minutes.
- If using drop cloth: wash and dry once to soften, then iron the area where vinyl will go.
- Set up your hanging method (10 minutes).
- Backdrop stand: clamp fabric at the top bar, then adjust height to 7 ft.
- Wall: use Command hooks and a dowel/curtain rod pocket if your fabric has one.
- Plan text placement (10 minutes).
- Measure down 10"–14" from the top for the main name (keeps it above heads in photos).
- Lightly mark with painter’s tape or removable chalk.
- Apply vinyl lettering (20–40 minutes).
- Adhesive vinyl on fabric: works best on tight-weave polyester. Clean area with a lint roller first, then press firmly using a squeegee.
- HTV on fabric (recommended): place HTV (shiny carrier side up), press with a mini heat press or iron (no steam) for 10–15 seconds per section, using firm pressure. Let cool slightly, then peel per vinyl instructions.
- Add simple accents (optional, 15–30 minutes).
- Attach a balloon garland to one side using balloon strip + removable hooks.
- Drape greenery or fairy lights along the top bar for a soft glow.
Style 2: Painted Drop Cloth Backdrop (Handmade Heirloom Feel)
If you want that artisan look, paint is your best friend. This is also a wonderful personalized gift for a baby shower or first birthday—parents often save it.
Step-by-Step Instructions
- Hem or tape edges (optional, 10 minutes). If your drop cloth frays, use fabric tape or fold and iron a simple hem.
- Create a lettering guide (20 minutes).
- Use a projector (best) to project the name onto the fabric and trace lightly with pencil.
- No projector? Print letters on paper, tape them together as a template, and trace.
- Mix paint for crisp coverage (5 minutes).
- Use acrylic paint straight for bold letters, or mix 3 parts paint : 1 part fabric medium for softer feel and flexibility.
- Paint the main text (30–60 minutes).
- Use a 1" flat brush for thick strokes and a detail brush for curves.
- Apply 2 thin coats instead of one thick coat to reduce cracking.
- Dry time (at least 1–2 hours). Overnight is safest before folding or gifting.
- Heat-set (optional but helpful, 5–10 minutes). Iron on the back side (no steam) with a pressing cloth.
Style 3: Foam Board Panel Backdrop (Fast + Apartment-Friendly)
This is ideal if you’re short on time, need a lightweight setup, or want a solid “wall” look behind a cake table.
Step-by-Step Instructions
- Assemble your panels (20–30 minutes).
- For a 60" x 90" wall, use three 20" x 30" foam boards across and three down (9 boards total).
- Tape seams on the back with wide packing tape or gaffer tape.
- Cover seams (optional, 20 minutes).
- Use white poster tape or a thin strip of paper to hide front seams.
- Or lean into the “panel” look with a geometric design.
- Add personalization (15–30 minutes).
- Use adhesive vinyl letters or paint pens for crisp lines.
- Center the main name at eye level: about 55"–60" from the floor.
- Stabilize (10 minutes).
- Lean against a wall and secure with removable wall tape, or mount to a backdrop stand using clamps at the top corners.
Pro Tips for Professional-Looking DIY Party Backdrops
- Matte finishes photograph best. Matte vinyl and matte paint reduce glare from flash.
- Use high contrast. White on pastel is pretty in person but can disappear in photos. If your base is light, choose darker lettering.
- Keep the “photo zone” clear. Place balloons and decor on one side so faces aren’t covered.
- Do a quick camera test. Snap a photo from 6–8 ft away before you commit to final placement.
- Plan for transport. Fabric folds, foam boards stack, paper rolls need careful handling.
Beginner-Friendly Adaptations
- Skip cutting vinyl: buy pre-made letter stickers in a script font.
- Use a simple phrase: “Happy Birthday” + a name is easier than long quotes.
- Choose one focal element: a balloon garland OR paper flowers—doing both can feel overwhelming.
- Use stencils: stenciling reduces shaky lines and speeds up painting.
Advanced Variations (If You Want to Go Big)
- Layered 3D lettering: cut the name from cardstock or foam sheets and mount with foam tape for dimension.
- Arch wall backdrop: build a 6 ft x 3 ft “arch panel” using lightweight insulation foam board, then paint and personalize.
- Ombre paint fade: blend 2–3 paint colors across the fabric using a slightly damp sponge.
- Neon-style LED sign look: shape flexible LED neon rope into the name and mount to a clear acrylic sheet.
Troubleshooting: Quick Fixes for Common Backdrop Problems
- Wrinkles won’t come out: steam from the back side, or hang it overnight with a few binder clips at the bottom for weight.
- Vinyl won’t stick to fabric: switch to HTV, or apply adhesive vinyl only to polyester with a tight weave. Always lint-roll first.
- Paint bleeding under a stencil: use less paint on your brush (pounce technique) and secure stencil edges with painter’s tape.
- Backdrop looks see-through: double up fabric layers or hang a white sheet behind it.
- Stand feels wobbly: widen the base, add sandbags (or small bags of rice) to the feet, and keep heavy balloon clusters supported with hooks.
Common Crafting Mistakes to Avoid
- Placing the name too low. People will stand in front of it and cover the personalization. Aim for 10"–14" from the top on fabric backdrops.
- Using glossy materials. Glossy vinyl and shiny paper reflect light and can look washed out in photos.
- Overcrowding the design. One main name/phrase + one accent (date, stars, small icons) is usually enough.
- Not testing adhesive on your surface. Some wall paints don’t love tape. Test a small corner first.
- Waiting until party day. Give yourself a cushion for drying time, redoing letters, and last-minute adjustments.
FAQ: Personalized Backdrops Gifts
What’s the easiest material for a beginner DIY backdrop?
A wrinkle-resistant polyester fabric backdrop on a stand is the simplest. Add personalization with HTV or large letter stickers for an easy, clean finish.
How do I choose the right font size for names?
For a standard 6 ft wide backdrop, make the main name 6"–10" tall. If it’s a short name, go bigger. For long names or phrases, use two lines instead of shrinking the font too much.
Can I make a personalized backdrop without a cutting machine?
Yes. Use pre-cut letter stickers, stencils, paint pens, or print-and-trace templates. A cutting machine is convenient, but it’s not required for great DIY party decorations.
How do I package this as a gift?
Fold fabric neatly and tie with a ribbon, then include a small card with setup instructions (stand height, clamp placement, and care tips). For foam board, stack panels and wrap with stretch wrap or kraft paper.
Will balloons damage the backdrop?
Balloons can leave rubbing marks on paper and pull on fabric if they’re heavy. Use removable hooks and support balloon garlands at multiple points so the weight isn’t hanging from one clamp.
How far in advance can I make it?
Fabric and foam board backdrops can be made 1–4 weeks ahead. If painting, allow at least 24 hours before folding to prevent sticking or cracking.
Make It Personal, Make It Photo-Ready
A personalized backdrop gift is one of those handmade projects that looks impressive, feels meaningful, and instantly upgrades any party setup. Start simple—choose a fabric base, add a bold name, and keep the design clean. Once you see it in photos, you’ll understand why custom DIY backdrops are a favorite in the world of party decorations and creative celebrations.
When you’re ready for your next crafty win, explore more DIY party decor and handmade celebration ideas on smartpartyprep.com.
More Articles
 Paper Craft Clay Ornaments Ideas
 Seasonal Wooden Signs Ideas
 Budget DIY Masks Under $5
 Budget DIY Coasters Under $50
 How to Update Settings to Allow 3rd Party Cookies in 2024: A Step-by-Step Fix for Chrome, Safari, Edge & Firefox (No Tech Degree Required)
 How Do I Block Third Party Cookies in 2024? The Real-World Guide That Actually Works (No Tech Degree Required)
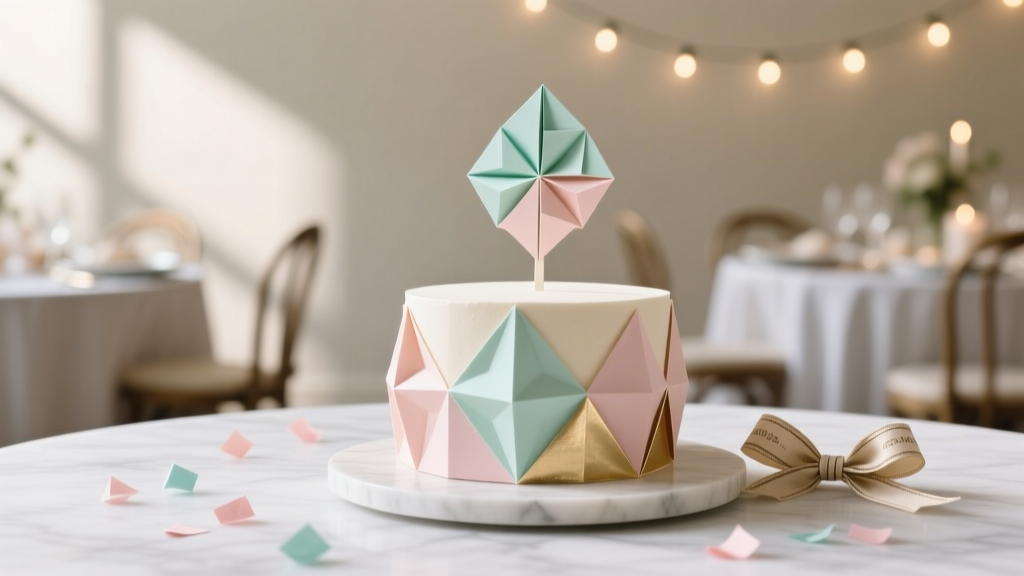 Paper Craft Cake Toppers Ideas
 How to Allow Third Party Cookies on MacBook Air (2020–2024): A Step-by-Step Safari & Chrome Fix That Actually Works in 2024 — No Tech Degree Required
 Advanced Paper Lanterns for Crafters
 When the Party Is Over Chords: The Only Complete, Beginner-Friendly Guide You’ll Ever Need (No Theory Required — Just Play in 7 Minutes)