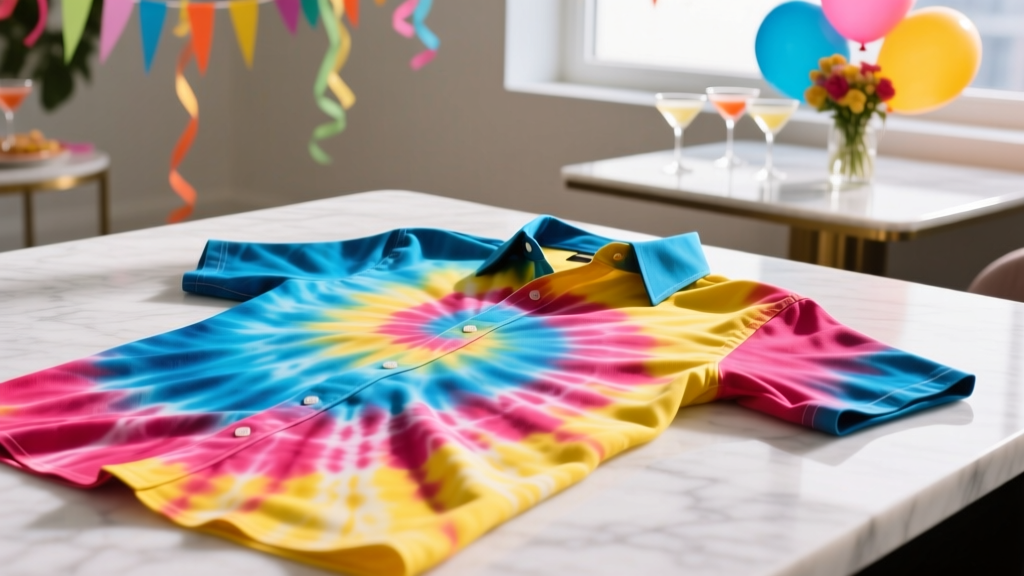
How to Make Tie-Dye Shirts at Home
Tie-dye shirts are the kind of DIY craft that instantly turns a regular gathering into a colorful, photo-worthy party. Whether you’re prepping for a birthday bash, a summer BBQ, a bachelorette weekend, a school spirit event, or a kids’ craft table, handmade tie-dye doubles as both an activity and a take-home favor.
Even better: this project is flexible. Beginners can stick to simple spirals and classic rainbow patterns, while more advanced crafters can try ice dye, geode designs, ombré gradients, and bleach effects. You don’t need a fancy studio—just a few supplies, a protected workspace, and a little creativity.
Below you’ll find a practical, step-by-step guide for making tie-dye shirts at home, plus pro tips, troubleshooting, and party-friendly ideas to help your DIY party decorations and handmade projects stand out.
Project Overview (Skill Level, Time, and Results)
- Skill level: Beginner-friendly (with advanced variations included)
- Total time: 1.5–3 hours active time + 6–24 hours resting time
- Best fabric: 100% cotton (highest color payoff)
- Typical cost per shirt: $4–$12 depending on shirt quality and dye method
- Great for: DIY crafts for parties, handmade party favors, team shirts, family reunions, kids’ activities
Materials and Tools (With Estimated Costs)
These are the most reliable supplies for bright, washable tie-dye shirts. Costs vary by location, but these ranges work well for planning.
Core Supplies
- White or light-colored 100% cotton T-shirts (adult or youth sizes)
- Budget tees: $3–$6 each
- Midweight, softer cotton: $6–$12 each
- Tip: Pre-washed shirts without fabric softener dye more evenly.
- Fiber-reactive dye kit (best brightness and wash-fast results)
- Squeeze-bottle kit (multiple colors): $12–$30
- Look for “fiber reactive” or “procion-type” dyes for cotton.
- Soda ash (sodium carbonate) for pre-soaking (often included in kits)
- Cost: $5–$10
- Rubber bands (assorted sizes)
- Cost: $2–$6
- Disposable gloves (nitrile recommended for durability)
- Cost: $5–$12 per box
- Plastic tablecloth or trash bags to protect surfaces
- Cost: $1–$5
Helpful Extras (Strongly Recommended)
- Wire rack + tray (keeps shirts out of puddles for cleaner patterns)
- Cost: $8–$20
- Plastic wrap or zip-top bags for batching (resting time)
- Cost: $3–$8
- Measuring cup + tablespoon (for consistent mixing)
- Cost: $5–$10
- Spray bottle with water (for dampening fabric and smoother dye flow)
- Cost: $2–$6
Optional Party-Prep Add-Ons
- Aprons or oversized old shirts for guests (especially kids)
- Name labels or masking tape to mark shirts during batching
- Plastic bins for each guest’s shirt (keeps colors from cross-contaminating)
- Clothesline + clothespins for drying outside
Choosing Dye and Fabric (What Works Best at Home)
Best Shirts for Bright Tie-Dye
- 100% cotton: brightest color, easiest for beginners
- Cotton/poly blends (50/50): softer vintage look, colors appear more muted
- Pre-wash shirts to remove sizing and oils (skip fabric softener)
Best Dyes for Party-Ready Results
- Fiber-reactive dyes bond permanently to cotton fibers and stay vibrant after many washes.
- All-purpose dyes can work but often fade faster and may bleed more.
Prep Your Workspace (Mess-Free Party Setup)
A little setup makes tie-dye feel smooth and fun—especially if you’re hosting a DIY party craft station.
- Cover the table with a plastic tablecloth or layered trash bags.
- Set out a glove station (one pair per person).
- Use a wire rack over a tray if possible to prevent muddy puddling.
- Keep paper towels and a trash bag nearby for quick cleanup.
- If working indoors, protect floors with a drop cloth or plastic sheeting.
Step-by-Step: How to Make Tie-Dye Shirts at Home
Step 1: Pre-Soak Shirts in Soda Ash (15–30 minutes)
This step is the secret to bright, long-lasting color.
- Fill a bucket or sink with 1 gallon (3.8 L) of warm water per 2–3 shirts.
- Add 1/2 cup (120 mL) soda ash per gallon of water. Stir until dissolved.
- Soak shirts for 15–30 minutes.
- Wring out until damp (not dripping). Damp fabric helps dye spread smoothly.
Step 2: Choose a Fold Pattern (5–10 minutes per shirt)
Here are three party-friendly patterns that work every time.
Option A: Classic Spiral (Beginner Favorite)
- Lay the damp shirt flat.
- Pinch the fabric at the center of the shirt (or off-center for a modern look).
- Twist in a circle until the shirt forms a tight “cinnamon roll.”
- Secure with 3–4 rubber bands crossing over the center like pizza slices.
Option B: Crumple (Fast and Foolproof)
- Lay the shirt flat and scrunch it up randomly into a tight bundle.
- Wrap several rubber bands around it to hold the shape.
- This is perfect for kids and large groups because it still looks great.
Option C: Stripes (Great for Team Colors)
- Fold the shirt like an accordion from bottom to top (or side to side).
- Add rubber bands every 1–2 inches (2.5–5 cm) for narrow stripes, or every 3–4 inches (7.5–10 cm) for bold stripes.
Step 3: Mix Your Dyes (5–15 minutes)
If you’re using a kit, follow the included instructions. If mixing powdered fiber-reactive dye, aim for consistent strength:
- In a squeeze bottle, add 1–2 teaspoons dye powder.
- Add warm water to fill (commonly 8–16 oz / 240–475 mL bottles).
- Shake thoroughly for 30–60 seconds.
Tool recommendation: Use squeeze bottles with narrow tips for crisp lines, or wider tips for quicker coverage.
Step 4: Apply Dye (10–20 minutes per shirt)
- Place the tied shirt on a rack/tray or protected surface.
- Apply dye to each section. For spirals, dye each “slice” a different color.
- Flip the shirt and dye the back—especially if you want bold color through the layers.
- For deeper saturation, apply dye until the fabric looks fully colored (not just surface-damp).
Color planning tip (avoids muddy brown): Keep “clean” color neighbors together, like blue next to green, or red next to orange. If red touches green directly, it can darken or brown where they blend.
Step 5: Wrap and Rest (Batching Time: 6–24 hours)
- Wrap the dyed shirt in plastic wrap or place it in a zip-top bag.
- Let it rest in a warm spot for at least 6–8 hours. For the brightest results, go 12–24 hours.
Temperature tip: Warmer rooms help dye react faster. If your home is cool, aim for the longer rest time.
Step 6: Rinse, Wash, and Dry (20–40 minutes active time)
- Wear gloves and rinse the shirt under cool running water while it’s still tied. Rinse until water runs less dark.
- Remove rubber bands and continue rinsing, gradually shifting to warmer water.
- Wash on hot with a small amount of detergent. (Wash tie-dye separately the first 1–2 washes.)
- Dry on medium/high heat or hang dry.
Pro Tips for Brighter Color and Cleaner Patterns
- Use damp—not dripping—fabric. Too wet causes colors to bleed into each other.
- Apply dye thoroughly. White “surprise spots” happen when dye doesn’t soak through folds.
- Use a rack. Keeping the shirt out of dye puddles prevents muddy color pooling.
- Label party shirts. Use masking tape flags on zip-top bags so guests don’t mix up projects.
- Plan a color palette. For party themes, pick 2–4 colors that match your DIY party decorations.
Fun Variations for Party Themes (Beginner to Advanced)
Beginner-Friendly Variations
- Two-color spiral: Easy, bold, and less risk of muddy blending.
- Monochrome ombré: One color in light/medium/dark intensity across stripes.
- Polka-dot scrunch: Use rubber bands to pinch small “nubs” for dot clusters.
Advanced Tie-Dye Ideas
- Ice dye (color-splatter look): Place a tied shirt on a rack over a bin, cover with ice, sprinkle dye powder over ice, and let melt completely (6–12 hours). Then batch an additional 12–24 hours for strong color.
- Geode tie-dye: Create multiple bound “rock” shapes with sinew or tight bands; dye around edges with darker outlines for crystal-like rings.
- Reverse tie-dye (bleach): Start with a dark shirt, tie it, then apply a diluted bleach solution to lighten patterns. Rinse thoroughly, neutralize, then optionally overdye with color for a bold two-step effect.
Troubleshooting: Fix Common Tie-Dye Problems
- Colors look dull after washing:
- Likely cause: skipped soda ash, short batching time, or fabric blend.
- Fix next time: use 100% cotton, soak in soda ash, batch 12–24 hours.
- Too much brown/muddy color:
- Likely cause: too many complementary colors touching or dye puddling.
- Fix next time: use fewer colors, add a rack, separate red/green and purple/yellow areas.
- Big white areas that weren’t planned:
- Likely cause: dye didn’t soak through thick folds.
- Fix next time: dye both sides, apply more dye, or use slightly looser folds.
- Color bleeding in the first wash:
- Likely cause: excess loose dye.
- Fix: rinse longer before washing, wash separately 1–2 times, use hot water wash initially.
Common Crafting Mistakes to Avoid
- Skipping the pre-wash: New shirts may have finishes that resist dye.
- Using fabric softener: It can block dye absorption and cause uneven results.
- Over-saturating the work surface: Shirts sitting in puddles blur designs—use a rack or rotate shirts.
- Rushing the batching time: The dye needs time to fully react; overnight resting is your friend.
- Not protecting hands and surfaces: Gloves and plastic table covers keep the project fun instead of stressful.
- Letting guests “free-pour” every color: For parties, offer a limited palette and sample photos to keep results vibrant.
Party-Friendly Ideas: Make Tie-Dye Part of Your Event
- Tie-dye favor station: Guests make shirts, then you bag and label them for pickup later.
- Theme palettes:
- Beach party: teal + turquoise + lime
- Unicorn party: pink + purple + aqua
- Retro party: hot pink + orange + yellow
- Team spirit: two school colors in stripes
- Matching DIY party decorations: Use leftover dye colors for paper napkins (fabric-only dyes won’t work on paper), or match your balloon arch and table settings to the shirt palette for cohesive party styling.
FAQ: Tie-Dye Shirts at Home
1) Do I have to use soda ash?
For cotton shirts and fiber-reactive dye, soda ash makes a huge difference in brightness and helps the color stay put through washing. If your kit includes it, use it. If not, you can buy it separately and follow the soak directions above.
2) Can I tie-dye shirts without a kit?
Yes. You’ll need fiber-reactive dye powder, soda ash, squeeze bottles, gloves, and rubber bands. Kits are easiest for beginners and party crafts because the colors are pre-measured and the instructions are streamlined.
3) How do I keep colors from bleeding together?
Use fewer colors, avoid placing complementary colors directly next to each other, and keep shirts off puddles with a wire rack. Also wring shirts to “damp” before dyeing—overly wet fabric encourages blending.
4) How long should I let tie-dye sit before rinsing?
At least 6–8 hours, but 12–24 hours delivers brighter, more permanent results—especially if the room is cool.
5) Can kids do tie-dye at a party?
Absolutely. Choose the crumple method, limit dye colors to 2–3 per shirt, pre-soak shirts ahead of time, and have adults handle rinsing and washing. Gloves and aprons make it smoother for everyone.
6) What’s the best way to wash tie-dye shirts the first time?
Rinse thoroughly first, then wash in hot water with a little detergent. Wash separately for the first 1–2 washes to prevent dye transfer.
Wrap-Up: Your Next Favorite Handmade Party Project
Tie-dye shirts are bright, practical, and endlessly customizable—exactly what you want from a DIY craft that doubles as party entertainment and a handmade favor. Start with one simple spiral, then experiment with stripes, ombré, or an ice-dye batch when you’re ready to level up.
When your shirts are dry, snap a group photo, set out coordinating accessories (sunglasses, bandanas, friendship bracelets), and enjoy the instant “we made this” energy that makes parties feel extra special.
Happy crafting! Explore more DIY crafts, party decorations, and handmade project ideas on smartpartyprep.com.
More Articles
 DIY Cupcake Wrappers Using Cricut
 Advanced Scrapbook Pages for Crafters
 Seasonal Resin Jewelry Ideas
 How to Unblock 3rd Party Cookies in 2024: A Step-by-Step Guide That Actually Works (No Tech Degree Required)
 Easy Origami Decorations for Beginners
 Upcycled Paper Lanterns from Recycled Materials
 12 Do It Yourself Party Hats You Can Make in Under 30 Minutes (No Sewing, No Glue Gun, and Zero Craft Store Runs Needed)
 What Is 'A Party of Patches'? The Surprisingly Viral DIY Crafter’s Guide to Hosting a Low-Stress, High-Joy Fabric-Fueled Gathering That Builds Community (Not Just Quilts)
 Step-by-Step Dream Catchers Tutorial
 Is Triquetra Third Party Tested? What You *Really* Need to Know Before Buying Spiritual Jewelry or Craft Supplies — 5 Red Flags & 3 Verified Brands That Actually Do It