Seasonal Resin Jewelry Ideas
Resin jewelry is one of those DIY crafts that feels a little magical: you pour a clear liquid, add color and tiny treasures, and a day later you’re holding a glossy, custom piece that looks boutique-made. Even better? Seasonal resin jewelry doubles as party-ready accessories and handmade decorations—perfect for birthdays, bridal showers, holiday gatherings, and theme parties where guests love a creative detail.
This project is fun because it’s flexible. You can keep it beginner-friendly with simple glitter and molds, or go advanced with layered designs, pressed flowers, and embedded mini charms. It’s useful, too: make a matching set for hosts, create party favors guests can wear home, or craft color-coordinated pieces that tie into your event decor.
Below you’ll find seasonal resin jewelry ideas, a practical materials list with estimated costs, step-by-step instructions, pro tips, troubleshooting, and mistakes to avoid—so you can make polished pieces even if you’re new to resin crafting.
Project Overview: Skill Level, Time, and What You’ll Make
- Skill level: Beginner to Intermediate (Advanced options included)
- Active time: 45–90 minutes (depending on batch size and complexity)
- Cure time: 12–24 hours (check your resin label)
- Total time: 1–2 days including cure time
- Best for: DIY party decorations, handmade gifts, party favors, seasonal accessories
- Typical batch yield: 6–12 small pieces (earrings/charms) per 2–4 oz mixed resin
Materials + Estimated Costs (Beginner-Friendly Shopping List)
Resin & Colorants
- 2-part epoxy resin (craft/jewelry grade) – 16 oz kit (8 oz resin + 8 oz hardener): $20–$35
- Mica powder set (12–24 colors): $10–$20
- Alcohol ink or resin dye (small set): $10–$18
- Fine glitter (cosmetic or craft grade, extra-fine): $6–$12
Molds, Findings & Jewelry Hardware
- Silicone resin molds (earrings, pendants, studs, rings): $8–$18
- Jewelry findings kit (jump rings, eye pins, earring hooks, lobster clasps): $10–$20
- Mini drill/hand pin vise (for drilling holes): $8–$15
- Small drill bits (1 mm and 1.5 mm): $5–$10
- Flat-nose and round-nose pliers (jewelry pliers set): $10–$18
Mixing Tools & Safety
- Silicone mixing cups (reusable): $8–$15
- Wood stir sticks or silicone stir sticks: $3–$8
- Nitrile gloves: $5–$10
- Respirator mask rated for organic vapors (recommended, especially indoors): $25–$45
- Isopropyl alcohol (91%+) (for cleanup): $3–$6
- Heat tool (mini heat gun) or long lighter for bubbles: $12–$25
Seasonal Add-Ins (Choose What Matches Your Theme)
- Pressed flowers or dried greenery: $6–$15
- Foil flakes (gold/silver/iridescent): $6–$12
- Mini charms (snowflakes, pumpkins, stars): $8–$18
- Polymer clay slices (fruit, candy, confetti shapes): $6–$12
Budget estimate: $45–$80 to start (you’ll have supplies for many batches). If you already own pliers and molds, you can get started closer to $25–$40.
Set Up Your Workspace (Fast, Clean, and Party-Prep Friendly)
- Cover your surface with a silicone mat, freezer paper, or plastic tablecloth.
- Work in a well-ventilated area (open window + fan is helpful).
- Level your table—resin will self-level, so a crooked surface means crooked pieces.
- Keep a “no-dust zone” for curing (a plastic container turned upside down works as a cover).
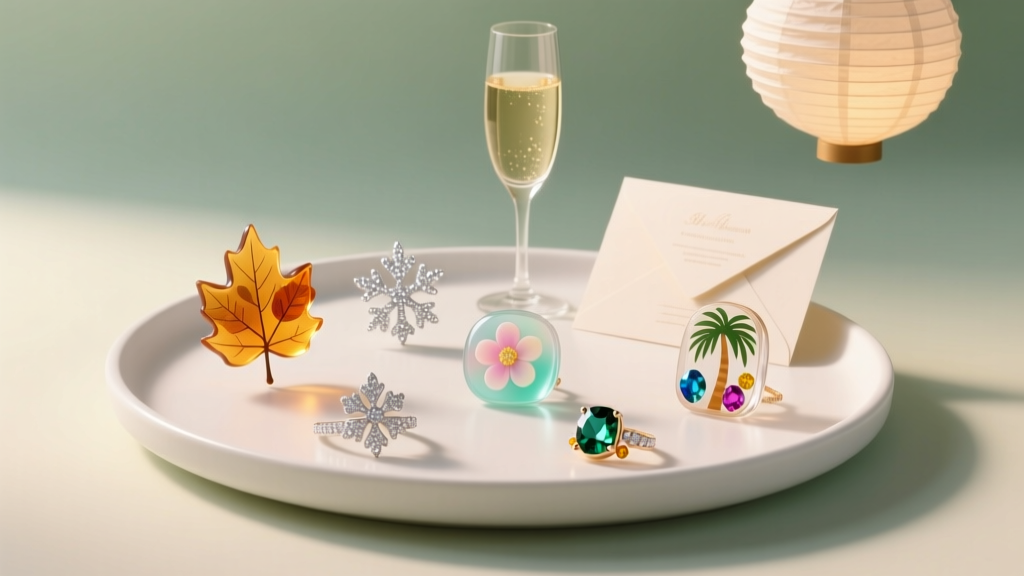
Seasonal Resin Jewelry Ideas (Party-Themed Inspiration)
Spring: Floral Garden Party Pieces
- Pressed flower studs (daisies, baby’s breath, tiny petals)
- Pastel ombré teardrop earrings with mica powder
- “Dew drop” pendants with clear resin + a single green leaf
Party pairing: garden brunch, baby shower, bridal shower, tea party DIY favors.
Summer: Bright Beach & Pool Party Jewelry
- Ocean wave earrings (blue/white swirl with a hint of glitter)
- Citrus slice charms (polymer clay lemon/orange slices)
- Confetti bangles with neon glitter for a birthday party look
Party pairing: pool party, tropical luau, summer birthday, backyard BBQ.
Fall: Cozy Harvest & Halloween Designs
- Pumpkin spice pendants (amber resin + gold foil)
- Leaf silhouette earrings (pressed leaves, copper flakes)
- Halloween “shaker” charms (tiny bats/stars in a cavity mold)
Party pairing: Halloween party accessories, Friendsgiving favors, autumn wedding details.
Winter: Holiday Sparkle & New Year Glam
- Snowflake earrings (clear resin + silver foil + white mica)
- Evergreen confetti pendants (tiny greenery sealed in resin)
- Midnight New Year studs (black resin + gold glitter + star charm)
Party pairing: holiday party, winter wedding, New Year’s Eve, gift exchanges.
Step-by-Step: How to Make Seasonal Resin Jewelry
Step 1: Choose a Design + Prep Your Mold
- Select your mold shapes (e.g., 2 matching earring cavities + 1 pendant cavity).
- Clean molds with tape (press and lift) to remove lint and dust.
- Decide your “story” per piece: one focal element (flower/foil/charm) + one accent (glitter/tint).
Measurement tip: For 4–6 small earrings or charms, start with 2 oz total mixed resin (1 oz resin + 1 oz hardener) if your brand uses a 1:1 ratio. Always follow your resin’s label for mixing ratio by volume or weight.
Step 2: Measure and Mix Resin Correctly
- Put on nitrile gloves and work in ventilation.
- Pour Part A and Part B into a mixing cup using the correct ratio.
- Stir slowly for 3 minutes, scraping the sides and bottom.
- Optional but helpful: pour into a second clean cup and stir for another 1 minute (this reduces sticky spots).
Step 3: Color and Add Seasonal Details
- For mica powder: start with 1/8 tsp per 2 oz mixed resin, then adjust.
- For resin dye/alcohol ink: add 1–2 drops at a time (too much can affect curing).
- For glitter: try 1/8 tsp per 2 oz for a subtle sparkle, 1/4 tsp for bold.
Embedding tip: If your add-ins float (foil, light botanicals), pour a thin “base layer,” wait 10–20 minutes until it thickens slightly, then place your elements and top off.
Step 4: Pour into Molds (Clean Edges, Fewer Bubbles)
- Pour resin in a thin stream into each cavity, stopping slightly below the top.
- Use a toothpick to guide resin into corners and pop trapped bubbles.
- Top off carefully so the surface is slightly domed (if your mold supports it) for a glossy finish.
Step 5: Remove Bubbles and Cover to Cure
- Pass a mini heat gun 6–8 inches above the mold for 2–3 seconds per area (don’t overheat).
- Cover the mold with a clean container to keep out dust.
- Let cure undisturbed for 12–24 hours.
Step 6: Demold, Finish, and Add Hardware
- Demold gently by peeling silicone away from the resin piece.
- If edges are sharp or uneven, sand lightly using 800 → 1200 → 2000 grit wet/dry sandpaper.
- Drill holes where needed using a 1 mm bit for jump rings (start slowly and drill straight).
- Attach findings:
- Use jump rings to connect charms to earring hooks.
- For necklaces, add a bail or drill and attach a jump ring + chain.
Optional gloss boost: Apply a thin “top coat” of resin or a resin-compatible gloss sealer to restore shine after sanding.
Pro Tips for Party-Perfect Results
- Batch like a party planner: Make sets of 6–12 pieces in the same color palette for coordinated party favors.
- Use a timer for mixing: Under-mixing is a top cause of sticky resin.
- Pre-seal paper items: If using tiny paper confetti or photos, seal with Mod Podge and let dry to prevent bubbles and discoloration.
- Keep botanicals dry: Use fully pressed/dried flowers to avoid browning.
- Test new add-ins: Try one sample piece first—some glitters and dyes behave differently in resin.
Seasonal Variations (Beginner to Advanced)
Beginner-Friendly Adaptations
- Single-color mica + matching glitter in a simple circle mold
- Clear resin with foil flakes only (minimal technique, high impact)
- Charm embed: place one mini charm in the center and pour clear resin
Advanced Variations
- Layered scenes: pour a clear base, cure, then add a colored top layer with a second element (great for winter “snow globe” looks).
- Gradient ombré pours: split resin into 2–3 cups and pour sequentially, blending with a toothpick.
- Shaker jewelry: create a cavity, add micro-beads or glitter, then seal with a clear resin layer.
- Alcohol ink petri effect: use white sinker ink (only if you’ve practiced—results vary by resin brand).
Troubleshooting: Fix Common Resin Issues
My resin is sticky or soft after curing
- Cause: incorrect ratio, under-mixing, or a cold room
- Fix: move to a warmer area (72–78°F / 22–26°C) for 24 more hours; for tacky surfaces, apply a properly mixed thin top coat.
I have lots of bubbles
- Cause: stirring too fast, thick resin, or pouring too quickly
- Fix: stir slowly, warm bottles in lukewarm water for 5–10 minutes (sealed), pour in a thin stream, and use gentle heat briefly.
My flowers turned brown or look cloudy
- Cause: moisture in botanicals or incompatible sealer
- Fix: use fully dried flowers; pre-seal delicate petals with a light spray sealer and let dry completely.
The surface has dust or lint specks
- Cause: uncovered curing area
- Fix: cover pieces while curing; sand and apply a thin top coat if needed.
Common Crafting Mistakes to Avoid
- Guessing the ratio: measure carefully (by volume or weight as directed) to avoid soft or uncured resin.
- Skipping safety: wear gloves; use ventilation; consider a respirator for frequent crafting.
- Overloading colorant: too much dye/glitter can prevent curing—add small amounts and build slowly.
- Rushing demold time: if it bends, it’s not ready; let it cure longer for crisp edges.
- Using wet or fresh plants: moisture causes discoloration and bubbles.
- Overheating with a torch/heat gun: can warp molds, scorch resin, or cause ripples—short passes only.
FAQ: Seasonal Resin Jewelry for DIY Parties
1) What’s the best resin for beginners making jewelry?
A 2-part epoxy resin labeled for crafts/jewelry is easiest for beginners. Look for a longer working time (30–45 minutes) and clear, non-yellowing claims. Always follow the manufacturer’s mixing instructions.
2) How do I make resin jewelry that matches my party decorations?
Pick 2–3 colors from your party theme (napkins, balloons, table runners) and mirror them in mica powders or resin dyes. Add one metallic accent (gold foil for glam, silver for winter, copper for fall) to make the set look intentional.
3) Can I make these as party favors?
Yes—small charms, keychains, and simple stud earrings are great handmade party favors. Plan for cure time: make them 2–3 days before the event so you have time to drill, assemble, and package.
4) What’s the easiest seasonal design that still looks impressive?
Clear resin with foil flakes is fast and high-impact. For winter, use silver; for fall, copper; for spring, iridescent; for summer, gold mixed with a tiny pinch of turquoise glitter.
5) How should I package resin jewelry for gifting or party tables?
Use small organza bags, mini jewelry boxes, or cardstock earring cards. Add a themed sticker (e.g., “Thank you for celebrating!”) to tie it into your party decor and handmade aesthetic.
6) How do I keep resin from yellowing over time?
Choose a non-yellowing resin, store finished pieces away from direct sunlight, and consider a UV-resistant top coat spray if your pieces will be worn outdoors often.
Wrap-Up: Make the Season Wearable
Seasonal resin jewelry turns your favorite time of year into wearable art—and it’s a smart way to add DIY charm to parties, gift bags, and event outfits. Start with a simple mold and a two-color palette, then level up with layers, botanicals, and shimmery add-ins as you gain confidence.
When you’re ready, make a “mini collection” for your next gathering: matching earrings for the host, a few charms as party favors, and one statement pendant that becomes the conversation piece of the night.
Happy crafting! Explore more DIY crafts, party decorations, and handmade project ideas at smartpartyprep.com.
More Articles
 Modern Mugs Designs
 Which Political Party Supported Slavery? Quizlet Won’t Tell You the Full Truth — Here’s What Textbooks Omit About Whig, Democratic, and Republican Roles in Slavery (1820–1865)
 30 Creative Backdrops Ideas (DIY-Friendly for Parties, Photos & Celebrations)
 How to Make Party in Infinite Craft (Step-by-Step Guide): The 4 Hidden Combinations You’re Missing — Plus Why ‘Fire + Music’ Fails Every Time
 Personalized Photo Frames Gifts
 Kids' Craft: Tie-Dye Shirts
 Is Levels Protein Third Party Tested? We Investigated Every Batch Report, Lab Certificate, and FDA Compliance Record So You Don’t Have to Waste Money on Unverified Supplements
 DIY Candles for Anniversaries
 How to Make a Balloon Arch for a Birthday Party: 7 Foolproof Steps (No Glue Gun, No Experience, No Stress — Just Gorgeous Results in Under 90 Minutes)
 Easy Balloon Arches for Beginners