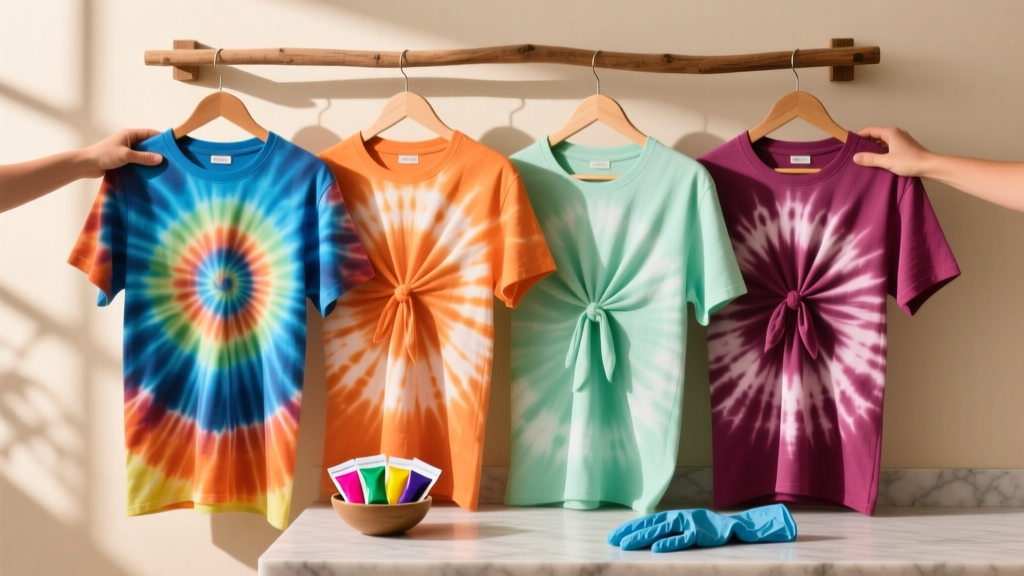
DIY Tie-Dye Shirts for Holidays
Nothing says “party-ready” like a set of handmade tie-dye shirts made to match your holiday theme. They’re bright, personal, and surprisingly easy—plus they double as wearable party decorations. Whether you’re hosting a backyard Fourth of July bash, a cozy Halloween movie night, or a Christmas cookie party, custom tie-dye makes guests feel included and instantly sets the vibe.
This project is also wonderfully flexible. You can keep it beginner-simple with one or two colors and a classic spiral, or level up with crisp holiday shapes like hearts, stars, candy-cane stripes, and snowflake-inspired bursts. Make one statement shirt for yourself, or batch-dye a whole group for a holiday photo, family reunion, classroom party, or friendsgiving.
Best of all: tie-dye is forgiving. If your lines aren’t perfect, it often looks even better—artsy, playful, and handmade. Grab a few supplies, protect your workspace, and you’ll have holiday party shirts that feel like a celebration all by themselves.
Skill Level, Time & Project Planning
- Skill level: Beginner to Advanced (choose your pattern and color count)
- Active time: 45–90 minutes for 1–4 shirts (more if doing advanced folds)
- Set time (dye batch time): 6–24 hours (hands-off)
- Rinse & wash time: 20–40 minutes
- Best planning tip: Start the day before your party so shirts can batch overnight and dry in time
Materials List (with Recommended Types & Estimated Costs)
Core Supplies
- 100% cotton shirts (white or light colors): $3–$8 each (craft store multipacks are often cheapest)
- Fiber-reactive dye kit (squeeze bottles + powder dye): $12–$25 (look for “tie-dye kit” labeled for cotton)
- Soda ash (sodium carbonate) for pre-soak (if not included in kit): $6–$12 (helps color bond and stay bright)
- Rubber bands (assorted sizes): $3–$6
- Disposable gloves (nitrile recommended): $5–$12
- Plastic table cover or painter’s plastic (at least 6 ft x 9 ft): $2–$6
- Zip-top bags (gallon size) or plastic wrap: $3–$6 (for batching/setting dye)
Helpful Tools for Cleaner Results
- Wire rack + tray (keeps fabric elevated for sharper patterns): $8–$20
- Measuring cup and measuring spoons: $5–$12
- Bucket or wash basin for soda ash soak: $3–$10
- Plastic squeeze bottles (extra set for custom colors): $6–$12
- Marker (washable) for pattern guides: $1–$3
Optional “Party Upgrade” Extras
- Iron-on vinyl or fabric paint pens (add names, dates, or slogans): $8–$20
- Stencils (stars, hearts, snowflakes): $5–$15
- Aprons for guests: $2–$10 each
Best Shirts & Prep for Bright Holiday Tie-Dye
Choose the Right Fabric
- Best: 100% cotton (most vibrant, classic tie-dye look)
- Also works: cotton/poly blends (colors may be softer or “vintage”)
- Avoid for first timers: 100% polyester (needs different dye type)
Pre-Wash (Don’t Skip This)
Wash shirts in warm water with a small amount of detergent and no fabric softener. This removes sizing and finishes that can block dye absorption.
Soda Ash Pre-Soak (Brighter, Longer-Lasting Color)
- Mix 1 cup soda ash per 1 gallon (3.8 L) warm water in a bucket.
- Soak shirts for 15–30 minutes.
- Wring out until damp (not dripping).
Holiday Color Palettes & Theme Ideas (Wearable Party Decorations)
- Fourth of July / Patriotic party: red + blue + a touch of black or purple for depth (leave white space for contrast)
- Halloween party: orange + black + purple (try “reverse tie-dye” on a black shirt for a bold twist)
- Thanksgiving / Friendsgiving: golden yellow + rust + brown + olive (earthy, cozy tones)
- Christmas party: red + green with white space; add gold fabric paint splatter after washing
- Valentine’s Day: pink + red + a hint of purple; heart patterns are perfect here
- St. Patrick’s Day: greens with yellow accents; spiral or shamrock-inspired folds
- Easter: pastel rainbow (pink, lilac, mint, pale yellow) for a soft spring look
Step-by-Step: How to Tie-Dye Holiday Shirts
Step 1: Set Up a Mess-Friendly Dye Station
- Cover your table with plastic (extend at least 12 inches beyond your work area).
- Put on gloves and old clothes.
- Set a wire rack over a tray if you want sharper patterns and less pooling.
- Prepare squeeze bottles according to your dye kit directions (typically warm water + dye powder; shake well).
Step 2: Pick a Pattern (Beginner-Friendly to Advanced)
Pattern A: Classic Spiral (Beginner, Fast, Always Looks Great)
- Lay the damp shirt flat. Pinch the fabric at the center point of your spiral (chest area or slightly off-center).
- Twist into a tight spiral “bun.”
- Add 3–4 rubber bands crossing over the circle to create wedge sections.
Pattern B: Candy Cane Stripes (Beginner/Intermediate, Great for Christmas)
- Lay the shirt flat and smooth out wrinkles.
- Starting at the bottom hem, accordion-fold (pleat) the shirt upward in 1-inch (2.5 cm) folds.
- Band every 2–3 inches (5–7.5 cm).
Pattern C: Heart Burst (Intermediate, Perfect for Valentine’s Day)
- Fold the shirt in half vertically (like closing a book).
- On the folded edge, lightly draw half a heart with a washable marker (about 5–7 inches tall for an adult shirt).
- Accordion-fold along the heart outline, keeping folds tight and aligned.
- Band tightly along the heart line (this resist area helps create the heart shape).
Pattern D: Star Wedges (Intermediate/Advanced, Great for Patriotic Parties)
- Make a spiral as in Pattern A.
- Create more “slices” by adding extra rubber bands (aim for 6–8 wedges).
- Use smaller dye sections with clean white space to mimic starburst energy.
Step 3: Apply Dye (Control the Look with Placement)
- Place the bound shirt on your rack or tray.
- Apply dye one color at a time. Saturate each section until dye soaks through to the underside.
- Flip and repeat to ensure full coverage.
- For crisp holiday palettes, leave some areas undyed to keep white highlights.
Coverage guideline: For an adult T-shirt, plan roughly 2–4 oz (60–120 ml) of mixed dye total, depending on how saturated you want it and how many colors you use.
Step 4: Batch (Let the Dye Set)
- Place the dyed shirt in a gallon zip-top bag or wrap it in plastic wrap.
- Keep it in a warm spot (ideal room temp is 70–80°F / 21–27°C).
- Let it batch for 6–24 hours. Longer batching usually means richer color.
Step 5: Rinse, Wash, and Dry
- Rinse in cold water first (with rubber bands still on) until runoff is lighter.
- Remove rubber bands and continue rinsing, gradually warming the water to warm/hot.
- Wash on warm with a small amount of detergent. For the first wash, wash tie-dye items together.
- Dry as usual, or air-dry to preserve brightness.
Pro Tips for Brighter Color & Cleaner Holiday Patterns
- Use damp fabric, not soaking wet: Too much water dilutes dye and blurs patterns.
- Push dye into folds: Apply dye slowly and squeeze the fabric to help it penetrate.
- Control “muddy brown”: Keep complementary colors (red/green, orange/blue) separated with white space.
- Batch warmer for deeper shades: If your home is cool, set bagged shirts in a closed cooler or near (not on) a gentle heat source.
- Label bottles: Holiday palettes often look similar; a simple label avoids mix-ups.
- Host a tie-dye station at your party: Pre-soak and pre-fold shirts in advance, then let guests choose colors.
Fun Variations (Beginner to Advanced)
Beginner Variations
- Two-color ombré: Pleat the shirt and apply one color at the bottom, one at the top, blending lightly in the middle.
- Single-color ice-dye look (easy version): Use one color and embrace the natural light/dark variations.
- Mini tie-dye: Dye toddler tees, onesies, or bandanas for party favors.
Advanced Variations
- Reverse tie-dye for Halloween: Start with a black cotton shirt, tie it, then apply a bleach solution (work outdoors, ventilate well). Once lightened, neutralize/rinse thoroughly and then dye over for neon effects.
- Geode tie-dye: Create clustered scrunch folds and use 4–6 colors in small bursts for a crystal-like look.
- Stenciled holiday overlay: After washing and drying, add iron-on vinyl stars, names, or party dates for a personalized “event shirt.”
Troubleshooting: Fix Common Tie-Dye Problems
- Colors look pale:
- Use soda ash pre-soak and batch longer (aim for 12–24 hours).
- Ensure the shirt is 100% cotton.
- Use warmer batching conditions.
- White patches where you wanted color:
- Apply dye to both sides and massage into folds.
- Use a rack so dye doesn’t pool away from the fabric.
- Muddy colors:
- Limit to 2–3 colors or separate clashing colors with white space.
- Apply less dye where colors meet.
- Pattern not defined:
- Fold tighter and band more firmly.
- Reduce water content in the shirt (damp, not dripping).
Common Crafting Mistakes to Avoid
- Skipping the pre-wash: Store finishes can repel dye and cause uneven coloring.
- Using fabric softener: It can block absorption and dull results.
- Not protecting your workspace: Dye splashes happen—cover a larger area than you think you need.
- Overloading with too many colors: Holiday tie-dye shines with intentional palettes (2–4 colors is plenty).
- Rinsing too soon: If you rinse before the dye sets, colors wash out.
- Washing tie-dye with regular laundry right away: Do a separate first wash to prevent color transfer.
FAQ: DIY Holiday Tie-Dye Shirts
How many shirts can I make with one tie-dye kit?
Most standard kits handle about 3–10 shirts depending on shirt size, how saturated you dye, and how many colors you use. If you want bold, fully saturated holiday colors, plan closer to the lower end.
Do I really need soda ash?
If your kit includes it, use it. If not, soda ash is the easiest way to get brighter, longer-lasting color on cotton. Without it, the dye may look lighter and fade faster after washing.
What’s the best pattern for a kids’ holiday party?
The spiral and scrunch methods are the most kid-friendly. Pre-band the shirts for younger kids, then let them apply dye to the wedges. It keeps the activity fun and reduces mess.
How do I keep red and green from turning brown for Christmas shirts?
Leave white space or add a buffer color (like a tiny touch of yellow or light green) between red and green sections. Also avoid oversaturating where the colors meet.
Can I tie-dye colored shirts instead of white?
Yes—light pastel shirts can look amazing for Easter or Valentine’s Day. Just remember the base color will mix visually with your dye, so the final result may be more muted or shifted.
How far ahead can I make tie-dye shirts for a party?
You can make them 1–2 weeks ahead. Wash and fully dry, then store folded in a clean, dry bin. If you’re adding iron-on vinyl names or dates, do that after the first wash.
Ready to Make Your Holiday Party More Colorful?
DIY tie-dye shirts bring instant energy to any celebration—plus they’re wearable keepsakes guests actually want to take home. Choose a holiday palette, pick a fold that matches your skill level, and let the dye do its magic. One shirt is fun; a matching set for your group is a whole party theme.
When you’re ready for more DIY crafts, party decorations, and handmade project ideas, explore more creative how-tos on smartpartyprep.com.
More Articles
 How to Draw a Party Hat in 5 Minutes (Even If You Can’t Draw): A Foolproof, Step-by-Step Guide for Kids, Teachers & Party Planners Who Need Instant Printable Art
 10 Creative Custom Stickers Ideas
 DIY Wreaths Using Cricut
 Seasonal Paper Flowers Ideas
 Kids' Craft: Beaded Bracelets
 Budget DIY Custom Stickers Under $25
 DIY Dream Catchers with Dollar Store Supplies
 How to Make a Balloon Arch for a Birthday Party: 7 Foolproof Steps (No Glue Gun, No Experience, No Stress — Just Gorgeous Results in Under 90 Minutes)
 How to Make Party in Infinite Craft (Step-by-Step Guide): The 4 Hidden Combinations You’re Missing — Plus Why ‘Fire + Music’ Fails Every Time
 DIY Balloon Arches for Anniversaries