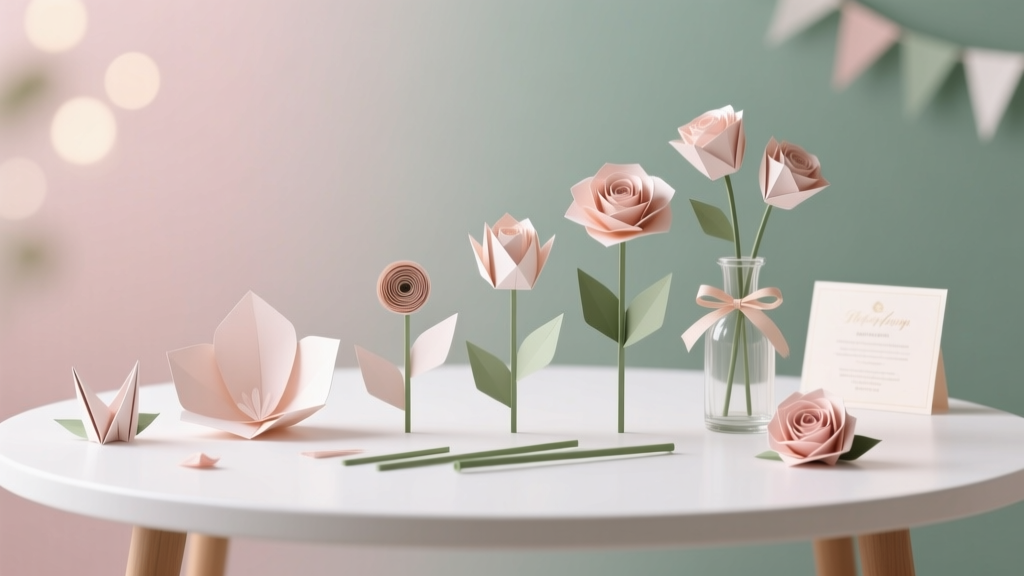
Step-by-Step Paper Flowers Tutorial
Paper flowers are one of those DIY crafts that instantly make a party feel styled and intentional—without needing fresh florals or a big budget. Whether you’re decorating a birthday backdrop, dressing up a dessert table, building a baby shower photo wall, or adding handmade details to wedding décor, paper flowers deliver major impact with simple supplies.
The best part? You can customize everything: size, colors, petal shapes, and even the “personality” of each bloom. Make a giant statement flower for a balloon garland backdrop, a cluster of small blooms for party centerpieces, or a whole bouquet for gift giving. This tutorial is designed for beginners, but it also includes advanced variations so you can level up your paper flower game as you go.
Expect a practical, step-by-step approach with measurements, time estimates, and troubleshooting tips—so you can create party-ready handmade decorations that look polished and professional.
Project Overview (Skill Level, Time, and Uses)
- Skill level: Beginner to Intermediate (advanced options included)
- Time estimate:
- 1 medium flower (6–8 inches): 20–35 minutes
- 1 large flower (10–14 inches): 35–60 minutes
- Set of 6 party flowers: about 2.5–4 hours
- Great for: DIY party decorations, photo backdrops, balloon garland pairings, wall décor, centerpieces, cake table styling, handmade gifts
Materials & Tools (With Estimated Costs)
Paper Options (Pick One)
- Cardstock (65–80 lb) – best for crisp petals and larger flowers. Estimated cost: $6–$15 for a multipack.
- Crepe paper (single or double) – best for realistic, stretchy petals and ruffled edges. Estimated cost: $8–$20 for a set.
- Tissue paper – best for fluffy pom-pom style flowers and budget party décor. Estimated cost: $3–$10 per pack.
Adhesives
- Low-temp hot glue gun + glue sticks (recommended for speed and strength). Estimated cost: $10–$25 for gun; $5–$10 for sticks.
- Craft glue (PVA) for slower, adjustable assembly. Estimated cost: $3–$8.
- Double-sided tape for lightweight flowers or quick party prep. Estimated cost: $4–$10.
Tools
- Scissors (8-inch comfort grip recommended). Estimated cost: $6–$15.
- Optional precision scissors for detailed petals. Estimated cost: $6–$12.
- Ruler (12-inch) and pencil. Estimated cost: $2–$6.
- Bone folder or the back of a butter knife (for curling cardstock). Estimated cost: $0–$8.
- Floral wire (18–22 gauge) for stems (optional). Estimated cost: $4–$10.
- Floral tape (optional, for stems). Estimated cost: $4–$8.
- Circle cutter or a cup/bowl to trace (optional). Estimated cost: $0–$12.
Party-Friendly Extras (Optional)
- Command strips or removable mounting putty for hanging flowers. Estimated cost: $5–$12.
- Wooden dowels for photo booth props. Estimated cost: $3–$8.
- Glitter spray or metallic paint pen for accents. Estimated cost: $6–$12.
Choose Your Flower Style
Style A: Layered Cardstock Flower (Best for Backdrops)
This tutorial focuses on a layered cardstock flower because it’s sturdy, beginner-friendly, and perfect for DIY party decorations like backdrops and wall clusters.
Style B: Crepe Paper Flower (Best for Realistic Bouquets)
Crepe paper flowers look wonderfully lifelike and soft. Keep reading for crepe variations in the Pro Tips section.
Style C: Tissue Paper Puff Flower (Fastest Option)
If you need a lot of flowers quickly for a party, tissue puff flowers are speedy—check the Variations section for a quick method.
Step-by-Step Instructions: Layered Cardstock Paper Flower
Step 1: Decide Your Flower Size
- Medium party flower: 6–8 inches wide (great for centerpieces)
- Large statement flower: 10–14 inches wide (great for backdrops)
Measurement guide: You’ll build the flower with 3 petal layers plus a center.
- Large flower base circle: 4.5 inches diameter
- Medium flower base circle: 3.5 inches diameter
Step 2: Cut Petals (Use This Simple Petal Template)
Cut three petal sizes. Each petal is a rounded “teardrop” shape.
- Large petals: 10 petals, each about 5 inches tall x 3 inches wide
- Medium petals: 8 petals, each about 4 inches tall x 2.5 inches wide
- Small petals: 6 petals, each about 3 inches tall x 2 inches wide
Beginner-friendly shortcut: Fold the cardstock and cut 2–4 petals at a time to speed things up. If your scissors struggle, reduce the stack thickness.
Step 3: Shape the Petals for Dimension
This is where flat paper starts looking like a real flower.
- Curl the top edges: Use a bone folder (or the back of a butter knife) and gently pull the petal edge over it to curl outward.
- Create a “cup” shape: Cut a small slit at the bottom center of each petal, about 1/2 inch deep.
- Overlap the slit edges: Add a small dot of hot glue and overlap one side over the other by about 1/4 inch. Hold for 3–5 seconds.
What you’ll see: The petal should stand up slightly instead of laying flat.
Step 4: Prepare the Flower Base
- Cut a cardstock circle:
- Large: 4.5-inch circle
- Medium: 3.5-inch circle
- If you want a stem, poke a small hole in the center and thread floral wire through (about 8–12 inches long). Secure with hot glue on the back.
Step 5: Glue the First Layer (Large Petals)
- Place the base circle in front of you.
- Glue the 10 large petals around the outer edge, spacing evenly like a clock.
- Angle each petal slightly upright for a fuller look.
Tip for symmetry: Glue petals in pairs opposite each other (12 and 6 o’clock, 3 and 9 o’clock) before filling gaps.
Step 6: Add the Second Layer (Medium Petals)
- Glue 8 medium petals inside the first layer.
- Stagger them so each medium petal lands between two large petals.
Step 7: Add the Third Layer (Small Petals)
- Glue 6 small petals closer to the center.
- Angle them more upright than the outer petals for a natural bloom shape.
Step 8: Make the Flower Center (3 Easy Options)
Option 1: Fringe Center (Most Popular for Party Flowers)
- Cut a strip of cardstock: 1.5 inches tall x 12 inches long.
- Make fringe cuts every 1/8–1/4 inch, stopping about 1/4 inch from the bottom edge.
- Roll tightly into a coil, gluing as you go.
- Fluff the fringe and glue the coil into the center of the flower.
Option 2: Spiral Rose Center (Elegant and Easy)
- Cut a spiral circle (about 4 inches wide) from cardstock.
- Roll from the outside inward, then let it loosen slightly.
- Glue the base closed and attach to the flower center.
Option 3: Pom-Pom Center (Soft and Playful)
- Use a small craft pom-pom (1–1.5 inches).
- Hot glue it to the center for instant texture.
Step 9: Final Shaping
- Gently bend a few petals outward and a few inward for a more natural look.
- If the flower looks too flat, re-curl the top edges and lift the inner petals more upright.
Pro Tips for Professional-Looking Paper Flowers
- Use low-temp hot glue if you’re new—less stringy, more forgiving, fewer burnt fingertips.
- Mix petal shapes for realism: round petals on the outside, slightly pointy petals toward the center.
- Create an ombré effect using 2–3 shades of the same color: darkest center, lighter outer petals.
- Double up paper for mega flowers: If making a 16–20 inch giant bloom, use heavier cardstock (80–100 lb) or glue two petals together for strength.
- Crepe paper upgrade: Stretch crepe paper gently at the center of each petal to create a natural “cup,” and ruffle edges by pulling slightly along the top.
- Backdrop-ready mounting: Glue a small folded cardstock tab to the back (like a loop), then hang with removable hooks or thread onto a backdrop frame.
Creative Variations for Party Decorations
1) Giant Statement Flowers for Photo Backdrops
- Increase petal sizes by 25–50%.
- Add an extra layer: 12 large, 10 medium, 8 small petals.
- Pair with a balloon garland for a high-impact DIY party backdrop.
2) Mini Flowers for Table Scatter or Cake Table Décor
- Reduce petal sizes: 2.5", 2", 1.5" tall petals.
- Use a 2-inch base circle.
- Glue to toothpicks or skewers for cupcake toppers (let glue cool fully before placing near food).
3) Tissue Paper Puff Flower (Quick Party Prep)
- Stack 8–12 sheets tissue paper (10x14 inches).
- Accordion fold in 1-inch sections.
- Twist a pipe cleaner around the center.
- Round the ends with scissors, then gently separate layers to fluff.
4) Luxury Metallic Accents
- Add gold foil paper as the center layer.
- Use a metallic paint pen to edge petals.
- Lightly dust with glitter spray (spray outdoors and let dry 20–30 minutes).
Troubleshooting: Fix Common Paper Flower Problems
- My flower looks flat. Re-curl petal edges, deepen the bottom slit to 3/4 inch, and overlap the base more to create stronger cupping.
- Petals won’t stick. Make sure you’re gluing to paper (not glossy coating). Use fresh glue sticks and hold each petal 3–5 seconds until set.
- Hot glue strings are everywhere. Use low-temp glue, work in short dabs, and let glue cool a second before pressing pieces together.
- My layers look uneven. Start with four anchor petals at 12/3/6/9 o’clock, then fill in between.
- Center keeps popping out. Apply glue around the full base of the center piece (a ring of glue, not one dot) and press firmly.
Common Crafting Mistakes to Avoid
- Skipping petal shaping: Cutting is only half the look—curling and cupping petals creates the wow factor for handmade decorations.
- Using paper that’s too thin for big flowers: Lightweight paper sags. For large party backdrop flowers, choose sturdier cardstock or reinforce petals.
- Over-gluing: Too much glue makes bumps and stiff petals. Use small dabs, especially on inner layers.
- Rushing the center: A neat center hides small imperfections and makes the flower look finished.
- Mounting without a plan: Before making 10 flowers, test how you’ll hang them (hooks, backdrop stand, foam board, or a wall-safe adhesive).
FAQ: Paper Flowers for DIY Party Decorations
How many paper flowers do I need for a party backdrop?
For a standard 5x7 ft backdrop area, a balanced cluster often uses 8–14 flowers in mixed sizes (for example: 3 large, 5 medium, 4 small) plus greenery or streamers to fill gaps.
What’s the best paper for beginners?
65–80 lb cardstock is the easiest to control and holds its shape well. If you prefer softer, more realistic petals and don’t mind a learning curve, try crepe paper.
Can I make paper flowers ahead of time?
Yes—paper flowers are ideal make-ahead party décor. Store them in a large box with tissue paper between layers. Avoid heavy stacking so petals don’t get crushed.
How do I attach paper flowers to a wall without damage?
Use removable hooks, Command strips, or mounting putty. A sturdy option is to attach flowers to foam board first, then mount the board with wall-safe strips.
How do I make a paper flower with a stem?
Use 18–22 gauge floral wire and secure it through the base circle with hot glue. Wrap with floral tape, and add paper leaves if you’d like.
Can kids help with this project?
Yes—with supervision. Kids can trace and cut petals (safety scissors work well) and help curl edges. Adults should handle the hot glue gun, or swap to double-sided tape for safer assembly.
Bring Your Party Décor to Life with Handmade Paper Flowers
Paper flowers are one of the most satisfying DIY crafts because they’re fast to personalize and instantly transform a space. Start with one medium bloom to get the hang of shaping and layering, then build a full party-ready set in your favorite color palette. Once you see how easy it is to create a statement flower wall or a dreamy dessert table accent, you’ll want to make them for every celebration.
Want more handmade projects, party decorations, and creative DIY crafts? Explore more ideas on smartpartyprep.com and keep your next event extra special—one craft at a time.
More Articles
 No-Sew Beaded Bracelets Tutorial
 DIY Painted Canvas for Weddings
 DIY Dream Catchers with Dollar Store Supplies
 How to Make Party Hats Out of Construction Paper in Under 12 Minutes (No Glue Gun, No Scissors Required for Kids!) — 7 Foolproof Designs That Actually Stay On Heads
 How to Allow Third-Party Cookies on Chrome iPad in 2024: The Only 4-Step Guide That Actually Works (No More ‘Settings Not Found’ Errors)
 DIY Vision Boards in 10 Minutes
 How to Make a Slumber Party Tent in Under 20 Minutes (No Sewing, No Special Tools — Just Blankets, Chairs & Kid-Approved Magic)
 Personalized Centerpieces Gifts
 Easy Balloon Arches for Beginners
 How to Make a Paper Party Hat in Under 12 Minutes (No Glue Gun, No Scissors Required — Just Printer Paper & a Stapler)