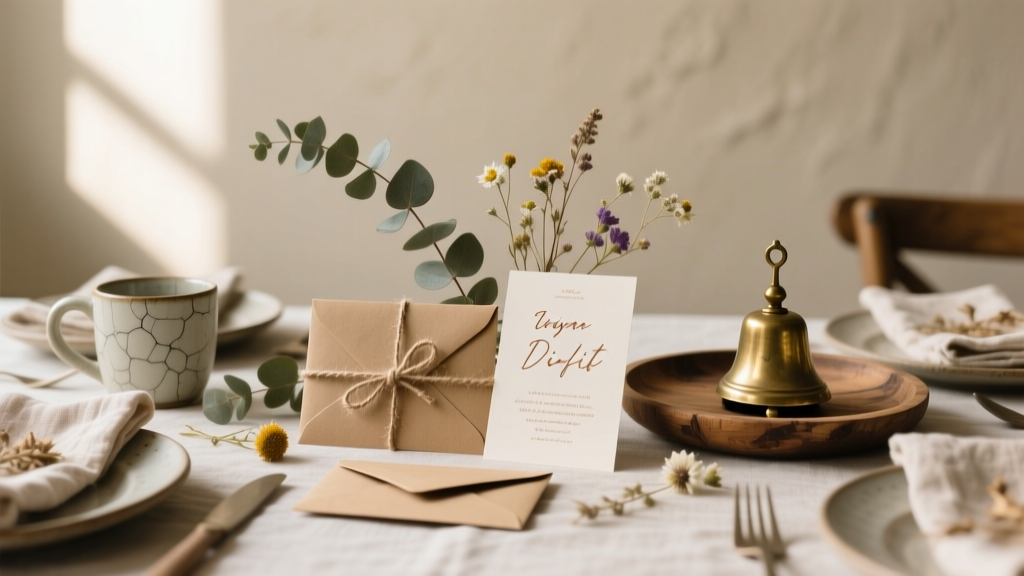
Rustic Invitations Ideas (That You Can DIY at Home)
Rustic invitations are one of those party details that instantly set the mood. Whether you’re planning a barn wedding, a cozy fall baby shower, a woodland birthday, or a “backyard under the lights” graduation party, a handmade rustic invite makes your event feel personal before guests even arrive.
The best part: you don’t need fancy machines or professional printing to make them look polished. With a few budget-friendly supplies—kraft paper, twine, simple stamps, and a touch of greenery—you can create DIY party invitations that look boutique-worthy and still fit your schedule.
This guide shares multiple rustic invitation ideas (from super beginner-friendly to “wow, you made that?!”), plus step-by-step instructions, measurements, time estimates, and practical tips to help you avoid common crafting pitfalls.
Quick Project Overview
- Skill level: Beginner to Intermediate (advanced options included)
- Time estimate: 60–120 minutes for 10 invitations (plus drying time if using ink/paint)
- Typical finished size: 5 in x 7 in invitation card (fits A7 envelope)
- Best for: Weddings, bridal showers, baby showers, engagement parties, birthday parties, anniversary parties, rehearsal dinners, holiday gatherings
Materials List (With Product Types + Estimated Costs)
Costs vary by brand and what you already have. These estimates assume you’re making about 10–20 invitations.
Paper & Cardstock
- Kraft cardstock (8.5 in x 11 in, 65–80 lb): $8–$15 (pack of 25–50 sheets)
- White cardstock (for printed insert, 65–80 lb): $6–$12
- Deckle edge paper (optional, for torn-edge look): $10–$20
- Vellum sheets (optional belly bands/overlays): $6–$12
Adhesives & Assembly
- Double-sided tape runner (clean, fast): $6–$12
- Glue dots (best for twine, mini pinecones, small embellishments): $4–$8
- PVA craft glue (optional for heavier layers): $3–$6
Rustic Details
- Jute twine or baker’s twine: $3–$8
- Mini clothespins (optional): $3–$6
- Dried pressed flowers or faux greenery sprigs: $6–$15
- Rubber stamp set (florals, leaves, woodgrain, “you’re invited”): $8–$20
- Ink pads (brown, black, olive, terracotta): $5–$15
- Wax seal kit (optional): $12–$30
Cutting & Tools
- Paper trimmer (recommended over scissors for clean edges): $15–$35
- Metal ruler + craft knife (for precise trims): $8–$20
- Corner rounder punch (optional): $6–$12
- Bone folder (optional but helpful for crisp folds): $5–$10
- Self-healing cutting mat (optional): $10–$20
Envelopes & Mailing
- A7 envelopes (5.25 in x 7.25 in): $8–$15 (pack of 25)
- Address labels or fine-tip paint pen for hand lettering: $4–$10
- Postage: varies; weigh one completed invite at the post office if adding wax seals or bulky accents
Pick Your Rustic Invitation Style
Mix and match these ideas—rustic DIY crafts are all about texture, layering, and a handmade feel.
1) Kraft + Printed Insert (Classic Rustic)
- Kraft cardstock base with a clean printed white insert
- Twine wrap or small tag for a farmhouse vibe
2) Deckle Edge Invitations (Soft, Handmade Look)
- Torn-edge paper mimics artisan stationery
- Beautiful for weddings, showers, and elegant rustic themes
3) Vellum Belly Band + Greenery
- Wrap vellum around the invitation and seal with a wax stamp or sticker
- Add a tiny sprig of faux eucalyptus or dried flower
4) Stamped Woodgrain or Botanical Border
- Create a rustic frame using stamps and earthy ink tones
- No special printer needed if you handwrite or use letter stamps
5) Postcard-Style Rustic Invites (Fast + Budget-Friendly)
- Single 5 in x 7 in card—no folding, minimal layers
- Great for birthday parties, casual showers, and last-minute events
Step-by-Step: Rustic Kraft Invitation with Twine + Tag
This is the most versatile “go-to” rustic invitation. You can keep it simple for a beginner-friendly project or upgrade it with wax seals and layered paper.
Measurements & Cut List (Per Invitation)
- Kraft base: 5 in x 7 in (cut from 8.5 in x 11 in)
- White insert: 4.5 in x 6.5 in (gives a clean 0.25 in border all around)
- Twine: 20–24 in length (enough to wrap and tie a bow)
- Mini tag (optional): about 1.25 in x 2.25 in
Tools Recommended
- Paper trimmer (for quick, consistent cuts)
- Tape runner or double-sided tape
- Scissors (for trimming twine)
- Corner rounder (optional, softens the look)
Step 1: Design and Print the Invitation Text
- Set your document size to 4.5 in x 6.5 in (or design on 5 in x 7 in if you’re doing a single-layer postcard style).
- Use readable fonts and strong contrast. For rustic party invitations, pair:
- a simple serif for details (time, date, address)
- a script accent for the name or event title (optional)
- Print one test page on regular paper first, then print on white cardstock.
Time saver: Print extras. A couple inevitably smudge, misprint, or get trimmed slightly off.
Step 2: Cut the Kraft Base and White Insert
- Trim kraft cardstock to 5 in x 7 in.
- Trim the printed white insert to 4.5 in x 6.5 in.
- Optional: Round corners on both layers for a softer rustic look (do it consistently on every card).
Consistency tip: Stack and cut with the trimmer’s guide, or use a “master template” card as a reference.
Step 3: Adhere the Insert to the Kraft Base
- Flip the printed insert over.
- Apply tape runner along all four edges (stay about 1/8 in from the edge to prevent adhesive squeeze-out).
- Center the insert on the kraft base with an even border (0.25 in on all sides).
- Press firmly, especially around corners.
Step 4: Add Twine Wrap (and Optional Tag)
- Wrap twine around the invitation horizontally (about 1/3 down from the top is a classic placement).
- Flip the invite over and cross the twine ends to keep it snug.
- Flip back to the front and tie a simple bow or a double knot.
- If using a tag, punch a hole in the tag and thread it onto the twine before tying.
Optional upgrade: Add a tiny dried flower tucked under the twine and secure it with a mini glue dot on the back side of the sprig.
Step 5: Final Check + Envelope Stuffing
- Check for smudges, crooked inserts, or loose twine.
- Place each invitation in an A7 envelope.
- If you’re adding wax seals to the envelope flap, consider mailing in an outer envelope to protect it (or use flexible wax seals made for mailing).
Pro Tips for a Polished Rustic Look
- Stick to a color palette: kraft + white + one accent (sage, terracotta, burgundy, navy) feels intentional.
- Use texture strategically: twine, vellum, deckle edges, and a single botanical element are usually enough.
- Mass-produce in stages: cut everything first, then assemble, then add twine, then embellish. This keeps your DIY party project moving fast.
- Print settings matter: choose “Best” quality and the correct paper type if your printer offers it.
- Keep embellishments flat for mailing: chunky items (pinecones, thick wood pieces) look adorable but can raise postage costs and get crushed.
Beginner-Friendly Adaptations
- No printer? Use alphabet stamps for the event title and handwrite the details with a fine-tip marker.
- No paper trimmer? Use a metal ruler + craft knife on a cutting mat for straighter edges than scissors.
- Short on time? Skip layers. Print directly on kraft cardstock (test first—some printers struggle with thick stock).
- New to design? Keep spacing generous and fonts minimal. A clean layout always reads “professional.”
Advanced Variations (For Extra “Wow”)
Wax Seal Vellum Belly Band
- Cut vellum to 2 in x 11 in (trim to wrap around your 5 x 7 card with a slight overlap).
- Secure with a small piece of double-sided tape on the back.
- Add a wax seal at the front center (or use a wax seal sticker for less mess).
Deckle Edge Layering
- Use deckle edge paper for the printed text, then mount it onto kraft.
- Keep your border slightly larger: try a 4.75 in x 6.75 in deckle layer on a 5 x 7 base for a fuller look.
Stamped Botanical Frame
- Stamp corners with leafy patterns in olive or brown.
- Heat-set ink carefully (low heat, keep the heat tool moving) to reduce smudging.
Troubleshooting: Fix Common Issues Fast
- My printed text smears. Let prints dry for 10–15 minutes before stacking. Consider switching to a matte cardstock that’s inkjet-friendly.
- The insert is crooked. Lightly pencil alignment marks on the kraft base, or use a gridded cutting mat to line up edges.
- Twine keeps sliding. Add a tiny glue dot on the back side to “anchor” the twine in place.
- Cardstock is cracking when folded. Score the fold line first (bone folder + ruler) and fold gently. Use 65–80 lb stock for easier folding.
- Embellishments fall off. Use glue dots for textured items and press firmly for 10 seconds. For heavier items, use a small dab of PVA glue and allow drying time.
Common Crafting Mistakes to Avoid
- Skipping a test print: Always test on plain paper to confirm spacing, margins, and spelling.
- Using too many textures at once: Rustic doesn’t mean cluttered. Choose 1–2 “hero” elements (twine + greenery, or vellum + wax seal).
- Cutting as you go: Batch cutting keeps sizes consistent and speeds up assembly.
- Forgetting postal reality: Wax seals, thick layers, and 3D decor can raise postage. Assemble one complete invite and weigh it before making 30.
- Not buying extra envelopes: Order 10–20% more than you need for misprints and last-minute guest additions.
- Over-gluing: Liquid glue can warp paper. Use tape runners for flat layers and glue dots for accents.
FAQ: Rustic DIY Invitations
What’s the easiest rustic invitation idea for beginners?
A single-layer 5 in x 7 in kraft postcard-style invite with printed text and a simple twine bow is the fastest, least fussy option. No layering required.
Can I make rustic invitations without a cutting machine?
Yes. A paper trimmer (or ruler + craft knife) handles nearly everything. Rustic styles actually look better with simple cuts, torn edges, and handmade imperfections.
How do I keep rustic invitations readable on kraft paper?
Print your details on a white or cream insert and mount it to kraft cardstock. If you print directly on kraft, use dark ink and larger font sizes (at least 11–12 pt for body text).
How far in advance should I make handmade party invitations?
Plan to start 2–3 weeks before you want to mail them. That gives you time for test prints, supply runs, drying time (if stamping), and any re-dos.
What rustic embellishments are safest for mailing?
Flat embellishments like vellum bands, thin twine, lightweight paper tags, and dried pressed flowers (very thin) are easiest to mail. Bulky items may require extra postage or hand-canceling.
How can I tie the invitations into my rustic party decorations?
Repeat the same elements—twine, kraft paper, and greenery—on place cards, favor tags, dessert table signs, and DIY centerpieces for a coordinated rustic party theme.
Wrap-Up: Make Rustic Invitations That Feel Like You
Rustic invitations are a satisfying DIY craft because you get that “handmade charm” without needing complicated techniques. Start with a simple kraft base and a clean insert, then add twine, a tag, or a touch of greenery until it matches your party theme perfectly. A small detail—like a deckle edge or a wax seal—can make the whole design feel extra special.
Try one style, make a single finished sample, and then batch-produce the rest with confidence. Your guests are going to love getting something handmade in the mail.
Looking for more DIY party decorations and handmade project ideas? Browse fresh inspiration and step-by-step craft tutorials on smartpartyprep.com.
More Articles
 Budget DIY Mason Jar Crafts Under $5
 What Is Party Craft? (And Why Your Next Celebration Doesn’t Need Store-Bought Decor — Here’s the Real, Low-Stress, High-Joy Definition Most People Get Wrong)
 How to Turn On 3rd Party Cookies in 2024: A Step-by-Step Guide for Chrome, Safari, Firefox & Edge (Without Breaking Your Privacy or Site Functionality)
 Paper Craft Backdrops Ideas
 How to Install 3rd Party Apps on LG Smart TV (2024): The Only Safe, Step-by-Step Method That Actually Works — No Hacks, No Bricking, No Developer Mode Confusion
 Upcycled Paper Lanterns from Recycled Materials
 Advanced Photo Frames for Crafters
 Kids' Craft: Wreaths
 Step-by-Step Fabric Bunting Tutorial
 How to Record Xbox Party Chat in 2024: The Only Step-by-Step Guide That Actually Works (No Capture Card Required)