How to Make Dream Catchers at Home
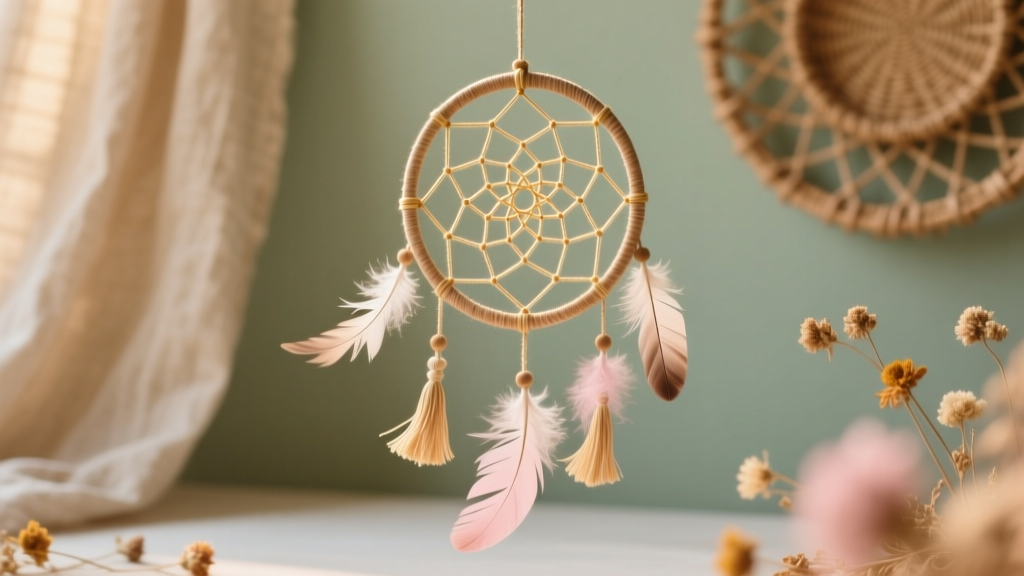
Dream catchers are one of those DIY crafts that feel instantly special—part decoration, part keepsake, and completely customizable. Whether you’re planning a boho birthday party, a whimsical baby shower, or a cozy sleepover setup, a handmade dream catcher adds texture, movement, and that “wow, you made that?” factor to your party decorations.
Even better: dream catchers are friendly to beginners (a simple hoop + web + ribbon goes a long way), but they also have tons of room for creativity if you love leveling up your handmade projects. You can match party color palettes, add personalized name charms, or create mini dream catchers as guest favors. With a few inexpensive craft supplies and some patience, you’ll have a finished piece that looks boutique-quality.
This guide walks you through materials, step-by-step instructions, pro tips, common mistakes, and variations—from quick kids’ crafts to advanced woven designs—so you can confidently make dream catchers at home for parties and everyday decor.
Skill Level, Time, and What You’ll Make
- Skill level: Beginner to Intermediate (advanced options included)
- Active time: 45–90 minutes (simple web); 2–3 hours (detailed weaving + embellishments)
- Drying time: 20–40 minutes if you glue knots or add painted elements
- Finished size: Common hoop sizes: 4 in, 6 in, 8 in, 10 in diameter
- Great for: DIY party decorations, photo backdrops, wall decor, party favors, kids’ craft tables
Materials List (with Estimated Costs)
Costs vary by location and whether you’re buying singles or bulk packs. These estimates assume budget-friendly craft store or online multipacks.
Base Supplies
- Hoop (metal ring or embroidery hoop) – 6–8 in recommended for first-time makers ($1–$5 each)
- Wrapping material (choose one):
- Cotton cord (2–3 mm) ($4–$8 per spool)
- Suede lace (1/8 in to 1/4 in) ($5–$10 per roll)
- Satin ribbon (3/8 in to 1 in wide) ($3–$7 per roll)
- Web thread (choose one):
- Waxed cotton cord (best for beginners) ($5–$10)
- Embroidery floss (more delicate look) ($1–$3 per skein)
- Nylon beading thread or fishing line (nearly invisible; trickier tension) ($3–$7)
Hanging Strands + Decor
- Yarn, ribbon, lace trims, or macramé cord for tails (2–6 strands, 18–30 in each) ($3–$10)
- Feathers (craft feathers or natural—washed/dried) ($4–$10 per pack)
- Beads (wood, acrylic, glass; 6–20 pieces) ($3–$10)
- Optional charms (moon, star, letter beads for names) ($3–$10)
Tools (Recommended)
- Sharp scissors (fabric scissors or craft scissors)
- Tape measure or ruler
- Hot glue gun + glue sticks (optional but helpful) ($10–$20 for a basic set)
- Large-eye needle (yarn needle) for threading beads ($1–$3)
- Clips or clothespins to hold ribbon ends while wrapping (optional)
Budget Snapshot (Per Dream Catcher)
- Budget build: $4–$8 (simple hoop, yarn tails, a few beads)
- Party-perfect build: $8–$18 (wrapped hoop, feathers, mixed ribbons, charm)
- Premium/advanced build: $15–$30 (macramé cord, quality feathers, special beads, layered hoops)
Choosing a Style for Your Party Theme
Before cutting anything, decide how your dream catcher will function as party decor:
- Backdrop cluster: Make 3–7 dream catchers in different sizes (4 in, 6 in, 8 in, 10 in) and hang them together.
- Chair backs: Use 4–6 in hoops with shorter tails (12–16 in) so they don’t drag.
- Party favors: Mini dream catchers (2.5–4 in) with simple webbing—fast and cute.
- Table decor: Use a single 6–8 in dream catcher on a stand or lay it flat as a centerpiece accent.
Color tip: Pick 2–3 main colors plus 1 metallic (gold/silver) for beads or charms to keep your handmade decorations looking cohesive.
Step-by-Step: How to Make a Classic Dream Catcher
Step 1: Measure and Wrap the Hoop
Time: 10–25 minutes
- Cut wrapping material:
- For a 6–8 in hoop, start with 2.5–3 yards (90–110 in) of ribbon or cord.
- If using thick yarn or fabric strips, you may need less.
- Anchor the end: Tie a small knot around the hoop, or place a tiny dot of hot glue to secure the first inch.
- Wrap tightly: Wrap at a slight angle, overlapping each pass just enough so the hoop doesn’t show through.
- Finish neatly: When you reach the starting point, cut the end, tuck it under a few wraps, and secure with a knot or a small dab of glue.
Beginner-friendly option: Skip full wrapping and just wrap the top third of the hoop (where it hangs). It’s faster and still looks polished.
Step 2: Add the Hanging Loop
Time: 2–5 minutes
- Cut a 10–14 in piece of ribbon/cord.
- Tie both ends to the top of the hoop with tight double knots.
- Adjust the loop height so it hangs straight.
Step 3: Create the Web (Basic Loop Webbing)
Time: 20–45 minutes
This method creates the classic dream catcher “spokes” with evenly spaced loops around the hoop.
- Cut web thread: Use about 3–5 yards (110–180 in) for a 6–8 in hoop. It’s better to have extra than run short.
- Tie to the hoop: Tie a secure double knot near the top (next to the hanging loop). Leave a 3–4 in tail (you can trim later).
- Make your first loop: Move about 1.5–2 in along the hoop. Bring the thread over the hoop and pull the tail through to create a loop knot (like a lark’s head around the hoop).
- Continue around: Repeat the same loop knot all the way around the hoop, keeping spacing consistent. Most 6–8 in hoops look great with 12–18 loops.
- Start the second round: Instead of looping around the hoop, loop into the middle of each previous loop. This pulls the web inward.
- Add beads (optional): Thread a bead onto the cord before making a loop, then position it where you want it to sit in the web.
- Close the center: When the center opening is about the size of a nickel to quarter (3/4–1 in), tie a firm knot to secure.
- Finish clean: Tie off with 2–3 knots. Trim ends or tuck them under nearby loops. Add a tiny dot of glue if you want extra security.
Tension check: The web should be snug and evenly spaced, but not so tight that the hoop bends or your loops bunch up.
Step 4: Add Tails (Ribbons, Yarn, Lace) + Feathers
Time: 10–20 minutes
- Cut strands: For a wall-hanging dream catcher, cut 4–8 strands in lengths of 18–30 in. Vary the lengths for a layered look.
- Attach to the bottom: Fold each strand in half and lark’s-head knot it to the hoop, or tie individual knots spaced evenly.
- Add feathers: Tie or glue feathers onto the ends of selected strands. For a cleaner look, slide a bead over the strand and “cap” the feather quill beneath it.
- Trim for shape: Hang it up and trim tails into a gentle V-shape or uneven boho lengths.
Step 5: Final Touches for Party-Ready Polish
- Hide knots: Cover messy knots with a small charm, bow, or a tiny wrap of ribbon.
- Match your party theme: Add letter beads for a guest of honor’s name, or mini star charms for a celestial party.
- Hang test: Hold it at arm’s length. If it tilts, shift tails slightly left/right until it balances.
Pro Tips for Cleaner, Faster Results
- Use clips while wrapping: Clothespins or binder clips hold your ribbon end in place so it doesn’t unravel mid-wrap.
- Pre-plan bead placement: Decide whether beads go in the web, on the tails, or both. Too many beads in the web can make it sag.
- Keep loop spacing consistent: Mark the hoop lightly with pencil every 1.5–2 in for perfectly even loops (great for beginners).
- Choose the right thread: Waxed cotton cord is forgiving and grips knots well—ideal for DIY beginners.
- Batch-cut for parties: If you’re making multiples (party favors or backdrop sets), cut all ribbons and cords assembly-line style first.
Dream Catcher Variations (Beginner to Advanced)
Beginner Variations
- Mini dream catchers: Use 2.5–4 in rings and make only 2–3 web rounds for speed. Perfect for party favors or gift tags.
- No-weave center: Stretch crisscross lines across the hoop like a simple star pattern, then tie at the center.
- Fabric-scrap tails: Use leftover party tablecloth fabric, tulle, or gift wrap ribbon for a coordinated look.
Intermediate Variations
- Ombré wrap: Wrap the hoop using two colors, blending halfway for a gradient effect (great for birthday party decor).
- Floral hoop accent: Glue faux flowers (1–3 in blooms) to one side of the hoop—ideal for bridal showers and baby showers.
- Layered textures: Mix lace, velvet ribbon, and macramé cord in the tails for a boutique look.
Advanced Variations
- Double-hoop dream catcher: Connect a smaller hoop inside a larger hoop with wrapped cord, then weave separate webs.
- Macramé net web: Use square knots and spiral knots instead of loop webbing for a dramatic statement piece.
- Beaded fringe: Create long beaded strands (8–12 in) hanging below the hoop for a glam party backdrop vibe.
Troubleshooting: Fixes for Common Issues
- My web looks uneven: Count your first-round loops (aim for 12–18). If spacing varies, redo the first round—everything builds from that base.
- The center hole won’t close: Your tension may be too loose. Gently tighten each loop round by round, then tie off when the hole is 3/4–1 in.
- My knots slip: Switch to waxed cord or add a tiny dot of glue on the final knot (especially helpful for party decor that gets transported).
- The hoop shows through the wrap: Wrap with more overlap, or choose wider ribbon (5/8–1 in) for quicker coverage.
- It hangs crooked: Your tails may be heavier on one side. Remove one heavy strand or redistribute beads evenly.
Common Crafting Mistakes to Avoid
- Starting with a huge hoop: A 12–14 in hoop can feel overwhelming. Start with 6–8 in to learn the web pattern comfortably.
- Cutting web thread too short: Running out mid-web is frustrating. When in doubt, cut extra—unused thread is better than re-tying.
- Inconsistent first-round spacing: If the first loop ring is uneven, the entire web will look lopsided.
- Over-gluing: Hot glue can show and harden awkwardly. Use tiny dots only where needed (end wraps, final knots, feather quills).
- Too many heavy embellishments: Large beads and thick charms can drag the web down or tilt the hoop. Balance weight left-to-right.
- Not testing hang length: Hold it up or hang it temporarily before trimming tails—gravity changes how it looks.
FAQ: Dream Catchers at Home
1) What’s the easiest dream catcher for beginners?
A 6 in hoop with waxed cotton cord for the web and 4–6 ribbon tails is the simplest. Use evenly spaced loops (about 12–14) and stop weaving when the center hole is around 1 in.
2) How much cord do I need for the web?
For a 6–8 in hoop, plan on 3–5 yards of web thread. If you’re adding beads, cut closer to 5 yards so you have room for threading and knots.
3) Can kids make dream catchers for a party craft table?
Yes—with a simplified approach. Pre-wrap hoops, pre-cut tails, and have kids do a basic crisscross center or a first-round loop web only. Use plastic beads and skip hot glue (use tacky glue with adult help).
4) What can I use if I don’t have feathers?
Try tassels, pom-poms, felt shapes (stars/hearts), paper butterflies, or extra ribbon fringe. These options work especially well for DIY party decorations and are easy to match to a theme.
5) How do I make dream catchers look more “professional”?
Wrap the hoop fully with tight overlap, keep loop spacing consistent, limit your palette to 2–3 colors, and finish knots cleanly (trim close and secure with a tiny dot of glue). Balanced tails and bead placement also make a big difference.
6) How do I hang dream catchers for a party backdrop?
Use removable hooks or a backdrop stand. Hang at different heights using clear fishing line or matching ribbon. Cluster odd numbers (3, 5, 7) for a fuller, styled look in photos.
Wrap-Up: Your Handmade Dream Catcher, Your Style
Making dream catchers at home is one of those DIY crafts that checks every box: affordable, relaxing, customizable, and seriously party-friendly. Whether you’re crafting one statement piece for a wall display or creating a whole set for a birthday party backdrop, you can tailor every detail—colors, textures, charms, and length—to fit your celebration.
Grab a hoop, pick your palette, and give yourself permission to experiment. Your first one doesn’t need to be perfect to look amazing—and by the second or third, you’ll be flying through the steps with confidence.
Want more party-ready handmade projects? Explore more DIY craft ideas, decorations, and creative party prep inspiration on smartpartyprep.com.
More Articles
 How to Install 3rd Party Apps on Firestick in 2024: The Only Step-by-Step Guide You’ll Ever Need (No Tech Degree Required)
 Rustic Cake Toppers Ideas
 Stop Struggling with 'When the Party's Over' Guitar Chords: The Exact 4-Chord Progression (with Capo-Free & Beginner-Friendly Versions) That 92% of Learners Miss — Free Printable Chart Inside
 Easy Tote Bags for Beginners
 How to Make Tie-Dye Shirts at Home
 How to Enable Third Party Cookies on iPad in 2024: A Step-by-Step Guide That Actually Works (No More 'Blocked' Errors or Broken Logins)
 How to Make Party Hats Out of Paper in Under 10 Minutes (No Glue Gun, No Scissors Required — Just Printer Paper & Tape)
 DIY Candles for Home Decor
 No-Sew Origami Decorations Tutorial
 How to Allow Third Party Cookies on a Mac in 2024: A Step-by-Step Safari & Chrome Guide (No Tech Degree Required)