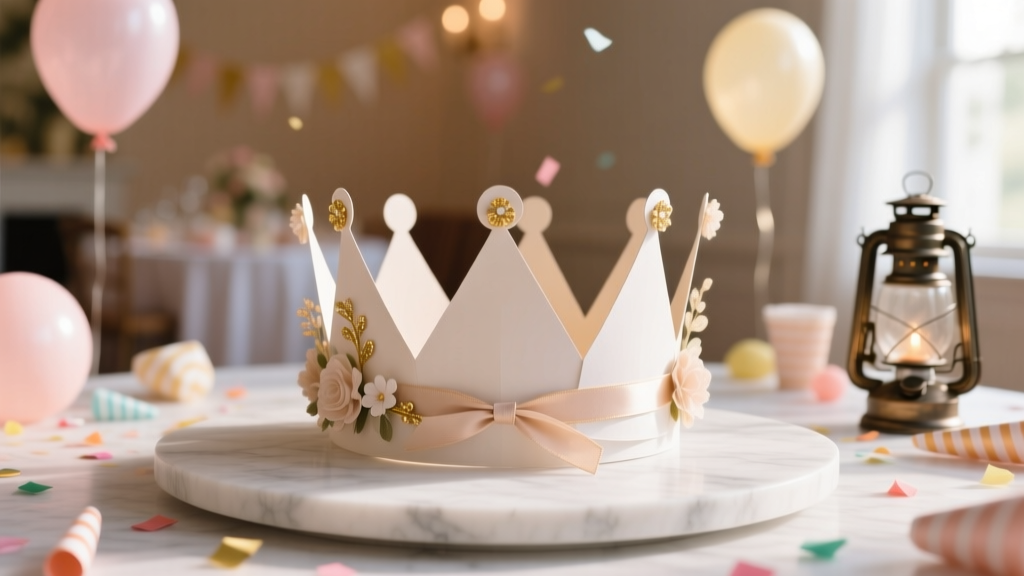
How to Make Crowns at Home
There’s something instantly magical about a crown. The moment someone puts one on—kid, teen, or adult—the mood shifts. Suddenly it’s not just a birthday party or baby shower; it’s a celebration with a theme, a character, and a little sparkle. The best part? DIY crowns are one of the easiest party decorations you can make at home, and they double as wearable keepsakes and adorable photo props.
Making crowns is also a sneaky-good craft for using up supplies you already have: cardstock, ribbon scraps, craft glue, leftover faux flowers, even a handful of beads from an old bracelet. Whether you’re planning a princess party, a woodland baby shower, a “birthday queen” brunch, or a classroom celebration, handmade crowns let you customize colors, sizes, and styles to match your party perfectly.
This guide walks you through several crown-making methods, from beginner-friendly paper crowns to sturdier felt and glitter styles. You’ll get measurements, tool recommendations, time estimates, pro tips, troubleshooting, and variations—so you can craft crowns that look store-bought, without the store-bought price.
Quick Overview: Skill Level, Time, and Best Uses
- Skill level: Beginner to intermediate (advanced variations included)
- Time estimate (per crown):
- Simple paper crown: 10–20 minutes
- Glitter foam crown: 20–35 minutes
- Felt + elastic crown: 25–45 minutes
- Floral statement crown: 35–60 minutes
- Great for: Birthday parties, baby showers, bridal showers, dress-up stations, party favors, classroom crafts, handmade party decorations
Materials List (with Product Types + Estimated Costs)
You can mix and match supplies depending on the crown style. Costs vary by brand and region, but these ranges are realistic for most craft stores or online shopping.
Base Materials
- Cardstock (65–110 lb) – 12x12 sheets or letter size; great for paper crowns ($5–$12 per pack)
- Glitter cardstock – for extra sparkle without loose glitter ($6–$15 per pack)
- EVA foam sheets (2mm–3mm) – sturdy, flexible crowns ($6–$15 per multi-pack)
- Felt sheets (9x12 in) – soft, comfy for kids ($5–$12 per variety pack)
Decorations
- Stick-on gems/rhinestones (self-adhesive) ($4–$10)
- Mini pom-poms, sequins, or confetti shapes ($3–$8)
- Faux flowers (small blooms for crowns) ($6–$20)
- Feathers (optional, for whimsical looks) ($4–$12)
- Metallic marker or paint pen (gold/silver/white) ($3–$8)
Adhesives + Fasteners
- Hot glue gun + glue sticks (best for foam, felt, flowers) ($10–$25 for gun; $5–$10 for sticks)
- Craft glue (PVA) or tacky glue (best for paper) ($3–$8)
- Double-sided tape or glue dots (clean and fast) ($4–$10)
- Stapler (quick sizing adjustments) ($6–$15)
- Velcro dots (adjustable fit, great for party favors) ($4–$10)
- Elastic cord (1/4 in) for kids’ crowns ($3–$8)
- Ribbon (3/8 in to 1 in) for ties ($3–$12)
Tools (Recommended)
- Scissors (sharp craft scissors)
- Craft knife + cutting mat (for precise points and windows) ($8–$20)
- Ruler (12 in or 18 in) and pencil
- Hole punch (single-hole) for elastic or ribbon ($4–$10)
- Optional: circle punch (for confetti accents), corner rounder, bone folder for crisp folds
Before You Start: Sizing and Measurements That Actually Fit
Most crown frustration comes from sizing. Use these easy measurements so your DIY party crowns fit comfortably.
Head Circumference Guide
- Toddlers (1–3 years): 18–19.5 in (46–50 cm)
- Kids (4–10 years): 19.5–21 in (50–53.5 cm)
- Teens/Adults: 21–23 in (53.5–58.5 cm)
Easy Crown Strip Formula
- Cut a strip that’s 2 in (5 cm) longer than the head circumference for overlap and fastening.
- Height: 3.5–4.5 in for kids; 4.5–6 in for adults (depends on style).
Method 1: Classic Paper Crown (Fast + Party-Friendly)
Best for: classroom crafts, party favors, quick birthday crowns
Skill level: Beginner
Time: 10–20 minutes per crown
Materials
- Cardstock (or glitter cardstock)
- Scissors or craft knife
- Ruler + pencil
- Glue dots, double-sided tape, or stapler
- Decor: stick-on gems, markers, sequins
Step-by-Step Instructions
- Measure and cut the base strip. For a kid-size crown, start with 21 in long x 4 in tall (you can trim later). If your cardstock is shorter, cut two strips and overlap them by 1 in to join.
- Mark your crown points. Along the top edge, make a small pencil mark every 2–2.5 in. Connect marks into triangles (classic pointy crown) or soft curves (rounded “royal” crown).
- Cut the crown shape. Use scissors for simple points; use a craft knife for crisp angles. If you want cut-out windows, draw circles/teardrops and cut carefully on a mat.
- Decorate before assembling. Add gems, metallic doodles, names, numbers, or a “Birthday Queen/King” title. Let wet glue dry for 5–10 minutes before bending.
- Fit it to the head. Wrap the strip around the wearer’s head (or a bowl roughly the same size). Overlap ends until comfortable—snug, not tight.
- Fasten the back seam. Use strong double-sided tape, glue dots, or a staple (hide the staple with a sticker or small paper circle).
Beginner-Friendly Adaptation
- Skip cutting points—make a straight band and decorate it like a “tiara” with gems across the front third.
- Use Velcro dots at the ends for adjustable sizing (great for party favors where you don’t know head sizes).
Method 2: Glitter Foam Crown (Sturdy, Reusable, No Messy Glitter)
Best for: dress-up stations, party photos, reusable handmade decorations
Skill level: Beginner–Intermediate
Time: 20–35 minutes
Materials
- Glitter EVA foam sheet (or plain foam + glitter cardstock overlay)
- Hot glue gun (low-temp recommended for safety)
- Scissors
- Elastic (1/4 in) or ribbon ties
- Decor: rhinestones, foam stickers, felt shapes
Step-by-Step Instructions
- Cut the crown base. For kids: cut a strip 20 in long x 4.5 in tall. Foam stretches slightly, so you may need a bit less length than paper.
- Create the crown top. Draw points or scallops with a pencil, then cut. For a “princess” look, make the center point the tallest (about 5.5 in total height) and side points slightly shorter.
- Add an optional comfort lining. Cut a matching strip of soft felt (same length x 1.5 in tall) and hot glue it along the inside bottom edge to reduce itchiness.
- Choose your closure:
- Elastic: Punch holes 1/2 in from each end and 1/2 in from the bottom edge. Thread elastic and knot securely.
- Ribbon ties: Hot glue a 12–16 in ribbon to each end, then tie at the back.
- Decorate. Hot glue larger pieces (big gems, foam shapes). Use self-adhesive gems for speed, but press firmly for 10 seconds to help them grip glitter foam.
Advanced Variation
- Layer two foam colors: cut a smaller “inner crown” silhouette (about 1/2 in smaller all around) and glue it on top for a dimensional look.
- Add battery tea-light “jewels” (tiny LED sticker lights) for a glowing party crown—keep it lightweight and place lights near the front only.
Method 3: Soft Felt Crown with Elastic (Comfy for Kids)
Best for: toddlers, sensory-sensitive kids, party favors that won’t tear easily
Skill level: Intermediate (easy if you keep the shape simple)
Time: 25–45 minutes
Materials
- Felt sheets (stiff felt works best)
- Hot glue or fabric glue
- Elastic (1/4 in) or Velcro dots
- Scissors
- Optional: needle + thread for extra durability
Step-by-Step Instructions
- Cut a felt strip. Use 19 in x 4 in for toddlers, 20–21 in x 4.5 in for kids. Felt has less structure than foam, so a slightly taller crown helps it look “regal.”
- Cut crown points. Keep points wider than paper (at least 1.5–2 in wide at the base) so they don’t flop.
- Reinforce if needed. For a stiffer crown, cut a second identical felt piece and glue them together (wrong sides facing) for a double-layer crown.
- Add elastic. Instead of closing the crown into a full circle, overlap the felt ends slightly and glue, then attach a 3–5 in elastic segment at the back for stretch. This makes it comfortable and forgiving for sizing.
- Decorate. Felt shapes (hearts, stars, numbers) glued on top hold better than heavy gems. If you use gems, glue them with hot glue and let cool fully before wearing.
Method 4: Faux Floral Statement Crown (Showstopper for Showers + Photos)
Best for: bridal showers, baby showers, birthday photo shoots, themed parties
Skill level: Intermediate–Advanced
Time: 35–60 minutes
Materials
- Floral wire (18–22 gauge) or a pre-made floral crown base
- Floral tape
- Wire cutters
- Faux flowers and greenery (small to medium)
- Ribbon (two pieces, 18–24 in each)
- Hot glue (optional for extra hold)
Step-by-Step Instructions
- Make the wire base. Measure head circumference and cut wire 2 in longer. Form a circle and twist ends together tightly.
- Wrap the base. Cover the entire wire circle with floral tape so it’s less slippery and more comfortable.
- Prep flower stems. Cut faux flower stems down to 1–1.5 in. Group small clusters (1 flower + a bit of greenery) for a balanced look.
- Attach flowers. Lay stems along the base and wrap with floral tape. Work in one direction so the tape overlaps neatly. Add hot glue only if something shifts.
- Add ribbon ties. Tie or tape ribbons onto the back of the crown so you can adjust fit and let the ribbon tails drape for a pretty photo effect.
Pro Tips for Better-Looking DIY Crowns
- Make a template first. Fold paper in half, draw half the crown shape, cut, and unfold for symmetry.
- Decorate the front third. Crowns look polished when the “statement” area is centered and not overloaded all the way around.
- Use glitter cardstock instead of loose glitter. Cleaner, faster, and much more party-friendly.
- Hide seams. Cover the back join with a small rectangle of matching cardstock or a sticker label (also great for writing names at a kids’ party).
- For hot glue: A low-temp glue gun reduces burns and works well for foam and felt.
Fun Variations (Theme Ideas for Party Crowns)
- Birthday number crown: Add a large “5” or “30” to the front (cut from glitter foam). Size suggestion: 3–4 in tall for kids, 4–5 in for adults.
- Jungle party crown: Use green cardstock, add paper leaves and a tiny lion face.
- Mermaid crown: Scalloped edge + faux pearls + iridescent paper “shells.”
- Unicorn crown: Add felt ears and a spiral paper horn (about 5–6 in tall) plus flowers.
- Royal “king” crown: Taller points (up to 6.5 in) with faux fur trim (or white felt) along the bottom.
Troubleshooting: Fixes for Common Crown Problems
- Crown keeps popping open: Use a 1 in overlap and strong tape or hot glue (paper + hot glue can warp—test first). Velcro dots also help.
- Points bend or flop: Switch to heavier cardstock (110 lb), double-layer the paper, or use foam instead.
- Gems won’t stick to glitter: Use hot glue or a strong clear-drying tacky glue. Press and hold each gem for 10–15 seconds.
- Crown is itchy: Add a felt lining strip along the inside bottom edge, or use elastic so it sits lightly.
- Crown is too tight: Add an extender strip (about 1–2 in) at the back and cover the join with a decorative label.
Common Crafting Mistakes to Avoid
- Skipping a test fit. Always wrap the crown base around a head (or bowl) before permanently fastening.
- Overloading decorations. Too many heavy gems can cause sagging, especially on paper crowns. Balance sparkle with lightweight accents.
- Using thin printer paper. It tears quickly and looks droopy. Choose cardstock, foam, or felt for better results.
- Gluing before cutting. Decorate after cutting the crown shape (or decorate lightly first), but avoid placing bulky items where you still need to cut.
- Not letting glue set. Give glue a few minutes to grab before bending the crown into a circle.
- Unsafe hot glue habits. Keep a small silicone mat or scrap cardboard nearby, and never let kids use hot glue unsupervised.
FAQ: Making Crowns at Home
1) What’s the easiest crown to make for a kids’ party?
A cardstock paper crown with stick-on gems and a tape or Velcro closure is the quickest. Plan 10–15 minutes each, or pre-cut the crowns and let kids decorate as a party activity.
2) How do I make crowns that fit different head sizes?
Use Velcro dots or ribbon ties instead of a fixed glue seam. You can also make a “one-size” elastic-back felt crown by adding a 3–5 in elastic section.
3) What materials work best for reusable DIY crowns?
Glitter EVA foam and felt are the most durable. Foam holds its shape well, and felt is comfortable and tough—both are great for dress-up bins and repeat party use.
4) Can I make a crown without a glue gun?
Yes. For paper crowns, use strong double-sided tape, glue dots, or a stapler. For felt, fabric glue works (allow extra dry time). For floral crowns, floral tape can do most of the work.
5) How far ahead can I make party crowns?
Paper and foam crowns can be made 1–2 weeks ahead and stored flat in a box. Floral crowns are best made 1–3 days ahead (faux flowers last longer than fresh), stored gently so the blooms don’t get crushed.
6) How do I keep crowns comfortable for kids?
Use soft materials (felt), avoid scratchy glitter on the inside, and add a comfort strip along the bottom edge. Elastic-back designs prevent tight pressure around the head.
Wrap-Up: Your Party, Your Crown Style
DIY crowns are one of those handmade party decorations that deliver big results with minimal fuss—custom colors, personalized names, and a wearable party detail guests actually get excited about. Start with a simple cardstock crown, then level up to glitter foam or a floral statement piece when you want something extra memorable.
When you’re ready for your next creative party project—photo booth props, handmade banners, centerpieces, and more—explore more DIY craft ideas on smartpartyprep.com.
More Articles
 Is Mary Ruth’s Third Party Tested? We Investigated Every Certificate, Lab Report, and FDA Warning Letter So You Don’t Have To — Here’s What’s Verified, What’s Missing, and How to Spot Legit Supplements in 2024
 Rustic Mugs Ideas: DIY Projects for Cozy Parties, Weddings, and Giftable Decor
 How to Enable Third Party Cookies on Mac in 2024: A Step-by-Step Safari & Chrome Guide (Plus Why You Might Not Want To)
 Paper Craft Soap Bars Ideas
 How to Discharge Debt as a Secured Party Creditor: The Truth Behind the Viral Loophole (Spoiler: It Doesn’t Work — Here’s What Actually Does)
 Modern Thank You Cards Designs
 DIY Confetti in 30 Minutes
 DIY Gift Boxes for Weddings
 Kids' Craft: Thank You Cards
 Is Thorne 3rd party tested? The truth about their lab verification — what independent testing reports *actually* show (and why most supplement brands won’t publish theirs)