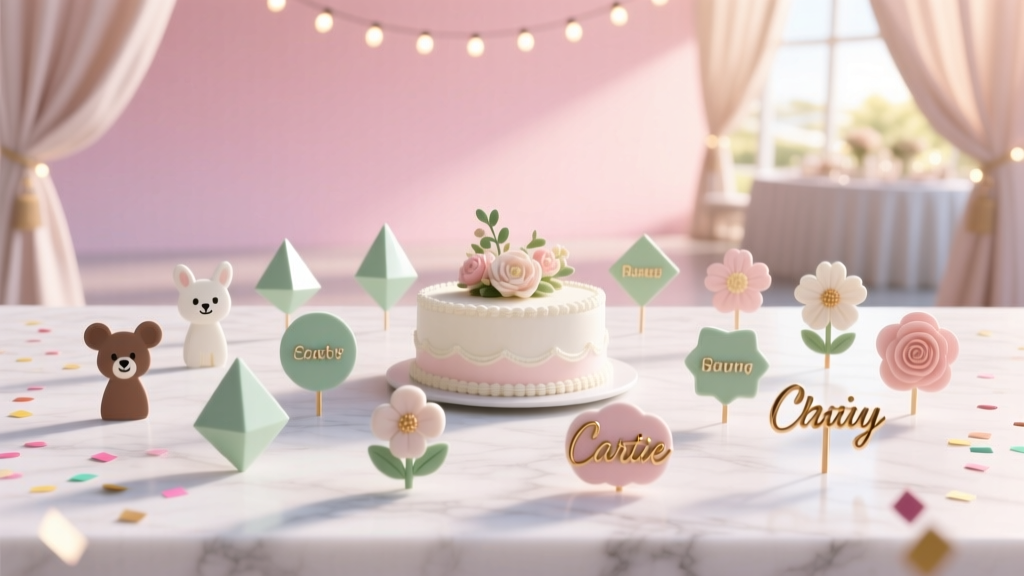
25 Creative Cake Toppers Ideas
A cake topper is one of those party decorations that looks fancy, photographs beautifully, and secretly takes way less time (and money) than most people think. Whether you’re planning a birthday, baby shower, wedding, graduation, or a “just because” celebration, a handmade cake topper turns a simple cake into a centerpiece.
The best part: you can tailor the topper to your theme, color palette, and personality—sparkly, rustic, modern, whimsical, or minimalist. This guide is packed with DIY cake topper ideas, plus step-by-step instructions, beginner-friendly shortcuts, and advanced variations so you can craft something that looks custom (because it is).
Skill Level: Beginner to Intermediate (with optional advanced upgrades)
Time Estimate: 20 minutes to 2 hours depending on the topper style
Budget: $2–$20 per topper (many are under $5 if you already craft)
Materials & Tools (with Estimated Costs)
Core Supplies (pick what matches your topper style)
- Cardstock (65–110 lb): $5–$12 per pack
- Glitter cardstock (optional): $6–$15 per pack
- Wooden skewers (10–12 inch) or paper straws: $2–$6
- Hot glue sticks (mini or full size): $3–$8
- Double-sided tape (strong craft type): $3–$10
- Craft glue (PVA or quick-dry): $2–$6
- Foam dots (for 3D layering): $3–$6
- Mini clothespins (optional): $2–$6
- Vinyl (adhesive or HTV for acrylic): $8–$15 per roll
- Acrylic discs (4–6 inch): $6–$12 for a set
- Polymer clay (small blocks): $2–$3 each
- Floral wire (22–26 gauge) or craft wire: $3–$7
- Fake flowers/greenery (small stems): $3–$15
- Edible options (wafer paper, edible markers, edible glitter): $6–$20
Tool Recommendations
- Scissors (sharp detail scissors help): $5–$15
- Craft knife + cutting mat (for clean edges): $10–$25
- Hot glue gun (low-temp recommended for safety): $10–$25
- Ruler and pencil for measuring: $2–$8
- Hole punch (1/8 inch and 1/4 inch are handy): $5–$12
- Optional: Cricut/Silhouette cutting machine for intricate designs
Food-Safe Tip (Quick but Crucial)
- If any part of your topper touches cake, wrap the skewer/stem with floral tape or food-safe parchment, or insert into a drinking straw pushed into the cake first.
How to Make a Basic Layered Cake Topper (Works for Most Ideas)
This simple method is the foundation for many DIY party decorations and handmade cake toppers.
Measurements & Layout
- Standard topper width: 5–7 inches (fits most 8–10 inch cakes)
- Standard topper height (design only): 3–5 inches
- Skewer length: 10–12 inches (insert 2–3 inches into cake)
- Use two skewers for stability on anything wider than 5 inches
Step-by-Step Instructions
- Choose your design. Pick a phrase, number, shape, or theme icon.
- Cut the front layer. Use cardstock, glitter cardstock, or vinyl on cardstock. If cutting by hand, print a template first.
- Cut a backing layer. Use plain cardstock slightly larger (about 1/8 inch border) for strength and a clean finish.
- Attach supports. Tape or glue two skewers to the back, spacing them 2–4 inches apart.
- Sandwich and seal. Add glue to the backing layer and press the front layer on top, trapping skewers in between.
- Reinforce edges. Press firmly and let dry 5–10 minutes. Trim any uneven edges.
- Food-safe prep. Wrap the bottom 3 inches of skewers or insert them into straws before placing on cake.
25 Creative Cake Topper Ideas (with Quick How-To Notes)
Classic & Custom Message Toppers
- Name Script Topper (Beginner-Intermediate | 30–60 min): Cut a name from cardstock or vinyl, mount on backing, add two skewers.
- “Happy Birthday” Layered Topper (Beginner | 25���45 min): Use bold letters for easy hand cutting; add foam dots for 3D.
- Milestone Number Topper (Beginner | 20–30 min): Cut a 4–5 inch number; outline with glitter paper for pop.
- Monogram Letter Topper (Beginner | 20–40 min): One large letter plus a small banner underneath with the date.
- Mini Pennant Banner Topper (Beginner | 20–35 min): Cut triangles 1.5 inches wide, string on twine, attach to two skewers.
Floral, Botanical & Nature-Inspired Toppers
- Paper Flower Bouquet Topper (Intermediate | 60–90 min): Roll paper roses (1–1.5 inch blooms) and tape to skewers; cluster and tie with ribbon.
- Eucalyptus & Greenery Spray (Beginner | 15–25 min): Trim faux greenery to 4–6 inches and wire to a skewer bundle.
- Butterfly Cluster Topper (Beginner | 30–45 min): Cut butterflies, fold wings, attach at center only for lift; vary sizes (1–3 inches).
- Sunflower or Daisy Pick Topper (Beginner | 25–40 min): Use layered petals; stack 3 layers; add a textured center circle.
- Rustic Leaf Garland Topper (Intermediate | 40–60 min): Cut leaves, add vein lines with a pen, string between two skewers like a banner.
Fun Themes for Kids & Whimsical Parties
- Rainbow Arc Topper (Beginner | 30–50 min): Cut 5–6 arcs (each 1/4 inch wider than the last) and layer with foam dots.
- Dinosaur Silhouette Topper (Beginner | 20–35 min): Cut a dino shape and add a small name label; use green + gold accents.
- Unicorn Horn & Ears Topper (Intermediate | 45–75 min): Make a horn from glitter foam sheet cone, add ear shapes, flowers at base.
- Space Rocket Topper (Beginner | 30–45 min): Layer rocket pieces; add “flames” with metallic paper strips.
- Mermaid Tail Topper (Beginner | 25–45 min): Use scale pattern paper; add shimmer with glitter cardstock outline.
Elegant & Modern Toppers
- Acrylic Round with Vinyl Text (Beginner | 20–40 min): Apply adhesive vinyl to a 5 inch acrylic disc; hot glue to two clear sticks or skewers behind.
- Minimal Line Art Face Topper (Intermediate | 45–60 min): Cut line art from black cardstock; mount on white backing for contrast.
- Geometric Frame Topper (Intermediate | 45–75 min): Cut a hexagon or arch frame; suspend a name inside with thin strips.
- Tassel Edge Topper (Beginner | 30–45 min): Add tissue tassels (1/4 inch cuts) along the bottom of a text topper.
- Gold Foil Accent Topper (Intermediate | 45–60 min): Use foil transfer sheets or metallic paper; keep shapes bold for clean edges.
Edible & Party-Friendly Toppers
- Wafer Paper Ruffles (Advanced-Edible | 45–90 min): Cut strips, gently ruffle, and apply per edible instructions; great for elegant cakes.
- Chocolate Sail Topper (Advanced | 60–90 min): Spread melted chocolate thinly, set in curved form; handle carefully for showstopper height.
- Marshmallow Pop Topper Picks (Beginner | 20–30 min): Put mini marshmallows on lollipop sticks, dip in candy melts, add sprinkles.
- Fruit & Herb Skewer Topper (Beginner | 10–20 min): Thread berries with mint leaves; best on whipped or naked cakes.
- Edible Image/Photo Topper (Beginner | 15–25 min): Use edible paper print; mount on fondant backing for stability.
Pro Tips, Variations & Troubleshooting
Make It Sturdy (No Floppy Toppers)
- Use 110 lb cardstock for large toppers, or double-layer regular cardstock.
- Add two skewers and keep them parallel for balance.
- For heavy designs, glue a thin strip of cardstock across the skewers on the back like a brace.
Cleaner Cuts Without a Machine
- Print your design and tape it to cardstock; cut through both layers with detail scissors.
- Use a craft knife for tight corners (letters like A, R, B) on a cutting mat.
Color & Style Variations
- Modern: black + white + gold, acrylic + vinyl.
- Boho: neutral cardstock, pampas-style paper fringe, dried florals.
- Kids: bright cardstock, layered shapes, googly eyes (keep non-edible pieces away from food).
Troubleshooting Quick Fixes
- Topper tilts forward: Insert skewers deeper (2.5–3 inches) or widen skewer spacing.
- Paper curls: Use less glue (thin, even coat), press under a book for 5 minutes.
- Glitter shedding: Spray with a light coat of clear acrylic sealer outdoors; let dry fully before use.
- Vinyl won’t stick to acrylic: Clean acrylic with rubbing alcohol and a lint-free cloth first.
Common Crafting Mistakes to Avoid
- Making the topper too big. A 9-inch-wide topper overwhelms most cakes. Aim for 5–7 inches wide.
- Using one skewer for a wide design. Two supports prevent wobble and droop.
- Skipping a backing layer. Backing hides glue and makes the topper look store-bought.
- Letting non-food-safe materials touch frosting. Use straws, wrap sticks, or create a barrier.
- Waiting until party day. Make paper toppers 1–3 days ahead and store flat in a box.
FAQ: DIY Cake Toppers
1) What’s the best cardstock weight for cake toppers?
65 lb works for small toppers, but 80–110 lb is best for most layered designs. If you only have lighter cardstock, double-layer it with a solid backing.
2) How do I make a cake topper food-safe?
Keep the topper decoration above the frosting and only insert wrapped supports. Wrap skewers with floral tape, parchment, or slide them into paper straws before inserting into the cake.
3) Can I make cake toppers without a Cricut or cutting machine?
Yes. Choose bold fonts and simple shapes, print a template, and cut with sharp scissors or a craft knife. Layering hides small imperfections and still looks polished.
4) How far in advance can I make handmade cake toppers?
Paper and acrylic toppers can be made up to 1–2 weeks ahead. Store flat, out of humidity, in a box or large envelope. Edible toppers depend on the ingredient (wafer paper and chocolate are best closer to the event).
5) What can I use instead of wooden skewers?
Try paper straws, lollipop sticks, or clear acrylic sticks for a cleaner look. For heavy toppers, skewers are usually strongest.
Wrap-Up: Your Cake, Your Style
These creative cake topper ideas are designed to be fun, budget-friendly, and flexible—perfect for DIY crafts lovers who want party decorations that feel personal. Start simple with a layered name topper, then level up with acrylic, florals, or edible elements as your confidence grows.
Save your favorite idea, gather a few basic supplies, and give your next celebration cake a handmade finishing touch that guests will remember. For more party-ready DIY crafts, handmade projects, and creative decorating ideas, explore more tutorials on smartpartyprep.com.
More Articles
 How Do You Enable 3rd Party Cookies in 2024? (Spoiler: It’s Not Just One Click — Here’s Exactly What Changes in Chrome, Safari, Edge & Firefox)
 Easy Custom Stickers for Beginners
 Personalized Invitations Gifts
 No-Sew Friendship Bracelets Tutorial
 How to Make a Hat for a Tea Party in Under 90 Minutes (No Sewing Machine Needed!) — 5 Foolproof Styles That Impress Guests & Boost Your Confidence
 Step-by-Step Wreaths Tutorial
 ‘Is Just Ingredients Third Party Tested?’ — The Truth Behind Label Claims (and How to Verify What You’re Really Buying)
 Easy Photo Booth Props for Beginners
 How to Buy a House as a Secured Party Creditor: The Truth About UCC-1 Filings, Property Titles, and Why 97% of These Attempts Fail Legally (and What Actually Works Instead)
 DIY Masks Using Cricut