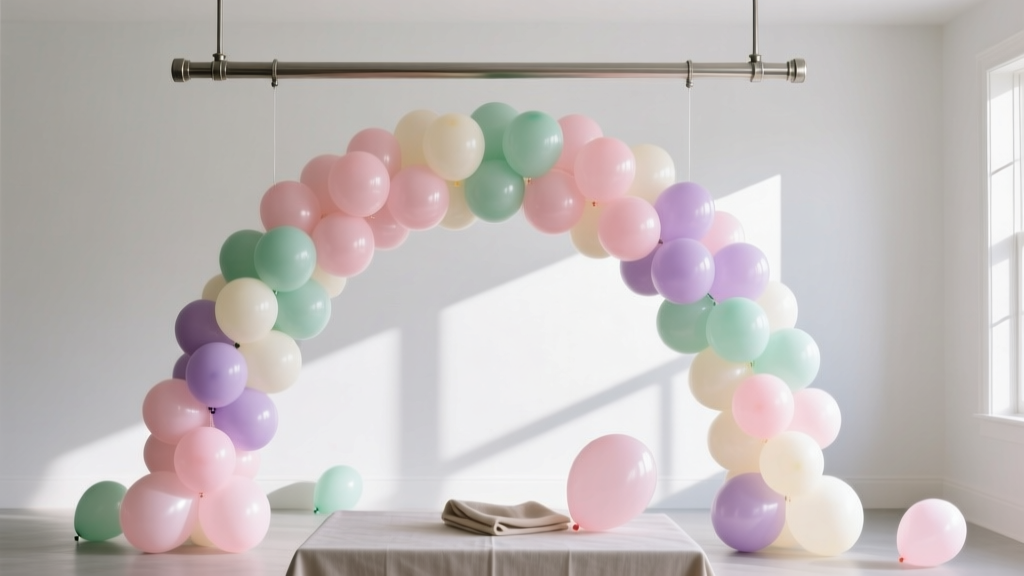
How to Make Balloon Arches at Home
A balloon arch can turn an everyday room into a party-ready backdrop in under two hours. Whether you’re celebrating a birthday, baby shower, graduation, engagement, or hosting a backyard BBQ, this DIY party decoration instantly creates a “wow” moment—without needing a professional decorator.
The best part? Balloon arches are surprisingly beginner-friendly. You don’t need fancy equipment, and you can customize the colors, shape, and size to match any theme. Make it organic and modern, classic and symmetrical, or add flowers and greenery for a handmade, high-end look.
This guide walks you through everything: materials, estimated costs, step-by-step balloon arch instructions, pro tips, troubleshooting, and easy upgrades. Grab your balloon pump and let’s build a beautiful balloon arch at home.
Project Snapshot: Skill Level, Time, and Size
- Skill level: Beginner (with easy adaptations) to Intermediate/Advanced (with add-ons and shaping)
- Active time: 45–120 minutes (depending on size and detail)
- Best build window: Same day or up to 24 hours before the party (indoors)
- Typical sizes:
- Small backdrop (5–6 ft): Great for dessert tables
- Standard doorway arch (7–8 ft): Perfect for entrances
- Large statement arch (9–10+ ft): Photo wall centerpiece
Materials List (With Product Types + Estimated Costs)
Costs vary by location and brand, but this gives you a realistic budget for DIY balloon arch supplies.
Balloons (Latex) — $12–$45
- 5" latex balloons (accent “filler” balloons): 20–60 count, $5–$15
- 10"–12" latex balloons (main balloons): 60–120 count, $10–$30
- Optional 18"–24" balloons (statement balloons): 2–6 count, $5–$25
Tip: For a fuller organic balloon garland look, use 3 sizes (5", 10/12", and 18").
Assembly Tools — $10–$30
- Balloon pump (hand pump): $5–$10
- Electric balloon pump (highly recommended for larger arches): $15–$30
- Balloon decorating strip (plastic balloon tape): 1 roll, $3–$8
- Glue dots (for adding small balloons): 1 pack, $3–$7
- Balloon hand-tie tool (optional but helpful): $3–$8
- Scissors (for cutting strip and fishing line): usually already owned
Hanging/Support Supplies — $8–$35
- Command hooks or removable wall hooks (indoor): $6–$15
- Strong string/fishing line (clear line looks clean): $3–$8
- Outdoor option: zip ties + sturdy poles/stands: $10–$35
- Balloon arch stand kit (freestanding): $20–$60
Optional Decor Add-Ons — $5–$35
- Faux greenery (eucalyptus garland, ivy): $10–$25
- Paper fans, tassels, ribbons, florals: $5–$35
- LED fairy lights (indoor evening parties): $8–$15
Before You Start: Plan Your Balloon Arch
Choose a Shape
- Classic arch: Symmetrical curve—great for doorways and stages
- Organic balloon garland: Asymmetrical, clustered style—perfect for photo backdrops
- Half-arch/swoop: One-sided cascade—ideal for small spaces
Pick a Color Palette (Easy DIY Rule)
For a polished handmade party decoration, choose:
- 1–2 main colors (dominant balloons)
- 1 accent color (contrast or metallic)
- 1 neutral (white, cream, or clear)
How Many Balloons Do You Need?
- 5 ft garland: ~50–70 balloons
- 7 ft garland: ~70–100 balloons
- 10 ft garland: ~120–160 balloons
Quick tip: Underestimate less than you think—extra balloons help fill gaps and improve the “full” look.
Step-by-Step: How to Make a Balloon Arch at Home (Organic Style)
This method uses a balloon decorating strip, which is the easiest approach for beginners and gives a modern balloon arch look.
Step 1: Prep Your Workspace (5–10 minutes)
- Clear a floor area at least 6 ft x 6 ft for a standard garland.
- Lay out balloons by size and color (separate piles make it faster).
- Cut a balloon decorating strip to size:
- 6 ft garland: cut 7–8 ft strip
- 8 ft garland: cut 9–10 ft strip
- 10 ft garland: cut 11–12 ft strip
Step 2: Inflate Balloons in Mixed Sizes (20–45 minutes)
For an organic arch, variety is your secret weapon. Inflate in batches:
- Main balloons (10–12"): Inflate most to about 10–11" (not maximum size). This helps prevent popping and looks more professional.
- Accent balloons (5"): Inflate to about 4–5".
- Large balloons (18"+): Inflate sparingly and place intentionally.
Tool recommendation: An electric balloon pump saves time and hand strain for anything over 60 balloons.
Step 3: Attach Balloons to the Decorating Strip (20–40 minutes)
- Take an inflated balloon and tie a knot.
- Insert the knot into a hole on the decorating strip (skip a hole here and there for varied spacing).
- Alternate colors and sizes as you go:
- Add 2–4 balloons of one color
- Switch to the next color
- Sprinkle in larger balloons every 12–18 inches
- Keep building until the strip is full and slightly denser than you think you need—balloons settle and gaps appear after shaping.
Step 4: Shape the Garland for an “Arch” Look (10–15 minutes)
Your garland becomes an arch based on how you hang it and curve it.
- Gently bend and “massage” the strip so balloons rotate and face outward.
- Look for flat spots and turn balloons so the round sides show.
- If you’re going for an asymmetrical organic balloon arch, cluster more balloons toward one corner.
Step 5: Hang or Mount the Balloon Arch (10–30 minutes)
Indoor Hanging (Wall/Backdrop)
- Place 2–4 removable hooks where you want the arch to start and end. For an 8 ft garland, plan for:
- 1 hook at the start
- 1 hook at the end
- 1–2 hooks in the middle for support
- Tie fishing line or string to the strip ends and hang on hooks.
- Adjust the curve by tightening or loosening the line.
Freestanding Option (Great for Rentals and Outdoor Parties)
- Use a balloon arch stand kit and zip-tie the garland to the frame.
- For windy locations, weigh down each base with sandbags or heavy décor items.
Step 6: Fill Gaps and Add Small Balloons (10–20 minutes)
This is where it starts looking like a pro balloon garland.
- Inflate 5" balloons.
- Use glue dots to stick them into gaps (attach to other balloons, not directly to painted walls).
- Step back every few minutes and check the overall shape from a distance.
Beginner-Friendly Adaptations
- Make a mini arch: Build a 3–4 ft garland for a cake table using only 10–12" balloons.
- Skip the big balloons: Two sizes (12" and 5") still look full and stylish.
- Use fewer colors: A simple two-color palette is easier to balance.
- Work in sections: Create two 4 ft garlands and connect them with string for easier handling.
Advanced Variations (For Extra “Wow”)
- Double-stuffed balloons: Place one balloon inside another before inflating for custom shades (great for muted or earthy palettes).
- Add florals/greenery: Tuck faux stems into the balloon knots or secure with small pieces of floral wire (keep wire ends covered).
- Spiral color placement: Arrange a repeating sequence (A-B-C-A-B-C) for a more intentional pattern.
- Fringe + texture: Add tassels, crepe paper streamers, or ribbon tails along one side.
- LED glow arch: Weave fairy lights through the strip for evening photos (indoors only).
Pro Tips for a Fuller, Longer-Lasting Balloon Arch
- Underinflate slightly: Balloons are less likely to pop and look more uniform.
- Buy extra: Keep 10–20% more balloons than your estimate for breakage and last-minute filling.
- Control the environment: Heat, direct sun, and sharp edges are balloon enemies.
- Mix finishes: Combine matte, metallic, and confetti balloons (use confetti sparingly for impact).
- Photograph test: Take a quick phone photo—gaps show up faster on camera than to the naked eye.
Troubleshooting: Fix Common Balloon Arch Problems
My balloon arch looks sparse or “holey”
- Add more balloons to the strip in the thin areas.
- Use 5" balloons with glue dots to fill visible gaps.
- Rotate balloons so the round sides face forward.
The arch keeps drooping
- Add a middle support hook (indoors) or an extra tie point on the stand.
- Use stronger line (fishing line or sturdy string) and shorten the span.
- Reduce heavy clusters in one spot and redistribute large balloons.
Balloons are popping while I work
- Inflate slightly less.
- Keep balloons away from rough walls, textured ceilings, brick, and sharp décor.
- Avoid building outdoors in direct sun or high heat.
My colors look “off” compared to the theme
- Swap in a neutral (white/ivory) to soften the palette.
- Use one metallic accent instead of several bright shades.
- Cluster the boldest color in smaller sections rather than throughout.
Common Crafting Mistakes to Avoid
- Overinflating balloons: They pop more easily and look less elegant.
- Not buying enough balloons: A balloon arch looks best when it’s generously filled.
- Skipping small balloons: 5" balloons are the secret to a high-end organic balloon garland.
- Hanging from weak tape: Use removable hooks or a stand—basic tape often fails mid-party.
- Building too early (especially outdoors): Latex balloons oxidize and deflate faster in sun and wind.
- Forgetting the “viewing angle”: If it’s for photos, build fullness toward the camera side.
FAQ: DIY Balloon Arches at Home
How long do balloon arches last?
Indoors, a latex balloon arch typically looks great for 12–24 hours and can last 2–3 days with some softening. Outdoors, heat and sun can shorten that to just a few hours. For the best look, assemble the day of the party or the evening before (indoors).
Do I need helium for a balloon arch?
No—most DIY balloon arches and balloon garlands use air-filled balloons. They’re easier, cheaper, and they last longer than helium balloons. The “arch” shape comes from the strip and how you mount it.
What’s the easiest way to hang a balloon arch without damaging walls?
Use removable wall hooks (rated for the weight) and tie the garland with fishing line. For extra protection, hang from a backdrop stand or curtain rod instead of directly on painted surfaces.
How do I make my balloon arch look organic and expensive?
Mix balloon sizes, underinflate slightly, and use 5" balloons to fill gaps. Add a few large balloons strategically, then finish with greenery or florals tucked into the balloon knots for a handmade designer feel.
Can I make a balloon arch with no decorating strip?
Yes. You can tie balloons into clusters (quad groups) and twist them onto a strong string or balloon arch line. It’s a classic method, but the decorating strip is faster for beginners and makes shaping simpler.
What size balloon arch is best for a party photo backdrop?
A great all-purpose size is an 8–10 ft garland placed on one side and across the top of a backdrop (like a curtain or photo wall). Add extra fullness around the top corner where people’s faces will be in pictures.
Wrap-Up: You Can Make a Balloon Arch That Looks Store-Bought
Once you’ve built one balloon arch at home, you’ll start seeing all the ways to use this DIY party decoration—doorways, dessert tables, photo backdrops, and even cozy celebration corners in small spaces. Start simple, give yourself a little extra time, and don’t be afraid to adjust as you go. Balloon arches are forgiving, creative, and incredibly satisfying when you step back and see that finished shape.
Want more DIY crafts, party decorations, and handmade project ideas? Keep exploring smartpartyprep.com for more creative ways to make your next celebration unforgettable.
More Articles
 12 Do It Yourself Christmas Party Favors That Actually Impress Guests (No Craft Store Run Required — Just What’s in Your Junk Drawer + 20 Minutes)
 How to Turn On 3rd Party Cookies in 2024: A Step-by-Step Guide for Chrome, Safari, Firefox & Edge (Without Breaking Your Privacy or Site Functionality)
 Advanced Beaded Bracelets for Crafters
 DIY Wreaths Using Cricut
 12 Stunning Do It Yourself Western Party Decorations You Can Make in Under 2 Hours (No Craft Store Run Needed — Just Dollar Store & Recycled Supplies!)
 How to Discharge Debt as a Secured Party Creditor: The Truth Behind the Viral Loophole (Spoiler: It Doesn’t Work — Here’s What Actually Does)
 Paper Craft Crowns Ideas
 How Do You Make a Party Hat Out of Paper in Under 10 Minutes? (No Glue Gun, No Scissors Required — Just 3 Sheets & 1 Stapler)
 Upcycled Thank You Cards from Recycled Materials
 Stop Struggling with 'When the Party's Over' Guitar Chords: The Exact 4-Chord Progression (with Capo-Free & Beginner-Friendly Versions) That 92% of Learners Miss — Free Printable Chart Inside