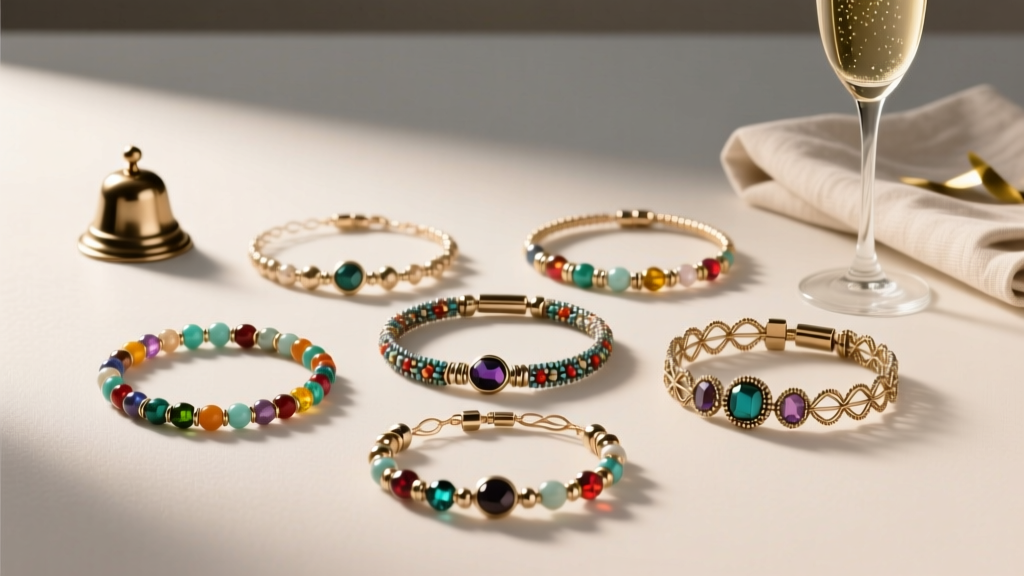
Advanced Beaded Bracelets for Crafters
Beaded bracelets are one of those DIY crafts that feel instantly rewarding: a handful of beads becomes a wearable piece of art in one sitting. For party lovers and makers, they’re also wildly useful—bracelets can double as party favors, place cards, team identifiers, bachelorette gifts, birthday “VIP” wristlets, or even decor accents tied to napkins and goodie bags.
This guide is for crafters who already know the basics (string beads, tie a knot) and want to level up. You’ll learn advanced bracelet techniques that look boutique-quality: seamless closures, stacked styles, sparkle details, and strong finishing methods that survive dancing, toasts, and long party nights.
Choose one featured design for a single statement piece, or make a coordinated set for a party theme. Either way, these handmade projects are budget-friendly, customizable, and perfect for turning your party decorations into something guests can wear and take home.
Quick Project Overview
- Skill level: Intermediate to Advanced (beginner-friendly adaptations included)
- Time estimate: 45–90 minutes per bracelet (depending on technique)
- Best for: DIY party favors, handmade gifts, bridal party accessories, birthday crafts, themed party decorations
- Finished size: Most adult bracelets: 6.5–7.5 in (16.5–19 cm); youth: 5.5–6.5 in (14–16.5 cm)
Materials and Tools (With Estimated Costs)
These are the core supplies for advanced beaded bracelets. Costs vary by brand and bead type; estimates are typical craft-store or online pricing.
Beads (choose 1–3 types per bracelet)
- Japanese seed beads (Miyuki or Toho 11/0): crisp, uniform for weaving and clean patterns ($3–$8 per 7–10g tube)
- Delica cylinder beads 11/0 (Miyuki Delica): best for flat, “woven textile” looks ($4–$9 per 5–7g tube)
- Fire-polished glass beads (3–4mm): sparkle without bulk ($3–$8 per strand)
- Gemstone rounds (4–6mm): premium party-favor feel ($6–$20 per strand)
- Pearls (glass or acrylic, 4–6mm): perfect for bridal and anniversary themes ($3–$12 per strand)
Stringing / Weaving Supplies
- Beading thread (WildFire 0.006–0.008 in or FireLine 6–8 lb): strong for advanced weaves ($8–$15 per spool)
- Stretch cord (0.7–1.0mm): for stacked party bracelets ($4–$8 per roll)
- Beading wire (Soft Flex or Beadalon 7- or 19-strand): for crimped, clasped designs ($7–$12 per spool)
Findings and Finishing
- Crimp beads or crimp tubes (1–2mm): choose tubes for a cleaner finish ($3–$6 per pack)
- Crimp covers (optional): hides crimps like tiny metal beads ($3–$6 per pack)
- Jump rings (4–6mm) + clasp: lobster clasp or toggle for secure party wear ($4–$10 per set)
- Bead tips / clamshells (optional): elegant ends for thread designs ($3–$7 per pack)
- Spacer beads (2–4mm): metal, crystal, or heishi spacers ($3–$8 per pack)
Tools (recommended)
- Flush cutters: for wire and thread tails ($6–$15)
- Chain-nose pliers + round-nose pliers: for jump rings and finishing ($10–$25)
- Crimping pliers: makes pro-looking crimps ($12–$25)
- Beading needles (size 10–12): for seed beads and Delicas ($2–$6)
- Bead mat or felt: stops beads from rolling away ($5–$12)
- Ruler or soft measuring tape: sizing accuracy is everything ($1–$6)
Bracelet Sizing and Measuring (So It Fits the First Time)
Before you start any advanced DIY bracelet, measure the wrist and decide how you want it to wear.
- Snug fit: wrist measurement + 1/4 in (0.6 cm)
- Comfort fit (most common): wrist measurement + 1/2 in (1.3 cm)
- Loose/stacking fit: wrist measurement + 3/4 in (1.9 cm)
Example: A 6.5 in wrist with a comfort fit becomes a 7.0 in finished bracelet (including clasp).
Design 1: Luxe Crimped Bracelet with a Hidden, Professional Finish
This is a go-to “fancy” party bracelet: gemstone rounds + seed bead spacers + a clasp. It’s durable, giftable, and looks like boutique jewelry.
Best for
- DIY party favors that don’t break mid-event
- Bridal showers, milestone birthdays, New Year’s Eve sparkle themes
What you’ll need
- Beading wire, 0.014–0.018 in (choose 0.018 in for heavier gemstones)
- 2 crimp tubes (2mm) + 2 crimp covers (optional)
- 1 clasp (lobster or toggle) + 2 jump rings
- Beads: 4–6mm gemstones or pearls + 11/0 seed bead spacers
- Tools: crimping pliers, chain-nose pliers, flush cutters
Step-by-step
- Cut wire: Cut a piece of beading wire 10–12 in (25–30 cm). Extra length makes finishing easier.
- Add first crimp + clasp: Slide on 1 crimp tube, then a jump ring attached to your clasp. Thread the wire back through the crimp tube to form a small loop.
- Set loop size: Make the loop just large enough for the jump ring to move freely. Leave a 1–1.5 in (2.5–4 cm) tail.
- Crimp securely: Use crimping pliers:
- First, place the crimp in the “crimp” notch to form a crease.
- Then, move it to the “round” notch to fold it into a neat bead shape.
- Hide the crimp (optional): Snap a crimp cover over the crimp using chain-nose pliers.
- String your pattern: Add beads until you reach your target length, subtracting about 1/2 in (1.3 cm) for the clasp hardware. Try patterns like:
- 1 gemstone + 3 seed beads (repeat)
- Alternate two colors of 4mm fire-polished beads
- Every 5th bead is a metallic spacer for a “confetti” look
- Test fit: Wrap the strand around your wrist (or a bracelet mandrel) and check the length before finishing.
- Finish the second end: Slide on a crimp tube, then a jump ring. Thread back through the crimp. Tighten so beads sit snug but not rigid.
- Crimp and trim: Crimp firmly, trim the wire tail close (leave 1–2mm), and add a crimp cover if using.
Beginner-friendly adaptation
- Use larger beads (6–8mm) and fewer seed bead spacers for easier handling.
- Skip crimp covers and focus on clean crimps with crimping pliers.
Design 2: Advanced Stretch Bracelet Stack with “No-Knot” Finish
Stretch bracelets are party favorites because they’re fast to put on and comfortable for guests. The advanced upgrade is a strong cord choice, a surgeon’s knot, and hidden ends that don’t pop out in photos.
What you’ll need
- Stretch cord 0.8–1.0mm (0.7mm for lighter beads)
- Beads: 6mm rounds or a mix of 4mm + 6mm (gemstone, glass, pearls)
- Optional: 1 large-hole focal bead (8–10mm) to hide the knot
- Tools: scissors or flush cutters, bead reamer (optional)
- Adhesive: jewelry glue or clear-drying craft glue (small amount)
Step-by-step
- Measure and cut: Cut cord 12–14 in (30–36 cm). Longer is easier to knot cleanly.
- Pre-stretch: Gently pull the cord for 10–15 seconds to reduce future loosening.
- String beads: Create a party-ready pattern:
- Ombre stack: 3 colors from dark to light
- Metallic pop: add a gold spacer every 4 beads
- Name/initial: letter beads centered with symmetrical bead counts
- Check length: Aim for wrist measurement + 1/2 in (1.3 cm) for a comfy stretch fit.
- Tie a surgeon’s knot: Cross ends, loop twice on the first pass, then pull tight. Repeat once more for a double-knot.
- Secure with a tiny glue dot: Add a very small amount on the knot only. Let it get tacky for 1–2 minutes.
- Hide the knot: While gently stretching the bracelet, slide the knot into a large-hole bead or between two tight-fitting beads.
- Trim ends: Cut tails to about 2–3mm. Don’t cut too close until glue is fully dry (10–20 minutes depending on glue).
Advanced variation
- Triple-stack set: Make three coordinating bracelets (7.0 in each): one metallic, one pearl, one gemstone. Tie them together as a party favor bundle with a ribbon that matches your party decorations.
Design 3: Flat Bead-Weaving Bracelet (Delica Strip with Sleek Closure)
This technique creates a smooth, modern bracelet that looks like a woven ribbon. It’s perfect for color-themed parties because patterns read clearly—stripes, chevrons, and mini “confetti” pixel designs.
What you’ll need
- Delica 11/0 beads (2–4 colors), about 3–8g total depending on width
- Beading thread (FireLine 6 lb or WildFire 0.006 in)
- Beading needle size 10–12
- Clasp option:
- Slide tube clasp sized to your beadwork width, or
- Ribbon ends (fold-over ends) + jump rings + clasp
- Scissors/flush cutters + bead mat
Measurements
- Recommended width: 8–12 beads across for a sleek party bracelet
- Length: beadwork strip length = wrist measurement + 1/4 in (0.6 cm), then add clasp length
Step-by-step (simple flat strip method)
- Plan your pattern: Keep it party-friendly and readable:
- 8-bead width stripe: 4 beads color A + 4 beads color B
- Confetti: mostly color A with random single beads of metallic or neon
- Event palette: match your table settings and party decorations
- Thread your needle: Use about 5 ft (1.5 m) of thread to start. Longer can tangle.
- Create the first row: Pick up your width (example: 10 Delicas). Slide them down leaving a 6–8 in (15–20 cm) tail for finishing.
- Build the strip: Continue weaving row by row, keeping even tension. The goal is firm beadwork that still flexes like fabric.
- Check length often: Stop when the strip reaches the planned beadwork length (don’t forget clasp length).
- Reinforce ends: Stitch back through the last 2–3 rows to strengthen the edge.
- Add the clasp: Attach a slide tube clasp or ribbon ends:
- For ribbon ends, carefully clamp the beadwork edge into the finding using chain-nose pliers (protect beadwork with a small piece of scrap fabric).
- Add jump rings and clasp.
Pro Tips for Party-Ready Results
- Choose a party palette: Pick 2–3 main colors and 1 metallic accent. Too many colors can look busy in group photos.
- Use bead boards or small trays: Great for assembly-line crafting when making party favors.
- Make it “giftable”: Add a tiny charm (star, heart, initial) on a jump ring near the clasp.
- Match your party decorations: Repeat the same metallic tone (gold, silver, rose gold) that’s in your balloons, banners, or tableware.
- Reinforce stress points: Any point near a clasp, knot, or focal bead should be stitched through twice (thread) or crimped cleanly (wire).
Troubleshooting (Fixes for Common Bracelet Problems)
- Bracelet feels too stiff (wire design): Use a more flexible strand count (19-strand vs 7-strand) or slightly thinner wire (0.014 in). Don’t over-tighten the second crimp.
- Stretch bracelet knot keeps showing: Use a larger-hole bead to hide it, or place two 6mm beads next to each other and “sink” the knot between them while gently stretching.
- Seed bead strip curls or waves: Tension is uneven. Stitch back through the last row, gently tightening, and avoid pulling too hard on one side.
- Crimp slips: Make sure you’re using crimp tubes with crimping pliers (not flat-nose). Also match crimp size to wire diameter.
- Thread frays in Delicas: Switch to a stronger thread (FireLine 6 lb) and replace needles that have burrs.
Creative Variations (Advanced Looks Without Extra Stress)
- Charm station bracelet: Add a single charm at center using a small jump ring between two beads on wire.
- Glow party version: Mix glow-in-the-dark beads with black seed beads for a dramatic night-party favor.
- Confetti sparkle: Use clear AB seed beads sprinkled through solid color beads to mimic confetti.
- Bridal “something blue”: Make pearl stretch bracelets with one pale-blue crystal near the knot hiding bead.
- Personalized place-setting bracelets: Add letter beads spelling names—guests can wear them and also use them as place markers.
Common Crafting Mistakes to Avoid
- Skipping measurements: Guessing leads to bracelets that won’t fit. Measure wrists (or use a standard size) and account for clasp length.
- Using the wrong cord thickness: Too-thin stretch cord breaks; too-thick cord won’t pass through beads. Match cord to bead hole size.
- Overloading with heavy beads on stretch: Very heavy gemstones can stress the knot. Use wire + clasp for heavier designs.
- Cutting tails too short: Leave enough tail to secure knots or re-thread through crimps. Trim only after testing strength.
- Ignoring tension in bead weaving: Tight on one row, loose on another causes warping. Aim for consistent, firm, flexible tension.
- Not reinforcing closures: A party is not the time for a “maybe it holds” finish. Double-check crimps, knots, and jump rings.
FAQ: Advanced Beaded Bracelet Crafting
What’s the most durable bracelet style for party favors?
A crimped beading wire bracelet with a lobster clasp is typically the most durable. It handles frequent on/off and fits a wide range of guests.
How do I price out supplies for making 10–20 bracelets?
Plan around a consistent bead choice (like 6mm glass or acrylic pearls) and buy in strands or bulk tubes. As a rough guide, budget $2–$6 per bracelet for materials depending on gemstone vs glass, plus clasps and findings.
Can beginners make these advanced styles?
Yes. Start with the crimped wire bracelet using larger beads and a simple pattern. Once you’re comfortable with finishing and sizing, move to Delica bead weaving for a more advanced look.
How do I make bracelets fit multiple wrist sizes at a party?
Use a chain extender (2–3 in / 5–7.5 cm) on clasped bracelets, or make stretch bracelets in two sizes (youth and adult). Extenders are great for DIY party decorations that need to be one-size-friendly.
What’s the best thread for seed bead bracelets that won’t break easily?
FireLine 6 lb is a favorite for strength and abrasion resistance, especially with Delica beads. Pair it with a size 10–12 needle for smooth stitching.
How can I keep my bead colors consistent across a bracelet set?
Buy beads from the same brand and dye lot when possible (especially for seed beads). For party-themed sets, pick one “hero” color and repeat it across every bracelet for a cohesive handmade look.
Wrap-Up: Make It, Wear It, Share It
Advanced beaded bracelets are the sweet spot of DIY crafts—creative, practical, and perfect for parties. Whether you’re crafting a single showpiece or making a whole batch of handmade party favors, focus on clean finishing, accurate sizing, and a color palette that matches your celebration.
Set out your bead mat, choose a party theme, and give one of these designs a try. Your future self (and your guests) will love having something beautiful to wear long after the last cupcake is gone.
More party-ready handmade projects and DIY craft ideas are waiting for you on smartpartyprep.com.
More Articles
 Is Nature's Way Third Party Tested? We Investigated Every Batch Report, Lab Certificate, and FDA Compliance Gap So You Don’t Have to Waste Time—or Risk Your Craft Projects on Unverified Supplements.
 How to Make Paper Party Hats in Under 12 Minutes (No Glue Gun, No Scissors Required!) — 5 Foolproof Methods That Actually Hold Their Shape All Night
 Which Political Party Supported Slavery? Quizlet Won’t Tell You the Full Truth — Here’s What Textbooks Omit About Whig, Democratic, and Republican Roles in Slavery (1820–1865)
 DIY Party Banners Using Cricut
 How to Remove a Pokemon from Your Party in Cobblemon: The 3-Step Method That Actually Works (No Crashes, No Lost Data, and Zero Mod Conflicts)
 Budget DIY Painted Rocks Under $15
 Why Don’t Third Parties Usually Succeed on Quizlet? The 5 Hidden Structural Barriers That Kill Outside Study Tools (And How to Beat Them)
 How to Make Slumber Party Tents That Actually Stay Up (No Glue Guns, No Tears): 7 Foolproof Methods Using Stuff You Already Own — From Cardboard Castles to Fairy-Light Canopies
 Budget DIY Origami Decorations Under $15
 Budget DIY Coasters Under $15