Easy Wall Art for Beginners
If you’ve ever looked at a blank wall before a party and thought, “This space needs something,” you’re going to love this project. DIY wall art is one of the fastest ways to add color, personality, and a handmade touch to your party decorations—without spending a fortune or needing advanced craft skills.
This beginner-friendly wall art idea is especially fun because it doubles as both decor and a photo backdrop. Make it for a birthday, baby shower, graduation, bridal shower, or holiday gathering, then reuse it later in a bedroom, craft room, or entryway. You’ll be amazed at how a few simple supplies can turn into party-worthy handmade decorations that look polished and intentional.
Best of all, you can tailor it to any theme: boho neutrals, bright rainbow, elegant black-and-gold, pastel baby shower vibes, or a seasonal color palette. Let’s make easy wall art that looks like you bought it—only better, because you made it.
Project Overview: Beginner Party Wall Art Panel
What You’ll Make
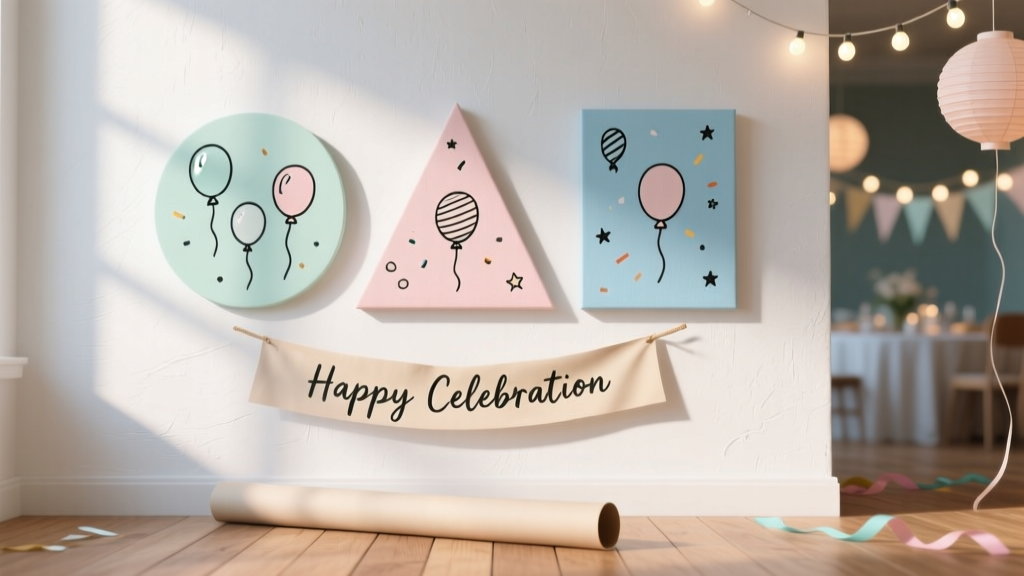
A lightweight wall art panel featuring layered paper shapes (arches, circles, and “confetti” accents) on a painted background. It’s sized to stand alone as a statement piece or work as a set of 2–3 panels behind a dessert table.
Skill Level & Time
- Skill level: Beginner (with optional advanced upgrades)
- Total time: 60–120 minutes
- Dry time: 30–60 minutes (paint/glue; varies by product)
- Best for: DIY party decorations, handmade wall decor, photo backdrop accents
Finished Size Options
- Standard statement panel: 16 in x 20 in (great for small walls)
- Backdrop set: 3 panels at 12 in x 16 in each (great behind snack tables)
- Large focal piece: 18 in x 24 in (dramatic above a gift table)
Materials List (With Estimated Costs)
These are common craft-store items—easy to find online or in-store. Costs vary by brand, but this will give you a realistic budget for DIY crafts and party-related handmade decorations.
Base & Background
- Canvas panel or stretched canvas (16x20 in) — $8–$18
- Budget option: canvas panel (thin but sturdy)
- Upgrade: stretched canvas for a gallery look
- Acrylic craft paint (2–3 colors, 2 oz bottles) — $2–$6 each
- Foam brush set (1–2 in wide) — $3–$6
- Optional: Painter’s tape (0.94 in or 1.41 in) — $5–$8
Design Elements (Easy & Party-Friendly)
- Cardstock (12x12 in sheets or mixed pack) — $6–$15
- Look for “solid core” cardstock for crisp edges
- Metallic cardstock is perfect for glam party decorations
- Glue — $3–$10
- Beginner-friendly: glue stick (less mess, slower grab)
- Stronger hold: tacky glue
- Fastest: double-sided tape runner
- Optional dimension: 3D foam mounting squares (1/2 in) — $3–$6
- Optional sparkle: fine glitter or glitter paint — $4–$10
Tools (Recommended)
- Scissors (sharp craft scissors) — $6–$15
- Craft knife + self-healing cutting mat (for clean shapes; optional but helpful) — $12–$25
- Ruler (12 in or 18 in) — $2–$8
- Pencil + eraser — $1–$3
- Circle cutter or hole punch set (optional for “confetti”) — $8–$20
Estimated total cost: $20–$45 depending on what you already have and whether you choose upgrades.
Choose a Theme Palette (Fast and Foolproof)
A simple color plan makes beginner DIY wall art look intentional. Pick 3–5 colors total:
- 1 background color (base coat)
- 2 main accent colors (large shapes)
- 1–2 highlight colors (tiny confetti, metallic touches)
Party-Friendly Color Combos
- Birthday bright: white + teal + hot pink + sunshine yellow
- Boho shower: cream + terracotta + olive + gold
- Graduation: black + white + gold (plus school color as an accent)
- Baby shower: soft gray + blush + sage + ivory
- New Year’s: black + champagne + silver
Step-by-Step Instructions: Easy Layered Paper Wall Art
Step 1: Prep Your Workspace (5 minutes)
- Cover your table with kraft paper, a trash bag, or an old sheet.
- Set out paint, brushes, water cup, and paper towels.
- If you’re using a craft knife, place your cutting mat nearby.
Step 2: Paint the Background (20–35 minutes + dry time)
- Paint a base coat on the canvas using a 1–2 in foam brush.
- Use long strokes in one direction, then lightly cross-stroke to smooth.
- Let it dry 20–30 minutes.
- Add a second coat if the canvas texture shows through.
Optional: Add a Simple Geometric Paint Detail (Beginner-Friendly)
- Once dry, add painter’s tape diagonally or in a border (1 in from the edge).
- Paint over the taped area with a contrasting color.
- Remove tape slowly while paint is slightly damp for crisp lines.
Step 3: Create Your Main Shapes (20–30 minutes)
This design uses three shape types: arches, circles, and tiny confetti dots. You can freehand, trace household items, or use templates.
Measurements (Use These for a Balanced Layout)
- Large arch: 8 in wide x 10 in tall (cut 1)
- Medium arch: 6 in wide x 8 in tall (cut 1)
- Circle cluster: circles in 1.5 in, 2 in, and 3 in diameters (cut 6–10 total)
- Confetti dots: 1/4 in to 1/2 in diameter (cut 20–40)
Easy Template Tricks
- Trace a bowl or plate for circles.
- For arches: trace a cup rim for the curve, then draw straight sides down to your chosen height.
- Cut one perfect arch first, then trace it to make matching layers.
Step 4: Plan Your Composition (5–10 minutes)
- Place the large arch slightly off-center (about 2 in from one side).
- Layer the medium arch on top, offset by about 1 in to show the bottom layer.
- Arrange circles to one side like a “balloon cluster” effect—perfect for party decor.
- Scatter confetti dots lightly around the focal shapes (keep most in the upper half).
Pro move: Take a quick photo of your layout before gluing. It helps you rebuild the arrangement if anything shifts.
Step 5: Glue Everything Down (15–25 minutes)
- Start with the largest shapes (arches), then add circles, then confetti.
- If using glue stick, coat edges well and press for 10 seconds.
- If using tacky glue, apply a thin line (too much can warp paper).
- For a 3D look, use foam mounting squares behind 2–4 circles.
Step 6: Add Optional Party-Ready Details (10 minutes)
- Metallic accents: add 5–10 gold dots or a thin painted border.
- Name/age banner effect: glue small letter cutouts (2 in tall) across the top.
- Mini bunting: cut 1 in triangles from cardstock and string across with twine.
Step 7: Hang or Display (5 minutes)
- For lightweight canvas panels, use Command picture hanging strips.
- For a table display, rest it on a small easel behind cupcakes or favors.
- If it’s part of a backdrop, line up 2–3 panels with 2–3 in gaps.
Pro Tips for Clean Results
- Use thicker cardstock (80–110 lb) to prevent curling and wrinkling.
- Less glue = smoother paper. A thin, even layer is plenty.
- Press shapes flat using a clean book for 2–3 minutes if edges lift.
- Repeat one shape (like circles) to make the design look cohesive.
- Keep a “rest zone.” Leave at least 20% of the background open so it doesn’t look crowded.
Variations (Beginner Adaptations + Advanced Upgrades)
Beginner-Friendly Adaptations
- No-paint version: wrap the canvas in solid gift wrap or contact paper instead of painting.
- Sticker style: use removable vinyl dots or pre-cut shapes for quick party decorations.
- One-color look: all-white shapes on a pastel background for a modern, minimal wall art piece.
Advanced Variations (If You Want More “Wow”)
- Add texture: use lightweight spackle through a stencil (dry fully before gluing paper).
- Paper quilling accents: curl a few strips for dimensional swirls.
- Layered shadow effect: cut the same arch 3 times in slightly different sizes and mount with foam squares.
- LED sparkle: tuck a micro-LED string behind a few raised circles (battery pack hidden behind the canvas).
Troubleshooting: Fix Common Issues Fast
- Paper is wrinkling: Too much wet glue. Switch to a tape runner or glue stick, and use less adhesive.
- Edges lifting: Add a tiny dot of tacky glue under the lifted corner and press for 20 seconds.
- Paint looks streaky: Apply a second coat and use a foam brush with lighter pressure.
- Layout feels “off”: Move your main cluster up or down by 1–2 inches. Small shifts make a big difference.
- Confetti looks messy: Group dots in mini clusters of 3–5 instead of scattering evenly everywhere.
Common Crafting Mistakes to Avoid
- Skipping dry time: Gluing on damp paint can cause bubbles and weak adhesion.
- Using thin printer paper: It wrinkles easily and doesn’t hold crisp edges like cardstock.
- Centering everything perfectly: Slightly off-center compositions often look more modern and “designed.”
- Overloading with too many colors: Stick to 3–5 colors for a polished party decor look.
- Gluing before testing the arrangement: Always do a dry layout first and snap a quick reference photo.
FAQ: Easy DIY Wall Art for Party Decorations
1) Can I make this wall art the night before a party?
Yes. Choose a fast-drying acrylic paint and a tape runner or glue stick. Plan for about 1–2 hours total, plus at least 30 minutes of dry time before hanging.
2) What’s the best size for a dessert table backdrop?
A set of three 12x16 in panels works beautifully behind a small dessert table. If you have more wall space, go with two 18x24 in panels for bigger impact.
3) How do I match this to my party theme?
Start with your theme colors and pick one “special” finish—metallic cardstock for glam, kraft tones for rustic, or pastel layers for baby showers. Repeating one shape (like circles) also helps tie the design to balloons and other party decorations.
4) Will the paper pieces fall off over time?
If you use cardstock and a stronger adhesive (tacky glue or a quality tape runner), it holds well. For long-term wall decor, add a tiny extra glue dot to the corners of larger pieces.
5) Can kids help with this project?
Absolutely. Kids can paint the background, punch confetti dots, and arrange shapes. An adult should handle craft knife cutting and any hot glue or precision work.
6) How do I store it after the party?
Store the panel flat in a closet or under a bed. If you added 3D foam pieces, place it in a shallow box so nothing gets crushed.
Wrap-Up: Your Wall Is About to Look Party-Ready
This easy wall art project is proof that beginner DIY crafts can look stylish, modern, and totally celebration-worthy. Once you’ve made one panel, you’ll start seeing endless ways to customize it—different shapes, bold colors, shiny accents, or even a matching set for a full party backdrop.
Try one panel first, then level up with a coordinated trio for your next birthday party, baby shower, or holiday gathering. Your future self (and your photo gallery) will thank you.
Want more handmade decorations and DIY party ideas? Explore more creative projects and smart party prep tips at smartpartyprep.com.
More Articles
 How to Install 3rd Party Apps on Roku TV (Without Jailbreaking): The Only Legal, Step-by-Step Method That Actually Works in 2024 — No Developer Mode Confusion, No Failed Sideloading, Just Real Results
 How to Enable Third Party Cookies in My Browser (2024 Guide): Step-by-Step Fixes for Chrome, Safari, Firefox & Edge — Because Yes, You *Can* Still Do It (Without Compromising Security)
 20 Creative Scrapbook Pages Ideas
 DIY Crowns in An Afternoon
 Upcycled Memory Books from Recycled Materials
 Seasonal Wreaths Ideas
 Personalized Invitations Gifts
 How to Enable Third Party Cookies in 2024: A Step-by-Step Browser Guide (Chrome, Safari, Firefox, Edge) — Because Yes, Some Sites Still Need Them (and Here’s Exactly How to Do It Safely)
 DIY Vision Boards in 10 Minutes
 Does Hasbro Hate Third Party Transformers? The Truth Behind Licensing, Cease-and-Desists, and Why Fans Keep Building Anyway — A Deep Dive for Customizers, Collectors & Makers